
Subscribe to Our Youtube Channel
Related Manuals for Maxcess D-MAXE


Summary of Contents for Maxcess D-MAXE
- Page 1 FIFE GUIDING SOLUTIONS D-MAXE with OI-B/OI-N Operating Instructions MI 2-296 1 D...
-
Page 3: Table Of Contents
Connecting the sensors/actuators ........3-6 Connections on the D-MAXE 1 Controller ....... . 3-8 Connections on the D-MAXE 2 Controller . - Page 4 Decommissioning ........... . . 9-1 MI 2-296 1 D D-MAXE with OI-B/OI-N www.maxcessintl.com...
- Page 5 D-MAX operator interface OI-B or OI-N ....... . 11-2 Inputs and outputs of the D-MAXE Controller ....... 11-3 Parallel input matrix .
-
Page 6: Introduction
D-MAXE systems. The Operating Instructions must be carefully kept and must always be available throughout the service life of the D-MAXE system. Note: These Operating Instructions describe basic operation of the D-MAXE systems. -
Page 7: Proper Use
Any other use of the D-MAXE system requires the prior approval of Maxcess. Note: The modules of the D-MAXE system must not be opened. If a module is opened, no claims under the warranty will be honored. Options... -
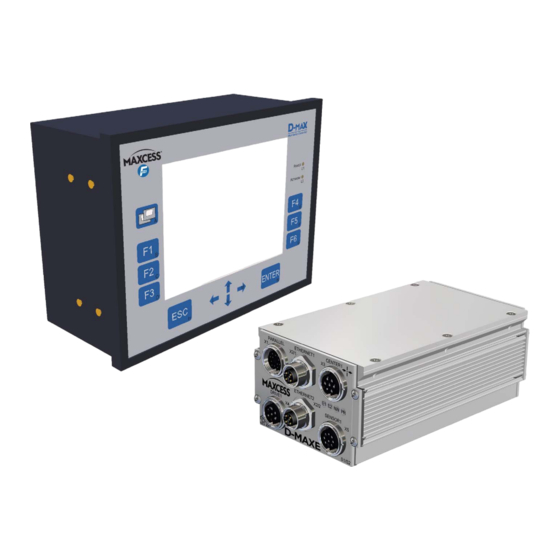
Page 8: Operating Principle
1 - 3 INTRODUCTION Operating principle The D-MAXE system consists of various modules that can be combined depending on the specific application. Modules D-MAXE Controllers – integrated into a guiding system or for wall mounting – D-MAXE 1 Controller: for the drive of a control loop –... -
Page 9: Operating Principle
1 D-MAXE 1 Controller 4 Actuator (offset pivot guide) 2 Operator interface OI-B/OI-N 5 Material web 3 Sensor(s) --- optional Figure 1.4: Operating principle of a control loop with modules of the D-MAXE system www.maxcessintl.com D-MAXE with OI-B/OI-N MI 2-296 1 D... -
Page 10: Safety Instructions
2 - 1 SAFETY INSTRUCTIONS 2 SAFETY INSTRUCTIONS Important information Problem-free and reliable operation of the D-MAXE system requires that the D-MAXE system is – properly shipped and stored, – properly mounted and placed in operation, – properly used and carefully maintained. -
Page 11: Symbols
∙ All assembly tasks must only be performed when there is no electrical power in the system. ∙ The D-MAXE system must only be placed in operation if all components are securely assembled. ∙ Electrical connections on the modules of the D-MAXE system must only be made or disconnected when the electrical power is turned off. -
Page 12: Operation
Maintenance ∙ Danger of injury by crushing Maintenance work must only be performed on the D-MAXE system when the power is turned off, the machine is stopped, and it is protected against being turned back on. MI 2-296 1 D D-MAXE with OI-B/OI-N www.maxcessintl.com... -
Page 13: Installation
3 - 1 3 INSTALLATION Transport and storage – Modules of the D-MAXE system must be secured to prevent them from slipping during transport. – The modules must be kept cool, clean and dry. – Operator interfaces OI-B/OI-N must not be stored close to powerful magnetic fields. -
Page 14: Mounting
– On a fixed machine part or on a wall – Not in places where there is a risk of explosions. Figure 3.1: Dimensions of the D-MAXE 1 and D-MAXE 2 controllers with assembly bracket MI 2-296 1 D D-MAXE with OI-B/OI-N... - Page 15 INSTALLATION 3 - 3 Figure 3.2: Dimensions of the D-MAXE 3 controller with assembly bracket www.maxcessintl.com D-MAXE with OI-B/OI-N MI 2-296 1 D...
-
Page 16: Installation Location Of D-Max Operator Interface Oi-B/Oi-N
The operator interface can be damaged or an unintended switching process may be triggered. - Cable output optionally right or left - Cable length: 360mm Figure 3.3: Dimensions of the D-MAX operator interface OI-B/OI-N assembly bracket MI 2-296 1 D D-MAXE with OI-B/OI-N www.maxcessintl.com... -
Page 17: Mechanical Fastening Of D-Max Operator Interface Oi-B Or Oi-N
∙ Carefully insert the plug-in unit back into the shaft ∙ Tighten the mounting screws with the TORX 8 screwdriver. A tightening torque of 0.25 Nm is recommended www.maxcessintl.com D-MAXE with OI-B/OI-N MI 2-296 1 D... -
Page 18: Electrical Connection
Power supply of D-MAXE Controller The D-MAXE Controller has no power switch. Because of this, the power supply of the D-MAXE Controller must be switched on and off via the machine's power distribution. The D-MAXE Controller must be connected to the power supply according to the information supplied at connector X6 of the figure 3.6... - Page 19 3 - 7 Note: Ensure that two wires from the power supply line are connected to the D-MAXE controller with a power supply in the permitted range from 24V to 48V. -V +V Figure 3.5: Power supply of D-MAXE modules www.maxcessintl.com...
-
Page 20: Connections On The D-Maxe 1 Controller
Servo-Center transducer 1/Encoder 1 Drive 1 Sensor 1 (S1/S2) Power supply voltage FifeNet/ OI-TS Sensor 2 (S3/S4) Figure 3.6: D-MAXE 1 Controller For technical details and additional information, please consult 11 Technical Data . Section Connections on the D-MAXE 2 Controller... -
Page 21: Connections On The D-Maxe 3 Controller
Servo-Center transducer 2/Encoder 2 FifeNet/ OI-TS Sensor 2 (S3/S4) Drive 2 Sensor 3 (S4/S3) Figure 3.8: D-MAXE 3 Controller Servo-Center transducer 3 / Encoder 3 Drive 3 For technical details and additional information, please consult 11 Technical Data . Section www.maxcessintl.com... -
Page 22: Leds On The D-Maxe Controller
3 - 10 INSTALLATION LEDs on the D-MAXE Controller Additional information about error messages that are displayed Status Indicates No Ethernet connection Green or Green Ethernet connection detected (X2/1) flashing Either a 10mbps connection or a Yellow half-duplex connection is recognized... -
Page 23: Maxnet Addresses
∙ MAXNET is a proprietary protocol used for communication between D-MAXE Controllers and D-MAXE operator interfaces. ∙ The MAXNET address of the D-MAXE Controller must be different than the addresses of other controllers on the network (addresses 1 to 31). -
Page 24: Operation
Placeholder "y" (in the example y = A) is the job currently selected in the system. Safety instructions While the D-MAXE system is in operation, the following safety instructions must be observed. WARNING: During operation, do not touch or reach close to moving parts (rollers, web). -
Page 25: User Interface
No connection Network Green Ethernet connection detected * not present on virtual operator interface Additional information about error messages that are displayed Troubleshooting, page 10-1 may be found in Section www.maxcessintl.com D-MAXE with OI-B/OI-N MI 2-296 1 D... -
Page 26: Keys And Their Functions
4 - 3 OPERATION Keys and their functions Key designation User level Menu level – Switch between D-MAXE "devices" that are present in the network – If the key is held down for A key longer than 2seconds, a list appears with available "devices"... -
Page 27: Display - User Level
12 Display of status symbols, Status displays (see item page 4-5 Shows the name of the D-MAXE Controller (can be edited, Menu 1y.7.1 Names, page 7-46 Shows the name of the selected "device" (can be edited, see Menu 1y.7.1 Names, page 7-46... - Page 28 [8000] The motor is actively locked in "Manual" mode (hardlock). [0010] ASC is activated [0020] ASC is triggered. This icon appears if the ASC function has been activated and triggered on the selected drive. MI 2-296 1 D D-MAXE with OI-B/OI-N www.maxcessintl.com...
- Page 29 MAXNET data is either not connected or not turned on. [2000] The selected "device" expects data from a Gateway, but does not receive any data, since no data can be received on the Gateway. www.maxcessintl.com D-MAXE with OI-B/OI-N MI 2-296 1 D...
-
Page 30: Display - Menu Level
Menu area Contains the menu structure in which the user moves about The selected menu is marked by a square The selected menu appears with the corresponding data in the information area MI 2-296 1 D D-MAXE with OI-B/OI-N www.maxcessintl.com... -
Page 31: Menu Structure
Therefore it is possible that certain parts of the menu structure will not be present in the customer's specific application or additional menu items may appear. All menus of the D-MAXE Controller can be reached in "Manual“ mode. This number is limited in "Automatic" and "Servo-Center" modes. - Page 32 * It is possible that the sensor being used is already returning a center signal. In this case, center guiding will be performed. ** On a D-MAXE 3, S3 is connected to both X9/1 and X11/2, and S4 is connected to both X11/1 and X9/2 and will generally be referred to as X11/1.
-
Page 33: User Level
OPERATION 4 - 10 User level All user functions required for normal operation of the D-MAXE system appear on the user level: Select operating modes Select jobs (Types of Guiding) Move drive/move guidepoint Switch to menu structure The D-MAXE system is completely controllable with the corresponding keys on the operator interface. -
Page 34: Selection Of "Devices
OPERATION Selection of "devices" The A key is used to select individual "devices" present on the network, for example the D-MAXE Controllers and their drives as well as any customer-specific system menus (CM) or Gateways that may be present. Fig 4.5 describes how controllers and drives are identified in the status line. - Page 35 If the "devices" in the network are filtered and a "device" the user is searching for does not appear in the list, filtering can Distributed temporarily be turned off with the F4 key (see system 7-47 Application filter on page on page www.maxcessintl.com D-MAXE with OI-B/OI-N MI 2-296 1 D...
-
Page 36: Automatic Operating Mode
Switch to "Manual" mode Offset of guidepoint is possible Menu 1y.6.3.1 Jog (if enabled in parameter Enable, page 7-44 Change of job is possible Switch to menu level Only restricted menus are available. MI 2-296 1 D D-MAXE with OI-B/OI-N www.maxcessintl.com... -
Page 37: Servo-Center Operating Mode
Description Switching between existing "devices" is possible Switch to "Automatic“ mode Switch to "Manual" mode Selection of job for "Automatic" mode possible Switch to menu level Only restricted menus are available. www.maxcessintl.com D-MAXE with OI-B/OI-N MI 2-296 1 D... -
Page 38: Manual Mode
Switching between existing "devices" is possible Switch to "Automatic“ mode Switch to "Servo-Center" mode The drive can be moved The job can be selected Switch to menu level All menus are available. MI 2-296 1 D D-MAXE with OI-B/OI-N www.maxcessintl.com... -
Page 39: Selection Of "Jobs
Selection of "Jobs" Description Jobs are types of controllers that are in principle available in a D-MAXE system. The table on page is a list of possible controller types with their menu identifications that may be active in "Automatic" mode. -
Page 40: Shift Guidepoint
The guidepoint is reset to 0%. The triangle under the bar graph disappears. Note: This parameter can also be set with menu 3y.3.y1 guidepoint Menu 1y.3.y1 Guidepoint Offset, page 7-5 offset or with MI 2-296 1 D D-MAXE with OI-B/OI-N www.maxcessintl.com... -
Page 41: Menu Level
Press the ESC-key to cancel the entry: The old settings are retained in the system Selection lists Some menus contain lists from which one or more entries (depending on a parameter) can be selected. www.maxcessintl.com D-MAXE with OI-B/OI-N MI 2-296 1 D... - Page 42 Arrow’ key to deactivate the entry Save the entry with the Enter-key: The new setting is accepted into the system Press the ESC-key to cancel the entry: The old settings are retained in the system MI 2-296 1 D D-MAXE with OI-B/OI-N www.maxcessintl.com...
-
Page 43: Operator Interface Menus
– Format of menu identification: b.a – a If there are multiple "devices" in the D-MAXE system, the second place in the menu identification changes depending on the "device“ selected by the customer. (in the example a = 1) –... -
Page 44: Menu 1.A.1 Language
The current setting for the parameter is shown here. Enable the parameter for input Input Menu 1.a.1.2: Language Select the desired entry in the list Save the entry or cancel MI 2-296 1 D D-MAXE with OI-B/OI-N www.maxcessintl.com... -
Page 45: Menus 1.A.2 Control Options
This section describes menus that are used for the basic setup and assignment of the "devices" to be displayed. These settings apply only to the relevant operator interface. They must be performed once for each operator interface present in the D-MAXE system. www.maxcessintl.com D-MAXE with OI-B/OI-N MI 2-296 1 D... -
Page 46: Menu 1.A.2.1 Bmp Orientation
Select the "device" in the list for which the parameter will be set Enable the parameter for input Input Menu 1.a.2.1.1.1: BMP Orientation Select the desired entry in the list Save the entry or cancel MI 2-296 1 D D-MAXE with OI-B/OI-N www.maxcessintl.com... - Page 47 View of all main conditions (CM) of the applications Selected Application: View of all "Devices" in an application Filtering can be turned off temporarily with the F4 key in Selection of "devices", page 5-13 menu "All Devices" (see www.maxcessintl.com D-MAXE with OI-B/OI-N MI 2-296 1 D...
- Page 48 5 - 6 OPERATOR INTERFACE MENUS Menu 1.a.2.2.2 Selected Application Selected Application ∙ Enter the MI 2-296 1 D D-MAXE with OI-B/OI-N www.maxcessintl.com...
-
Page 49: Menu 1.A.2.3 Connect On Start
.. Connect on start .. Description You can use menu to define which "device" will be displayed on the relevant operator interface when the D-MAXE system starts. Menu Key sequence for menu 1.a.2.3: → Press longer than 2seconds →... -
Page 50: Menus 1.A.3 Display Settings
Display Settings 1a.3 Display Settings Switch to the menus that write the Input Menu 1.a.3.1 Contrast Contrast ∙ Set the desired Menu 1.a.3.2 Background Color Background Color ∙ Select the desired MI 2-296 1 D D-MAXE with OI-B/OI-N www.maxcessintl.com... - Page 51 Shows the serial number of the D-MAX operator interface Menu 1.a.4.2 FW Number Shows the firmware number of the D-MAX operator interface Menu 1.a.4.2 SW Number Shows the software number of the D-MAX operator interface www.maxcessintl.com D-MAXE with OI-B/OI-N MI 2-296 1 D...
-
Page 52: Menus 1.A.5 Network (X2
Switch to the menus that describe Menu 1.a.5.1: TCP/IP (X2...X6) The following parameters can be viewed and changed: Menu 1.a.5.1.1 IP-Address (X2...X6) Menu 1.a.5.1.2 Subnet Mask (X2...X6) Menu 1.a.5.1.3 Gateway (X2...X6) Menu 1.a.5.1.4 DHCP (X2...X6) MI 2-296 1 D D-MAXE with OI-B/OI-N www.maxcessintl.com... -
Page 53: Menus 1.A.6 Service
OPERATOR INTERFACE MENUS 5 - 11 Menus 1.a.6 Service Description The purpose of these menus is to show information about the D-MAXE system that is important for Customer Service. Menu Key sequence for menu 1.a.6: → Press longer than 2seconds →... -
Page 54: Commissioning
(see Commissioning Once all assembly and connection tasks have been checked and are in proper condition, the D-MAXE system can be placed in operation. Also make certain before commissioning that – Commissioning of the D-MAXE system is performed while the web is stopped. - Page 55 1y.2 Remote Control, page 7-2 (see 5. Switch the D-MAXE system into Manual mode with the F3 key on the operator interface. There is no guiding of the web course in Manual mode. Now the D-MAXE system can be adjusted to the relevant application.
- Page 56 Selection of "Jobs", page 4-16 (see 12. If the optional parameters ’OSC’ or ’PIC’ are found in the selected job, these parameters must first be switched to the state. (see also the Operating Instructions "D-MAXE/OSC" or "D-MAXE/PIC") Polarity Menu 1y.3.y8 Polarity, 13. Set the parameter.(see...
-
Page 57: Controller Menus
– To reach the user level: The key sequence for a given menu is always based on the assumption that the D-MAXE system is in the user level. To do this, continue pressing the "ESC" key or hold it down until you reach the user level. -
Page 58: 1Y.2 Remote Control
..→ 1y.2 Remote Control remote control It shows the current setting for the parameter. Enable the parameter for input Input Menu 1y.2.1: Control Sources MI 2-296 1 D D-MAXE with OI-B/OI-N www.maxcessintl.com... - Page 59 CONTROLLER MENUS: 1Y.2 REMOTE CONTROL 7 - 3 control sources remote control for parameter turn and off Save the entry or cancel www.maxcessintl.com D-MAXE with OI-B/OI-N MI 2-296 1 D...
-
Page 60: 1Y.3 Job Settings
– The identification of the job appears again in lower menu levels in "Automatic“ mode. The two identifications match and cannot be changed at this point. "Servo-Center" mode: – These parameters cannot be set. MI 2-296 1 D D-MAXE with OI-B/OI-N www.maxcessintl.com... - Page 61 Input Menu 1y.3.y1.1: Guidepoint Offset Position the cursor under the digit whose value you want to change Change the value of the selected digit Save the entry or cancel www.maxcessintl.com D-MAXE with OI-B/OI-N MI 2-296 1 D...
- Page 62 Key sequence for menu 1y.3.y2: ..→ 1y.3 Job Settings Auto Setup → 1y.3.y2 Auto Setup is started. Save the entry or cancel MI 2-296 1 D D-MAXE with OI-B/OI-N www.maxcessintl.com...
- Page 63 Input Menu 1y.3.y3.1: Gain Position the cursor under the digit whose value you want to change Change the value of the selected digit Save the entry or cancel www.maxcessintl.com D-MAXE with OI-B/OI-N MI 2-296 1 D...
- Page 64 You can use the menu to select the optional oscillator ’OSC’ of the D-MAXE system. The oscillator ’OSC’ is only present in a job of the D-MAXE system if the software has been programmed accordingly. Menu Key sequence for menu 1y.3.y4: ...
- Page 65 The ’PIC’ controller is only present in a job of the D-MAXE system if the software has been programmed accordingly. Menu Key sequence for menu 1y.3.y5...
- Page 66 1 - Threshold 1 (pos.) 2 - Threshold 2 (neg.) If the D-MAXE system is in "Automatic" mode and the parameter is activated, the web is guided as long as it is within the restricted field of view of the sensor. This is indicated by the “ASC“...
- Page 67 The value that is entered must be positive. Standard value = 90% Menu 1y.3.y6.3: ASC Threshold 2 (Neg) ASC Threshold 2 (Neg) ∙ Set The value that is entered must be negative. Standard value = -90% www.maxcessintl.com D-MAXE with OI-B/OI-N MI 2-296 1 D...
- Page 68 This would not be a useful setting. Position the cursor under the digit whose value you want to change Change the value of the selected digit Save the entry or cancel MI 2-296 1 D D-MAXE with OI-B/OI-N www.maxcessintl.com...
- Page 69 1y.3.y8 Polarity The current setting for the parameter is shown here. Enable the parameter for input Input Menu 1y.3.y8.1: Polarity Select the desired polarity Save the entry or cancel www.maxcessintl.com D-MAXE with OI-B/OI-N MI 2-296 1 D...
- Page 70 The current setting for the parameter appears. Enable the parameter for input Input Menu 1y.3.y9.1: Speed Gain Control Speed Gain Control Set or turn off the parameter Save the entry or cancel MI 2-296 1 D D-MAXE with OI-B/OI-N www.maxcessintl.com...
- Page 71 1y.3.y10.1: Max Actuator Speed or or Position the cursor under the digit whose value you want to change Change the value of the selected digit Save the entry or cancel www.maxcessintl.com D-MAXE with OI-B/OI-N MI 2-296 1 D...
-
Page 72: 1Y.4 Servo-Center
– All parameters are available. "Servo-Center" mode: – Only selected parameters are available. "Automatic" mode: – These parameters cannot be set. Menu 1y.4.1 SC Offset Note: This menu is not available in the default configuration. MI 2-296 1 D D-MAXE with OI-B/OI-N www.maxcessintl.com... - Page 73 Input Menu 1y.4.2.1: SC Gain Position the cursor under the digit whose value you want to change Change the value of the selected digit Save the entry or cancel www.maxcessintl.com D-MAXE with OI-B/OI-N MI 2-296 1 D...
- Page 74 SC Polarity The current setting for the parameter is shown here. Enable the parameter for input Input Menu 1y.4.3.1: Polarity Select the desired polarity Save the entry or cancel MI 2-296 1 D D-MAXE with OI-B/OI-N www.maxcessintl.com...
-
Page 75: 1Y.5 Hardware Ios
"Manual" mode: – All parameters are available. "Servo-Center" mode: – All parameters are available. "Automatic" mode: – Only selected parameters are available. www.maxcessintl.com D-MAXE with OI-B/OI-N MI 2-296 1 D... -
Page 76: General Information About These Menus
Menus 1y.5.1.4 S 04 (X9 /2) These menus are used to calibrate sensor S04 at input X9/2. (On a D-MAXE 3, X9/2 is also connected to X11/1 and is referred to as X11/1 in the menus.) General information about these menus The analog sensors present in the system must be calibrated. - Page 77 All menus for all sensor connections are always available, even if the connections are not assigned. Therefore the connections that are used must be correctly selected. Additional information may be found in the system diagram of the system documentation. www.maxcessintl.com D-MAXE with OI-B/OI-N MI 2-296 1 D...
- Page 78 The following explanation of menus is based on an example of the S01 sensor connected to X5/1. Menu Key sequence for menu 1y.5.1.1.1: ..→ 1y.5 Hardware IOs → Sensor Setup 1y.5.1 → 1y.5.1.1 S 01 MI 2-296 1 D D-MAXE with OI-B/OI-N www.maxcessintl.com...
- Page 79 ∙ Move the drive until the sensor's field of view is completely covered by the material web Position the material web in the sensor's field of view manually ∙ Determine the reference value (covered) www.maxcessintl.com D-MAXE with OI-B/OI-N MI 2-296 1 D...
- Page 80 Save the entries or cancel If the contrast is not sufficient for guiding, appears in Failed the display. ∙ Cancel entries Repeat the calibration of the sensor until the process can be completed successfully. MI 2-296 1 D D-MAXE with OI-B/OI-N www.maxcessintl.com...
- Page 81 Input Menu 1y.5.1.1.3.1: Dimension Position the cursor under the digit whose value you want to change Change the value of the selected digit Save the entry or cancel www.maxcessintl.com D-MAXE with OI-B/OI-N MI 2-296 1 D...
- Page 82 The parameter is used to detect a faulty connection between the D-MAXE Controller and a connected sensor. This parameter can only be evaluated if corresponding customer-specific programming is present. The following explanation of menus is based on the example of the S01 sensor connected to X5/1.
- Page 83 CONTROLLER MENUS: 1Y.5 HARDWARE IOS 7 - 27 Note: If the message appears in the Recalibration Required! display, the sensor calibration was not correct or the type of sensor used does not support this parameter. www.maxcessintl.com D-MAXE with OI-B/OI-N MI 2-296 1 D...
- Page 84 The reference value for the maximum web speed must be determined. To do this, the material web with the relevant application must be running at maximum web speed in the customer system. MI 2-296 1 D D-MAXE with OI-B/OI-N www.maxcessintl.com...
- Page 85 Save the entry or cancel If the difference (contrast) is too low, appears in the Failed display. ∙ Cancel entries Repeat the calibration of the Line Speed Signal until the process can be completed successfully. www.maxcessintl.com D-MAXE with OI-B/OI-N MI 2-296 1 D...
-
Page 86: General Information About These Menus
General information about these menus An incremental position transducer (encoder) can be connected to each drive on the D-MAXE to record positions. This makes position monitoring and evaluation possible. In most applications, the encoder is used together with a sensor positioning system. - Page 87 The following sections describe the 1y.5.1._.1 Calibration 1y.5.1._.2 Dimension 1y.5.1._.3 Recover Reference Point 1y.5.1._.4 Clear Encoder Limits menus. These explanations apply to all encoder menus and are based on the encoder on X3 as an example. www.maxcessintl.com D-MAXE with OI-B/OI-N MI 2-296 1 D...
- Page 88 The following explanation of menus is based on an example of the encoder connected to X3. Note: The Servo-Center transducer must be positioned within the restricted travel path before it is possible to approach the Servo-Center position in "Servo-Center" mode. MI 2-296 1 D D-MAXE with OI-B/OI-N www.maxcessintl.com...
- Page 89 → Calibration 1y.5.1.7.1 Encoder (X3) ∙ Start the sequence for calibrating the parameter Menu 1y.5.1.7.1.1 1. [ENTER] to SC The drive first moves to the Servo-Center position. ∙ Approach the Servo-Center position www.maxcessintl.com D-MAXE with OI-B/OI-N MI 2-296 1 D...
- Page 90 Determine the second limit value Menu 1y.5.1.7.1.5 5. Enter Distance (Optional) Enter the measured distance between the first two thresholds. Position the cursor under the digit whose value you want to or or change MI 2-296 1 D D-MAXE with OI-B/OI-N www.maxcessintl.com...
- Page 91 CONTROLLER MENUS: 1Y.5 HARDWARE IOS 7 - 35 Change the value of the selected digit Confirm the value that was entered Menu 1y.5.1.7.1.6 6. Save Settings Save the entry or cancel www.maxcessintl.com D-MAXE with OI-B/OI-N MI 2-296 1 D...
- Page 92 . . . → Hardware IOs 1y.5 → 1y.5.1 Sensor Setup → 1y.5.1.7 Encoder (X3) → Dimension 1y.5.1.7.2 Dimension The current setting for the parameter is shown here. Enable the parameter for input MI 2-296 1 D D-MAXE with OI-B/OI-N www.maxcessintl.com...
- Page 93 7 - 37 Input Menu 1y.5.1.7.2.1: Dimension Position the cursor under the digit whose value you want to change Change the value of the selected digit Save the entry or cancel www.maxcessintl.com D-MAXE with OI-B/OI-N MI 2-296 1 D...
- Page 94 → Recover Reference Point 1y.5.1.7.3 Start the sequence for recovering the reference. Menu 1y.5.1.7.3.1 1. [ENTER] to SC The drive first moves to the Servo-Center position. Approach the Servo-Center position MI 2-296 1 D D-MAXE with OI-B/OI-N www.maxcessintl.com...
- Page 95 CONTROLLER MENUS: 1Y.5 HARDWARE IOS 7 - 39 Menu 1y.5.1.7.3.2 2. Wait for SC ... The drive moves to the Servo-Center position. Menu 1y.5.1.7.3.3 3. Save Settings Save the entry or cancel www.maxcessintl.com D-MAXE with OI-B/OI-N MI 2-296 1 D...
- Page 96 Hardware IOs → Sensor Setup 1y.5.1 → 1y.5.1.7 Encoder (X3) → Clear Encoder Limits 1y.5.1.7.4 Enable the parameter for input Input Menu 1y.5.1.7.4.1: Clear Encoder Limits ∙ Save the entry or cancel MI 2-296 1 D D-MAXE with OI-B/OI-N www.maxcessintl.com...
- Page 97 CONTROLLER MENUS: 1Y.5 HARDWARE IOS 7 - 41 Additional menus 1y.5._ This section contains a list of menus with information about connected input/output devices of the D-MAXE Controller. Menus Key sequence for menus: ..
- Page 98 Menus 1y.5.4.1 Digital Output A Menu 1y.5.4.1.1 Delay Menu 1y.5.4.1.2 <Set> State Menu 1y.5.4.1.3 <Cleared> State Menus 1y.5.4.2 Digital Output B Menu 1y.5.4.2.1 Delay Menu 1y.5.4.2.2 <Set> State Menu 1y.5.4.2.3 <Cleared> State MI 2-296 1 D D-MAXE with OI-B/OI-N www.maxcessintl.com...
-
Page 99: 1Y.6 Control Options
CONTROLLER MENUS: 1Y.6 CONTROL OPTIONS 7 - 43 1y.6 Control Options This section includes information about menus that contain basic properties for operating the D-MAXE Controller. "Manual" mode: – All parameters are available. "Servo-Center" and "Automatic" mode: Remote Control – Only the parameter is available. -
Page 100: Menu 1Y.6.3 Jog Keys
Length unit If the displayed value of the parameter is not correct, this value “Menu must be converted manually and entered again in 1y.5.1.1.3 Dimension” MI 2-296 1 D D-MAXE with OI-B/OI-N www.maxcessintl.com... - Page 101 Hardlock ∙ Turn the parameter on and off Menu 1y.6.6.2 Hardlock Gain Hardlock ∙ Set the gain for the parameter Menu 1y.6.6.3 Hardlock Polarity Hardlock Set the polarity for the parameter www.maxcessintl.com D-MAXE with OI-B/OI-N MI 2-296 1 D...
-
Page 102: 1Y.7 Configuration
7 - 46 CONTROLLER MENUS: 1Y.7 CONFIGURATION 1y.7 Configuration This section includes a list of menus containing information about the D-MAXE Controller. This information is required when ordering replacement parts or for service inquires. "Manual" mode: – All parameters are available. - Page 103 "devices". Figure 7.1 shows an example of a distributed system consisting of several D-MAXE Controllers and operator interfaces. Each individual element of the distributed system has its own menu structure. These elements ("devices") must be operated from a separate operator interface OI-N.
- Page 104 #3–D-MAXE Controller with address 3: CM:Main operation ’Chasing’ D1:Record Slave web D2:Slave web guiding #8–D-MAXE operator interface OI-N with address 8: GW: Gateway for data exchange with customer OI-N - separate operator interface Figure 7.1: Example of a distributed system All elements ("devices") present in the distributed system can be...
- Page 105 3 – Application identification 3: #1/D1-->Subfunction 2 #2/D2-->Subfunction 1 #1/D2-->Subfunction 1 #1/CM-->Subfunction 0 #1/CM-->Subfunction 0 #3/D1-->Subfunction 2 #2/D1-->Subfunction 3 #3/D2-->Subfunction 3 #8/GW-->Subfunction 4 Figure 7.2:Example of combining "devices" within a distributed system www.maxcessintl.com D-MAXE with OI-B/OI-N MI 2-296 1 D...
- Page 106 Filter, page 5-5 on the operator interface. The two parameters described below can be used to configure the distributed system. These two parameters must be configured on every "device" present in the network. MI 2-296 1 D D-MAXE with OI-B/OI-N www.maxcessintl.com...
- Page 107 Distributed system parameter Input Menu 1y.7.5.1 Application ID ∙ Entered the desired application identification n = 1 ... 255 Menu 1y.7.5.2 Sub Function ∙ Enter the desired subfunction n = 0 ... 255 www.maxcessintl.com D-MAXE with OI-B/OI-N MI 2-296 1 D...
- Page 108 D-MAXE Controller to a backup copy in the module. Note: A "device" is selected for a D-MAXE 2 or D-MAXE 3 controller from which the settings are saved simultaneously for all the controller's drives. Therefore, only one backup is required.
- Page 109 D-MAXE Controller to the values of a backup copy. Note: A "device" is selected for a D-MAXE 2 or D-MAXE 3 controller from which values are restored from a backup copy simultaneously for all the controller's drives.
- Page 110 Note: If nothing appears on the display of the operator interface after a restart, a "device" must be selected with the A key. Note: Then commissioning of the D-MAXE Controller must be performed. MI 2-296 1 D D-MAXE with OI-B/OI-N...
-
Page 111: 1Y.8 Network
Instructions" (see system documentation) or after consulting with Maxcess. Note: If nothing appears on the display of the operator interface after a restart, a "device" must be selected with the A key. www.maxcessintl.com D-MAXE with OI-B/OI-N MI 2-296 1 D... -
Page 112: Menu 1Y.8.3 Fieldbus
1y.8.3.2 FieldBus State Menu 1y.8.3.3 FieldBus Data For the meaning of the data, please refer to the "Supplementary Operating Instructions" in the system documentation. Menu 1y.8.4 MAC-ID Display of MAC-ID of the D-MAXE Controller MI 2-296 1 D D-MAXE with OI-B/OI-N www.maxcessintl.com... -
Page 113: 1Y.9 Service
CONTROLLER MENUS: 1Y.9 SERVICE 7 - 57 1y.9 Service The purpose of these menus is to show information about settings of the D-MAXE system that is important for Customer Service. "Manual" mode: – All parameters are available. "Servo-Center" and "Automatic" mode: –... -
Page 114: Menu 1Y.9.3 Errors/Warnings
7 - 58 CONTROLLER MENUS: 1Y.9 SERVICE Menu 1y.9.3 Errors/ Warnings Display of errors and warnings that occurred Menu 1y.9.3.1 Errors/Warnings (Actual) Menu 1y.9.3.2 Errors/Warnings (Complete) MI 2-296 1 D D-MAXE with OI-B/OI-N www.maxcessintl.com... -
Page 115: Maintenance
8 MAINTENANCE WARNING: Danger of injury by crushing Maintenance work must only be performed on the D-MAXE system when the power is turned off, the machine is stopped, and it is protected against being turned back on. Maintenance work No maintenance work is required on the D-MAXE Controller or operator interface. -
Page 116: D-Maxe Decommissioning
Decommissioning 1. Turn off the electrical power to the D-MAXE system. 2. Remove all cables from the modules of the D-MAXE system. 3. Disassemble the modules of the D-MAXE system. 4. Modules of the D-MAXE system can be stored according to... -
Page 117: 10 Troubleshooting
1. Check the LEDs on the individual modules of the D-MAXE systems 10-2 see table 2. Check the icons that appear in the display of the D-MAXE operator interface see page 3. Check possible causes for faulty behavior. Frequent causes... -
Page 118: Leds On The D-Maxe Controller
TROUBLESHOOTING LEDs on the D-MAXE Controller While the device is being turned on, the LEDs on the D-MAXE Controller are lit red briefly. This makes it possible to check their functionality. The LEDs indicate errors and/or show information about normal operation of the D-MAXE Controller. -
Page 119: D-Max Operator Interface
10 - 3 D-MAX operator interface While the device is being turned on, the LEDs on the D-MAXE Controller are lit red briefly. This makes it possible to check their functionality. The LEDs indicate errors and/or show information about normal operation of the D-MAXE Controller. -
Page 120: Leds On The D-Maxe Operator Interface
10 - 4 TROUBLESHOOTING LEDs on the D-MAXE operator interface While the device is being turned on, the LEDs on the D-MAX operator interface are lit briefly. This makes it possible to check their functionality. Then the LEDs indicate errors and/or show information about normal operation of the D-MAX operator interface. -
Page 121: Leds X2
Yellow No connection Check the plug and cable of the connected device green LED* Information Green Connection detected * not present on virtual operator LED* interface Green Flashing Connection is active LED* www.maxcessintl.com D-MAXE with OI-B/OI-N MI 2-296 1 D... -
Page 122: Icons In The Display Of The D-Max Operator Interface
Therefore, these icons must be evaluated individually for troubleshooting to determine whether what seems to be an error may actually be a normal operating state of the D-MAXE system. Icon Status... - Page 123 To restore the basic values, switch to "Servo- Center" mode and approach the Servo-Center position. If the error persists, check the parameters in Menu 1y.4.2 SC Gain, page 7-17 Menu 1y.4.3 SC Polarity, page 7-18 www.maxcessintl.com D-MAXE with OI-B/OI-N MI 2-296 1 D...
- Page 124 If there is customer-specific programming, refer to the "Supplementary Operating Instructions" in the system documentation for information about the X1 parallel interface. [1000] The D-MAXE system is The devices may not be connected to the expecting commands network. from external devices.
-
Page 125: Faulty Behavior And Setting Errors
Faulty behavior and setting errors Often the cause of incorrect or undesirable guiding behavior is an incorrect setting on the D-MAXE system. These errors can easily be eliminated by changing the appropriate settings on the D-MAXE system. Possible causes for faulty... - Page 126 Correct the guidepoint if A cursor appears below the necessary. bar graph at the location to which the guide point was moved, together with a numeric entry. MI 2-296 1 D D-MAXE with OI-B/OI-N www.maxcessintl.com...
- Page 127 For further information see the "Supplementary Operating Instructions" in the system documentation. Menu 1y.6.5 Length The length unit is set see item Unit, page 7-44 1y.6 incorrectly. in section Control Options Check the length unit. www.maxcessintl.com D-MAXE with OI-B/OI-N MI 2-296 1 D...
-
Page 128: Faulty Behavior
Menu 1y.4.2 The actuator vibrates The gain for the Decrease the gain SC Gain, page 7-17 in the "Servo-Center" Servo-Center 1y.4 operating mode. transducer is set too in section Servo-Center high. MI 2-296 1 D D-MAXE with OI-B/OI-N www.maxcessintl.com... - Page 129 Perform the adjustment only when the machine is stopped and protected against being turned on. Type: Switching Distance ISCT-03: about 1mm ISCT-20: about 1.5mm ISCT-21: about 2mm ISCT-22: about 5mm ISCT-23: about 10mm www.maxcessintl.com D-MAXE with OI-B/OI-N MI 2-296 1 D...
-
Page 130: Fuse Replacement
10 - 14 TROUBLESHOOTING Fuse replacement The printed circuit boards in the D-MAXE controller and the operator interface are static sensitive devices. All standard ESD precautions must be followed when touching or handling the printed circuit boards. These fuses should be replaced by qualified personnel only. - Page 131 Operator interface fuse To access the operator interface fuse, remove the rear panel. Replace the fuse and reinstall the rear panel. F101 - Power fuse, 2.5A delay Figure 10.2: Operator interface fuse location www.maxcessintl.com D-MAXE with OI-B/OI-N MI 2-296 1 D...
-
Page 132: 11 Technical Data
400W maximum at 48V Dimensions Length: 184mm [7.24 in] without cables Width: 87mm [3.45 in] Height: 60mm [2.36 in] D-MAXE 1, D-MAXE 2 93mm [3.66 in] D-MAXE 3 Weight 1.0kg [2.2 lbs] D-MAXE 1, D-MAXE2 1.2 kg [2.65 lbs] D-MAXE 3... -
Page 133: D-Max Operator Interface Oi-B Or Oi-N
Ambient conditions Ambient temperature: 0°C to 60°C [32 to 140°F] Relative humidity: 10% to 95% non-condensing Altitude above sea level: maximum 3000m [9842 ft] Fuse protection 2.5A delay [Bussmann S506-2.5-R or Littelfuse 021802.5P] www.maxcessintl.com D-MAXE with OI-B/OI-N MI 2-296 1 D... -
Page 134: Inputs And Outputs Of The D-Maxe Controller
11 - 3 TECHNICAL DATA Inputs and outputs of the D-MAXE Controller Communication interface [Note 3] based on Ethernet - 100 Mbps full duplex Electromechanical drive maximum 4A/drive Hydraulic servo-valve ± 50mA with or without lock valve (24V or 48V, maximum 4A) Motor Power Amplifier MPA ±... - Page 135 TECHNICAL DATA 11 - 4 www.maxcessintl.com D-MAXE with OI-B/OI-N MI 2-296 1 D...
- Page 136 Maximum voltage: 28V Overcurrent and short-circuit protection +12V available as auxiliary voltage Note 1. Guiding amplifiers of type D-MAXE 1, D-MAXE 2 and D-MAX 3 normally have a 0 (zero) ohm connection between the primary-side protective ground wire [PE] and the DC-side ground [GND].
-
Page 137: Parallel Input Matrix
Because of the option for customer-specific programming, there may be some deviations in the parallel input matrix. Customer- specific software adjustments of this type are described in the "Supplementary Operating Instructions" for the D-MAXE system and are included in the system documentation. Inputs... -
Page 138: Jobs
* It is possible that the sensor being used is already returning a center signal. In this case, center guiding will be performed. ** On a D-MAXE 3, S3 is connected to both X9/1 and X11/2, and S4 is connected to both X11/1 and X9/2 and will generally be referred to as X11/1. -
Page 139: Actuators
2.6A MOTOR 30.1K 2.6A 48 VDC M146713 Motor 30.1K LAB-10A 0.6A MOTOR 8.66K 0.6A 48 VDC M136105 Motor 8.66K LA-9 M126246 Motor AB-1 3.5A MOTOR 36.5K 3.5A 48 VDC 36.5K M126687 Motor www.maxcessintl.com D-MAXE with OI-B/OI-N MI 2-296 1 D... - Page 140 Fife No motor or valve detected. None Menu 1y.5.2 Actuator, page 7-41 ** The maximum possible mains power voltage on the D-MAXE Controller is 51VDC. The D-MAXE Controller regulates the voltage down to the necessary level required by the connected motor/valve.
-
Page 141: Cable Lengths
Modules of the D-MAXE system have been engineered according to the standards and guidelines of the European Union. A declaration of conformity is available on file. Modules of the D-MAXE system are in compliance with the following standards: EN 61326-1... -
Page 142: Accessories (Optional)
External input device for easier sensor calibration of edge sensors RCAL-26 External input device for easier sensor calibration of line sensor SE-26/SE-26A Assembly accessories Wall bracket for D-MAXE Controller Wall bracket for operator interface MI 2-296 1 D D-MAXE with OI-B/OI-N www.maxcessintl.com... -
Page 143: Menu Structure D-Maxe Controller
MENU STRUCTURE D-MAXE CONTROLLER 12 - 1 MENU STRUCTURE D-MAXE CONTROLLER Legend The menu is only present in Manual mode The menu is not present in Automatic mode The menu is not present in Servo-Center mode The menu is only present if the customer software has been programmed accordingly A numeric entry follows. - Page 144 12 - 2 MENU STRUCTURE D-MAXE CONTROLLER "x“ is derived from the selected operating mode: x = 1: Manual x = 2: Servo-Center x = 3: Automatic All additional pages in this menu structure are described based on Manual mode (x = 1).
- Page 145 MENU STRUCTURE D-MAXE CONTROLLER 12 - 3 1y.3 Job Settings 1y.3.z1 Guidepoint Offset ENTER 1y.3.z2 Auto Setup ENTER 1y.3.z3 Gain ENTER 1y.3.z4 continued in the Operating ENTER Instructions for the OSC 1y.3.z5 continued in the Operating ENTER Instructions for the PIC 1y.3.z6...
- Page 146 12 - 4 MENU STRUCTURE D-MAXE CONTROLLER 1y.4 SC Settings 1y.4.1 SC Offset ENTER 1y.4.2 SC Gain ENTER 1y.4.3 SC Polarity ENTER MI 2-296 1 D D-MAXE with OI-B/OI-N www.maxcessintl.com...
- Page 147 MENU STRUCTURE D-MAXE CONTROLLER 12 - 5 1y.5 Hardware IOs 1y.5.1 Sensor Setup ENTER 1y.5.1.1 S 01 1y.5.1._.1 ENTER Calibration 1y.5.1.2 ENTER S 02 1y.5.1._.3 ENTER Dimension 1y.5.1.3 ENTER S 03 1y.5.1._.4 ENTER Sensor Supervision 1y.5.1.4 ENTER S 04 ENTER 1y.5.1.5...
- Page 148 12 - 6 MENU STRUCTURE D-MAXE CONTROLLER 1y.5.2 Actuator 1y.5.3 Digital Inputs ENTER 1y.5.4 Digital Outputs ENTER 1y.5.4.1 Digital Output A 1y.5.4._.1 ENTER Delay 1y.5.4.2 ENTER Digital Output B 1y.5.4._.2 ENTER <Set> State ENTER 1y.5.4._.3 <Cleared> State ENTER MI 2-296 1 D D-MAXE with OI-B/OI-N www.maxcessintl.com...
- Page 149 MENU STRUCTURE D-MAXE CONTROLLER 12 - 7 1y.6 Control Options 1y.6.1 Mode Enable ENTER 1y.6.2 Job Enable ENTER 1y.6.3 Jog Keys 1y.6.3.1 ENTER Jog Enable 1y.6.4 ENTER Remote Control 1y.6.3.2 ENTER Jog Direction 1y.6.5 ENTER Length Unit 1y.6.3.3 ENTER Jog Speed 1y.6.6...
- Page 150 12 - 8 MENU STRUCTURE D-MAXE CONTROLLER 1y.7 Configuration 1y.7.1 Names 1y.7.1.1 ENTER Device 1y.7.2 ENTER Serial Number 1y.7.1.2 Drive 1y.7.3 ENTER FW Number 1y.7.4 SW Number 1y.7.5 Distributed System 1y.7.5.1 ENTER Application ID ENTER 1y.7.5.2 ENTER 1y.7.7 Backup 1y.7.7.1...
- Page 151 MENU STRUCTURE D-MAXE CONTROLLER 12 - 9 1y.8 Network 1y.8.1 TCP/IP 1y.8.1.1 ENTER IP-Address ENTER 1y.8.1.2 Subnet Mask ENTER 1y.8.1.3 Gateway ENTER 1y.8.1.4 DHCP ENTER 1y.8.2 MAXNET 1y.8.2.1 ENTER MAXNET-Address ENTER 1y.8.3 FieldBus 1y.8.3.1 ENTER FieldBus Type 1y.8.4 MAC-ID 1y.8.3.2 FieldBus State 1y.8.3.3...
- Page 152 12 - 10 MENU STRUCTURE D-MAXE CONTROLLER 1y.9 Service 1y.9.1 Measuring Points 1y.9.1.1 ENTER Sensors ENTER 1y.9.1.2 Encoder ENTER 1y.9.1.3 Digital Inputs (X1) 1y.9.1.6 Network ENTER 1y.9.1.7 Power ENTER 1y.9.1.8 Loop Gain 1y.9.2 Set Digital Outputs 1y.9.2.1 ENTER Digital Output A 1y.9.2.2...
-
Page 153: Operator Interface Menu Structure
A list follows from which the entries can be selected. A list follows which contains various displays, but does not allow for entries. Move between the menus of a level with the "Up-Arrow" and "Down-Arrow" keys. www.maxcessintl.com D-MAXE with OI-B/OI-N MI 2-296 1 D... - Page 154 Background Color ENTER 1.a.4 Configuration 1.a.4.1 ENTER Serial Number 1.a.4.2 FW Number 1.a.4.3 SW Number 1.a.5 Network (X2...X6) continued on ENTER TCP/IP (X2...X6) page 1.a.6 Service continued on ENTER Measuring Points page MI 2-296 1 D D-MAXE with OI-B/OI-N www.maxcessintl.com...
- Page 155 Control Options 1.a.2.1 BMP Orientation 1.a.2.1.1 ENTER D-MAX.D1 ENTER 1.a.2.1.2 D-MAX.D2 ENTER 1.a.2.2 Application Filter 1.a.2.2.1 ENTER Filter Type ENTER 1.a.2.2.2 Selected Application ENTER 1.a.2.3 Connect on start .. ENTER 1.a.2.4 Log In www.maxcessintl.com D-MAXE with OI-B/OI-N MI 2-296 1 D...
- Page 156 Network (X2...X6) 1.a.5.1 TCP/IP (X2...X6) 1.a.5.1.1 ENTER IP-Address (X2...X6) ENTER 1.a.5.1.2 Subnet Mask (X2...X6) ENTER 1.a.5.1.3 Gateway (X2...X6) ENTER 1.a.5.1.4 DHCP (X2...X6) ENTER 1.a.6 Service 1.a.6.1 Measuring Points 1.a.6.1.1 ENTER Power ENTER MI 2-296 1 D D-MAXE with OI-B/OI-N www.maxcessintl.com...
-
Page 157: 14 Glossary
The Gain and Polarity parameters are calibrated automatically. CM (Customized Menu) Customer-specific system menu This system menu is only present if the D-MAXE controller has been programmed accordingly. Deadband A range is defined around the guide point in the sensor field of view in which guiding is reduced or is not active at all in the "Automatic"... - Page 158 Then the control rollers of the actuator are aligned parallel to the rollers of the customer system. Servo-Center transducer Assigns the Servo-Center position for "Servo-Center" mode SGC (Speed Gain Control) Guiding depends on web speed. MI 2-296 1 D D-MAXE with OI-B/OI-N www.maxcessintl.com...
- Page 159 D-MAXE system and are included in the system documentation. Web/strip The web/strip is the customer's material, which is affected in its direction of movement as it is guided by the D-MAXE system. These Operating Instructions will refer only to the ‘web’. www.maxcessintl.com...
-
Page 160: 15 Service
Fife-Tidland GmbH Max-Planck-Straße 8 Siemensstraße 13-15 65779 Kelkheim 48683 Ahaus Deutschland Deutschland Tel: +49.6195.7002.0 Fax: +49.6195.7002.933 E-Mail: service@maxcess.eu Web: www.maxcess.eu Maxcess 222 West Memorial Road Oklahoma City, OK 73114, USA Tel: +1.405.755.1600 Fax: +1.405.755.8425 E-Mail: service@maxcessintl.com Web: www.maxcessintl.com © 2016 Maxcess...
Need help?
Do you have a question about the D-MAXE and is the answer not in the manual?
Questions and answers