
Subscribe to Our Youtube Channel
Related Manuals for Heta SCAN-LIINE 80 XL


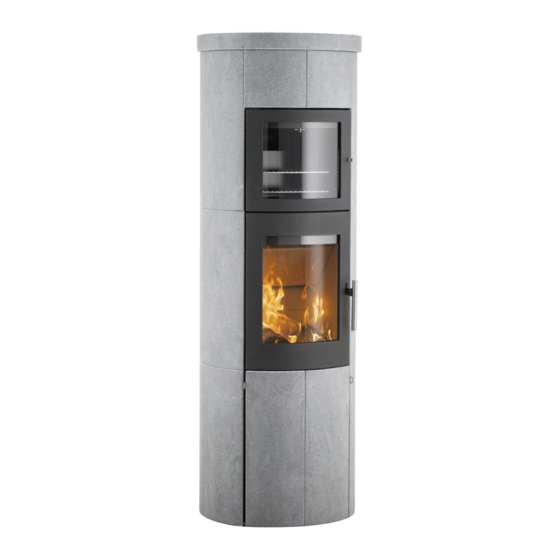
Summary of Contents for Heta SCAN-LIINE 80 XL
- Page 1 80 Xl - sCan-line 80 XlB BakinG oven aPProveD For Use in sMoke Control areas When BUrninG Dry WooD loGs or aUthoriseD FUels www.heta.dk Danish DesiGn . Danish QUality . Danish ProDUCtion...
- Page 2 DOP-Scan-Line 1000 2017 required tools are not supplied. Heta A/S Jupitervej 22, DK-7620 Lemvig Copyright © 2014 Printed in Denmark Heta is a registered Subject to printing errors 21.05.2022 Phone: +45 9663 0600 trademark of Heta A/S and changes. 0037-1415 Version 2,0...
-
Page 3: Installation Instructions
installation instrUCtions safety clearances the chimney connection Stoves must always be installed in line with nati- The chimney opening must follow national and onal and, if applicable, local regulations. It is im- local regulations. However, the area of the ope- portant to abide by local regulations regarding ning should never be less than 175 cm , which... - Page 4 • The chimney contains false air. chimney and the low temperature of the fresh • The chimney and flue gas pipe are blocked. air. The length and insulation of the chimney, • The house is too airtight (i.e. when there is wind and weather conditions also have an effect on the ability of the chimney to generate appro- an insufficient supply of fresh air).
- Page 5 energy source, you save the environment about ting fire starter (bag, brick, paraffin) on the top, 1.3 kg CO every time you have used 1 kg nor- now you are ready to light the fuel. The flames mal wood. must work from the top down. Chimney fires In the event of a chimney fire –...
- Page 6 Never fill firewood over the stove’s max. fill line. the production of large volumes of gas, and this gas can explode if the intake of primary and se- See fig. 5. condary air is insufficient. It is an advantage always to leave some ash ly- ing in the bottom of the combstion chamber.
-
Page 7: Operational Problems
oPerational ProBleMs The chimney must be swept at least once a year, turning plate. In cases where the wood burns we recommend the use of a NACS (national as- too quickly, this may be due to excessive chim- sociation of chimney sweeps) registered chim- ney draught. -
Page 8: Maintenance
Therefore, the duration of the warranty is 5 years on this product, covering manufactu- rer’s defects, 1 year on paint adhesion defects from purchase date from Heta and a 3 months total warranty for seals, vermiculite and glass from the date of sale from the dealer. - Page 9 Cleaning the oven The oven should be cleaned using an appropriate household oven cleaning agent. Diagram for the maintenance Qualified Stove Owner Technicia Maintenance / Period Before 60-90 1st Year 2st Year Daily Autum week days days Cleaning the chimney (see. Chimney) Cleaning the chimney and stove Cleaning the stoves firebox Cleaning combustion air intake...
- Page 10 troubleshooting table - applies to all stove types Fault Cause Troubleshooting Solution Inadequate chimney draft. Lighting problems. When the You can test using a lighter whether Improve the chimney. The chimney only has stove is cold, smoke seeps flame is drawn into the combustion sufficient draft when it is hot.
- Page 11 The stove allows connection to outside air through a Ø 100 mm inlet An aluflex Ø 100 mm hose is recommended (available from Heta), which can handle tempe- ratures up to 200° C Fig. 1 illustrates the two options – downwards or backwards.
- Page 12 For top flue outlet Cut the small metal bridge connecting the cover to the convection vent. For rear flue outlet If the rear flue outlet is being used, the cover in the convection vent must NOT be removed. The cladding must be positioned with holes at the top, in line with the installation instructions for soapstone/ceramic stoves on page 14 and The dimensions on the drawing fig.
- Page 13 Cleaning after sweeping the chimney and replacing the stones installinG soaPstone anD CeraMiC Panels Heta recommends that stove installation be carried out by two people. The soapstone and ceramic panels must be handled with extreme care, as the corners and edges are very fragile.
- Page 14 soapstone cladding with product numbers scan-line 80 Xl Product no. soapstone SL 80 XL 0023-2277 0023-2278 0023-2279 0023-2280 0023-2281 0023-2282 0023-2283 soapstone cladding with product numbers scan-line 80 XlB Product no. Qty SL 80 XLB soapstone baking oven 0023-2277 0023-2278 0023-2279 0023-2280 0023-2281...
- Page 15 Ceramic cladding with product numbers scan-line 80 Xl Product no. ceramic SL 80 XL 0023-2365 0023-2366 0023-2367 0023-2368 0023-2369 0023-2370 Ceramic cladding with product numbers scan-line 80 XlB Product no. Qty SL 80 XLB ceramic baking oven 0023-2365 0023-2366 0023-2367 0023-2368 0023-2370 0023-2372...
- Page 16 scan-line 80 Xl Stoves are shipped from the factory with a 1 mm gap between the side plates. This gap can be adjusted using screws (6 pieces) to match the space between cladding panels C and D. Remove the air adjustment lever before installing the cladding.
- Page 17 scan-line 80 XlB Stoves are shipped from the factory with a 1 mm gap between the side plates. This gap can be adjusted using screws (6 pieces) to match the space between cladding panels C and D. Remove the air adjustment lever before installing the cladding.
- Page 18 scan-line 80 Xl and scan-line 80 XlB...
- Page 19 scan-line 80 Xl Start by mounting the cladding stone to the The mounting pegs should rest at the bottom right of the door and work around the oven. of the keyholes when the cladding has been positioned correctly. Install all the panels in the bottom row before starting on the second row of cladding stone.
- Page 20 scan-line 80 Xl Once the cladding stones (E) have been instal- led, install the top front stones (F). Follow the same procedure as for the other cladding sto- nes, except that the distance from the top of the cladding stones to the mounting pegs is 55 mm. These two cladding stones (F) are interchangeable.
- Page 21 scan-line 80 Xl There is space for up to four 0023-0121 ther- mastones near the top flue outlet on the Scan- Line 80 XL, which can be installed before or after the cladding is installed. The Scan-Line 80 XL is shipped from the fac- tory with two thermastones.
- Page 22 scan-line 80 XlB Install the front stones near the door (G) fol- lowing the same procedure as for the other stones. When adjusting the cladding under the door, it must be min. 4 mm air between door and clad- ding. Pull the door out slightly before installation.
- Page 23 scan-line 80 XlB The soapstone panels have no fixed top or bot- tom, leaving you free to orient them how you wish. Fourteen cladding stone panels (E) are needed for the Scan-Line 80 XLB baking oven. These panels can be arranged however you want, as the same type of cladding stone panels are used on the opposite side of the stove.
- Page 24 scan-line 80 XlB The soapstone/ceramic panels may need to be adjusted to be level with the cladding stones on the sides of the stove. Do this by loosening the four screws, two on each side. (use a 4 mm hex key) Start by loosening the bottom two screws while the cladding is attached.
- Page 25 scan-line 80 Xl and scan-line 80 XlB installation oF CeraMiC toP anD ConveCtion toP Panel Install the convection top panel as follows: 1: push (x) into the slot (y) in the top stone. 2: then push (z) into position in the hole between the top stones. If the top flue outlet is being used, remove the Correct installation of the convection centre cover plate using pliers.
- Page 26 scan-line 80 Xl and scan-line 80 XlB installation oF soaPstone toP anD ConveCtion toP Panel Install the convection top panel as follows: When installing the top cladding, 1: push (x) into the slot (y) in the top stone. place (A) first. Then install (B). 2: then push (z) into position in the hole between the top stones.
- Page 27 Certifikat no. 1447 Manufacturer Heta A/S Ecodesign Adress Jupitervej 22, DK 7620 Lemvig EU Declaration of Conformity E-mail heta@heta.dk Website www.heta.dk DoC Scan-Line 800 1447-2017 Telephone +45 9663 0600 Product fiche Model identifier Scan-Line 800, 810, 820, 820B, 820S, 830B, 830S, 840, 840B, 850, 80XL, 80XLB serie...
Need help?
Do you have a question about the SCAN-LIINE 80 XL and is the answer not in the manual?
Questions and answers