Honeywell CIPer 50 Installation & Commissioning Instructions
Hide thumbs
Also See for CIPer 50:
- Installation & commissioning instructions (51 pages) ,
- User manual (44 pages) ,
- User manual (46 pages)

Related Manuals for Honeywell CIPer 50


Summary of Contents for Honeywell CIPer 50
- Page 1 CIPer MODEL 50 CONTROLLER INSTALLATION & COMMISSIONING INSTRUCTIONS DECEMBER 2020 ® U.S. Registered Trademark 31-00233-02 Copyright © 2020 Honeywell Inc. • All Rights Reserved...
- Page 2 Honeywell makes no representations or warranties with respect to this document. In no event shall Honeywell be liable for technical or editorial omissions or mistakes in this document, nor shall it be liable for any damages, direct or incidental, arising out of or related to the use of this document.
-
Page 3: Table Of Contents
CIPer MODEL 50 CONTROLLER – INSTALLATION AND COMMISSIONING INSTRUCTIONS TABLE OF CONTENTS Safety Information ............................. 6 General Safety Information ................................6 Information as per EN 60730 ............................... 6 WEEE Directive ..............................7 Standards and Approvals ..........................7 Specifications of Controller ..........................7 System Overview .............................. - Page 4 CIPer MODEL 50 CONTROLLER – INSTALLATION AND COMMISSIONING INSTRUCTIONS Terminal Assignment ..................................31 Power Supply .......................................33 Powering CIPer Model 50 ...................................33 Transformer Data ......................................34 Powering Panel Bus I/O Modules and Field Devices ........................35 Powering Field Devices and Panel Bus I/O Module via Separate Transformers ..............35 Powering Field Devices via Panel Bus I/O Module .........................35 WEB-EHSERIESNX26X Connection Examples ..................
- Page 5 CIPer MODEL 50 CONTROLLER – INSTALLATION AND COMMISSIONING INSTRUCTIONS Connecting CIPer Model 50 via RS485-1 Interface to a BACnet MS/TP Bus ...........55 Connecting CIPer Model 50 via RS485-2 Interface to a BACnet MS/TP Bus ...........57 Modbus Connection ............................58 Modbus Considerations ................................58 Connecting CIPer Model 50 via RS485-1 Interface to a Modbus ................58 Connecting CIPer Model 50 via RS485-2 Interface to a Modbus ................59 M-Bus Connection ............................
-
Page 6: Safety Information
• If the CIPer Model 50 System is modified in any way, except by the manufacturer, all warranties concerning operation and safety are invalidated. • Rules regarding electrostatic discharge should be followed. • Use only accessory equipment which comes from or has been approved by Honeywell. Information as per EN 60730 Purpose The purpose of the device is operating control. -
Page 7: Weee Directive
CIPer MODEL 50 CONTROLLER – INSTALLATION AND COMMISSIONING INSTRUCTIONS WEEE DIRECTIVE WEEE: Waste Electrical and Electronic Equipment Directive • At the end of the product life, dispose of the packaging and product in an appropriate recycling center. • Do not dispose of the device with the usual domestic refuse. •... -
Page 8: System Overview
CIPer MODEL 50 CONTROLLER – INSTALLATION AND COMMISSIONING INSTRUCTIONS System Overview Overview of Hardware Table 3. Overview of models (hardware) Order No Max. cable Without HMI With HMI Feature Description length WEB- WEB- EHSERIESNX26ND EHSERIESNX26D NTC10kΩ (Type II) / NTC20kΩ (Type II) / 1200 ft 0…10V / slow BI, 0.4 Hz (366 m) - Page 9 CIPer MODEL 50 CONTROLLER – INSTALLATION AND COMMISSIONING INSTRUCTIONS 9 ft USB 2.0 Device Interface (as Network Interface) (2.74 m) 9 ft USB 2.0 Host Interface (max. 200 mA) (2.74 m) RS232 M-Bus communication via 45-feet 3000 ft (15 m)-long PW3 / PW20 / PW60 (914.4 m) converters Power LED (green)
-
Page 10: System Architecture
CIPer Model 50 controller provides interface connections, which allow connection to external systems (e.g., BACnet controllers). Via the IF-LON External Interface, the CIPer Model 50 can also communicate with systems, including Honeywell L I/O Modules. For details about system architecture, refer... -
Page 11: Bus And Port Connections
CIPer MODEL 50 CONTROLLER – INSTALLATION AND COMMISSIONING INSTRUCTIONS Bus and Port Connections Overview WARNING Risk of electric shock or equipment damage • Do not touch any live parts in the cabinet. • Disconnect the power supply before making connections to or removing connections from terminals of the CIPer Model 50 controller or Panel Bus I/O modules. -
Page 12: Legend
CIPer MODEL 50 CONTROLLER – INSTALLATION AND COMMISSIONING INSTRUCTIONS Legend RS232 / RJ45 socket (for connection of M-Bus and other RS232-based protocols; factory debugging) Three-position slide switch (for setting bias and termination resistance of RS485-1) Two Ethernet / RJ45 sockets (for BACnet IP communication); 10/100 Mbit/s; 1 "link" LED + 1 "activity"... -
Page 13: Configuring The Rs232 Interface In Webs N4
CIPer MODEL 50 CONTROLLER – INSTALLATION AND COMMISSIONING INSTRUCTIONS Configuring the RS232 Interface in WEBs N4 When you configure the RS232 interface (for M-Bus) in WEBs N4, the corresponding Port Name will appear as shown in Figure 5. Figure 5: Configuring the RS232 Interface in WEBs N4 USB 2.0 Host Interface Via its USB 2.0 Host interface, the CIPer Model 50 controller can be connected to, e.g., the IF-LON2 External Interface Adapter and thus to L... -
Page 14: Usb 2.0 Device Interface
CIPer MODEL 50 CONTROLLER – INSTALLATION AND COMMISSIONING INSTRUCTIONS USB 2.0 Device Interface All models of the CIPer Model 50 controller are equipped with a USB 2.0 Device Interface at the front. This interface is for connection to WEBs N4 and web browsers, or 3 -party touch panels. -
Page 15: Separated Networks
CIPer MODEL 50 CONTROLLER – INSTALLATION AND COMMISSIONING INSTRUCTIONS RIGHT (YELLOW) LED LIT CONTINUOUSLY = "100 Mbaud" DARK "10 Mbaud" INTER- INTER- FACE 1 FACE 2 LEFT (GREEN) LED LIT CONTINUOUSLY = " LINK ACTIVE " DARK = " LINK INACTIVE "... - Page 16 CIPer MODEL 50 CONTROLLER – INSTALLATION AND COMMISSIONING INSTRUCTIONS WEB-EHSERIESNX #2 WEB-EHSERIESNX #3 ETHERNET/RJ45 SOCKET #2 ETHERNET/RJ45 SOCKET #2 DEACTIVATED DEACTIVATED max. 100 m max. 100 m max. 100 m CAT5 CABLE TO DEACTIVATED TO ACTIVATED ETHERNET SOCKET ETHERNET SOCKET SWITCH FUNCTIONALITY OF DEVICE #1 OF DEVICE #4...
-
Page 17: Default Ip Addresses Of Ethernet Interfaces 1 And 2
CIPer MODEL 50 CONTROLLER – INSTALLATION AND COMMISSIONING INSTRUCTIONS To ensure that the discovery of devices, datapoints, schedules, and histories does not fail, you should enter a gateway address. If there is no gateway address physically given by the Network Setting, then enter a gateway address that relates to the IP address of the enabled Ethernet Interface. - Page 18 CIPer MODEL 50 CONTROLLER – INSTALLATION AND COMMISSIONING INSTRUCTIONS Configuring the RS485 Interfaces in WEBs N4 When you configure the two RS485 interfaces (for Modbus, BACnet MS/TP, or Panel Bus) in WEBs N4, the corresponding Port Names will appear as shown in Figure 13. Figure 13: Configuring the RS485 interfaces in WEBs N4 RS485-1 Bias and Termination Resistors RS485-1 is equipped with a three-position slide switch which can be used to switch its bias resistors OFF...
- Page 19 CIPer MODEL 50 CONTROLLER – INSTALLATION AND COMMISSIONING INSTRUCTIONS 47 kOHM MID (DEFAULT) RS485-1 (+) RS485-1 (-) 47 kOHM GND-1 Figure 15: RS485-1 three-position slide switch setting MID 550 OHM BIAS RS485-1 (+) RS485-1 (-) 550 OHM GND-1 Figure 16: RS485-1 three-position slide switch setting BIAS Figure 17: RS485-1 three-position slide switch setting END NOTE •...
-
Page 20: Rs485-2 Bias And Termination Resistors
CIPer MODEL 50 CONTROLLER – INSTALLATION AND COMMISSIONING INSTRUCTIONS RS485-2 Bias and Termination Resistors The RS485-2 interface is not affected by the aforementioned three-position slide switch. The 550Ω bias resistors and 130Ω termination resistor of the RS485-2 are thus always ON. 550 OHM RS485-2 (+) 130 OHM... -
Page 21: Modbus Connection
CIPer MODEL 50 CONTROLLER – INSTALLATION AND COMMISSIONING INSTRUCTIONS Modbus Connection The CIPer Model 50 controller can function as a Modbus Master or Slave. In general, the RS485 wiring rules must be followed. Wiring Topology Only daisy-chain wiring topology is allowed. Figure 19: Allowed Modbus wiring topology Other wiring topologies (e.g., star wiring, or mixed star wiring and daisy chain wiring) are prohibited;... -
Page 22: Shielding
Use shielded twisted pair cable shielded twisted pair cable 3322 or 3251 and connect the Modbus to a noise-free earth ground – only once per Modbus connection. RS485 Repeaters RS485 repeaters are possible but have not been tested by Honeywell. Hence it is within responsibility of the installing / commissioning person to ensure proper function. NOTE Each Modbus segment will require its own line polarization and line termination. -
Page 23: Set Up And Configuration
CIPer MODEL 50 CONTROLLER – INSTALLATION AND COMMISSIONING INSTRUCTIONS Set Up and Configuration You can access the CIPer Model 50 controller via the RS232 interface using a terminal program (serial port) such as "PuTTY." This can be helpful in the following cases: •... - Page 24 CIPer MODEL 50 CONTROLLER – INSTALLATION AND COMMISSIONING INSTRUCTIONS • To login and change the IP address and/ or configure further network settings, press 1. RESULT: You will be asked to enter your username. • Enter the username and press Enter. RESULT: You will be asked to enter your password.
- Page 25 CIPer MODEL 50 CONTROLLER – INSTALLATION AND COMMISSIONING INSTRUCTIONS • Configure the network as desired by applying the available options displayed. • To reset the controller to factory defaults, press F in the Boot menu. ATTENTION: Resetting the controller to its factory defaults will result in the following: •...
-
Page 26: Configuring Ports To Enable Webserver Functions
CIPer MODEL 50 CONTROLLER – INSTALLATION AND COMMISSIONING INSTRUCTIONS Configuring Ports to Enable Webserver Functions The CIPer Model 50 controller provides webserver functionality, e.g., for using the WEBs N4 Supervisor. In order to use webserver functions, the http and https standard port settings must be changed as follows: •... - Page 27 CIPer MODEL 50 CONTROLLER – INSTALLATION AND COMMISSIONING INSTRUCTIONS • Expand the Http Port and Https Port options. • Change Http Port to 8080 and the Https Port to 8443. • Click the Save button at the bottom. RESULT: The changed port settings are saved. 31-00233-02...
-
Page 28: Firmware Update
Platform/Platform Administration, and check the version of the Niagara Runtime installed in the CIPer Model Firmware updates may be available on the Honeywell Buildings Forum and the firmware upgrade procedure will be available with the firmware updates. If there are any queries on Firmware updates, please reach out to your WEBs technical support. -
Page 29: Mounting And Dismounting
CIPer MODEL 50 CONTROLLER – INSTALLATION AND COMMISSIONING INSTRUCTIONS Mounting and Dismounting IMPORTANT To allow the evaporation of any condensation resulting from low shipping / storage temperatures, keep the controller at room temperature for at least 24hrs before applying power. US requirement, only: This device must be installed in a UL-listed enclosure offering adequate space to maintain the segregation of line voltage field wiring and Class 2 field wiring. -
Page 30: Wiring And Set-Up
• Do not reconnect the power supply until you have completed the installation. Fusing Specifications System Fusing We recommend that the system be equipped with an external fuse. Fusing of Active Field Devices F2 (depends upon given load) Lightning Protection Please contact your local Honeywell representative for information on lightning protection. 31-00233-02... -
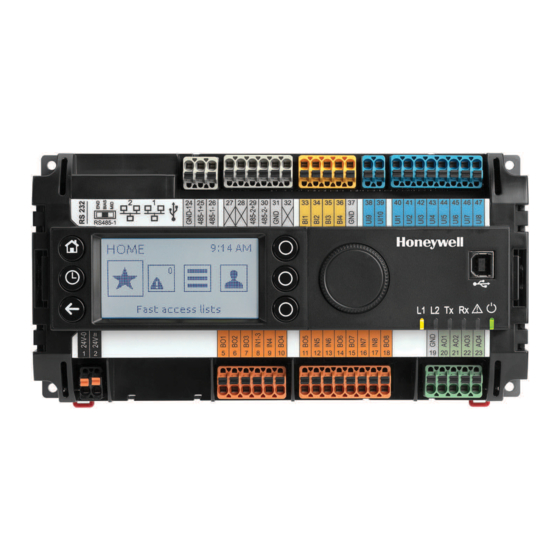
Page 31: Wiring Terminals
CIPer MODEL 50 CONTROLLER – INSTALLATION AND COMMISSIONING INSTRUCTIONS Wiring Terminals The CIPer Model 50 is equipped with push-in terminal plugs. Figure 23: Inserting/removing wires from push-in terminals NOTE • With solid conductors, ferrules are prohibited. • Use only one conductor per push-in terminal. •... - Page 32 CIPer MODEL 50 CONTROLLER – INSTALLATION AND COMMISSIONING INSTRUCTIONS Binary output 7. N.O. relay contact switching input power connected to terminal 16 Relay contact for BO7 Relay contact for BO8 Binary output 8. N.O. relay contact switching input power connected to terminal 17 Ground terminal (see NOTE below) Analog output 1 Analog output 2...
-
Page 33: Power Supply
CIPer MODEL 50 CONTROLLER – INSTALLATION AND COMMISSIONING INSTRUCTIONS Power Supply Powering CIPer Model 50 Power is supplied via a removable terminal plug (attached to terminals 1 and 2). The power supply of the CIPer Model 50 controller must conform to Safety Class II. To reduce overall current consumption, the CIPer Model 50 can be powered by a switch power supply (rather than by a transformer). -
Page 34: Transformer Data
CIPer MODEL 50 CONTROLLER – INSTALLATION AND COMMISSIONING INSTRUCTIONS Transformer Data In the U.S. and Canada, if the CIPer Model 50 is powered by transformers, then such transformers must be NEC Class-2 transformers. In Europe, if the CIPer Model 50 is powered by transformers, then such transformers must be safety isolating transformers conforming to IEC61558-2-6. -
Page 35: Powering Panel Bus I/O Modules And Field Devices
CIPer MODEL 50 CONTROLLER – INSTALLATION AND COMMISSIONING INSTRUCTIONS Powering Panel Bus I/O Modules and Field Devices The CIPer Model 50, Panel Bus I/O modules, and field devices can be powered by either separate transformers (see Figure 26 and Figure 27) or by the same transformer. NOTE Use a min. -
Page 36: Web-Ehseriesnx26X Connection Examples
CIPer MODEL 50 CONTROLLER – INSTALLATION AND COMMISSIONING INSTRUCTIONS WEB-EHSERIESNX26X Connection Examples 24 25 26 27 28 29 30 31 32 33 34 35 36 38 39 40 41 42 43 44 45 46 47 WEB-EHSERIESNX26X BLOCK 1 BLOCK 2 9 10 11 12 13 14 15 16 17 18 WARNING... -
Page 37: Internal I/Os Of The Ciper Model 50
CIPer MODEL 50 CONTROLLER – INSTALLATION AND COMMISSIONING INSTRUCTIONS A3 A4 A5 A6 A7 B1 B2 B3 B4 B5 B6 B7 XS830 2 3 4 5 6 7 2 3 4 5 6 7 24 25 26 27 28 29 30 31 32 33 34 35 36 38 39 40 41 42 43 44 45 46 47... - Page 38 CIPer MODEL 50 CONTROLLER – INSTALLATION AND COMMISSIONING INSTRUCTIONS (i.e., resistances and resultant voltages in dependence upon temperature) of the various different sensor types which can be connected to them, and on the thresholds at which sensor failures are recognized. Table 11.
-
Page 39: Slow Binary Input Specifications
CIPer MODEL 50 CONTROLLER – INSTALLATION AND COMMISSIONING INSTRUCTIONS 10 VDC 25 k 200 k Figure 31: Internal wiring of UI1-UI10 configured for input from NTC10kΩ / NTC20kΩ / voltage input (with pull-up resistor) Slow Binary Input Specifications When configured as slow binary inputs, the universal inputs of the CIPer Model 50 have the following specifications: Open contact ≥... -
Page 40: Analog Outputs
CIPer MODEL 50 CONTROLLER – INSTALLATION AND COMMISSIONING INSTRUCTIONS Analog Outputs The WEB-EHSERIESNX26XX is equipped with four analog outputs (AOs). In the event of an application stop (e.g., during application download), the analog outputs assume the safety positions configured in WEBs N4. The analog outputs can be configured in WEBs N4 as binary outputs (with an output of 0 V or 10 V, as the case may be). - Page 41 CIPer MODEL 50 CONTROLLER – INSTALLATION AND COMMISSIONING INSTRUCTIONS closed external contact → state=1 normal (default) open external contact → state=0 closed external contact → state=0 reverse open external contact → state=1 Pulse Counter Specifications Using WEBs N4, the binary inputs of the CIPer Model 50 can be configured as pulse counters (fast totalizers) for operation in conjunction with devices equipped with an open collector output.
-
Page 42: Binary Outputs
CIPer MODEL 50 CONTROLLER – INSTALLATION AND COMMISSIONING INSTRUCTIONS Binary Outputs The CIPer Model 50 features eight binary outputs arranged in two blocks (BO1…4 and BO5…8, respectively). WARNING Risk of electric shock or equipment damage Low voltage and line voltage must not be wired within the same block. In the event of an application stop (e.g., during application download), the binary outputs assume the safety positions configured in WEBs N4. -
Page 43: Engineering And Commissioning
CIPer MODEL 50 CONTROLLER – INSTALLATION AND COMMISSIONING INSTRUCTIONS Engineering and Commissioning Required Preparations In order to access (with a laptop or PC) the CIPer Model 50 controller via Ethernet/IP for the first time, the default pass- words are used. For IP connections, you may employ any one of the following two options: Option 1: USB 2.0 Device (recommended) This USB 2.0 Device interface is the recommended interface for downloading applications and firmware via WEBs N4. -
Page 44: Additional Parts
CIPer MODEL 50 CONTROLLER – INSTALLATION AND COMMISSIONING INSTRUCTIONS Additional Parts Table 18. Additional parts Order no. Description Set of ten terminals. Each package consists of two XS830 groups of nine internally connected push-in terminals, A1 A2 A3 A4 A5 A6 A7 A8 A9 B1 B2 B3 B4 B5 B6 B7 B8 B9 for distributing signals / power. -
Page 45: Software Licenses And Upgrades
CIPer MODEL 50 CONTROLLER – INSTALLATION AND COMMISSIONING INSTRUCTIONS Software Licenses and Upgrades Table 19. Software Licenses and Upgrades Model License content / upgrade license WEB-EHSERIESNX26ND 100 Global Points (Panel-bus, on-board I/O) +10 Analytics Points + WEBS N4 Software Maintenance Agreement WEB-EHSERIESNX26D EHSERIESH255UP 255 Additional Panel-bus Expansion I/O Points... -
Page 46: Panel Bus Connection
CIPer MODEL 50 CONTROLLER – INSTALLATION AND COMMISSIONING INSTRUCTIONS Panel Bus Connection The CIPer Model 50 controller features two RS485 interfaces to which Panel Bus modules can be connected: RS485-1 (consisting of push-in terminals 24 [GND-1], 25, and 26) and/or RS485-2 (consisting of push-in terminals 29, 30, and 31 [GND-2]). -
Page 47: Connecting Ciper Model 50 Via Its Rs485-1 Interface To A Panel Bus
CIPer MODEL 50 CONTROLLER – INSTALLATION AND COMMISSIONING INSTRUCTIONS – Total max. no. of Panel Bus I/O modules: 128 • Max. no. of hardware I/O points per CIPer Model 50: 1000 (given a polling rate of 2 seconds) Connecting CIPer Model 50 via its RS485-1 Interface to a Panel Bus NOTE When connecting an CIPer Model 50 via its RS485-1 to a Panel Bus I/, it is recommended that the slide switch be set to "END."... -
Page 48: Connecting Ciper Model 50 Via Its Rs485-2 Interface To A Panel Bus
CIPer MODEL 50 CONTROLLER – INSTALLATION AND COMMISSIONING INSTRUCTIONS Connecting CIPer Model 50 via its RS485-2 Interface to a Panel Bus Figure 37: Connecting an CIPer Model 50 controller via its RS485-2 interface to a Panel Bus (single transformer) Figure 38: Connecting an CIPer Model 50 controller via its RS485-2 interface to a Panel Bus 31-00233-02... -
Page 49: Addressing Panel Bus I/O Modules
CIPer MODEL 50 CONTROLLER – INSTALLATION AND COMMISSIONING INSTRUCTIONS Addressing Panel Bus I/O Modules Each Panel Bus I/O Module must be addressed manually using its HEX switch (S2). The HEX switch setting is defined using the WEBs N4 engineering tool. PANEL BUS I/O MODULE (EXAMPLE) Figure 39: Location of HEX switch on Panel Bus I/O Module... -
Page 50: Cable Specifications
CIPer MODEL 50 CONTROLLER – INSTALLATION AND COMMISSIONING INSTRUCTIONS Cable Specifications Panel Bus I/O Modules When checking the length of the power supply cable, the connection cables to all Panel Bus I/O Modules must be taken into account Table 20. Power supply cable specifications Max. - Page 51 CIPer MODEL 50 CONTROLLER – INSTALLATION AND COMMISSIONING INSTRUCTIONS Figure 41: Editing the standard polling interval in "Poll Scheduler" of Property Sheet of PanelbusNetwork You can assign different poll intervals to individual points in the Panel Bus Point Discovery Dialog (see Figure 42).
-
Page 52: Field Devices
CIPer MODEL 50 CONTROLLER – INSTALLATION AND COMMISSIONING INSTRUCTIONS Field Devices Depending on the distance from the controller, field devices can be supplied with power by the same transformer used for the Panel Bus I/O Modules, or by a separate transformer, using cables as specified in Table 22. -
Page 53: Lonworks Communications
• Plenum-rated level IV 22 AWG (Belden part number 9H2201504) non-shielded, twisted-pair, solid- conductor wire. When possible, use Honeywell AK3781, AK3782, AK3791, or AK3792 cable (US part numbers). See Excel 50/500 L Wiring Guidelines 74-2865 for details, including maximum lengths. - Page 54 CIPer MODEL 50 CONTROLLER – INSTALLATION AND COMMISSIONING INSTRUCTIONS Figure 43: IF-LON2 Depending upon the chosen network configuration, one or two terminations may be required. The following L termination module is available: ORKS • L connection / termination module (mountable on DIN rails and in fuse boxes), order no. XAL- ORKS Term2 LONWORKS TERMINATION...
-
Page 55: Bacnet Ms/Tp Bus Connection
CIPer MODEL 50 CONTROLLER – INSTALLATION AND COMMISSIONING INSTRUCTIONS BACnet MS/TP Bus Connection The CIPer Model 50 controller features two RS485 interfaces to which BACnet MS/TP devices can be connected: RS485-1 (consisting of push-in terminals 24 [GND-1], 25, and 26) and/or RS485-2 (consisting of push-in terminals 29, 30, and 31 [GND-2]). - Page 56 CIPer MODEL 50 CONTROLLER – INSTALLATION AND COMMISSIONING INSTRUCTIONS Example 2: Multiple CIPer Model 50 Controllers and Connected BACnet Modules Figure 46: Connection of multiple CIPer Model 50 controllers via their RS485-1 interfaces to a BACnet MS/TP Bus Example 3: Multiple CIPer Model 50 Controllers and Connected BACnet Modules (with inserted termination resistor) Figure 47: Connection of multiple CIPer Model 50 controllers via their RS485-1 interfaces to a BACnet MS/TP Bus...
-
Page 57: Connecting Ciper Model 50 Via Rs485-2 Interface To A Bacnet Ms/Tp Bus
CIPer MODEL 50 CONTROLLER – INSTALLATION AND COMMISSIONING INSTRUCTIONS Connecting CIPer Model 50 via RS485-2 Interface to a BACnet MS/TP Bus NOTE With regards to Figure 50 and Figure 51, please note the following: • Always power each CIPer Model 50 controller and the connected BACnet MS/TP modules via separate transformers. -
Page 58: Modbus Connection
CIPer MODEL 50 CONTROLLER – INSTALLATION AND COMMISSIONING INSTRUCTIONS Modbus Connection The CIPer Model 50 controller supports both Modbus RTU master and Modbus RTU slave functionality. Modbus slaves can be connected to either or both of the two onboard RS485 interfaces: RS485-1 (consisting of push-in terminals 24 [GND-1], 25, and 26) or RS485-2 (consisting of push-in terminals 29, 30, 31 [GND-2]). -
Page 59: Connecting Ciper Model 50 Via Rs485-2 Interface To A Modbus
CIPer MODEL 50 CONTROLLER – INSTALLATION AND COMMISSIONING INSTRUCTIONS Example: CIPer Model 50 Modbus Master Controller and Connected Modbus Slaves (with inserted termination resistor) Figure 50: Connection of an CIPer Model 50 Modbus master controller via its RS485-1 interface to a Modbus with slaves The termination resistor must be inserted directly into the terminals of the last Modbus slave. - Page 60 CIPer MODEL 50 CONTROLLER – INSTALLATION AND COMMISSIONING INSTRUCTIONS Example: CIPer Model 50 Modbus Master Controller and Connected Modbus Slaves (with inserted termination resistor) Figure 51: Connection of an CIPer Model 50 Modbus master controller via its RS485-2 interface to a Modbus with slaves The termination resistor must be inserted directly into the terminals of the last Modbus slave.
-
Page 61: M-Bus Connection
– Maximum cable capacitance of 180 nF For bus length extension, M-Bus repeaters can be used, but have not been tested by Honeywell. Hence, it is the responsibility of the installing / commissioning personnel to ensure proper functioning. Wiring Topology M-Bus meters are connected to the bus cable in parallel. -
Page 62: Cabling Pw3/Pw20/Pw60 To M-Bus
CIPer MODEL 50 CONTROLLER – INSTALLATION AND COMMISSIONING INSTRUCTIONS 8 7 6 5 4 3 2 1 Figure 53: CIPer Model 50 RS232 / RJ45 socket Table 25. RS232-to-PW cable specifications RJ45 plug, pin no. RS232 function 9-Pin sub-D connector pin no. Not used Figure 54: YIOVVOM DB9 Breakout Connector power / communication cable details Cabling PW3/PW20/PW60 to M-Bus... -
Page 63: M-Bus Connection Procedure
CIPer MODEL 50 CONTROLLER – INSTALLATION AND COMMISSIONING INSTRUCTIONS NOTE If, alternatively, only a single transformer is available, when connecting a laptop, PC, web browser, CL-Touch, or 3 -party touch panel to the USB 2.0 Device Interface on the front of the CIPer Model 50 controller, use an optical isolator for the USB connection or substitute an M-Bus Mikro-Master USB (Relay GmbH, D-33106 Paderborn) for the PW M-Bus Adapter. - Page 64 CIPer MODEL 50 CONTROLLER – INSTALLATION AND COMMISSIONING INSTRUCTIONS To can make up your own RJ-45 to conventional to RS-232 DB-9 female connecting cable using a standard Ethernet cable with the one end cut off. The standard color codes are: Pin 2 / RxD (receive data) = Orange ▪...
- Page 65 CIPer MODEL 50 CONTROLLER – INSTALLATION AND COMMISSIONING INSTRUCTIONS Figure 57: Connecting the CIPer Model 50 to the PW M-Bus adapter Connect 24 V power to the M-Bus Adapter. WARNING Risk of electric shock or equipment damage! Due to the risk of short-circuiting (see Figure 24), it is strongly recommended that the CIPer Model 50 con- troller be supplied with power from a dedicated transformer.
-
Page 66: Controller Performance
CIPer MODEL 50 CONTROLLER – INSTALLATION AND COMMISSIONING INSTRUCTIONS Controller Performance The controller performance has been tested in two test scenarios. NOTE These are example scenarios. It is therefore, of course, possible for you to use any other mix of Panel Bus points and BACnet MS/TP points as long as the maximum number of hardware I/O points (see section "Panel Bus Considerations"... -
Page 67: Troubleshooting
CIPer MODEL 50 CONTROLLER – INSTALLATION AND COMMISSIONING INSTRUCTIONS Troubleshooting CIPer Model 50 Controller Troubleshooting The following LEDs of the CIPer Model 50 controller can be used for troubleshooting purposes: • Power LED (green) • Status LED (red) • L1 and L2 LEDs (yellow) •... -
Page 68: L1 Led
CIPer MODEL 50 CONTROLLER – INSTALLATION AND COMMISSIONING INSTRUCTIONS L1 LED Table 30. CIPer Model 50 controller bus L1 LED Case Bus LED Meaning Remedy ON continuously after Normal operation; Daemon No action necessary. power-up starting. Flashes constantly Station starting; if L2 is also No action necessary. -
Page 69: Tx And Rx Leds
Panel Bus I/O Module Troubleshooting Please refer to HONEYWELL EXCEL 5000 OPEN SYSTEM - Installation & Commissioning Instructions (EN1B-0375GE51) for more information about Panel Bus I/O module troubleshooting. 31-00233-02... -
Page 70: Appendix 1: Earth Grounding
CIPer Model 50 controller is designed to be in compliance with SELV (Safety Extra-Low Voltage). Furthermore, SELV offers the greatest possible safety against electrical impact. To support SELV, all Honeywell external (CRT series) or internal transformers comply with standard EN60742. Earth grounding is therefore not recommended. - Page 71 CIPer MODEL 50 CONTROLLER – INSTALLATION AND COMMISSIONING INSTRUCTIONS NOTE • Use a noise-free earth ground inside the cabinet. • If a field device that prohibits earth grounding is connected to the system ground, an isolation monitoring device must be used instead of earth grounding. Connect earth ground to the respective terminal of the CPU, see Figure 60 CPU 1 I/O MODULE...
- Page 72 CIPer MODEL 50 CONTROLLER – INSTALLATION AND COMMISSIONING INSTRUCTIONS Connect earth ground to the proper terminal of the CPU. DEVIATING NUMBERING! CPU 1 CPU 2 CPU 3 CPU N 24V~0 24V~ 24V~0 24V~ 24V~ 24V~0 24V~0 24V~ LINE 24 V~0 NOISE-FREE EARTH GROUND (ONLY ONE PER SYSTEM) Figure 60: Connecting and earthing multiple CPUs...
-
Page 73: Sensor Input Accuracy
CIPer MODEL 50 CONTROLLER – INSTALLATION AND COMMISSIONING INSTRUCTIONS APPENDIX 2 Sensor Input Accuracy The internal sensor inputs of the CIPer Model 50 controller support both NTC10kΩ (Type II) and NTC20kΩ (Type II) sensors (see also section "Universal Inputs"). The following table lists the typical minimum accuracies of the hardware and software for temperature sensors. -
Page 74: Sensor Characteristics
CIPer MODEL 50 CONTROLLER – INSTALLATION AND COMMISSIONING INSTRUCTIONS PT1000-2 32 … 752°F (0…400°C) BALCO500 22 … 248 °F (-30…..+120°C) NOTE In the case of temperatures lying outside the aforementioned ranges, the lowest/highest value within the range, instead, will be communicated. Thus, a temperature of -59.8°F (-51 °C) will be communicated as "... - Page 75 CIPer MODEL 50 CONTROLLER – INSTALLATION AND COMMISSIONING INSTRUCTIONS NTC 20 kΩ (Type II) Temperature NTC 20 kΩ (Type II) Temperature Temp. Temp. Terminal Temp. Temp. Terminal Resistance Resistance [°F] [°C] voltage [V] [°F] [°C] voltage [V] -5.8 8.13 174.2 2.24 0.818 8.08...
- Page 76 CIPer MODEL 50 CONTROLLER – INSTALLATION AND COMMISSIONING INSTRUCTIONS NTC 20 kΩ (Type II) Temperature NTC 20 kΩ (Type II) Temperature Temp. Temp. Terminal Temp. Temp. Terminal Resistance Resistance [°F] [°C] voltage [V] [°F] [°C] voltage [V] 4.22 0.53 0.207 78.8 19.1 4.12...
-
Page 77: Ntc 10 Kω (Type Ii) Temperature Characteristics
CIPer MODEL 50 CONTROLLER – INSTALLATION AND COMMISSIONING INSTRUCTIONS NTC 10 kΩ (Type II) Temperature Characteristics NTC10kΩ (same voltages for inputs of Panel Bus I/O Modules and onboard inputs of CIPer Model 50). NTC 10 kΩ (Type II) Temperature NTC 10 kΩ (Type II) Temperature Temp. - Page 78 CIPer MODEL 50 CONTROLLER – INSTALLATION AND COMMISSIONING INSTRUCTIONS NTC 10 kΩ (Type II) Temperature NTC 10 kΩ (Type II) Temperature Temp. Temp. Terminal Temp. Temp. Terminal Resistance Resistance [°F] [°C] voltage [V] [°F] [°C] voltage [V] 19.898 4.209 165.2 1.531 0.575 51.8...
-
Page 79: Ni1000 Tk6180 Din B Temperature Characteristics
CIPer MODEL 50 CONTROLLER – INSTALLATION AND COMMISSIONING INSTRUCTIONS NI1000 TK6180 DIN B Temperature Characteristics Nominal Resistance: R = 1000 Ω, Sensitivity: TC = 6180 ppm/K (same voltages inputs for Panel Bus I/O Modules). NI1000 TK6180 DIN B Temperature °F °C 742.55 791.31... -
Page 80: Ni1000 Tk5000 Din B Temperature Characteristics
CIPer MODEL 50 CONTROLLER – INSTALLATION AND COMMISSIONING INSTRUCTIONS NI1000 TK5000 DIN B Temperature Characteristics Nominal Resistance: R0 = 1000 Ω, Sensitivity: TC = 5000 ppm/K (same voltages inputs for Panel Bus I/O Modules). NI1000 TK5000 DIN B Temperature °F °C 790.88 830.84... -
Page 81: Balco 500 Temperature Characteristics
CIPer MODEL 50 CONTROLLER – INSTALLATION AND COMMISSIONING INSTRUCTIONS BALCO 500 Temperature Characteristics Same voltages for inputs of Panel Bus I/O Modules and Onboard inputs. BALCO 500 Temperature BALCO 500 Temperature Temp[°F] Temp [°C] Resistance (Ω) Temp[°F] Temp[°C] Resistance (Ω) -40.0 -40.0 379.35... - Page 82 CIPer MODEL 50 CONTROLLER – INSTALLATION AND COMMISSIONING INSTRUCTIONS BALCO 500 Temperature BALCO 500 Temperature Temp[°F] Temp [°C] Resistance (Ω) Temp[°F] Temp[°C] Resistance (Ω) 39.2 461.01 242.6 715.79 41.0 462.98 244.4 718.34 42.8 464.96 246.2 720.89 44.6 466.94 248.0 723.44 46.4 468.92 249.8...
-
Page 83: Pt1000 Temperature Characteristic (Pt1000-1, Pt1000-2)
CIPer MODEL 50 CONTROLLER – INSTALLATION AND COMMISSIONING INSTRUCTIONS PT1000 Temperature Characteristic (PT1000-1, PT1000-2) Same voltages for inputs of Panel Bus I/O Modules and Onboard inputs. PT1000 Temperature PT1000 Temperature Temp [°F] Temp [°C] Resistance (Ω) Temp [°F] Temp [°C] Resistance (Ω) 842.7 138.2... - Page 84 CIPer MODEL 50 CONTROLLER – INSTALLATION AND COMMISSIONING INSTRUCTIONS PT1000 Temperature PT1000 Temperature Temp [°F] Temp [°C] Resistance (Ω) Temp [°F] Temp [°C] Resistance (Ω) 1039 228.2 1419.1 51.8 1042.9 1422.9 53.6 1046.8 231.8 1426.7 55.4 1050.7 233.6 1430.5 57.2 1054.5 235.4 1434.3...
-
Page 85: Index
INDEX • accuracies see sensor input accuracies • Panel Bus • connection 30 BACnet ▪ 1. multiple rails, single transformer 31, 32 BACnet MS/TP via RS485-1 6 ▪ via RS485-1 8 ▪ BACnet MS/TP via RS485-2 6 ▪ via RS485-2 8 ▪...
Need help?
Do you have a question about the CIPer 50 and is the answer not in the manual?
Questions and answers