
Related Manuals for ADA INSTRUMENTS Vertical


Summary of Contents for ADA INSTRUMENTS Vertical
- Page 1 Operating manual Instrument of vertical projection Model: ADA Vertical Manufacturer Address www.geooptic.ru...
-
Page 2: Table Of Contents
VERTICAL Table of contents 1. Description and application ..............3 2. -
Page 3: Description And Application
VERTICAL ADA VERTICAL presents the instrument of vertical projection with laser emitter, class 2. Do not look into the laser beam and do not aim at other persons. 1. Description and application 1) Transmission of planned position with the help of optical method or laser beam;... -
Page 4: Specifications
; at night<250m Laser power Diameter of laser spot 3 mm / 50 m Error of misalignmen of optical and 5” vertical axis is less than Error of misalignmen of optical and 5” laser axis is less than MEASUREMENT FOUNDATION www.geooptic.ru... - Page 5 VERTICAL Source Laser diod Laser wavelength 650 nm Laser power Laser plumb (down point) Effective laser range Diameter of laser spot 1 mm / 1,5 m Focusing range Not adjustable Power supply 2 batteries type АА /1,5 V Operating temperature -10°...
-
Page 6: Construction Features
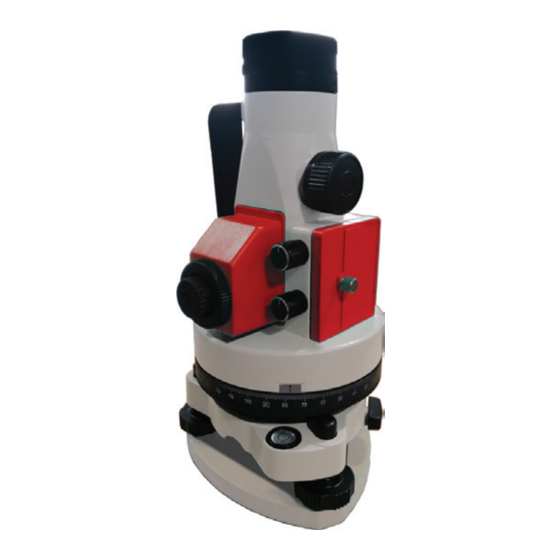
VERTICAL 3. Construction features 1) lens; 2) focusing screw; 3) battery compartment cover; 4) screw to switch on and brightness adjustment; 5) screw to switch on and brightness adjustment of laser plumb down; 6) eyepiece; 7) circular bubble level; 8) foot screws of the tribrach;... -
Page 7: Preparation Before Operation
VERTICAL 4. Preparation before operation Insert the batteries Remove battery compartment cover (3) and insert 2 batteries type AA observing the polarity. Mounting the instrument on the tripod Place the tripod on the construction site. Place the instrument on the tripod and tighten the central screw properly. - Page 8 3) Repeat steps 4.3.2 for fine leveling of the instrument. Be sure, laser dot must be on the reference point. Preparation before vertical measurements Place laser target onto the place of the reference point. Turn screw (4) to switch on laser dot of the marker of plumb up. Rotate focusing screw (2) to get accurate image of laser dot and marking on the laser target.
-
Page 9: Measurements
1) Watch laser target and laser marker in the eyepiece of the instrument. If necessary, adjust sharpness of manual focusing; 2) Laser target can be moved vertically for transmission of reference point on desired height; 3) As a result you will get reference point. Line that connects these two points will be vertical. Vertical measurements in wells Such measurements can be used in mine survey and engineering surveying. - Page 10 VERTICAL of the instrument by 180°. It’s necessary to make further adjustment, if the offset of the bubble is more than 1 graduation. Half of the value of bubble deviation is necessary to improve with the help of foot screws. Another half – with the help of adjustment screw of tubular level.
-
Page 11: Maintenance
VERTICAL Adjusting screw of Adjusting collimation screws of error laser spot Pic.10 Pic.9 3) Rotate the adjusting screw, as shown in the picture 9 with the help of pin. Laser spot must coincide with the center of reticule. Adjustment of the focus of laser beam Aim at the target and watch in the eyepiece. -
Page 12: Warranty
VERTICAL Warranty This product is warranted by the manufacturer to the original purchaser to be free from defects in material and workman- ship under normal use for a period of two (2) years from the date of purchase. During the warranty period, and upon proof of purchase, the product will be repaired or replaced (with the same or similar model at manufactures option), without charge for either parts of labour. - Page 13 WARRANTY DOESN’T EXTEND TO FOLLOWING CASES: 1. If the standard or serial product number will be changed, erased, removed or wil be unreadable. 2. Periodic maintenance, repair or changing parts as a result of their normal runout. 3. All adaptations and modifications with the purpose of improvement and expansion of normal sphere of product application, mentioned in the service instruction, without tentative written agreement of the expert provider.
-
Page 14: Appendix 1. Warranty Card
WARRANTY CARD Name and model of the product ________________________________________________ Serial number ________________date of sale_______________________ Name of commercial organization _____________________stamp of commercial organization Warranty period for the instrument explotation is 24 months after the date of original retail purchase. During this warranty period the owner of the product has the right for free repair of his instrument in case of manufacturing defects. Warranty is valid only with original warranty card, fully and clear filled (stamp or mark of thr seller is obligatory). -
Page 15: Appendix 2. Certificate Of Acceptance And Sale
Certificate of acceptance and sale __________________________________________________________________________ __________________________________________________________________________ ___________________________________________________________№_____________ name and model of the instrument Corresponds to ______________________________________________________________ designation of standard and technical requirements Data of issue _______________________________________________________________ Stamp of quality control department Price Sold ___________________________________ Date of sale ______________________ name of commercial establishment www.geooptic.ru... - Page 16 MEASUREMENT FOUNDATION WWW.ADAINSTRUMENTS.COM www.geooptic.ru...
- Page 17 Руководство по эксплуатации Прибор вертикального проектирования Модель: ADA Vertical Производитель: ADAINSTRUMENTS Адрес: WWW.ADAINSTRUMENTS.COM www.geooptic.ru...
- Page 18 VERTICAL Оглавление 1. Описание и предназначение прибора ............19 2.
-
Page 19: Описание И Предназначение Прибора
Перед использованием внимательно прочтите руководство по эксплуатации. Соблюдайте правила эксплуатации для продления срока службы и обеспечения точности прибора и исправного состояния. ADA VERTICAL представляет собой прибор вертикального проектирования с лазерным излучателем 2 класса. Избегайте прямого попадания луча в глаза. Не направляйте лазерный луч на других людей. -
Page 20: Основные Технические Параметры Прибора
VERTICAL 2. Основные технические параметры прибора Предельные отклонения отвеса зенит (вверх) ±2.0 мм/100м Предельные отклонения отвеса надир (вниз) ±1.0 мм/1.5м Точность цилиндрического уровня 20” / 2 мм Изображение обратное Увеличение 25х Угол обзора 1° 50’ Диаметр объектива 36 мм Минимальное фокусное расстояние... - Page 21 VERTICAL Источник Лазерный диод Длина волны 650 нм Мощность лазера 1 мВт Лазерный отвес (надир) Эффективный диапазон лазера 2 м Диаметр лазерного пятна 1 мм / 1,5 м Диапазон фокусировки Не регулируемый Источник питания 2 батареи типа АА /1,5 В...
-
Page 22: Внешний Вид И Составляющие Прибора
VERTICAL 3. Внешний вид и составляющие прибора 1) объектив; 2) ручка фокусировки; 3) крышка батарейного отсека; 4) ручка для включения и регулировки яркости лазерного отвеса вверх; 5) ручка для включения и регулировки яркости лазерного отвеса вниз; 6) окуляр; 7) круглый пузырьковый уровень;... -
Page 23: Подготовка К Работе
VERTICAL 4. Подготовка к работе Установка батареи Откройте крышку батарейного отсека (3) и разместите две батареи типа АА. При установке обратите внимание на полярность батареи. Установка на штатив Установите штатив на стройплощадке. Разместите прибор на площадке штатива и закрепите становым винтом. Отрегулируйте высоту штатива для комфортной работы с прибором. - Page 24 VERTICAL Точное выравнивание по цилиндрическому уровню: 1) Поверните прибор так, чтобы цилиндрический уровень (13) располагался параллельно линии, проходящей через подъемные винты А и В (рис. 4); 2) Вращая подъемные винты А и В, добейтесь расположения пузырька воздуха по центру цилиндрического уровня (13);...
-
Page 25: Измерения
VERTICAL Для это необходимо выполнить следующее: 1) Выставите оцифрованный лимб так, чтобы ноль на шкале совпал с риской на корпусе прибора; 2) Отметьте положение лазерной точки; 3) Разверните прибор на 180°, а также отметьте новое положение лазерной точки; 5. Измерения... -
Page 26: Регулировка Прибора
VERTICAL 6. Регулировка прибора Регулировка цилиндрического уровня Ось уровня должна быть перпендикулярна оси вращения теодолита. Поверните алидаду прибора так, чтобы ось цилиндрического уровня была параллельна воображаемой линии, соединяющей центры любых двух подъемных винтов трегера. Вращая только эти два винта в противоположные стороны, добейтесь, чтобы пузырек был в середине... - Page 27 VERTICAL Регулиро- вочный винт Винты коллимаци- регулировки онной размеров ошибки лазерного пятна Рис.9 Рис.10 3) Поверните алидаду прибора на 180°, наблюдая за смещением сетки нитей; 4) Отрегулируйте положение нитей при помощи четырех регулировочных винтов, как на рис.8. Устраните смещение наполовину;...
-
Page 28: Обслуживание Прибора
VERTICAL 7. Обслуживание прибора 1) Извлечение прибора из кейса производите при помощи ручки для переноски (11). Ни в коем случае не извлекайте прибор из кейса, потянув за объектив; 2) Вращение алидады прибора должно быть легким; 3) Следует избегать прямых солнечных лучей при использовании прибора;... -
Page 29: Гарантия
VERTICAL Гарантия Производитель предоставляет гарантию на продукцию покупателю в случае дефектов материала или качества его изготовления во время использования оборудования с соблюдением инструкции пользователя на срок до 2 лет со дня покупки. Во время гарантийного срока, при предъявлении доказательства покупки, прибор будет починен или заменен на такую... - Page 30 ГАРАНТИЙНЫЕ ОБЯЗАТЕЛЬСТВА НЕ РАСПРОСТРАНЯЮТСЯ НА СЛЕДУЮЩИЕ СЛУЧАИ: 1.Если будет изменен, стерт, удален или будет неразборчив типовой или серийный номер на изделии; 2.Периодическое обслуживание и ремонт или замену запчастей в связи с их нормальным износом; 3.Любые адаптации и изменения с целью усовершенствования и расширения обычной сферы применения изделия, указанной...
- Page 31 ГАРАНТИЙНЫЙ ТАЛОН Наименование изделия и модель _______________________________________________ Серийный номер ___________________Дата продажи_________________ Наименование торговой организации ___________________Штамп торговой организации мп. Гарантийный срок эксплуатации приборов составляет 24 месяца со дня продажи. В течении гарантийного срока владелец имеет право на бесплатный ремонт изделия по неисправностям, являющимся...
- Page 32 СВИДЕТЕЛЬСТВО О ПРИЕМКЕ И ПРОДАЖЕ ______________________________________________________________________________________________ ______________________________________________________________________________________________ _____________________________________________________________________________№_______________ НАИМЕНОВАНИЕ И ТИП ПРИБОРА Соответствует __________________________________________________________________________________ обозначение стандарта и технических условий Дата выпуска ___________________________________________________________________________________ Штамп ОТК (клеймо приемщика) Цена Продан(а) ___________________________________________________Дата продажи ______________________ www.geooptic.ru...
- Page 33 www.geooptic.ru...
- Page 34 MEASUREMENT FOUNDATION WWW.ADAINSTRUMENTS.COM www.geooptic.ru...
Need help?
Do you have a question about the Vertical and is the answer not in the manual?
Questions and answers