Advertisement
Quick Links
Advertisement

Subscribe to Our Youtube Channel
Related Manuals for FUNKY MONKEY BARS Floating Flying Fox


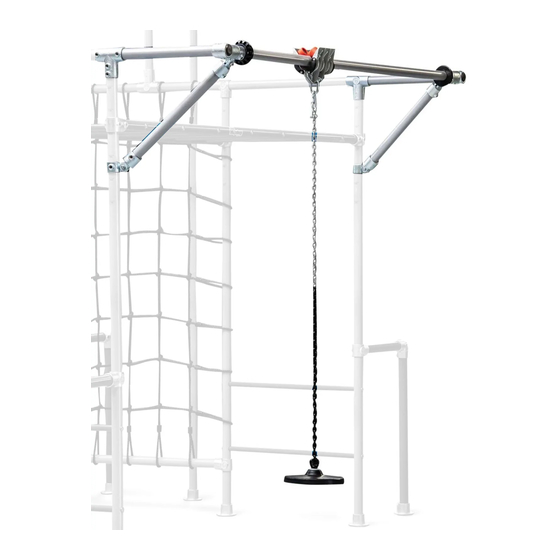
Summary of Contents for FUNKY MONKEY BARS Floating Flying Fox
- Page 1 FLOATING FLYING FOX (add on) ASSEMBLY INSTRUCTIONS...
-
Page 2: Table Of Contents
Bars®. Especially lower quality products that have not been approved by Funky Monkey Bars®. 15. Ensure the height of your Funky Monkey Bars® (horizontal ladder) are set at a level that is age appropriate. 16. DO NOT install your Funky Monkey Bars® over or near objects that could interfere with users in an unsafe way. - Page 3 Work on flat level surface. LOCATION A safe fall zone around your Funky Monkey Bars® is essential. A minimum distance of 1.5m to 2m (5 ft to 6.5ft) is recommended around the elevated hanging points of your Funky Monkey Bars®.
-
Page 4: Load Rating
The tests have been performed by independent, certified structural engineers in accordance with Australian Standard for Playground Equipment AS4685.1:2014 and European Standards EN1176-1:2008. The independent testing conducted on The Floating Flying Fox certified the frame to a load rating of 130kgs or 1 user. LOAD TESTING CERTIFICATION... -
Page 5: Assembly Tips
ASSEMBLY TIPS CORRECT INSERTION INTO FITTINGS Gap. No gap. All tubes must be fully inserted until contact is made with adjoining tube. CORRECT TIGHTENING METHOD OF GRUB SCREWS 2. Using other end of the allen key do one 1. With long end of allen key, hand full 360 degree turn as a minimum, tighten grub screw as much as possible. - Page 6 ASSEMBLY TIPS (continued) IT IS CRITICAL YOUR MAIN FRAME IS 100% SQUARE AND LEVEL PLAN VIEW Check assembly is 100% level, square & straight. SIDE VIEW If your frame is not straight or level remove pegs, loosen grub screws, re-adjust re-tighten and re-peg the frame. INSTALLATION ON A SLOPE If your frame is being installed on a slope ensure the monkey ladder bar is level.
-
Page 7: Inventory
INVENTORY TOOLS REQUIRED FOR INSTALLATION 8mm Allen key Tape Measure Soft Hammer Spirit Level (included) (not included) (not included) (not included) TUBES 50Dia. x 600mm Extension Tube/ Brace Tube 50Dia. x 2950mm Flying Fox Tube FITTINGS Long Short Tee Extra Long Tee Swivel Brace D-101L D-104L... - Page 8 Trolley (Flying Fox Handle- depending on order) One of the best things about Funky Monkey Bars® is the ability to add new equipment and accessories as your child and family grows. You can swap or add accessories to your existing frame, or add extra frames that will give you more versatility to attach equipment.
-
Page 9: Assembly Instructions
Swing side NOTE: The Floating Flying Fox can be assembled on either side of the frame. Funky Monkey Bars® recommends positioning the Floating Flying Fox on the opposite side to the monkey bar ladder for improved structural integrity and ease of assembly. - Page 10 2x End Cap REMOVE PEGS & LOOSEN ELBOWS Swing bar. Swing leg. Remove pegs from base plates on selected floating flying fox side. Loosen elbow grub screws connecting swing legs to swing bar on same side. Remove pegs x4 Loosen elbow grub screws.
- Page 11 REMOVE SWING LEGS & ELBOWS 1. Lay swing legs on the ground. 2. Remove leg elbows x2. CONNECT EXTENSION TUBES TO EXISTING LEGS x2 Grub screw facing downwards. 1. Slide swivel braces onto lowered legs ensuring the grub screws are facing the base plate, leave hand tight for later adjustment.
- Page 12 ASSEMBLE FLOATING FLYING FOX FRAME 1. Slide trolley, rubber stoppers and swivel braces onto flying fox tube. 2. Slide long short tees onto assembled legs from step 6. Insert the flying fox tube into the long short tees and make sure the tube is butted up 100% to the extension tube as per detail below.
- Page 13 CONNECT THE BRACE TUBES. Fit 2x 600mm brace tubes into position by rotating and sliding swivel brace fittings. 2x Brace Tube 50Dia x 600mm. ORDER OF STEPS: 1. Slide brace tubes into swivel braces (A) & (B). 2. Tighten grub screws on (A) & (B). 3.
- Page 14 LIFT FLOATING FLYING FOX INTO POSITION. With two people lift floating flying fox assembly into position and fully tighten grub screws on extra long tees. WARNING: Be aware of trolley catching fingers whilst raising into position. Swing Bar Swing Bar + 360 Ensure swing bar is fully engaged into extra long tee.
- Page 15 SECURE TO GROUND 1. Check level and square. 2. Hammer in all removed pegs. Hammer in pegs x 4. FINAL CHECKS E x t s i o 1. Ensure extension tube is level. (If not loosen grub screw (A) & (B) and adjust by raising or lowering lower swivel brace tube.) 2.
- Page 16 ATTACH BUTTON SWING AT DESIRED HEIGHT. Set desired height - 450mm. or lower is a recommended safe height. Reload Twirly Whirly bars - refer to step 14 RELOAD TWIRLY WHIRLY BARS. To reduce movement in your frame load your twirly whirly bars as per original frame assembly instructions or refer to website at www.funkymonkeybars.com/pages/videos CHECK ALL GRUB SCREWS, NUTS AND BOLTS ARE FULLY TIGHTENED AS SPECIFIED.
-
Page 17: Maintenance
MAINTENANCE. At the beginning of each heavy play session (especially a party) and twice a month during play season ensure; 1. Tighten all hardware - grub screws, nuts and bolts. 2. Pegs are in place and fully secure. 3. Lubricate all metallic moving parts (trolley and swing hooks.) 4. - Page 18 72 164 496 520 1300 912 198 info@funkymonkeybars.com www.funkymonkeybars.com ® AUSTRALIAN MADE 9 Cutting Way, we are social monkeys AND OWNED Yangebup WA 6164 All Funky Monkey Bars® designs are registered and protected under IP Australian certification. IP Australia...
Need help?
Do you have a question about the Floating Flying Fox and is the answer not in the manual?
Questions and answers