
Subscribe to Our Youtube Channel
Related Manuals for FUNKY MONKEY BARS Boxing Bag


Summary of Contents for FUNKY MONKEY BARS Boxing Bag
- Page 1 Ninja Grips Roman Rings Delta Rings Boxing Bag Weight Bar Holder Resistance Bands Gym Bar (chin up bar) Dip Bar Add-on Add-on Add-on Add-on GYM/NINJA ACCESSORIES ASSEMBLY INSTRUCTIONS...
-
Page 2: Table Of Contents
Bars®, especially lower quality products that have not been approved by Funky Monkey Bars®. 15. Ensure the height of your Funky Monkey Bars® (horizontal ladder) are set at a level that is age appropriate. 16. DO NOT install your Funky Monkey Bars® over or near objects that could interfere with users in an unsafe way. - Page 3 Work on flat level surface. LOCATION A safe fall zone around your Funky Monkey Bars® is essential. A minimum distance of 1.5m to 2m (5 ft to 6.5ft) is recommended around the elevated hanging points of your Funky Monkey Bars®.
-
Page 4: Assembly Tips
ASSEMBLY TIPS CORRECT TIGHTENING OF SWING HOOKS - (indicative diagram shown) 2. Fully tighten bolt on swing hook 1. Slide the swing hook along the to clamp tightly onto tube. Failure tube until the desired location. to do so can result in serious injury. CORRECT INSERTION INTO FITTINGS - (indicative diagram shown) Gap. - Page 5 ASSEMBLY TIPS (continued) TOOLS REQUIRED FOR INSTALLATION - (varies for each accessory) Soft Hammer 17mm Rachet Spirit Level Tape Measure 8mm Allen key 3m Step Ladder (Included (Not included) (Not included) (Not included) (Not included) (Not included) with frame) IT IS CRITICAL YOUR MAIN FRAME IS 100% SQUARE AND LEVEL (indicative diagram shown) PLAN VIEW Check assembly is 100%...
-
Page 6: Assembly Instructions
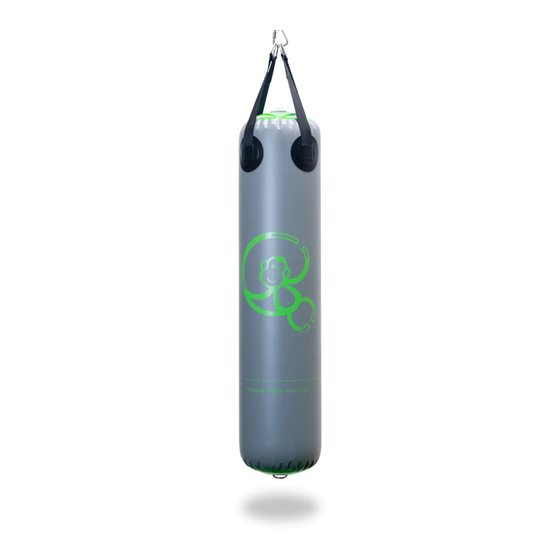
Swing Hook Boxing Bag Hand Air Pump INSTALL SWING HOOK AND TIGHTEN BOLT 1. Select suitable location for boxing bag. 2. Loosen any neccessary fittings and slide swing hook onto tube into desired position. 3. Fully retighten any loosened fittings 4. - Page 7 OPEN SPRING VALVE Press down Press down on spring valve to engage open position. Open Spring valve FILL BAG WITH WATER TILL LINE Fill the boxing bag with water to the indicated- MAXIMUM WATER FILL LEVEL. Page 6...
- Page 8 2. Screw valve cap located on top of boxing bag back into place WARNING: DO NOT HANG FROM BOXING BAG AS IT WILL TEAR. FINAL CHECKS 1. Ensure all swing hook bolts are firmly tightened. 2. Check that all other grub screws and rung bolts on your frame are fully tightened.
-
Page 9: Ninja Grips- Long & Round
ASSEMBLY INSTRUCTIONS - NINJA GRIPS PACKAGE (round or long) CHECK INVENTORY - (not to scale) Check that you have the following items before assembling your Funky Monkey Bars® round or long ninja grips package. Carabiner Shackle Ninja Grips either Extra Long Tee... - Page 10 POSITION C - (using hanging straps) Carabiner Shackle Hanging Strap Ninja Grips either Long or Round Evenly space straps along Open carabiner shackle Feed both strap hoops into monkey bar ladder. attach round or long grips. the shackle then lock shackle. (check straps regularly) POSITION A &...
- Page 11 LOWER LEGS TO GROUND - REMOVE ELBOW 1. Lower leg assemblies to the ground. 2. Remove elbows (Position B only) NOTE: For selected position A ( step 1) DO NOT remove elbows from top of Position B only - refer to note lowered leg assemblies.
- Page 12 ATTACH ACCESSORIES BAR Swing bar. POSITION A. Flip assembled accessory Accessory bar bar over 180º so that extra 180º assembly from step 6. long tee grub screws are facing downwards. With 2 people carefully slide the accessories bar onto the open ended swing bars for Position A or on the ends of the lowered legs for...
- Page 13 1. Ensure all swing hook bolts are firmly tightened. 2. Check that all other grub screws and rung bolts on your frame are fully tightened. 3. The entire Funky Monkey Bars® frame is pegged down. 4. Place Load Rating sticker onto accessories bar .
-
Page 14: Roman Rings
Straps with Carabiner Buckle SELECT DESIRED LOCATION OF ROMAN RINGS Roman rings centrally located between legs. Choose a location on your Funky Monkey Bars® frame that is clear from other accessories and cental between legs. HANG ROMAN RINGS STRAPS Swing Bar. - Page 15 THREAD STRAPS THROUGH RINGS Thread straps through roman rings one at a time. FEED STRAPS THROUGH BUCKLE Push the buckle lever open then feed the straps through the back of the buckle. Pull the strap through until the roman rings are at the desired Push height.
- Page 16 CHECK INVENTORY - (not to scale) Check that you have the following NOTE : Hanging straps will deteriorate items before assembling your in sunlight - Please check regularly Funky Monkey Bars® Delta rings. for fraying or any sign of deteriation. Hanging Strap Delta Ring...
-
Page 17: Delta Rings
2. Check that all other grub screws and rung bolts on your frame are fully tightened. 3. The entire Funky Monkey Bars® frame is pegged down. NOTE: When Ninja grips are NOT in use, bring indoors to prolong life of this product. - Page 18 ASSEMBLY INSTRUCTIONS - RESISTANCE BANDS CHECK INVENTORY - (not to scale) Check that you have the following items before assembling your Funky Monkey Bars® Resistance Bands. FITTINGS, HARDWARE & TUBES Short Tee Band Tube D-101 Plastic End Cap Purple Resistance Band...
- Page 19 ASSEMBLE RESISTANCE BAND SUPPORTS Short Tee D-101 1. Tap plastic end caps into band tubes. 2. Insert tubes into short tees and tighten grub screws. Band Tube Plastic End Cap Insert Band Tube flush with through hole. PREPARE FRAME FOR INSTALLATION 1.
- Page 20 INSTALL RESISTANCE BAND SUPPORTS 1. Slide resistance band supports from leg bases upwards into desired position. + 360 2. Fully tighten all grub screws. 2x Resistance band supports from step 3 RE-ASSEMBLE FRAME 1. Replace any removed base plates pegs bolts and fittings. 2.
-
Page 21: Resistance Bands
FINAL CHECKS 1. Check that all grub screws and bolts on your frame are fully tightened. 2. The entire Funky Monkey Bars® frame is pegged down. 3. Load Twirly Whirly bars - see frame assembly instructions or website http://www.funkymonkeybars.com/pages/videos NOTE: When Resistance bands are NOT in use, bring indoors to prolong life of this product. - Page 22 ASSEMBLY INSTRUCTIONS - WEIGHT BAR HOLDERS CHECK INVENTORY - (not to scale) Check that you have the following items before assembling your Funky Monkey Bars® Weight Bar Holders. FITTINGS, HARDWARE & TUBES Band Tube Short Tee Elbow Plastic End Cap...
- Page 23 PREPARE FRAME FOR INSTALLATION Swing Bar 1. You will need to remove a number of fittings in order to fit the weight holders. In most cases it will be easier to install from the top, downwards. 2. Remove top swing bar and loosen all grub screws on short tee A.
- Page 24 RE-ASSEMBLE FRAME 1. Re-attach any frame tubes and fittings that were removed to enable adding 2x short tees. (In the shown example - replace swing bar) 2. Fully tighten all grub screws. + 360 ATTACH WEIGHT BAR HOLDERS 1. Insert 2x weight bar holders preassembled in step 3.
- Page 25 1. Check that all grub screws and bolts on your frame are fully tightened. 2. The entire Funky Monkey Bars® frame is pegged down. NOTE: When your weights are NOT in use, please remove for safety, reducing excessive loading and weathering.
- Page 26 ASSEMBLY INSTRUCTIONS - GYM BAR (chin up bar) CHECK INVENTORY - (not to scale) Check that you have the following items before assembling your Funky Monkey Bars® Gym Bar. FITTINGS & HARDWARE Elbow Reducing Tee D-125 D-101 D48-B34 Straight Through...
- Page 27 THE FOLLOWING GYM BAR ADD-ON ASSEMBLY INSTRUCTIONS WILL BE DEMONSTRATED ON LEG A (STEP 2) Installation on a swing leg (D or C -step 2) also involves removing the twirly whirly bar, but requires the top elbow to be removed rather than the monkey ladder bar short tee. REMOVE TWIRLY WHIRLY BAR - PREPARATION 1.
- Page 28 SLIDE ON SHORT TEE & REDUCING TEE Short Tee (reused step 5) Reducing Tee D-101 D48-B34 Depending on desired height of Chin up tube replace removed short tees from step 5 with 1x reducing tee and reuse 1x short tee. C could be above A if gym bar selected height is above the monkey bar ladder.
- Page 29 ASSEMBLE VERTICAL TWIRLY TUBE Elbow D-125 1. Fully insert twirly whirly tube into elbow and base plate. 2. Fully tighten all grub screws. Twirly Tube Insert Twirly Tube fully into Elbow. 50Dia x 900mm Base Plate D-131 ATTACH HORIZONTAL TWIRLY TUBE Twirly Tube 50Dia x 900mm + 360...
- Page 30 1. Ensure all swing hook bolts are firmly tightened. 2. Check that all other grub screws and rung bolts on your frame are fully tightened. 3. The entire Funky Monkey Bars® frame is pegged down. 4. Load Twirly Whirly bars - see frame assembly instructions or website http://www.funkymonkeybars.com/pages/videos Please refer to the maintenance steps at the back of the booklet.
-
Page 31: Dip Bar
ASSEMBLY INSTRUCTIONS - DIP BAR CHECK INVENTORY - (not to scale) Check that you have the following items before assembling your Funky Monkey Bars® Dip Bar Add-on. FITTINGS & HARDWARE Elbow Short Tee Base Plate D-125 D-101 D-131 TUBES Brace Tube... - Page 32 THE FOLLOWING DIP BAR ADD-ON ASSEMBLY INSTRUCTIONS WILL BE DEMONSTRATED ON LEG A (STEP 2) Installation on a swing leg (C or D -step 2) also involves removing the twirly whirly bar and the lower base plate. EXISTING FRAME - PREPARATION 1.
- Page 33 ASSEMBLE DIP STATION LEGS 3x Elbow D-125 3x Dip Vertical Tube 1. Fit short tees at same height as leg 50Dia x 1085mm - Silver short tee (C) in step 5. 2. Fully insert elbows and base plates, then fully tighten all grub screws. 3x Short Tee D-101 3x Base Plate D-131 Insert dip vertical tube (silver) fully into elbow.
- Page 34 ATTACH OTHER DIP STATION SIDE Insert brace tubes into short tees and fully tighten all grub screws on dip station. + 360 Tighten all grub screws. SECURE TO GROUND 1. Check level and square - Loosen and adjust if not. 2.
-
Page 35: Maintenance
MAINTENANCE. At the beginning of each heavy play session (especially a party) and twice a month during play season ensure; 1. Tighten all hardware - grub screws, nuts and bolts. 2. Pegs are in place and fully secure. 3. Lubricate all metallic moving parts with WD40 or Vasaline - (trolley and swing hooks.) 4. - Page 36 72 164 496 520 1300 912 198 info@funkymonkeybars.com www.funkymonkeybars.com ® AUSTRALIAN MADE 9 Cutting Way, we are social monkeys AND OWNED Yangebup WA 6164 All Funky Monkey Bars® designs are registered and protected under IP Australian certification. IP Australia...
Need help?
Do you have a question about the Boxing Bag and is the answer not in the manual?
Questions and answers