
Related Manuals for Kiloview NDI E Series


Summary of Contents for Kiloview NDI E Series
- Page 1 E Series NDI Video Encoder ® USER MANUAL CO.,LTD. Changsha KILOVIEW Electronics...
- Page 2 Legal Notices Subject to the receiving of this document from Changsha Kiloview Electronics Co., Ltd.,(Hereinafter referred to “Kiloview”), the following terms are understood and agreed. Or else, please stop using this document. This document is copyright of Kiloview, all rights reserved. The document covers the proprietary information of the company.
-
Page 3: Table Of Contents
E Series NDI Encoder·User Manual CONTENTS 1 PRODUCT INTRODUCTION ............................1 1.1 A DVANTAGES ..................................1 1.2 P ARAMETERS ..................................2 2 OPERATION GUIDANCE ............................... 3 3 PACKING LIST AND INTERFACE DESCRIPTION ..................... 4 3.1 P ..................................4 ACKING LIST 3.2 I NTERFACE DESCRIPTION .............................. - Page 4 E Series NDI Encoder·User Manual 7.6 L OCAL RECORDING ................................33 7.7 N (NAS) ............................37 ETWORK TORAGE 7.8 T ............................39 MAGE IME OVERLAY 7.8.1 Overlay Image Management............................39 7.8.2 Overlay function ................................ 40 7.9 S ..............................42 ERVICE ONFIGURATION 7.9.1 Web Service Configuration ............................
-
Page 5: Product Introduction
Capable with customized text and image overlay function, which can be at any position on the screen. With SD/TF card slot, it supports local recording, and supports NAS network storage. Copyright © Changsha KILOVIEW Electronics CO.,LTD. All rights reserved... -
Page 6: Parameters
Image and text overlay the screen Recording Micro SD/TF card , local recording,NAS network storage Management Web/Android APP Power DC 12V 1A / 4W supply/Consumption Size/ Weight 125*89*28mm/380g Working temperature -20℃~60℃ Copyright © Changsha KILOVIEW Electronics CO.,LTD. All rights reserved... -
Page 7: Operation Guidance
NDI video stream directly. ⚫ Other streaming service If necessary, you can also configure the device to push video streams such as RTMP, RTMPS,UDP, HLS, SRT,etc.. Copyright © Changsha KILOVIEW Electronics CO.,LTD. All rights reserved... -
Page 8: Packing List And Interface Description
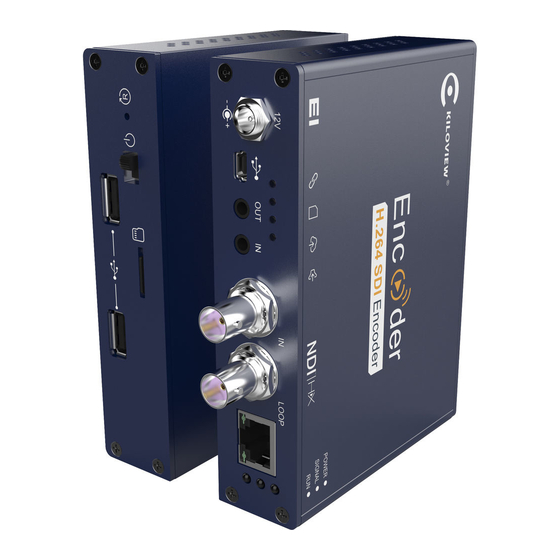
Quick start guide Certificate/Warranty card 3.2 Interface description 1.Power 2.Mini USB 3.Audio out 4.Audio in 5.SDI IN/ HDMI LOOP 6.SDI LOOP/HDMI IN 7.Ethernet 8.Indicator 9.USB extend 10.TF card 11.Power Switch 12.Reset Copyright © Changsha KILOVIEW Electronics CO.,LTD. All rights reserved... -
Page 9: Signal Indicator
When the NDI source is output to NDI receivers such as VMIX, TriCaster, etc. and when switch to Program or Preview, the encoder receives the notification and changes the color on the "Tally" device, as shown in the figure below: Copyright © Changsha KILOVIEW Electronics CO.,LTD. All rights reserved... -
Page 10: Installation And Connection
4.3 Network connection Connect the network cable to the Ethernet port of the device, and connect the other end to the network switch or directly to the network port of the computer. Copyright © Changsha KILOVIEW Electronics CO.,LTD. All rights reserved... -
Page 11: Login And Network Configuration
Note: Due to the browser compatibility issues, it may cause the web page display abnormal, it is recommended to use Chrome and Firefox. After login, the encoding and function parameters can be set on the encoder management web page. The page is shown as below: Copyright © Changsha KILOVIEW Electronics CO.,LTD. All rights reserved... -
Page 12: Network Configuration
IP address is fixed as long as the encoder does not restore the factory settings, this method is more stable. Therefore, the two methods have their own advantages, and can be selected accordingly. Copyright © Changsha KILOVIEW Electronics CO.,LTD. All rights reserved... -
Page 13: Convenient Management Functions
192.168.1.168. Note: When accessing the device through a convenient managed IP address, your computer must have an IP address on the same network segment. Copyright © Changsha KILOVIEW Electronics CO.,LTD. All rights reserved... -
Page 14: Android App
⚫ The device information shown in the list includes device interface information, device serial number, device IP address, etc. ⚫ Click the device from the device list to enter into management page. Copyright © Changsha KILOVIEW Electronics CO.,LTD. All rights reserved... - Page 15 ⚫ Click “Signal Source” for audio and video source choice page . ⚫ “Setting”are used for quick reset, device reboot, restoring factory settings and device name modifications. Click and enter into device information page. Copyright© Changsha KILOVIEW Electronics CO.,LTD. All rights reserved...
-
Page 16: Ndi Discover And Configuration
At present, the encoder uses a compressed NewTek NDI|HX technology. Before using other tools to connect, you need to download and install the NDI|HX driver from the NEWTEK website (https://www.newtek.com/ndi/tools ), NDI Tools contains the following: Copyright© Changsha KILOVIEW Electronics CO.,LTD. All rights reserved... -
Page 17: Ndi Discover And Connection
Note: After opening the selected video of the encoder by Studio Monitor, click in the lower right corner of the player to open the Web page of the encoder directly, which is convenient for the management of the encoder. Copyright© Changsha KILOVIEW Electronics CO.,LTD. All rights reserved... -
Page 18: Modify Ndi Device Name And Channel Name
NDI flows. 6.4 Modifying NDI Bit Rate On the dashboard, click SET at H.264 Main Stream to set the bit rate, which is also the bit rate of NDI stream. Copyright© Changsha KILOVIEW Electronics CO.,LTD. All rights reserved... -
Page 19: Discovery Service
"multicast sending enabled" function, select "Use discovery server", and set the "Server IP" address to the IP address of your computer that enables the discovery server function. After configured, the receiving end can discover the NDI stream registered with the server. Copyright© Changsha KILOVIEW Electronics CO.,LTD. All rights reserved... -
Page 20: Parameters Configuration
“system spaces”, “data spaces”, “network status” and “connectivity” of the device, and go for “Ping” testing. If users need to push to Internet platforms, network status should be “Internet reachable”, or it cannot push streams. Copyright© Changsha KILOVIEW Electronics CO.,LTD. All rights reserved... -
Page 21: Basic Settings
Users can go for some basic functions settings here. 7.3 Change WEB login password Click “Change Password”, an option box will pop up, users can modify the WEB login password, the default password is admin. Copyright© Changsha KILOVIEW Electronics CO.,LTD. All rights reserved... -
Page 22: Location And Time
E Series NDI Encoder·User Manual 7.3.1 Location and time Click “location and time”, then users can modify system time of the encoder, or just select “Synchronize from this PC”. Copyright© Changsha KILOVIEW Electronics CO.,LTD. All rights reserved... -
Page 23: Restore Factory Settings
“Upgrade” to upgrade the device.The upgrade process is slow, around 30s to 1 minute, please be patient. After upgrading, kindly check whether the version information of the latest firmware is consistent with the expected status through the System Status-Software Version of the Web page. Copyright© Changsha KILOVIEW Electronics CO.,LTD. All rights reserved... -
Page 24: Video&Audio Adjustments
1, but necessary in specific application.) (4) Rotation or flipping: It's the last step before encoding, you can rotate the video with 90/180/270 degrees, horizontal mirror or vertical flip. Copyright© Changsha KILOVIEW Electronics CO.,LTD. All rights reserved... - Page 25 E Series NDI Encoder·User Manual Copyright© Changsha KILOVIEW Electronics CO.,LTD. All rights reserved...
-
Page 26: Audio Signal Source
Above process is a pipeline from step 1 to step 4. You could choose to open, or prohibit it about each step. 7.4.3 Audio signal source Audio source “Auto selection” mode is automatically to select the embedded audio of the input video source. Copyright© Changsha KILOVIEW Electronics CO.,LTD. All rights reserved... -
Page 27: Encoding & Steam
64Kbps. One more detail: if encoder using TS-UDP protocol or needs using recording, then it needs to choose “With ADTS header” under AAC format. Note: Please do "Quick Reset" to take affect if you changed the 'Resample policy' or 'Sampling' parameter. Copyright© Changsha KILOVIEW Electronics CO.,LTD. All rights reserved... -
Page 28: Encoding And Stream Settings
Note: It is H.264 Main stream, the second setting, not Motion JPEG setting. Note: For NDI, the sub-stream of the encoder must always be in the running state, otherwise it may cause the NDI stream to have no audio. Copyright© Changsha KILOVIEW Electronics CO.,LTD. All rights reserved... - Page 29 “HALF” means if input video is 1920*1080P50, video framerate after encoding will be 25. This will be a good saving on the consumption of network bandwidth; customized framerate is user assigning framerate after encoding, in theory, it shouldn’t be higher than original framerate. Copyright© Changsha KILOVIEW Electronics CO.,LTD. All rights reserved...
-
Page 30: Streaming Media Service
Note: The principle of RTMP push stream is that it must be pushed from the encoder to the platform. The computer/decoder then pulls the RTMP stream from the platform for playback. The Copyright© Changsha KILOVIEW Electronics CO.,LTD. All rights reserved... - Page 31 Click the settings button on the right side of the RTMP push, and you will enter the interface to fill in the RTMP push configuration. The push address on YouTube platform is filled in the "push point" , and set "Enable pushing" to "Yes". Click “Save”, then RTMP will stream to YouTube. Copyright© Changsha KILOVIEW Electronics CO.,LTD. All rights reserved...
- Page 32 No need to change Multicast TTL; If using multicast, “pushing target address” needs to write a correct multicast address (224.x.x.x ~ 239.x.x.x). “Target port” is any port, but it is better not conflicted with other service port. Copyright© Changsha KILOVIEW Electronics CO.,LTD. All rights reserved...
- Page 33 E Series NDI Encoder·User Manual Copyright© Changsha KILOVIEW Electronics CO.,LTD. All rights reserved...
- Page 34 Using HLS service, the first thing is to “add a stream service”, then click right-side SET icon of “HLS service” for setting. Below is setting interface of HLS service. Very simple, if no special requirements, no need setting, only enable service. Copyright© Changsha KILOVIEW Electronics CO.,LTD. All rights reserved...
- Page 35 Once enabling service, it will get one HLS Publish point. You could watch it through VLC and other players using this address. ⚫ SRT service Click “Encoding & Stream”--“Encoding and Stream Settings”--“H.264 main stream”--“Add a stream”. Choose “SRT-TS pushing”, click “OK” and add a SRT service. Copyright© Changsha KILOVIEW Electronics CO.,LTD. All rights reserved...
- Page 36 (which can be understood as the payload), but it is different from our common protocol overhead, TCP header overhead, UDP header Copyright© Changsha KILOVIEW Electronics CO.,LTD. All rights reserved...
-
Page 37: Local Recording
USB disk inserted into USB port of encoder for recording. The recording operation is as follows: 1) Click “Record” below “H.264 Main Stream” under “Dashboard” or “Encoding and stream setting”. Copyright© Changsha KILOVIEW Electronics CO.,LTD. All rights reserved... - Page 38 It will record to the biggest available storage area. Recording format is TS file by default. Users could set recording for automatic cutting based on specified size. And when storage space is insufficient, it will automatically overwrite the old video file to achieve redundant storage. Copyright© Changsha KILOVIEW Electronics CO.,LTD. All rights reserved...
- Page 39 ⚫ When no disks inserted or NAS network storage not set, the status will be as follows , dashboard will show “Stopped” Record status shows “No valid disks”and “No records”. ⚫ After inserted disks, the encoder will start recording automatically and the dashboard shows “Recording”. Copyright© Changsha KILOVIEW Electronics CO.,LTD. All rights reserved...
- Page 40 TF card unrecognizable. Sometimes, due to the influence of some files or programs in the TF card, the TF card can not be recognized. You need to format the TF card once. Copyright© Changsha KILOVIEW Electronics CO.,LTD. All rights reserved...
-
Page 41: Network Storage(Nas
NAS manager will show “Mounted” if NAS connection has been established, and there is a RECORD file under the Mount point. If the connection is abnormal, it will be displayed as “Mounting”. Copyright© Changsha KILOVIEW Electronics CO.,LTD. All rights reserved... - Page 42 E Series NDI Encoder·User Manual Copyright© Changsha KILOVIEW Electronics CO.,LTD. All rights reserved...
-
Page 43: Text/ Image/Time Overlay
⚫ Transparent color index: Manually specify an index color to erase background. Set tolerance (0%~100%) to control the similar color range selection.In most cases, transparent PNG images do not need to be processed manually. Copyright© Changsha KILOVIEW Electronics CO.,LTD. All rights reserved... -
Page 44: Overlay Function
“Don't rotate follow picture”, please choose yes or no .Then choose “Add overlay item” to set overlay functions for “Text”, “Time” and “Image” respectively.You can set multiple overlays at the same time Add overlay item ( text) Copyright© Changsha KILOVIEW Electronics CO.,LTD. All rights reserved... - Page 45 ⚫ If the added image occupies the majority of the video screen, the actual bitrate and the set bitrate will be greatly reduced due to the low screen dynamic fluctuation. ⚫ For the image format, only JPEG and PNG supported . Copyright© Changsha KILOVIEW Electronics CO.,LTD. All rights reserved...
-
Page 46: Service Configuration
E series devices currently. 7.9.3 Telnet Service Configuration Telnet service listens on port 23 for remote connection and debugging of devices. For security reasons, you can choose to close telnet services. Copyright© Changsha KILOVIEW Electronics CO.,LTD. All rights reserved... -
Page 47: Serial Ports And Ptz
7.10.2 PTZ Setting The encoder can control the PTZ camera via Sony Visca.Pelco-D.Pelco-P protocols, you can also set the control speed. Copyright© Changsha KILOVIEW Electronics CO.,LTD. All rights reserved... -
Page 48: Control Panel
“Reboot” is used to restart the device software, it will take about 3 minutes. 7.12 Logs and Debug System logs are available for download, which can be provided to technical service engineers for technical analysis. Copyright© Changsha KILOVIEW Electronics CO.,LTD. All rights reserved... -
Page 49: Preset Configuration
When there are other devices on site or the parameters of your device are restored to the factory, you want to use the parameters previously set. You can upload the saved configuration file in "manage or load preset configuration", restart the device after loading, and the parameter configuration will take effect. Copyright© Changsha KILOVIEW Electronics CO.,LTD. All rights reserved... - Page 50 E Series NDI Encoder·User Manual Thank you for reading. Changsha KILOVIEW Electronics CO.,LTD. Service Hotline:86-731-88315979 Website :en.kiloview.com Technical support Email:support@kiloview.com WhatsApp: +86-18573195156/18573195256 Skype:kiloview-support/keqiu wang Address: 188#, Middle Huanbao Rd, Yuhua District, Changsha, Hunan Province, China Copyright© Changsha KILOVIEW Electronics CO.,LTD. All rights reserved...
Need help?
Do you have a question about the NDI E Series and is the answer not in the manual?
Questions and answers