Table of Contents
Advertisement
Quick Links
Advertisement
Table of Contents

Related Manuals for Korg D12


Summary of Contents for Korg D12
- Page 2 • Be careful not to let metal objects get into the equip- ment. If something does slip into the equipment, unplug the AC/AC power supply from the wall outlet. Then contact your nearest Korg dealer or the store where the equipment was purchased. THE FCC REGULATION WARNING (for U.S.A.)
-
Page 3: About Copyright
Do not repeatedly turn the power on/off. This may damage not only the D12, but also any SCSI devices that are connected. This device begins to access the hard disk immedi- ately after the power is turned on. -
Page 4: Table Of Contents
Regarding disk capacity... 71 Note when using DOS format disks... 72 Step 14. MIDI ...73 1. MIDI connections... 73 2. MIDI messages used by the D12... 73 3. Using MIDI ... 73 Reference... 75 1. COUNTER ...75 Counter: Counter display ... 75 2. - Page 5 5. SONG ... 88 P1 SelSong: Selecting a song ... 88 P2 EditSong: Song editing ... 89 P3 PrgPlay: Program playback of songs... 90 P4 CDR/RW: Creating and playing a CD-R/RW .. 90 6. STORE ... 91 7. MARK ... 92 P1 Mark: Editing marks ...
- Page 6 1. Cautions for handling ... 133 2. Installing the CDRW-1 ... 133 3. Using the CDRW-1 ... 135 Updating the system software ...135 D12 specifications ...136 MIDI implementation chart ...138 Block diagram...139 Effect Program List...140 Rhythm Name List (215patterns) ...142 Demo Song List...143...
-
Page 7: Introduction
To ensure trouble-free enjoyment, please read this manual carefully and use the instrument as directed. Features • The D12 is a 12 track digital multi-track recorder (MTR) with full-digital processing (24 bit internal processing, 16/24 bit uncompressed recording and playback, 44.1 kHz sampling frequency). - Page 8 Alternatively, you can create tempo maps, or record MIDI clock messages from an external device. • The D12 can synchronize with MIDI Clock, MTC, or MMC-compatible sequencers or rhythm machines. • Standard connectors such as SCSI and S/P DIF (dig- ital interface) are provided, allowing connection to numerous external devices.
-
Page 9: Printing Conventions In This Manual
Printing conventions in this manual Switches and knobs [ ] Keys, dials, and knobs on the panel of the D12 are printed within [square brackets]. Parameters that appear in the LCD screen “ “ Parameters that appear in the LCD screen are printed inside “double quotation marks.”... -
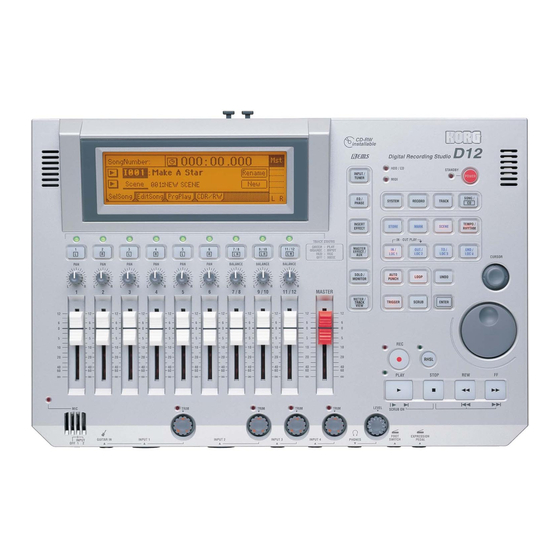
Page 10: Panel Overview Of The D12
Panel overview of the D12 Top panel * For the mic and trim controls etc., refer to the “Front panel” section. LCD screen This displays the volume (level meters) and time locations (locate) during recording or playback, and displays the various parameters. ( p.13) - Page 11 This indicator will light when the internal hard disk is being accessed for recording or playback, or when the internal CD-R/RW drive is operating. Never move the D12 or apply physical shock to it when this HDD/CD-RW access indicator is lit. 11 MIDI indicator This indicator will light when MIDI messages are received from the MIDI IN connector.
-
Page 12: Front Panel
( p.35, 97) By holding down the [IN/LOC1] key and pressing the [OUT/LOC2] key, you can listen to the audio between the IN–OUT points. 27 [AUTO PUNCH] key This key is used to turn the Auto Punch-in/out function on/off, to set the pre/post roll time, and to verify the start/end locations. -
Page 13: Rear Panel
MIDI device from the D12. ( p.73) [MIDI IN] connector MIDI messages are received at this connector. Use this when you wish to control the D12 from a con- nected external MIDI device. ( p.73) [LCD CONTRAST] knob This adjusts the contrast of the LCD screen. -
Page 14: Side Panel
[MONITOR OUT LEVEL] knob This knob sets the volume level from the [MONI- TOR OUT L/R] jacks. [MASTER OUT L/R] jacks These are analog outputs for the master LR bus which combines the signals from each mixer chan- nel, or for the audio source that is selected by the Solo function. -
Page 15: Objects In The Lcd Screen And Their Functions
Objects in the LCD screen and their Objects in the LCD screen To select an object displayed in the LCD screen, use the [CURSOR] key to select it, and press the [ENTER] key. In this manual, terms enclosed in “quotation marks”... -
Page 16: Adjusting The Lcd Screen Contrast
1. Selecting a mode To make settings in the LCD screen for the various functions of the D12, you must first press the key of the mode that includes that function. For the functions of each mode, refer to “Reference”... -
Page 17: Basic Operation
Connecting instruments and turning on the power Connect the instrument and mic etc. that you wish to use for recording to the D12, and turn on the power. ( p.17) Create a song First you will create a song, and assign a song title. - Page 18 Step 1 Connect instruments and turn on the power Create a new song Step 2 Record Assign mixer channels • Apply effects to the input sound (Step 8) • Apply EQ Step 4 Recording Overdubbing Adjust the recording level Step 5 Playback Step 10 Editing...
-
Page 19: Step 1. Making Connections, And Turning The Power On/Off
1 Connect the included AC/AC power supply. Connect the AC/AC power supply to the AC/AC power supply connector of the D12. Then plug the other end into an AC outlet. 2 Connect your audio monitoring system. -
Page 20: Turning The Power On/Off
D12. If an external drive is connected, turn on the power of the external drive. 3 Press the [POWER] key of the D12 to turn on the power. The LCD screen will show the opening message, and then the [SONG] “Sel- Song”... -
Page 21: Listening To The Demo Songs
1 If you wish to keep any effect settings that you edited, save them. ( p.46) 2 Lower the [MASTER] fader of the D12 to the – position. Lower the volume of any external devices to the minimum position. -
Page 23: Step 2. Creating/Selecting A Song
Step 2. Creating/selecting a song In order to record a new song, you must first create the new song. Here’s how to create a song, assign a name to it, and select songs. 1. Creating a new song 1 Press the [SONG] key to access the “SelSong” tab page. -
Page 24: Selecting Another Song
MO, Zip, or Jaz. Format Type This shows the format type of the drive. Internal drives of the D12 and external drives for- matted or initialized while connected to the D12 are displayed as playable drives (i.e., that can be used to create songs). -
Page 25: Step 3. Assign Audio Inputs To The Mixer
Step 3. Assign audio inputs to the mixer The D12 provides four channels of analog input and one (two-channel) digital input jack. In order to record the audio signals from these inputs, they must be assigned to mixer channels. If the CDRW-1 CD-R/RW... - Page 26 1 Enable the internal mic. Set the INPUT 2 [TRIM] to the min- imum position (+4 dB), lower the [MASTER] fader of the D12, and set the [MIC] switch to INPUT 2. The [MIC] on indicator will light. 2 Specify the input channel.
-
Page 27: Digital Input
2. Digital input The D12 can record a digital audio signal that is input via the S/P DIF jack. The S/P DIF input has a built-in sampling rate con- verter. Sources with sampling rates of 48 kHz or 32 kHz can be connected directly, and will automatically be converted to 44.1 kHz. -
Page 29: Step 4. Recording
When you are finished playing back, press the [STOP] key. (The [PLAY] LED will go dark.) 2. Recording on virtual tracks The D12 has twelve tracks, and each of these tracks has eight virtual tracks. For example when recording a solo part, you can... -
Page 30: Playback While Recording Addition Tracks: Overdubbing
PS-1 foot switch (separately sold option). This allows you to switch between playback and recording while you are performing on an instrument, or when you are at a distance from the D12. 1 Connect a foot switch to the [FOOT SWITCH] jack. -
Page 31: Combining Multiple Tracks Into Two: Bounce
CD, so you must combine your completed song into tracks 1 and 2. You can also mix down your completed song to two tracks of the D12, instead of mixing down to an external two-channel recorder. Combining 12 tracks of audio and over- writing them onto 2 tracks As an example, here’s how to combine the audio of... - Page 32 9 Begin bounce recording. Press the [REC] key to enter record-ready mode (LED blinking), and then press the [PLAY] key to begin recording (LED lit). 0 When recording is finished, press the [STOP] key to stop. A Listen to the recording. •...
-
Page 33: Other Recording Methods
6 In the [LOOP] “Loop” tab page, turn “Loop” “On.” 7 Begin recording. • When you press the [REC] key, the D12 will locate to the beginning of the pre-roll time pre- ceding the IN (recording start) point, and will enter record-ready mode. - Page 34 In addition to the recording methods described above, the following possibilities are available when recording on the D12. For details refer to the page listed. • Apply EQ to the audio being recorded. ( p.38) • Apply effects to the audio being recorded. ( p.44) •...
-
Page 35: Step 5. Playback
Step 5. Playback This section explains basic playback on the D12, and also how to use program playback. 1. Playback 1 Select the track(s) for playback. Press the [TRACK STATUS] keys for the tracks that you wish to play, to put them in PLAY mode (LED lit green). -
Page 37: Step 6. Changing The Time Location
Step 6. Changing the time location This section explains how you can move the counter that shows the current location within the song. 1. Switching the counter display You can switch the units of the current time shown by the counter. 1 Select the “... -
Page 38: Using Scrub Playback Etc. To Find A Precise Time Location
Moving to a locate point When you press a previously-registered [IN/LOC1], [OUT/LOC2], [TO/LOC3], or [END/LOC4] key, you will move to the registered location. Using marks to move the time location You can register a specific location in a mark, and then move instantly to the registered location. -
Page 39: Step 7. Using The Mixer
Step 7. Using the mixer Here you can adjust various mixer settings such as the volume, tone, and pan of each channel for input, recording, or playback, to create the most effective sounds for your entire song. For details on adjusting the effects, refer to p.43 1. -
Page 40: Pairing
“OK” button and press the [ENTER] key. 5. Monitor settings In order to monitor the audio from the D12, you will need to connect a set of powered monitor speakers etc. to the [MONITOR OUT L/R] jacks, or connect head- phones to the [PHONES] jack. -
Page 41: Solo Settings
[PHONES] jack. Adjusting the cue level Since the [CHANNEL] faders of the D12 adjust both the recording level of the tracks and the volume level of each channel, the recording level and the monitoring level will be the same. - Page 42 Registering a scene 1 Move the current time to the location at which you wish to register the scene. Use the counter or [FF]/[REW] keys to move. ( p.35) 2 Adjust the mixer settings. Adjust the [CHANNEL] faders, [PAN] knobs, EQ and effect settings.
- Page 43 MIDI input If “SceneRead” is “Off”, scene change messages (pro- gram changes) that are received will cause the D12 to select the scene of the corresponding number. If “SceneRead” is “On”, these messages will not be received, regardless of whether the D12 is playing, recording, or stopped.
-
Page 45: Step 8. Using Effects
Step 8. Using effects Overview of the effects On the D12, you can use up to eight insert effects that can be inserted into an analog input or mixer channel, two master effects that can be applied to the send from each channel, and a final effect that can be applied to... - Page 46 1 in 1 out x 4 (mono-in/mono-out • While recording four vocals simultaneously, you could apply Exciter-Comp to voices that lack impact, and apply Limiter-P4EQ to loud voices as you record. Other examples are shown below. During track playback 2 in 2 out x 2 (stereo-in/stereo-out •...
-
Page 47: Master Effects
You can also select effect programs while you listen to the playback. 2. Master effects The D12 contains two master effects (MstEff1 and MstEff2) which can be used simultaneously. You can adjust the send amount from each channel to change the depth of the effect. -
Page 48: Final Effect
3. Final effect One stereo-in stereo-out effect is provided as the final effect. It applies to the master LR output ( diagram on preceding page). The final effect is used mainly for dynamics processing (compression etc.) to make the overall level more con- sistent. -
Page 49: Controlling An Effect From An External Device
8 Save the effect program. • If the song is playing, press the [STOP] key to stop it. • Select the “Store” button, and press the [ENTER] key to access the “StoreEffect” dialog box. • Specify the number for storing, select the “Exec.”... -
Page 50: Using An External Effect
[INPUT 3] and [INPUT 4] jacks. 1 Connect your external effect processor. Connect the [AUX OUT] jack of the D12 to the INPUT jack of your external effect processor, and connect the OUTPUT jacks of the external effect processor to the [INPUT 3] and [INPUT 4] jacks of the D12. -
Page 51: Step 9. Mixdown
CD-R/RW. 9 Finalize the disc. If you wish to play back the newly created CD-R/ RW on an audio CD player, stop the D12, select the “Final” button, and press the [ENTER] key to final- ize the disc. -
Page 52: Recording To A Master Tape
2 Connect your external recording device. Refer to “Connections for mixdown” ( p.18). 3 Record on your external recording device. • Playback the D12 song, and adjust the recording level on your external recorder. • Begin recording on your external recording device, and playback the D12. -
Page 53: Step 10. Track Editing
Step 10. Track editing 1. Track editing functions The following functions are provided for track editing. Copy Track: copy a track Insert Track: insert a blank Erase Track: erase a track Delete Track: delete a track Reverse Track: flip a track end-for-end Optimize Track: optimize a track Swap Track: exchange tracks Expansion/Compression Track: expand or compress a... -
Page 54: Track Editing Examples
2. Track editing examples Copying track data: Copy Track The Copy Track command copies recorded track data from the specified region (IN–OUT) to another location (TO). • You can copy the IN–OUT data not only once, but multiple times in succession. •... - Page 55 Procedure for inserting a blank (Insert) Here’s how to insert a blank into the IN–OUT region of track 1. 1 Register the IN and OUT times. ( p.97) 2 Select the Insert command. In the [TRACK] “EditTrk” tab page, set “EditType” to “InsertTrack.”...
- Page 56 Procedure for reversing track data (Reverse) Here’s how to reverse the IN–OUT region of track 1, and copy it three times to the TO location of track 2. 1 Register the IN, OUT, and TO times. ( p.97) 2 Select the Reverse command. In the [TRACK] “EditTrk”...
- Page 57 6 Verify that the data was exchanged correctly. Press the [IN/LOC1] key to play back from the IN location, and verify that the data was exchanged correctly. You can use Undo to return to the state before exe- cuting the command. ( p.99) Expanding or compressing a track: Expan- sion/Compression Track This command expands or compresses the specified...
- Page 58 6 Verify that the data was copied correctly. Play back from the beginning of the song, and ver- ify that the data was copied correctly. You can use Undo to return to the state before exe- cuting the command. ( p.99) Procedure for copying to a V-track Here’s how V-track “a”...
- Page 59 Fading-in/fading-out: Fade Track This command fades-in or fades-out the specified region (IN–OUT) of recorded track data. By using fade- in and fade-out in conjunction with each other, you can create cross-fades. • You can fade-in or fade-out the IN–OUT region. •...
- Page 60 DestTrack 3 Select the normalize destination track number. Set “DestTrack” to track 1. 4 Execute the editing command. Select the “Exec.” button and press the [ENTER] key. The display will ask “AreYouSure?,” so select the “Yes” button and press the [ENTER] key to exe- cute the command.
-
Page 61: Step 11. Song Editing
Step 11. Song editing On the D12, songs can be edited in the following ways. Undo is not available for song editing. 1. Song editing procedure Basic procedure for editing a song 1 Select the song (or in the case of “CopyAllSongs”, the drive) that you wish to edit. - Page 62 SourceSong DestSong 3 Verify the song to be moved. Make sure that the move source song is selected in “SourceSong.” 4 Select the move destination song number. Use “DestSong” to select the move destination song number. 5 Execute the editing operation. Select the “Exec.”...
-
Page 63: Step 12. Rhythm/Tempo Settings
Step 12. Rhythm/tempo settings The D12 contains numerous rhythm patterns for a vari- ety of time signatures ( p.142 “Rhythm Pattern List”). When you have a sudden idea for a song, you can record your performance immediately, using the built- in rhythms as a guide. -
Page 64: Setting The Tempo
You can select one of these sources and use it to control the tempo of the song as well as to control the tempo of an external MIDI device that is synchronized to the D12. The tempo source is selected by the [TEMPO/ RHYTHM] “SetUp” tab page item “Tempo- Source.”... - Page 65 Here’s how MIDI clock tempo data from an external MIDI sequencer can be recorded on the tempo track. Use this when you wish to synchronize the D12 song with song data created on a MIDI sequencer in which the tempo changes continuously.
- Page 66 5 Record the tap tempo. • Select the “RecStart” button and press the [ENTER] key to put the D12 in record-ready mode. • Press either the [PLAY] key or the foot switch, and playback and recording will begin simulta- neously.
-
Page 67: Step 13. Saving Your Data
Step 13. Saving your data A word about data There is always a remote possibility that the D12 will malfunction, causing errors in the data or loss of data. If the D12 malfunctions, recorded data or other types of data may be lost. Please copy or back up your important data on an external drive such as a hard disk or removable disk. - Page 68 “Completed.” Select the “OK” button and press the [ENTER] key. Backup and restore using a CD-R/RW The optional internal CD-RW drive or an external CD- R/CD-RW drive connected to the [SCSI] connector can be used to backup and restore D12 song data.
-
Page 69: Connecting External Drives
• Format should be performed when a disk used by another device is to be used by the D12, or when a disk begins to produce frequent “Disk Error” indica- tions during playback. -
Page 70: Importing/Exporting Wav Files
D12 from a DOS format (FAT 16) external drive con- nected to the [SCSI] connector. Also, audio data from the clipboard of the D12 can be exported (written) to a WAV format file on a DOS format (FAT 16) external SCSI drive. - Page 71 The longer the import source file, the more time this operation will take before the “Com- pleted” message appears. 6 Register the TO time location. 7 Select the Copy command. In the [TRACK] “EditTrk” tab page, set “EditType” to “CopyTrack.” 8 Select the clipboard as the copy source track num- ber.
-
Page 72: Drive And Data Compatibility Within The Digital Recording Studio Series
Studio series. Using D8 backup data on the D12 In order to use a D8 song on the D12, you must backup the song on removable media, and restore it on the D12. Only the audio data will be restored into a new song. -
Page 73: Regarding Disk Capacity
Execute the Erase Track operation on the silent portions (A, B, and Break) of track 1. At this time, the D12 is only “provi- sionally” erasing the unwanted portions A, B, and Break, meaning that the disk capacity will not be recov- ered. -
Page 74: Note When Using Dos Format Disks
Undo. To erase the data that is maintained by the Undo func- tion, turn off the power of the D12. When you turn the power on once again, all data that had been maintained for purposes of Undo will be erased, thus allowing you to recover this disk capacity. -
Page 75: Step 14. Midi
2. MIDI messages used by the D12 Note, aftertouch, velocity, pitch bend: This data is used by the D12 to control effects. Program change: This data is used by the D12 to select scenes. Control change: This data is used by the D12 to control mixer parameters. - Page 76 Synchronizing two D12 units Here’s how you can synchronize two D12 units. One D12 will be the master, and the other will be the slave. Make connections as follows. “MTC Mstr” “Transmit” MIDI MIDI D12 (Master) D12 (Slave) 1 Make settings on the master D12.
-
Page 77: Reference
[Pedal, A.Touch, PitchBend, Velocity, NoteNum, CC#000…119] Select the external device that will control the inter- nal effects of the D12. The effect selected by “Ass” (P1-4) can be controlled in realtime. Pedal: An expression pedal can be used to control the effect. -
Page 78: P2 Midi: Midi Settings
If the effect program that you are using does not provide control capability, it cannot be controlled. ( p.113–) P2 MIDI: MIDI settings On the D12, you can use MIDI to do the following things: • Control effects ( p.47) • Synchronize with MIDI devices such as sequencers ( p.73) -
Page 79: P4 Mmc: Mmc Settings
Some MIDI devices may not respond to the MMC functionality of the D12. Details on the MMC func- tionality of the D12 are given in the MIDI imple- mentation. 1. Select MMC Mode... [Transmit, Receive, Off] Turn MMC transmission or reception on/off. - Page 80 This shows the format type of the drive. The internal drive of the D12 and external drives that were initialized or formatted by the D12 will be displayed as “playable” drives that can be used to create and play songs. All other drives will be dis- played as “backup”...
-
Page 81: P6 Diskutil: Initialize/Format/Check A Drive
first time. • Format a disk that was previously used by another device before using it on the D12, or if the “DiskEr- ror” display appears frequently during playback. It is not necessary to initialize or format a remov- able disk that you are using for backup. -
Page 82: Record
LoadSystem: System software will be loaded from the drive selected by “Drive ID” to rewrite the oper- ating system of the D12. For details refer to “Updat- ing the system software” ( p.135). 3. RECORD P1 RecMode: Selecting the recording mode 1. -
Page 83: Track
4. TRACK P1 Vtr1–6: Select virtual tracks 1–6 1. Select VirtualTrack ...[1a…1h, …, 6a…6h] Select the virtual track for each track “1”–“6.” Each track has eight virtual tracks: “a”–”h.” One of these virtual tracks can be selected for recording/play- back. Selected track Recorded track 2. - Page 84 2. SourceTrack ... [1...12, 1–2...11–12, 1–4...9–12, 1–6, 7–12, 1–12, Clip# Select the copy source track. : “Clip#” can be selected only if the clipboard con- tains data. # is the number of tracks in the clipboard. You can use “Clip#” to copy data from the tracks of another song.
- Page 85 4. Wave ... This displays the audio data of the track as a wave- form. Here you can set the editing locations (IN, OUT, TO) more precisely. ( p.81 EditType: “Copy- Track”) EditType: “DeleteTrack” This operation deletes the track data from the IN–OUT range of the delete destination track (“DestTrack”).
- Page 86 This operation optimizes the track data of the IN–OUT range of the optimize destination track (“DestTrack”). The D12 will not generate unnecessary sound if the IN– OUT range contains unused blank portions. However in the case of brief blank portions that are close to the next audio event, the data will be generated as a single sound to avoid producing “DiskBusy”...
- Page 87 When this is executed (“Exec.”), the copy destina- tion track will be overwritten. SourceTrack DestVTrack (a...h) 2. SourceTrack... [1...12, 1–2...11–12, 1–4...9–12, 1–6, 7–12, 1–12] Select the copy source track. In the case of a 24 bit song, only tracks 1–6 can be selected.
-
Page 88: P4 Import: Import A Wav File
P4 Import: Import a WAV file A WAV file saved on a FAT 16 DOS format external SCSI drive can be pasted into a D12 track. ( ”Note when using a DOS format disk”) You can also import this data into the clipboard, and paste it into a location other than the beginning of the track. -
Page 89: P5 Export: Export A Wav File
Execute the WAV file import command. P5 Export: Export a WAV file Audio track data copied to the clipboard of the D12 can be exported to a WAV file (16 bit, 44.1 kHz, mono or ste- reo) on a FAT 16 DOS formatted external SCSI drive. -
Page 90: Song
5. SONG P1 SelSong: Selecting a song 1. SongNumber ...[I, A…G/001…100] Select the song. The display shows the drive, song number, and song name. If a 24 bit song is selected, the display will indicate “ .” If the song is protected, the display will indi- cate “... -
Page 91: P2 Editsong: Song Editing
P2 EditSong: Song editing The song affected by editing will normally be the currently selected song. (However the “Copy- AllSong” operation will affect all songs.) Undo is not available after these operations. 1. EditType ...[CopySong, MoveSong, DeleteSong, ProtectSong, CopyAllSongs] Select the song editing operation. Press the “... -
Page 92: P3 Prgplay: Program Playback Of Songs
“Drive ID.” ( p.22) P4 CDR/RW: Creating and playing a CD-R/RW If a CDRW-1 (sold separately) is installed in the D12 or if a commercially available CD-R (CD Recordable) drive is connected, you will be able to create an audio CD. -
Page 93: Store
• An audio CD 3. Final(Finalize) ... Execute the Finalize operation. In order for a CD-R/RW disc created on the D12 to be playable on an audio CD player, the Finalize operation must be executed. You can use the CD-R/RW transport keys to audi- tion the disc before finalizing. -
Page 94: Mark
7. MARK You can register a specific time location in a Mark, and then jump instantly to that location when desired. Since you can assign a name to each mark, you can use them to indicate sections within your song. A maximum of 100 marks can be registered in each song. - Page 95 On: The filter will be on for that channel/parame- ter, and the scene settings will be disabled. Off: The filter will be off, and the scene settings will be enabled. When you register a scene, the filter settings act as a registration filter for that song.
-
Page 96: P2 Mixview: Pan/Fader Scene Display
P2 MixView: Pan/fader scene dis- play 1. Pan/Balance... (Pan1…Pan6, Bal7–8…Bal11–12) This shows the currently selected pan and balance settings. When you select an icon, the channel number and setting value will be displayed in the upper left. 2. Level...(Lev1…Lev6, Lev7–8…Lev11–12) This shows the currently selected channel fader set- tings. -
Page 97: P2 Tmpmap: Editing The Tempo Map
4. SelRhythm ... [(Rhythm Pattern List)] Specify the rhythm parameter that will be used when “TempoSource” is set to “Manual.” In the cases of “TempoMap” and “TempoTrack,” this will show the rhythm( P1-2) corresponding to the cur- rent time as specified in the “TmpMap” tab page. Press the “... -
Page 98: P3 Tmptrk: Create A Tempo Track
The tempo track can be recorded in two ways. • By recording MIDI Clock • By recording tap tempo The first method is used to synchronize the D12 to data created on an external sequencer. The second method is used when you do not know the... -
Page 99: In/Loc1, Out/Loc2, To/Loc3, End/Loc4
10. IN/LOC1, OUT/LOC2, TO/LOC3, END/LOC4 If locations in the song have been registered to the [IN/ LOC1], [OUT/LOC2], [TO/LOC3], and [END/LOC4] keys, you can use them to perform the following func- tions. • Locate point (press a key to move to the registered time location) •... -
Page 100: P1 Atpunch: Settings For Auto Punch-In/Out Recording
11. AUTO PUNCH P1 AtPunch: Settings for auto punch-in/out recording Auto punch-in/out recording is a function that auto- matically starts recording (punch-in) and stops record- ing (punch-out) at the time locations you specify beforehand. If you record when “AutoPunch” is “On,” punch-in/ out recording will occur automatically. -
Page 101: Loop
The hard disk recorder of the D12 preserves a his- tory of up to the last 99 recordings, edits, or opera- tions so that you can use the Undo function to return to an earlier state of your work. -
Page 102: Trigger
If recording begins too early or too late, re-adjust this level. 3. PreTrigTime ... [000…700ms] When trigger recording is used, the D12 can record the sound that was heard immediately before recording actually started. Trigger recording will initiate recording when the input signal exceeds the “Threshold”... -
Page 103: Scrub
15. SCRUB Scrub, Play From/Play To, and Slow Play functions can be switched on/off here. Each time you press the [SCRUB] key, the setting will be switched on or off. By using these functions, you can register Locate and Mark times more precisely and easily. On ([SCRUB] key lit): The following functions will be available. -
Page 104: Input
( p.50) After completing a song on the D12, you can syn- chronize a sequencer to the D12 and use sub inputs to mix the sequenced sounds with the track play- back of the D12. -
Page 105: P2 Ch7-12: Select The Inputs For Mixer Channels 7-12
4a. Select ChannelPair ... [1 2…5 6] Press the “1 2”–“5 6” button for the channels that you wish to pair. When pairing is “On,” the heart icon will be displayed. 4b. Select Function... [Eq, Send, Aux, Pan] Select the functions that will be paired for the chan- nels selected by “Select ChannelPair.”... -
Page 106: Eq/Phase
18. EQ/PHASE P1 Eq1–4: EQ settings for mixer channels 1–4 Here you can apply EQ (equalizer) to the playback of tracks 1–4. Use these settings when you wish to apply EQ to the playback. The EQ has three bands. High EQ and low EQ are shelving type, and the mid EQ is a peaking type with adjustable cutoff frequency. -
Page 107: Insert Effect
19. INSERT EFFECT The insert effects can be applied to the analog inputs during recording, or to track playback. The D12 lets you use up to eight different insert effects simultaneously. Insert effects cannot be used if “DigiIn” is turned “On”... -
Page 108: P2 Inseff1: Selection And Settings For Insert Effect 1
The effect program whose name or parameters you modified can be stored in user areas “U001”– ”U128.” The D12 provides 128 user areas for insert effects. In the “StoreEffect” dialog box, specify the “user area number” and press the “Exec.” button to store the effect. -
Page 109: P3 Inseff2: Selection And Settings For Insert Effect 2
D12 provides two master effects. The final effect is used to adjust the final stage of the master LR bus. The D12 provides one stereo final effect. The AUX send is used when you wish to apply an external effect to the sound. -
Page 110: P2 Msteff2: Selection And Settings For Master Effect 2
The effect program whose name or parameters you modified can be stored in user areas “u001”– ”u032.” The D12 provides 32 user areas for master effects. In the “StoreEffect” dialog box, specify the “user area number” and press the “Exec.” button to store the effect. -
Page 111: Solo/Monitor
The effect program whose name or parameters you modified can be stored in user areas “u033”– ”u064.” The D12 provides 32 user areas for final effects. In the “StoreEffect” dialog box, specify the “user area number” and press the “Exec.” button to store the effect. -
Page 112: P2 Monitor: Monitor Settings
P2 Monitor: Monitor settings Select the audio signals that will be output from the monitor output ([MONITOR OUT L/R] jacks) and the headphone output ([PHONES] jack). 1. SelectMonitor ... [MasterLR, Cue, Rhythm, (Solo)/On, Off] Select the audio signals that will be output from the [MONITOR OUT L/R] jacks and the [PHONES] jack. -
Page 113: Meter/Track View
22. METER/TRACK VIEW Here you can view the pre fader level meter and post fader level meter. You can also use the track view dis- play to check whether a track contains audio events. From the top, the level meters indicate CLP, –3, –6, –9, –12, –15, –18, –24 and –40 dB. -
Page 114: Fader
Play To. ( p.101) 5. [REC] key When you press this key, the D12 will enter record- ready mode (the LED will blink). In order to enter record-ready mode, [TRACK STATUS] must be set to REC for at least one track. -
Page 115: Effect Parameter List
Example Algorithm number: Category number: Algorithm name 1: RV1: Reverb Hall Parameter name shown on screen...Range of parameter Explanation (parameter name) *Time (Reverb Time [sec]) ...01...10.0s Sets the reverberation time * Parameters marked by an “*” in front of the screen parame- ter name can be controlled by an external device such as an expression pedal. -
Page 116: 9: Dl2: St/Cross Delay (Stereo/Cross Delay)
HiDamp (High Damp [%])... 0...100 Sets the damping amount in the high range LoDamp (Low Damp [%]) ... 0...100 Sets the damping amount in the low range Spread (Spread)... 0...50 Sets the width of the stereo image of the effect sound Mix (Wet/Dry)...Dry, 1:99...99:1, Wet Sets the balance between the effect and dry sounds : High Damp [%], : Low Damp [%]... -
Page 117: 13: Dl6: St.auto Panning Delay
The “Attack” and “Release” parameters specify attack time and release time of delay level control. 13: DL6: St.Auto Panning Delay (Stereo Auto Panning Delay) This stereo delay effect pans the delay sound left and right using the LFO. LTime (L Delay Time [msec])... 0...680ms Sets the delay time for the left channel LFback (L Feedback)... -
Page 118: 18: Mo5: St.tremolo (Stereo Tremolo)
18: MO5: St.Tremolo (Stereo Tremolo) This effect modulates the volume level of the input signal. The effect is stereo, and offsetting the LFO of the left and right phases from each other produces a tremolo effect between left and right. LFO (LFO Waveform) ... -
Page 119: 23: Dy3: Multiband Limiter
If “L Only” (or “R Only”) is selected, the left and right channels are linked, and the Limiter is controlled via only the left (or right) channel. With “indivi”, the left and right channels control the Limiter indi- vidually. : Ratio, : Threshold [dB], : Gain Adjust [dB] This parameter sets the signal compression “Ratio”. -
Page 120: 27: Dy7: St.parametric 4Band Eq
Set “Pre LPF” to “On” to prevent this noise from being generated. If you set the “Sampling Frequency” to about “3kHz” and set “Pre LPF” to “Off,” you can create a sound like a ring modulator. : Resolution, : Output Level If you set a smaller value for the “Resolution”... -
Page 121: Insert (2In2Outx2), Final
Insert (2in2outx2), Final These algorithms can be selected for an insert effect if “2in2outx2” is selected for “Select Eff Type”. They can also be selected for a final effect. Large size LS1 – LS7 Category: Large size effects 32: LS1: St.Graphic 7band EQ (Stereo Graphic 7band EQ) This is a stereo 7-band graphic equalizer. -
Page 122: 37: Ls6: Rotary Speaker
Type (Type) ...Sharp, Loose, Selects the decay curve for the early Modula, Revers reflection Time (ER Time [msec])... 10...1600ms Sets the time length of early reflection PreDly (Pre Delay [msec]) ... 0...200ms Sets the time taken from the original sound to the first early reflection EQTrim (EQ Trim) ... -
Page 123: Pa1 Category: Pre-Amp Simulator
Category: Pre-amp simulator 48: PA1: Pre Amp Simulator [Dist, NR, Tone, AmpSim] EB1 – EB3 Category: Bass multi 49: EB1: Bass Multi1 [Comp, Exctr, P4EQ, Cho/Fl, S.Dly] 50: EB2: Bass Multi2 [Dist, NR, Filter, Delay] 51: EB3: Bass Multi3 [Comp, P4EQ, Gate] Category: Mic multi 52: MS1: Mic Multi [CabRes, MicSim, Comp]... -
Page 124: Ampsim (Ampsimulator)
AmpSim (AmpSimulator) This effect simulates the acoustical characteristics of a guitar amp. Even if you are recording your instrument via a direct line, you can produce a realistic sound as though a guitar amp were actually being used. Type (Amplifier Type) ... AMP1...5 Selects the type of guitar amplifier CabRes (CabinetResonator) This effect simulates the acoustical characteristics and cabinet... -
Page 125: Micsim (Mic Simulator)
: Mode, Fine If Cntrl is controlling Pitch and you change Mode or Fine, you must once again use Cntrl to readjust the Max and Min parame- ters. : Feedback Position Select, : Feedback When “Feedback Position Select” is set to “Pre,” the output of the pitch shifter will be once again sent back to the pitch shifter. -
Page 126: Mm14: Exciter – Limiter
68: MM14: Exciter – Limiter [Excit2, Lmtr] 69: MM15: Exciter – Cho/Flng [Excit2, ChFl1] 70: MM16: Exciter – Phaser [Excit2, Phaser] 71: MM17: Exciter – Mt.Delay [Excit2, Mt.Dly] 72: MM18: Limiter – P4EQ [Lmtr, P4EQ] 73: MM19: Limiter – Cho/Flng [Lmtr, ChFl2] 74: MM20: Limiter –... -
Page 127: Comp2 (Compressor2)
Comp2 (Compressor2) This effect adds Pre LEQ and Pre HEQ to Comp1. Sense (Sensitivity)... 1...100 Sets the sensitivity Attack (Attack) ... 1...100 Sets the attack level Trim (EQ Trim) ... 0...100 Sets the EQ input level LEQG (Pre HEQ Gain [dB])...–15...+15dB Sets the gain of High EQ HEQG (Pre LEQ Gain [dB])...–15...+15dB Sets the gain of Low EQ Level (Output Level) ... -
Page 128: Insert (1In1Outx8)
Insert (1in1outx8) These algorithms can be selected as an insert effect if “1in1outx8” is selected for “SelectEffType.” Different insert effects can be used on each of eight channels/ tracks. Effects MN1–MN11 are monaural type effects. “1in1outx8” effects cannot be controlled by an expression pedal etc. -
Page 129: Troubleshooting
Troubleshooting No sound Is the power of the D12 or connected equipment turned off? ( p.17) Can’t hear the playback Have the [MASTER] fader or [PHONES] knob been lowered? Have the channel volume levels been lowered? When pairing has been switched off after it had been on, or after using Scene Read, the actual volume lev- els may not match the positions of the faders. -
Page 130: Can't Record
Is the [CHANNEL] fader of the D12 lowered? (When the [RECORD] “RecMode” tab page item “Select Rec- Mode” is set to “Input”) Is the [MASTER] fader of the D12 lowered? (When the [RECORD] “RecMode” tab page item “Select Rec- Mode” is set to “Bounce”) -
Page 131: Rhythm
In the [SYSTEM] “MIDI” tab page, check “GlobalCh.” ( p.73) The D12 does not synchronize as a slave If the D12 is set as a MTC slave, several seconds may be required before synchronization is achieved. Can’t control other devices via MMC In the [SYSTEM] “MMC”... -
Page 132: External Disk Drive
Did you turn on the power of the CD-R/RW drive before turning on the power of the D12? Turn off the power of both the CD-R/RW drive and the D12, and then turn the power on again in the order of CD-R/RW drive D12. -
Page 133: Messages
WAV files stored on a DOS format external SCSI disk do not appear in the WAV file list Are they saved in a sub-directory? Sub-directories are not supported for media other than CD-ROM, CD-R, or CD-RW. Re-save the WAV files in the root directory. - Page 134 ToTime>=EndTime When using the expand/compress track editing opera- tion (“ExpCmpTrack”), the TO and END settings you made were incorrect so that the operation could not be executed. This message will appear if TO is later than END, or if they are at the same time location. Set the times correctly.
-
Page 135: About The Cdrw-1
1 Remove the cover. Slide the [EJECT] switch (located on the bottom of the D12) in the direction of the arrow, and the drive bay cover on the side of the D12 will be pushed out. 2 Remove the cover. - Page 136 3, or try reinstalling the CDRW-1. Removing the CDRW-1 When you slide the [EJECT] switch located on the bot- tom of the D12, the CDRW-1 will be pushed out of the D12. Gently remove the CDRW-1. Fastening the CDRW-1 firmly in place...
-
Page 137: Using The Cdrw-1
For the procedure of using the CDRW-1 to create an audio CD, refer to “Step 9. Mixdown” ( p.49). When using the CDRW-1, you must be sure that the D12 is placed on a level surface that does not vibrate. Listening to an audio CD Here’s how to listen to an audio CD with the L channel... -
Page 138: Specifications
240 64 pixel LCD with backlight Power supply: AC9V 3A AC/AC power supply Power consumption: 19 W (AC 9V 2.2A max, D12 alone) 23 W (AC 9V 2.6A max, with CDRW-1 installed) Dimensions: 357mm (W) 245mm (D) 81mm (H) (Including protrusions) Weight: 2.0 kg (main unit only) - Page 139 Output impedance: Maximum level: 50 mW @32 <S/P DIF INPUT/OUTPUT> Connector: optical Format: 24 bit S/P DIF (IEC60958, EIAJ CP– 1201) <SCSI> Connector: D-sub half-pitch 50 pins female Format: SCSI-2 compatible <MIDI IN/OUT> Connectors: DIN 5 pin 2 <FOOT SW> Connector: 1/4"...
-
Page 140: Midi Implementation Chart
Mode 1: OMNI ON, POLY Mode 2: OMNI ON, MONO Mode 3: OMNI OFF, POLY Mode 4: OMNI OFF, MONO Consult your local Korg distributor for more information on MIDI IMPLEMENTATION. Transmitted Recognized *6: Transmitted/received for mixer control when ControlChange is enabled in [SYSTEM] “MIDI.”... -
Page 141: Block Diagram
Block diagram... -
Page 142: Effect Program List
INSERT EFFECT Preset128 User128 ProgNo Categ ProgramName Algorithm EFF1 Reverb 7 I001 RV1 ReverbHall Reverb Hall HALL I002 RV2 SmoothHall Smooth Hall SmtHall I003 RV3 WetPlate Reverb Wet Plate WPlate I004 RV4 DryPlate Reverb Dry Plate DPlate I005 RV5 ReverbRoom Reverb Room ROOM I006 RV6... - Page 143 MASTER EFFECT Preset32 User32 ProgNo Categ ProgramName Algorithm EFF 1 Reverb 15 M001 RV1 ReverbHall Reverb Hall HALL M002 RV2 SmoothHall Smooth Hall SmtHall M003 RV3 WetPlate Reverb Wet Plate WPlate M004 RV4 DryPlate Reverb Dry Plate DPlate M005 RV5 ReverbRoom Reverb Room ROOM M006 RV6 BrightRoom...
-
Page 144: Rhythm Name List (215Patterns)
Rhythm Name List (215patterns) For Beat settings other than 3/4, 4/4 or 6/8, only (Blank), Metro, or Hihat can be selected. For Beat settings of 3/4, 4/4 or 6/8, the following rhythm patterns can be selected in addition to (Blank), Metro, or Hihat. -
Page 145: Demo Song List
Demo Song List “ I Can’t Wait ” The song is written by Bill Champ- lin/Dennis atkosky. © 1999 Bill Champlin/Dennis Matko- sky — all rights reserved. Index Numerics 16Bit/12Track ... 88 1in1outx4 ... 43 1in1outx8 ... 43 1in2outx2 ... 43 24Bit/6Track ... - Page 146 Large size effects...119 Level meter ...111 Locate ...35, 97 Locate function ...97 Loop...99 Loop recording...31 Manual punch-in/out...28, 75 Manual tempo ...62 Mark ...75, 92 Delete...36 Move the time location ...36 Master...76 Master effect ...45, 107 MASTER fader ...112 Master L, R meter ...111 Master tape ...50 Metronome ...94 Mic multi...121...
- Page 147 Virtual track ...27 Vocal multi ...121 WAV file Export...87 Import ...86 Waveform ...82, 83, 84, 85, 86, 101...
Need help?
Do you have a question about the D12 and is the answer not in the manual?
Questions and answers