Table of Contents
Advertisement
Quick Links
Advertisement
Table of Contents

Subscribe to Our Youtube Channel
Summary of Contents for H2I ONEOF Accuracy Motion
- Page 1 Accuracy Motion User Manual...
-
Page 2: Table Of Contents
Table of content Introduction ....2 Using the application ..13 Equipment supplied with your ONEOF® Accuracy2 interface....13 Accuracy Motion . -
Page 3: Introduction
Holding rubber bands (X2) Quick start Guide Foreword This manual is intended for all users of an H2i Sàrl ONEOF® acoustic measuring device. It contains all the information necessary for its installation, commissioning, periodic maintenance and troubleshooting. This manual has been compiled by Petitpierre SA with the same care as your acoustic measurement device of which it is an inseparable part. -
Page 4: Limitation Of Warranty
(oneof.dat) available in the link Application data folder from the settings. [See Application settings, page 30] Petitpierre SA and H2i Sàrl are not responsible for : • misuse of the device ;... -
Page 5: Typographical Conventions
Typographical conventions The styles used in this manual are the following: Designation Definition Example First element Used in conjunction with the Second element Ordered list illustration numbers, preceded by the corresponding numbers. Etc... All software commands, buttons, Software function keys, windows and the like The On button (Switching on) allows commands used in the manual is indicated in... -
Page 6: Safety And Environment
Safety and environment This chapter defines the safety instructions for the proper operation of the Accuracy Motion device and the associated software. It also describes the handling and storage conditions. Environmental conditions The Accuracy Motion device must be used exclusively indoors. The electrical safety of the device is guaranteed only if the electrical installation of the building complies with the regulations for industrial buildings, and if it functioning properly. - Page 7 2.2.2.1 Mechanical hazards There is a risk of entrapment. Be careful not to leave your hand between the head and the base of the device during operation. 2.2.2.2 Electrical hazards It is forbidden to open the device in any way. A faulty main power supply (outside the range specified in the device features section) or a faulty cable can damage the device.
-
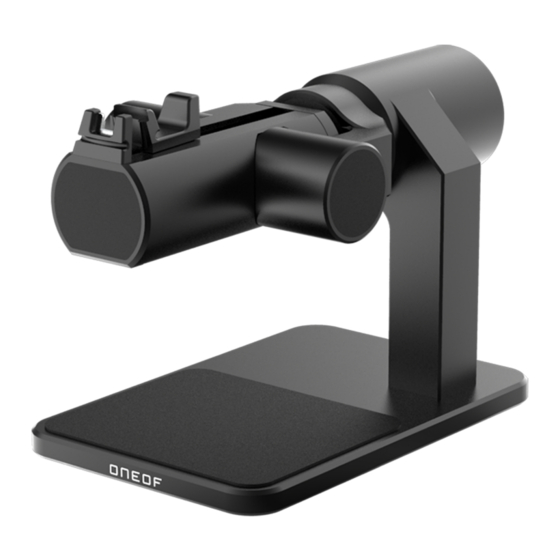
Page 8: General Description
One connector allow the device to be controlled by the software. The other one is an optionnal power supply (iPhone/iPad only). No other access to the components of the device is possible outside the technical services of Petitpierre SA and H2i Sàrl. Description 3.2.1 Overall view FIG. - Page 9 3.2.2 Rotation axes FIG. 3-2 - Accuracy Motion (Rotation axes) The Accuracy Motion rotation axes are: • Alpha (1) corresponds to movement from top (0°) to bottom (90°). The position in the illustration corresponds to 0°. • Beta (2) corresponds to the rotation movement (360°), the positive direction is counterclockwise.
-
Page 10: Technical Specifications
Technical specifications 3.3.1 Approximate dimensions and weight Designation Value Unit Length x Width 25 x 12 Height Weight 3.3.2 Power supply Designation Value Unit Type of cable USB type-C Voltage Current General description 9|36... -
Page 11: Handling And Storage
Handling and storage Handling (safety) When handling the device, make sure that: - it does not suffer from shock ; - there are no objects on or in the unit. Transport During transport, the device must be placed in its original packaging and not be subjected to shock. -
Page 12: Installation
Installation Installation and commissioning The device has been checked, adjusted and tested in our workshops. 5.1.1 Application installation Download and install the ONEOF® Accuracy2 App for Windows at https://h2i.ch/apps System requirements : • Windows 10 version 1803 or higher •... - Page 13 It is very important to secure the object to be measured with the holding rubber band provided for this purpose. Petitpierre SA and H2i Sàrl cannot be held responsible for any damage caused by a falling piece or a watch during a measurement.
-
Page 14: Using The Application
Using the application Accuracy2 interface To use the Accuracy Motion correctly, it is important to understand the different areas that make up the application window. FIG. 6-1 - Accuracy Motion (User interface areas) Application settings control area Control area Results or listing area Contextual menu area Editing area The editing area windows (3) can be shown or hidden... -
Page 15: Accuracy Tab
Data Contains all saved results and measurements. Here you can create new watches (measurement folders), delete them, view old results and export your measurement data. [See Data tab, page 21] Sequences Create and manage sequences involving movement operations and measurements. [See Sequence tab, page 26] Accuracy Tab FIG. - Page 16 6.2.1 Control bar The control bar allows you to select the standard measurement positions, to start or stop a measurements sequence, to start or stop a single measurement according to the chosen position, to save and to visualize the parameters related to the Accuracy Motion. FIG.
- Page 17 6.2.2 Device Overview Window This window allows you to select one or more devices, to display and edit the name (saved in database), and allows you to view the measurements table. FIG. 6-4 - Accuracy Motion (Device overview) Device name + serial number Status bar Summary table Detail views...
- Page 18 6.2.2.1 Detail views Clic on the Detail views button (4) of the Device overview window (see FIG. 6-4). In the detail view, you can analyze the current measurements of your watch. You can select different views to get a better overview of the data. The Scope view opens by default Scope view FIG.
- Page 19 Graphic view FIG. 6-6 - Accuracy Motion (Graphic view) Graphic view Next view button Previous view button Graphic view button Every second, a new value of precision rate, amplitude and beat error is added to the graph. It is always interesting to check how these two values vary over time. Some particular and natural fluctuations may appear, such as the impact of gear train defects, the drop of the amplitude at the time of change, or more generally the variation of the rate over the whole power reserve of the watch.
- Page 20 Diagram view FIG. 6-7 - Accuracy Motion (Diagram view) Diagram view Next view button Previous view button Diagram view button As soon as the frequency is detected, the diagram starts to display the results. Each point represents a tick or a tock in time, which is shown as two lines. •...
- Page 21 Data view When you measure a watch in several common positions, the data view provides a summary of the current measurement. The different parts of the data are shown in the figure below. FIG. 6-8 - Accuracy Motion (Data view) Data view Radar chart Previous view button...
-
Page 22: Data Tab
Data view / Radar chart FIG. 6-9 - Accuracy Motion (Radar chart) The watch can for example be perfectly accurate (1), can gain a few seconds per day (2), or have a problem with the CR position (3). Data tab This section allows access to the recorded data. - Page 23 6.3.2 Viewing the results of a recorded measurement FIG. 6-11 - Accuracy Motion (Recorded measurement viewing) • A double-click on the selected measurement gives access to the Graphic view and the Data view. A new menu appears (4) with the two buttons for viewing the Graphic view (3) and the Data view (2).
-
Page 24: Measurement Parameters
Measurement parameters 6.4.1 Measurement parameters tab The Measurement parameters contains the data related to the watch you want to measure (frequency, lift angle,...) but also the way you want to measure it (how much integration time, stabilization time,...). A measurement cannot be made without parameters. The default parameters are the parameters assigned to a connection with a device. - Page 25 6.4.1.1 Creation of parameters FIG. 6-13 - Accuracy Motion (Creation of parameters) • Create a new set of parameters by clicking Add Parameters (1). • Set as default: "Default" means that when a new device is connected, the measurement will be made with this parameter.
- Page 26 • Lift angle: manufacturer's data. • Escapement: manufacturer's data. • Frequency: number of oscillations of the balance wheel. The frequency can be set to automatic by checking the Auto box. • Gain: can also be found automatically by checking the Auto box.
- Page 27 6.4.2 Sequence tab The Sequences window is organized according to the following illustration: FIG. 6-15 - Accuracy Motion (Sequences) Sequences command bar Operation control bar Sequences actions list Sequences list Operations editing area 6.4.2.1 Create a measurement sequence: Click on the ADD button on the Sequences command bar (1). The software will ask you to select the type of device you want to create the sequence with.
- Page 28 The static operation corresponds to a standard measurement in a specific position. Measuring: Takes the measurement when the device reaches the requested position. If selected, the device will hold the sequence until a watch is detected Speed: Set the speed of movement, normal or slow.
- Page 29 6.4.2.3 Save a sequence FIG. 6-19 - Accuracy Motion (Save a sequence) Once the sequence is completed, click the Save button (1) on the command bar to save the sequence. If you forget to save, before accessing another section, the application will ask you if you want to save the changes.
- Page 30 6.4.3 Criteria tab 6.4.3.1 Define Criteria The Criteria define the display of the measurement data. The criteria will change the information displayed in the Device Overview window. FIG. 6-20 - Accuracy Motion (Criteria for displaying the measures) Create criteria button Device overview window Save button Displayed measurement positions...
-
Page 31: Application Settings
Application settings FIG. 6-21 - Accuracy Motion (Application settings) Application settings button Settings editing area 6.5.1 Display setting The color theme as well as the language can be changed in the Personalization section. 6.5.2 Language Choose the application displayed language. 6.5.3 Database This section contains all the fields to connect to the database and to test the connection. -
Page 32: Maintenance
Maintenance Cleaning the device Clean the Accuracy Motion with a dry or damp cloth. Periodic maintenance • No particular periodic maintenance is required. Maintenance 31|36... -
Page 33: Troubleshooting
Unplug and plug the device again. Restart the software. Send the Application data folder logs (accuracy-standale.txt and one-of.txt) to info@h2i.ch The device is not detected by your tablet Check after each of the following steps if the problem is solved: Unplug and plug the device again. -
Page 34: Recycling
Recycling To protect people and the environment, all equipment and accessories must be disposed of properly. It is imperative that the local laws and regulations concerning waste disposal are observed. The machine may only be disassembled and dismantled by a qualified technician. -
Page 35: Annexes
Annexes Annexes 34|36... -
Page 36: Glossary
Glossary Escapement: The escapement is a mechanism usually placed between the energy source (spring, weight, etc.) and the regulating organ. The purpose of the escapement is to maintain and count the oscillations of the balance wheel of a watch. It allows the transmission of time information from a regulating device (balance wheel) to the device to be regulated (the hands of a watch, for example), and to supply the regulating device with energy. - Page 37 • When the testing position is changed, noises appear in the signal due to the oscillating mass rotation. Setting a stabilization time can avoid bad results after a change of position. Glossary 36|36...
Need help?
Do you have a question about the ONEOF Accuracy Motion and is the answer not in the manual?
Questions and answers