Advertisement
Quick Links
Follow step - to install Window Intercom System. For information on Safety precautions, please refer to the instruction manual.
Connect devices.
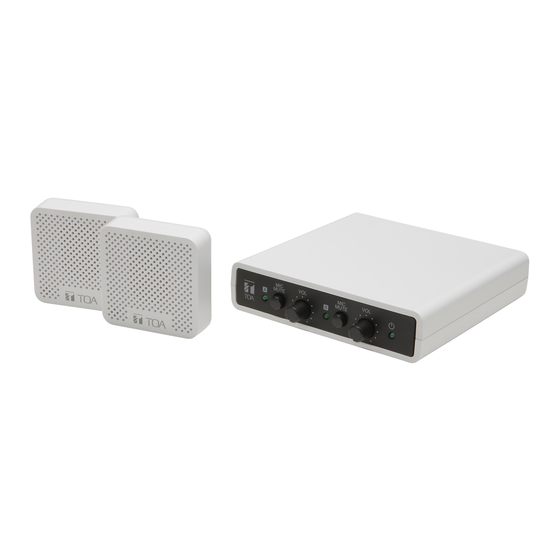
Sub-Unit (bottom)
Dedicated cable
(accessories)
Base Unit (rear)
To AC mains
Power cord*
AC adapter*
(accessory)
(accessory)
* Not supplied with
the version W
Headset switch
Note
When using a headset, set the Base Unit's
headset switch to ON.
Convenient Tool
Position the two Sub-Units
at speaker face height.
When mounting to a partition, use the Sub-Units' built-in
magnets to sandwich (mount on either side of) the partition.
Magnets (2 places)
Sub-Unit
Notes
When the Sub-Units are positioned too far away from
the speaker whose voice may not be picked up accurately.
( Refer to the page on the back. )
To prevent howling, mount the Sub-Units at least 15 cm
away from the edge of the partition.
The label of Speak Here is for Sub-Units
Download the template provided on the TOA DATA Library to create new label.
https://www.toa-products.com/international/detail.php?h=NF-2S
The recommended settings for the volume controls
are as follows:
Recommended volume control settings
Sub-Unit
Hospitals and other
quiet locations
Base unit (front)
Notes
Avoid setting the volume too high, as howling could result.
When no sound is being output, check if:
The MIC MUTE button is switched ON.
•
All connection cables are not firmly connected.
•
WINDOW INTERCOM SYSTEM
NF - 2 S
Adjust the Base Unit sound
volume.
Locations with
ambient noise, such
as supermarkets
MIC MUTE buttons
Continues on the reverse side.
Advertisement

Subscribe to Our Youtube Channel
Related Manuals for Toa NF-2S


Summary of Contents for Toa NF-2S
- Page 1 All connection cables are not firmly connected. • away from the edge of the partition. The label of Speak Here is for Sub-Units Convenient Tool Download the template provided on the TOA DATA Library to create new label. https://www.toa-products.com/international/detail.php?h=NF-2S Continues on the reverse side.
- Page 2 Partition The instruction manual can be accessed on the TOA DATA Library. Download the manual from QR code* with smartphone or tablet. “QR Code” is registered trademark of DENSO WAVE INCORPORATED in Japan and other countries.
Need help?
Do you have a question about the NF-2S and is the answer not in the manual?
Questions and answers