Toa N-SP80AS1 User Manual
Sip video/audio door stations
Hide thumbs
Also See for N-SP80AS1:
- Instruction manual (76 pages) ,
- Quick manual (8 pages) ,
- Setup manual (19 pages)
Table of Contents
Advertisement
Quick Links
Advertisement
Table of Contents

Related Manuals for Toa N-SP80AS1


Summary of Contents for Toa N-SP80AS1
- Page 1 N-SP80AS1 SIP Video Door Station, N-SP80VS1 SIP Audio Door Station User Manual...
-
Page 2: Table Of Contents
Content Production Overview ..............3 1 Production description ..................3 2 Features ........................ 4 3 Panel Description ....................5 4 Installation ......................6 Configuration ................8 1 Web Login ......................8 1.1 Obaining the IP address ................8 1.2 Login the web ..................... 8 2 Status ........................ -
Page 3: Production Overview
Production Overview 1 Production description TOA N-SP80 Series are outdoor-rated, SIP-compliant hands-free Voice over IP (VoIP) Emergency Stations. It makes the emergency teams to coordinate their rescue missions with high efficiency. N-SP80 supports two types: N-SP80AS1(Audio) and N-SP80VS1(Video). They are often used in locations such as: parking facilities, college campuses, medical centers, and industrial parks. -
Page 4: Features
2 Features Key Features One panic button input for emergency intercom; Two-way audio communication over IP networks with Echo Cancel feature; PoE (IEEE802.3af, Power-over-Ethernet); Camera resolution of 3M pixel;(N-SP80VS1 only); MPEG-4/MJPEG compression; (N-SP80VS1 only); Complies with SIP standard for easy integration in every SIP capable PBXes: CUCM, Avaya, Asterisk, Digium, etc;... -
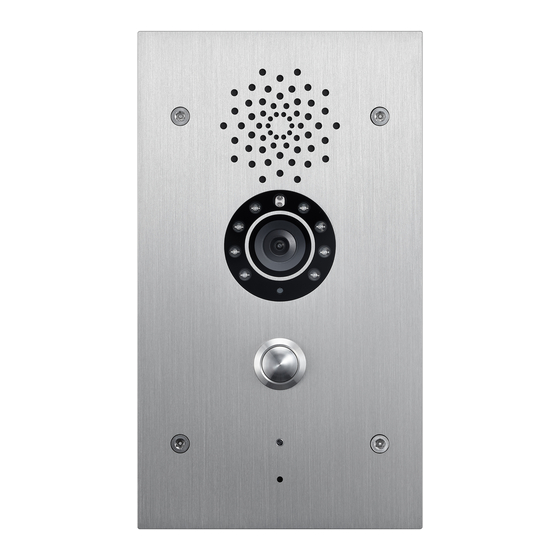
Page 5: Panel Description
Protocols support: IPv4, HTTP, HTTPS, FTP, SNMP, DNS, NTP, RTSP, RTP, TCP, UDP, ICMP, DHCP, ARP SIP Features SIP v1(RFC2543), SIP v2(RFC3261) Audio codecs: G.711a, G.711μ, G.722, G.729 Video codecs: MPEG-4/MJEG (N-SP80VS1 only) Speech Quality: 7kHz Audio Echo Cancellation Voice Activation Detection Comfort Noise Generator 3 Panel Description... -
Page 6: Installation
4 Installation... - Page 7 Installation step: 1. Use cement to fix the back cover in the wall(installation height about 1500mm) 2. Place N-SP80VS1/AS1 panel into the back cover. 3. Use screws to fix the panel.
-
Page 8: Configuration
1 Web Login 1.1 Obtaining the IP address The TOA N-SP80VS1/AS1 uses Static IP by default, and the default IP address is 192.168.1.102. If the IP address is unknown, press the call button when LED light turns blue, after a short period of time(about 5s), the phone will announce its IP. -
Page 9: Status
2 Status Status, including product information, network information and Account information, can be viewed from, Status -> Basic. Sections Description Product Information To display the device’s information such as Model name, MAC address (IP device’s physical address), Firmware version and Hardware firmware. Network Information To display the device’s Networking status(LAN Port),such as Port Type(which could be DHCP/Static/PPPoE), Link Status, IP... -
Page 10: Intrecom
3 Intercom 3.1 Basic Sections Description Account Selection Select Account: N-SP80VS1/AS1 supports 2 accounts. You can choose one account or Auto mode for the following Intercom basic settings. No Answer Call: Choosing Enabled is for 3 No Answer Calls. 1 call is to the cell of “Push Button”, 2 is “No Answer Call1”, 3... -
Page 11: Led Settings
3.2 LED Settings To configure the different LED blink mode of different states. Sections Description States There is five states: Normal, Offline, Calling, Talking and Receiving. Color Off The default status is OFF Color On It can support three color: Red, Green, Blue Blink Mode To setup the different blink frequency. -
Page 12: Relay&Input
3.3 Relay&Input To configure unlock and alarm setting. Go to the path: Push Button-> Relay&Input. Sections Description Relay To configure some settings about unlock Relay ID: N-SP80VS1/AS1 support 2 relays Relay Type: Different locks use different relay types. Delay(s): Allows door remain “open” for certain period The range is from 1 to 5 seconds DTMF: Setup DTMF code for remote unlock Status: Different relay type will show different status. -
Page 13: Live Stream(Optional)
Display Name: Which is sent to the other call party for displaying Call Timer: Every its seconds makes call during the input is activated. Light Status: Here is an indication of a status of input. 3.4 Live Stream(Optional) Sections Description Live Stream To check the real-time video from N-SP80VS1. -
Page 14: Aec Setting
3.5 AEC Setting Sections Description AEC Level AEC(Configurable Acoustic and Line Echo Cancelers) is used to adjust the echo effect during the communication. The default value is 700. Increase the level, the echo control is better. -
Page 15: Rtsp(Optional)
3.6 RTSP(optional) Sections Description RTSP Basic To active the RTSP function, then N-SP80VS1 can be monitored. RTSP Stream To enabled RTSP video and select the video codec. N-SP80VS1 supports H264,H263 video codec. H264 by default. H.264 Video Parameters H264: A video stream compression standard. Different from H263, it provides an approximately identical level of video stream quality but a half bit rate. -
Page 16: Onvif(Optional)
To modify the resolution, framerate and bitrate of MPEG4 MJPEG Video Parameters MJPEG: called Motion Joint Photographic Experts Group. It is a video encoding format.in which each image is compressed separately by JPEG.MJPEG compression can produce high quality video image and has a flexible configuration in video definition and Compressed frames To modify the resolution, framerate and bitrate of MJPEG 3.7 Onvif(optional) -
Page 17: Account
4 Account 4.1 Account->Basic To configure sip account, go to the path: Account->Basic Sections Description SIP Account To display and configure the specific Account settings. Status: To display register result. Display Name: Which is sent to the other call party for displaying. -
Page 18: Account-> Advanced
for authentication. Password: Used for authorization. SIP Server 1 To display and configure Primary SIP server settings. Server IP: SIP server address, it could be an URL or IP address. Registration Period: The registration will expire after Registration period, the IP phone will re-register automatically within registration period. - Page 20 Sections Description SIP Account To display current Account settings or to select which account to display. Codecs To display and configure available/unavailable codecs list. Codec means coder-decoder which is used to transfer analog signal to digital signal or vice versa. Familiar codecs are PCMU(G711U), PCMA(G711A), G722 (wid-bandth codecs), G729 and so on.
- Page 21 Provisioning Response ACK: 100% reliability for all provisional messages, this means it will send ACK every time the IP phone receives a provisional SIP message from SIP server. User=phone: If enabled, IP phone will send user=phone within SIP message. PTime: Interval time between two consecutive RTP packets.
-
Page 22: Network
user agent is set to specific value, user could see the information from PCAP. If user agent is not set by default, user could see the company name, model number and firmware version from PCAP 5 Network 5.1 Network-> Basic To configure the basic network settings, Go to the path: Network ->... - Page 23 For advanced settings, go to the path: Network -> Advanced. Sections Description Local RTP To display and configure Local RTP settings. Max RTP Port: Determine the maximum port that RTP stream can use. Starting RTP Port: Determine the minimum port that RTP stream can use.
- Page 24 Internet-standard protocol for managing devices on IP networks. TR069 To display and configure TR069 settings. Active: To enable or disable TR069 feature. Version: To select supported TR069 version (version 1.0 or 1.1). ACS/CPE: ACS is short for Auto configuration servers as server side, CPE is short for Customer-premise equipment as client side devices.
-
Page 25: Phone
6 Phone 6.1 Time/Language Go to the path: Phone-> Time/Language Sections Description To configure NTP server related settings. Time Zone: To select local Time Zone for NTP server. Primary Server: To configure primary NTP server address. Secondary Server: To configure secondary NTP server address, it takes effect if primary NTP server is unreachable. -
Page 26: Call Feature
6.2 Call Feature Go to the path: Phone->Call Feature Sections Description Mode To enable or disable feature key sync. Feature Key Sync: To enable or disable feature key sync. Mode: Select the desired mode. DND (Do Not Disturb) allows IP phones to ignore any incoming calls. -
Page 27: Voice
callee. Active: To enable or disable Intercom feature. Intercom Mute: If enabled, once the call established, the callee will be muted. Others Return Code When Refuse: Allows user to assign specific code as return code to SIP server when an incoming call is rejected. -
Page 28: Multicast
6.4 Multicast Sections Description Multicast Setting To display and configure the Multicast setting. Paging Barge: Setup the priority level. A call is in a higher priority than a paging below this level. Paging priority Active: Enable or disable a priority between a call and a paging Priority List To setup the multicast parameters. -
Page 29: Upgrade
7 Upgrade 7.1 Basic Upgrade To upgrade your device, go to the path: Upgrade > Basic. Sections Description Upgrade To select upgrading rom file from local or a remote server automatically. Note: Please make sure it’s right file format for right model. Firmware version To display firmware version, firmware version starts with MODEL name. -
Page 30: Advanced Upgrade
7.2 Advanced upgrade To do the advanced upgrade for your device, go to the path: Upgrade -> Advanced. Sections Description PNP Option To display and configure PNP setting for Auto Provisioning. PNP: Plug and Play, once PNP is enabled, the phone will send SIP subscription message to PNP server automatically to get Auto Provisioning server’s address. - Page 31 224.0.1.75(PNP server address by standard). DHCP Option To display and configure custom DHCP option. DHCP option: If configured, IP Phone will use designated DHCP option to get Auto Provisioning server’s address via DHCP. This setting require DHCP server to support corresponding option.
-
Page 32: Security
8 Security To modify web password, go to the path: Security-> Basic Sections Description Web Password Modify To modify user’s password. Current Password: The current password you used. New Password: Input new password you intend to use. Confirm Password: Repeat the new password. Note: For now, IP phone can only support user admin.
Need help?
Do you have a question about the N-SP80AS1 and is the answer not in the manual?
Questions and answers