Advertisement
Quick Links
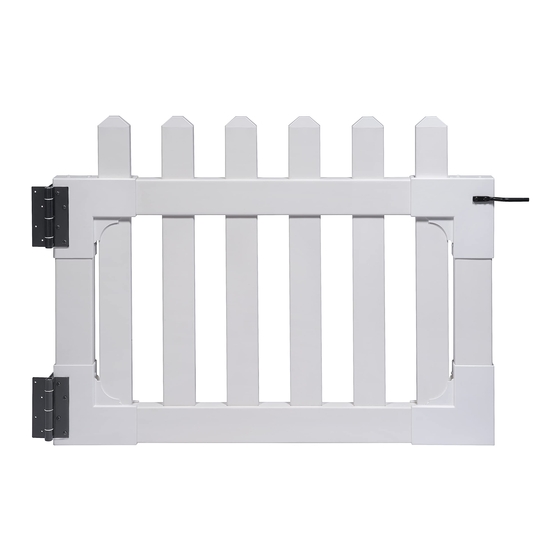
This gate can easily be trimmed down
horizontally to fit your custom fence. Use
fine-toothed circular saw or hack saw.
60 MIN
6935 Reames Rd. Ste. K. Charlotte, NC 28216
@
support@zippity-outdoor.com
704-892-5222 / 877-234-6196
zippity-outdoor.com
Ver. 072320
This gate is designed to be used with our Newport Vinyl Picket Fence.
NEWPORT VINYL PICKET GATE
Approximate assembly
time
ASSEMBLY
INSTRUCTIONS
2 in
1/2 in
41 in Gate Width
42 in Opening
(31" H X 41" W)
Want to see a video on how to
assemble this product? Scan
www.zippity-outdoor.com
33 1/2 in
1/2 in
the code below!
1
Advertisement

Related Manuals for Zippity NEWPORT


Summary of Contents for Zippity NEWPORT
- Page 1 ASSEMBLY INSTRUCTIONS This gate is designed to be used with our Newport Vinyl Picket Fence. 33 1/2 in 2 in 1/2 in 1/2 in 41 in Gate Width This gate can easily be trimmed down horizontally to fit your custom fence. Use 42 in Opening fine-toothed circular saw or hack saw.
-
Page 2: General Information
WEBSITE: nychgroup.com/parts EMAIL: support@zippity-outdoor.com PHONE: 704-892-5222 / 877-234-6196 Customer service agents are available to take calls weekdays from 8am-5pm EST. If you call outside of business hours, please leave a voicemail. - Page 3 This way, the weight strain will be transferred onto two posts versus just one. Installing fence panels on both sides of your gate is ideal in all sit- uations. If this is not possible because of space restrictions, please contact us for alternative solutions. www.zippity-outdoor.com...
- Page 4 Black 1¼” Self-Drilling Stainless Steel Screw (38) Vertical Rail (2) Picket (6) 1½” x 3½” x 18½” .875” x 3” x 29¾” Gate Hinge (2) Gate Latch (1) Bottom Gate Bottom Rail (1) Bracket (2) 1½” x 3½” x 40¾” www.zippity-outdoor.com...
- Page 5 Note: Orient the rail with the routed holes facing up. Insert vertical rails (C) until they hit the bottom rail. STEP 2.3 Completed gate bottom. www.zippity-outdoor.com...
- Page 6 Note: Opening on top gate bracket with the routed hole in the top rail brackets. STEP 3.3 Slide top gate brackets and top rail down over the vertical rails. Completed gate frame. www.zippity-outdoor.com...
- Page 7 (G) into the pre-drilled holes on the gate brackets as necessary. STEP 5: INSERT PICKETS INTO GATE FRAME STEP 5.1 Insert pickets (D) through the top rail into the bottom rail. Completed gate with frame. www.zippity-outdoor.com...
- Page 8 STEP 7: POSITION, ADJUST, AND ALIGN GATE/ SECURE HINGES TO POSTS Use temporary spacers Fasten hinges to the post STEP 7.1 STEP 7.2 or blocks to rest the gate with (8) black 1¼” self-drill- on during alignment and ing stainless steel screws. installation. www.zippity-outdoor.com...
- Page 9 STEP 8: ALIGN AND INSTALL LATCH Align and fasten the gate latch (J) to fit and function with the gate finger using (6) black STEP 8.1 1¼” self-drilling stainless steel screws. www.zippity-outdoor.com...
- Page 10 Congratulations, you are finished! 6935 Reames Rd. Ste. K. Charlotte, NC 28216 support@zippity-outdoor.com 704-892-5222 / 877-234-6196 zippity-outdoor.com www.zippity-outdoor.com...
Need help?
Do you have a question about the NEWPORT and is the answer not in the manual?
Questions and answers