Advertisement
A S S E M B LY I N S T R U C T I O N S
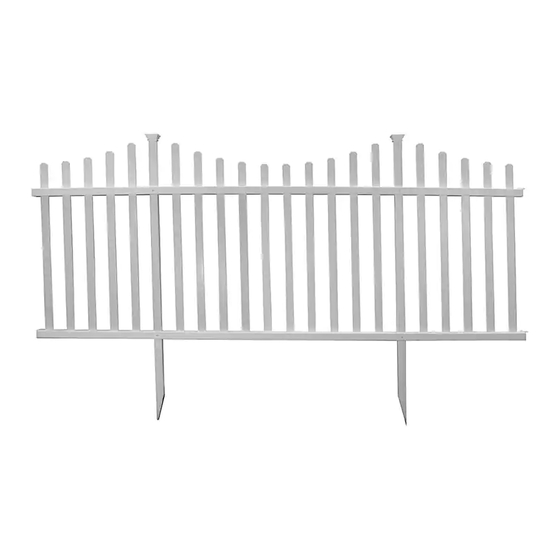
Madison Vinyl Picket Fence Kit 2-Pack
(30"H x 56 1/2"W)
This fence can easily be trimmed down horizontally
to fit your custom space. Use a fine toothed circular
saw or hack saw.
Please read through before starting assembly.
IMPORTANT: CHECK THE INSIDE OF THE LARGER PIECES IN YOUR BOX FOR OTHER MATERIALS
PACKED INSIDE.
Check Box for These Contents
In the event of missing or defective parts please call our customer service department at 1 877 234 6196 (Mon. to Fri. 8:00 AM to 4:00 PM EST).
1. Post Caps (4)
2. Top Rail (2) - 1½" x 1½" x 56 1/2"
3. Posts (4) - 7/8" x 1½" x 39½"
4. Pickets (24) - 1 - ¼" x 1½" x 25 1/8"
2 - ¼" x 1½" x 22 7/8"
3 - ¼" x 1½" x 21 7/8"
5. Bottom Rail (2) - 1½" x 1½" x 56 1/2"
6. Joiner Clips (4)
7. 3/4" Self-Auguring Stainless Steel Screw (24)
Tools You Will Need
• Cordless Drill
• Level
• Hammer
General Information
• Read Instructions through carefully before beginning assembly.
• When assembling components, place on a non-abrasive surface
(i.e. shipping box) to avoid scratching.
• We recommend an area approx 5'x 8' for unobstructed assembling.
• You should not need to use excessive force when assembling components.
14 1/8 in
24 in
40 in
10 in
1
2
3
4
6
7
5
Not to Scale
Zippity
DO-IT-YOURSELF
FRIENDLY PRODUCTS
56 1/2 in
14 1/8 in
2 1/2 in
2 in
28 1/4 in
Ver 3.0/102216
8 1/2 in
30 in
16 1/2 in
Ground
1
Advertisement
Table of Contents

Subscribe to Our Youtube Channel
Related Manuals for Zippity Madison Vinyl Picket Fence Kit 2-Pack


Summary of Contents for Zippity Madison Vinyl Picket Fence Kit 2-Pack
- Page 1 A S S E M B LY I N S T R U C T I O N S Madison Vinyl Picket Fence Kit 2-Pack Zippity DO-IT-YOURSELF (30”H x 56 1/2”W) FRIENDLY PRODUCTS 56 1/2 in This fence can easily be trimmed down horizontally...
- Page 2 Note: Orientate the bottom of Posts as Illustrated Note: Align Holes Zippity DO-IT-YOURSELF FRIENDLY PRODUCTS M a d i s o n Vi n y l P i c k e t F e n c e I n s t r u c t i o n s...
- Page 3 Zippity DO-IT-YOURSELF FRIENDLY PRODUCTS M a d i s o n Vi n y l P i c k e t F e n c e I n s t r u c t i o n s...
- Page 4 3. Use a block of wood to the protect the top of post and gently hammer each post into the ground equally. Push down on the top of posts with both hands Zippity DO-IT-YOURSELF FRIENDLY PRODUCTS Option 2: Option 1:...
- Page 5 S T E P T H R E E Install fence into Ground - Continued Zippity DO-IT-YOURSELF FRIENDLY PRODUCTS Level the assembled unit and backfill and compact dirt around the base of each post to strengthen the unit. Finish the assembly by pushing the post caps down over the top of posts as illustrated.
- Page 6 S T E P F O U R Zippity Fasten Joiner Clips DO-IT-YOURSELF FRIENDLY PRODUCTS Fasten joiner clips by screwing into place on the top of the top rail and top of the bottom rail as illustrated. Screws are self-drilling.
Need help?
Do you have a question about the Madison Vinyl Picket Fence Kit 2-Pack and is the answer not in the manual?
Questions and answers