Table of Contents

Subscribe to Our Youtube Channel
Related Manuals for Phcbi MBR-107D


Summary of Contents for Phcbi MBR-107D
- Page 1 Operating Instructions Blood Bank Refrigerator MBR-107DH Series Please read the operating instructions carefully before using this product, and keep the operating instructions for future use. See page 29 for all model numbers.
-
Page 2: Table Of Contents
CONTENTS INTRODUCTION P. 3 PRECAUTIONS FOR SAFE OPERATION P. 4 ENVIRONMENTAL CONDITIONS P. 7 REFRIGERATOR COMPONENTS P. 8 Control panel P. 10 INSTALLATION SITE P. 12 INSTALLATION P. 13 CAUTIONS FOR USAGE P. 14 START-UP OF UNIT P. 15 Adjustment of shelves P. -
Page 3: Introduction
INTRODUCTION Read the operating instructions carefully before using the appliance and follow the instructions for safety operation. PHC Corporation never guarantees any safety if the appliance is used for any objects other than intended use or used by any procedures other than those mentioned in the operating instructions. ... -
Page 4: Precautions For Safe Operation
PRECAUTIONS FOR SAFE OPERATION It is imperative that the user complies with the operating instructions as it contains important safety advice. Items and procedures are described so that you can use this unit correctly and safely. If the precautions advised are followed, this will prevent possible injury to the user and any other person. - Page 5 PRECAUTIONS FOR SAFE OPERATION WARNING Do not use the unit outdoors. Current leakage or electric shock may result if the unit is exposed to rain water. The installation by Only qualified engineers or service personnel should install the unit. unqualified personnel may cause electric shock or fire. Install the unit on a sturdy floor and take an adequate precaution to prevent the unit from turning over.
- Page 6 PRECAUTIONS FOR SAFE OPERATION WARNING Ensure you do not inhale or consume medication or aerosols from around the unit at the time of maintenance. These may be harmful to your health. Never splash water directly onto the unit as this may cause electric shock or short circuit. Never put containers with liquid on the unit as this may cause electric shock or short circuit when the liquid is spilled.
-
Page 7: Environmental Conditions
PRECAUTIONS FOR SAFE OPERATION CAUTION This unit must be plugged into a dedicated circuit protected by branch circuit breaker. Use a dedicated power source as indicated on the rating label attached to the unit. multiple-tap may cause fire resulting from abnormal heating. Connect the power supply plug to the power source firmly after removing the dust on the plug. -
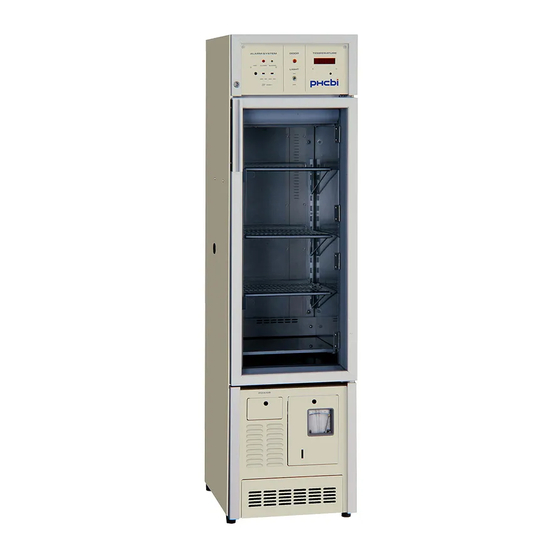
Page 8: Refrigerator Components
REFRIGERATOR COMPONENTS... - Page 9 REFRIGERATOR COMPONENTS 1. Control panel: Digital thermometer, fluorescent light switch, door check lamp, power failure and temperature warning device. 2. Door switch: Stops the air circulation fan when the door is opened to prevent the loss of cold air. Also activates the door check lamp. 3.
-
Page 10: Control Panel
REFRIGERATOR COMPONENTS Control panel Model without CE mark Model with CE mark 12 11 1. Power switch (except CE model) By putting this switch in ON position, power is supplied to mechanical part and machine starts its operation. 2. Fuse (except CE model) This protects the unit when the electric current is abnormal. - Page 11 REFRIGERATOR COMPONENTS 4. Power switch with circuit breaker (CE model) By setting this switch in “I” position, power is supplied to mechanical part and machine starts its operation. When the operation of the unit is stopped by this breaker, please contact with dealer or the service station after disconnecting the power supply plug.
-
Page 12: Installation Site
INSTALLATION SITE To operate this unit properly and to obtain maximum performance, install the unit in a location with the following conditions: A location not subjected to direct sunlight Do not install the unit under direct sunlight. Installation in a location subjected to direct sunlight cannot obtain the intended performance. -
Page 13: Installation
INSTALLATION 1. Removing the packaging materials and tapes Remove all transportation packaging materials and tapes. Open the doors and ventilate the unit. If the outside panels are dirty, clean them with a diluted neutral dishwashing detergent. (Undiluted detergent can damage the plastic components. -
Page 14: Cautions For Usage
CAUTIONS FOR USAGE First, operate the unit on a trial run basis referring to the “Start-up of unit”. Check that the unit is operating properly before placing anything inside the chamber. As the chamber temperature is maintained at 4 C ±... -
Page 15: Start-Up Of Unit
START-UP OF UNIT The following procedures should be adhered to for initial start-up and continuous operation 1. After enough ventilation, install the shelves. Use the stainless steel plate for the bottom shelf. 2. Leave the alarm and buzzer switches off and set the temperature recorder. 3. -
Page 16: Operation Control
OPERATION CONTROL Temperature control This unit is set at the factory to maintain the proper chamber temperature (4 C ± 1 C). No temperature adjustment is necessary. Defrost The heater built-in the condenser automatically defrosts during operation. There is no need for routine defrosting of the unit. -
Page 17: Temperature Recorder
TEMPERATURE RECORDER Usage of temperature recorder The temperature recorder is operated for about one year with size “C” or “R14” battery. A roll of recording paper can be used for one month. Temperature from +20 C to -6 C is recorded in increment of 1 C. - Page 18 TEMPERATURE RECORDER The used recording paper left in the used recording paper compartment can cause a malfunction. Be sure to remove it. See Fig. 5. 5. Place the recording paper between the guide and the guide plate. Slide the recording paper along the guide plate so that the recording paper will not be forced out of the date/hour slot.
-
Page 19: Routine Maintenance
ROUTINE MAINTENANCE WARNING Always disconnect the power supply to the unit prior to any repair or maintenance of the unit in order to prevent electric shock or injury. Ensure you do not inhale or consume medication or aerosols from around the unit at the time of maintenance. -
Page 20: Replacement Of Fluorescent Light
ROUTINE MAINTENANCE Replacement of fluorescent light 1. Remove the two screws below the shade. 2. The fluorescent light can be removed by gently pulling it down. 3. Insert a new fluorescent light bulb after removing the old one from the socket. 4. -
Page 21: Troubleshooting
TROUBLESHOOTING If the unit malfunctions, check out the following before calling for service. Malfunction Check/Remedy If nothing operates even There is a power failure. when switched on The fuse is blown or the circuit breaker is inactivated. The unit is not connected to the power supply. When unit does not get ... -
Page 22: Replacement Of Battery
REPLACEMENT OF BATTERY Location of a nickel-cadmium battery Power failure and This unit is provided a nickel-cadmium battery for the temperature warning device power failure and temperature warning device. The battery is located in the warning device inside the control panel. (see Fig. -
Page 23: Disposal Of Unit
DISPOSAL OF UNIT WARNING If the unit is to be stored unused in an unsupervised area for an extended period ensure that children do not have access and doors cannot be closed completely. The disposal of the unit should be accomplished by appropriate personnel. Always remove doors to prevent accidents such as suffocation. - Page 24 DISPOSAL OF UNIT (English) Disposal of Old Equipment and Batteries Only for European Union and countries with recycling systems These symbols on the products, packaging, and/or accompanying documents mean that used electrical and electronic products and batteries must not be mixed with general household waste. For proper treatment, recovery and recycling of old products and used batteries, please take them to applicable collection points in accordance with your national legislation.
- Page 25 DISPOSAL OF UNIT (French) L’élimination des équipements et des batteries usagés Applicable uniquement dans les pays membres de l’Union européenne et les pays disposant de systèmes de recyclage. Apposé sur le produit lui-même, sur son emballage, ou figurant dans la documentation qui l’accompagne, ce pictogramme indique que les piles, appareils électriques et électroniques usagés, doivent être séparées des ordures ménagères.
- Page 26 DISPOSAL OF UNIT (Portuguese) Eliminação de Equipamentos Usados e Baterias Apenas para a União Europeia e países com sistemas de reciclagem Estes símbolos nos produtos, embalagens, e/ou documentos que os acompanham indicam que os produtos elétricos e eletrónicos e as baterias usados não podem ser misturados com os resíduos urbanos indiferenciados.
- Page 27 DISPOSAL OF UNIT (Dutch) Het ontdoen van oude apparatuur en batterijen. Enkel voor de Europese Unie en landen met recycle systemen. Deze symbolen op de producten, verpakkingen en/of begeleidende documenten betekenen dat gebruikte elektrische en elektronische producten en batterijen niet samen mogen worden weggegooid met de rest van het huishoudelijk afval.
-
Page 28: Specifications
SPECIFICATIONS Blood Bank Refrigerator Product name MBR-107D(H) External dimensions W400 mm x D495 mm x H1515 mm Internal dimensions W320 mm x D350 mm x H710 mm Effective capacity 79 L Exterior Painted steel Interior Stainless steel Painted steel Door... -
Page 29: Performance
PERFORMANCE Product name Blood Bank Refrigerator Model number MBR-107DH-PT MBR-107DH-PK MBR-107DH-PE MBR-107DH-PR Chamber temperature C ± 1 Usable ambient temperature C to +35 Temperature recorder accuracy ± 1 C (+2 C to +8 Alarm duration 9 hours for power failure Noise level 50 dB (A scale) Maximum pressure... -
Page 30: Safety Check Sheet
CAUTION Please fill in this form before servicing. Hand over this form to the service engineer to keep for his and your safety. Safety check sheet 1. Unit contents: □ □ Risk of infection: □ □ Risk of toxicity: □ □... - Page 32 1-1-1 Sakada, Oizumi-machi, Ora-gun, Gunma 370-0596, Japan Printed in Japan LDCL037400-0 © PHC Corporation 2018 S0418-0...
Need help?
Do you have a question about the MBR-107D and is the answer not in the manual?
Questions and answers