
Related Manuals for Siemens SOMATOM Spirit


Summary of Contents for Siemens SOMATOM Spirit
- Page 1 SSME syngo CT 2010C Shi Jing Ru SOMATOM Spirit Operator Manual 2005-2012 C2-025 04/2012 CT RD DS VB36 SOMATOM Spirit 0 . 0 Operator Manual 0 . 0 syngo CT 2010C 0 . 0 www.siemens.com/healthcare...
- Page 2 CE mark and the related Declaration of Conformity. 0 . 0 The original language of this document is English. 0 . 0 © 2005-2012, Siemens Shang- EU Authorized Representative hai Medical Equipment Ltd. Order No. Siemens AG C2-025.620.27.05.02...
- Page 3 Overview of contents 0 . 0 Safety System Description System Handling Operation Maintenance Quality Assurance Technical Specifications Standards and Statutory Regulations H Forms DIP Report Location of Labels Glossary Index 0 . 0 04/2012 0 . 0 0 . 0...
- Page 4 0 . 0 SOMATOM Spirit 0 . 0 0 . 0...
-
Page 5: Table Of Contents
Table of contents 0 . 0 A Safety General Safety Information Information about Personal Safety Mechanical Safety Software Related Safety Information B System Description System Overview Scan Unit (Gantry) Patient Table Console Related Safety Advice Console Storage Media and Drives Accessories C System Handling Operation of the Gantry... - Page 6 Maintenance and Service Cleaning Agents and Disinfectants Cleaning and Disinfecting F Quality Assurance General Information Daily Quality Measurements Constancy Test Low Contrast Test (Optional) Camera Test Constancy Test of the Monitor 0 . 0 SOMATOM Spirit 0 . 0 0 . 0...
- Page 7 G Technical Specifications H Standards and Statutory Regulations J Forms K DIP Report L Location of Labels M Glossary N Index 0 . 0 04/2012 0 . 0 0 . 0...
- Page 8 0 . 0 SOMATOM Spirit 0 . 0 0 . 0...
- Page 9 Welcome to the powerful SOMATOM Spirit computed tomog- raphy system from Siemens. 0 . 0 The SOMATOM Spirit is equipped with the pioneering multi-modality software: syngo. 0 . 0 To make it easier for you to work with the system, the following documentation is included: 0 .
- Page 10 Introduction Quick Starter The Quick Starter describes the use of the SOMATOM Spirit com- 0 . 0 puted tomography system and its operating software. The description is limited to basic operating steps only. It is available in printed form. 0 . 0...
- Page 11 Information via internet More detailed information on accessories can be obtained via 0 . 0 Internet. (→ www.medical.siemens.com). Select your country on the Siemens Healthcare home page and then navigate to the products information. 0 . 0 0 . 0 04/2012 0 .
- Page 12 The overview and introduction chapter, which fol- lows, outlines the topic dealt with in this part. 0 . 0 In the chapters, a number of text sections are highlighted by symbols. 0 . 0 0 . 0 SOMATOM Spirit 0 . 0 0 . 0...
- Page 13 Introduction Operating steps 0 . 0 Individual steps of an instruction are indicated by dia- mond-shaped bullets. 0 . 0 Perform these operating steps. ✧ Preconditions for operating steps 0 . 0 If preconditions for subsequent operating steps have to be men- tioned, these are indicated by a check mark.
- Page 14 0 . 0 In notes, you will find useful hints such as information for easier 0 . 0 handling. 0 . 0 0 . 0 SOMATOM Spirit 0 . 0 0 . 0...
- Page 15 Introduction Names and parameters 0 . 0 All names and data of patients and institutions that are used in this operator manual are entirely fictional. 0 . 0 Any resemblance to names of existing people or organizations past or present is entirely coincidental. 0 .
- Page 16 SOMATOM Spirit is suitable for the generation and processing of tomographic images of patients for diagnostic purposes. 0 . 0 Site of application 0 . 0 SOMATOM Spirit can be operated in the X-ray department of a hospital or doctor’s office. 0 . 0 Authorized users 0 . 0...
- Page 17 This material does not sub- stitute for that duty and is not intended by Siemens, to be used for any purpose in that regard.
- Page 18 0 . 0 We will take account of your suggestions in the next edition. Thank you for your time. 0 . 0 0 . 0 SOMATOM Spirit 0 . 0 0 . 0...
- Page 19 PART 0 . 0 Safety A.1 General Safety Information A.1-1 Indications A.1-1 Fundamental rules of safety A.1-3 General practice A.1-5 Proper and improper use A.1-17 Specific national regulations A.1-20 A.2 Information about Personal Safety A.2-1 Positioning A.2-1 Laser beam A.2-5 System movement A.2-10 Terminating system movements and radiation...
- Page 20 Unique identification A.4-1 Patient sex and age A.4-2 Patient position A.4-2 Scanning A.4-3 Scan parameters A.4-3 Time settings A.4-5 Reconstruction A.4-6 Image quality check A.4-6 Field of view A.4-7 0 . 0 SOMATOM Spirit 0 . 0 0 . 0...
- Page 21 Safety Post-processing A.4-8 General A.4-8 Viewing A.4-12 A.4-13 syngo Neuro Perfusion CT A.4-16 syngo Body Perfusion CT A.4-19 Image display A.4-20 Topograms A.4-20 Scan lines for Osteo CT examinations A.4-21 Data compression A.4-22 Filming A.4-23 Print modes A.4-24 Paper printouts A.4-25 Exporting data A.4-26...
- Page 22 Exporting and recording off-line files A.4-37 Exiting the program A.4-38 Network & communication A.4-39 Software installation and network A.4-39 Searching for data A.4-41 Transferring manipulated images A.4-42 Remote service A.4-43 0 . 0 SOMATOM Spirit 0 . 0 0 . 0...
-
Page 23: General Safety Information
CHAPTER A . 0 General Safety Information This chapter discusses basic safety information. A . 1 Indications A . 1 If safety instructions and other important information are part of the general text, they are indicated as follows in this manual: A . - Page 24 First, the source of danger is addressed. A . 1 Then, possible consequences are described. A . 1 A . 1 Finally, measures are given to prevent a dangerous situa- ✧ tion. 0 . 0 A.1-2 SOMATOM Spirit 0 . 0 0 . 0...
-
Page 25: Fundamental Rules Of Safety
Safety General Safety Information Fundamental rules of safety A . 1 The basis for ensuring the safety of people and equipment are the statutory stipulations and guidelines as well as the informa- tion given in the manual. A . 1 The SOMATOM system was designed and built so that it cannot (→... - Page 26 Relevant statutory stipulations must be observed during instal- A . 1 lation, operation and maintenance. A . 1 Please observe the information given in (→ System Owner Manual) A . 1 0 . 0 A.1-4 SOMATOM Spirit 0 . 0 0 . 0...
-
Page 27: General Practice
Safety General Safety Information General practice A . 1 As an operator, you must observe certain basic rules. A . 1 Patient registration Incorrect assignment of the patient’s name to patient images A . 1 can cause incorrect diagnoses. A . 1 Make sure that you enter the personal data of the patient ✧... - Page 28 A . 1 patients or patients who do not keep still or have accident inju- ries. A . 1 Take the same care when using positioning accessories. A . 1 0 . 0 A.1-6 SOMATOM Spirit 0 . 0 0 . 0...
- Page 29 Safety General Safety Information Patients with implants Possible interference from the CT with implants must be clari- A . 1 fied prior to examination. A . 1 A . 1 CAUTION A . 1 Scanning patients with implanted devices such as pacemakers or neuro stimulators! A .
- Page 30 Press the lever under the handle of the table top and pull. ✧ (→ Page C.2-8 Moving the patient table manually) Release the table top to retract the table top with the ✧ patient. 0 . 0 A.1-8 SOMATOM Spirit 0 . 0 0 . 0...
- Page 31 Safety General Safety Information During scanning Despite the careful design of the CT scanner, it is not possible to A . 1 completely eliminate the risk of injury (danger due to collision, crushing, radiation). A . 1 Never leave the CT scanner unsupervised during an exami- ✧...
- Page 32 Document or export the patient images and studies as fast ✧ as possible. Computer viruses Despite precautions, the software of the computer system is not A . 1 absolutely safe from computer viruses. A . 1 0 . 0 A.1-10 SOMATOM Spirit 0 . 0 0 . 0...
- Page 33 Safety General Safety Information A . 1 CAUTION A . 1 System infected by computer virus! A . 1 Manipulation of the software. A . 1 A . 1 Never use a data medium that could contain a computer ✧ virus, for example game CD.
- Page 34 A . 1 A . 1 Never open components of the system. ✧ Leave all repairs to Siemens Service. ✧ Ensure that no objects, for example necklaces, paperclips or ✧ liquids, can get into the interior of the system (electrical shock, short circuit).
- Page 35 Safety General Safety Information Caution with liquids and Food and drinks must not be consumed in the vicinity of the food console or placed on the console. A . 1 A . 1 In particular near the console (keyboard, control box), you must be careful with liquids and food.
- Page 36 (→ Page D.2-1 A . 1 Perform the prescribed function tests. ✧ Function Tests) Make sure that maintenance is performed at the prescribed ✧ intervals. (→ System Owner Manual) 0 . 0 A.1-14 SOMATOM Spirit 0 . 0 0 . 0...
- Page 37 Defective or not released accessories can cause artifacts, injuries A . 1 to the patient and operating personnel or damage to the equip- ment. A . 1 Only use accessories approved by Siemens. ✧ Replace defective accessories with new original accessories ✧ immediately.
- Page 38 Monitor failure If no image is displayed on the monitor when the system is A . 1 switched on, the monitor is likely to be defective. A . 1 Call Siemens Customer Service. ✧ A . 1 CAUTION A . 1 Monitor failure! A .
-
Page 39: Proper And Improper Use
Safety General Safety Information Proper and improper use A . 1 The SOMATOM system is suitable for acquiring tomographic images of patients for diagnostic purposes using the computed tomography procedure. A . 1 A patient should be examined by doctors in accordance with the methods and precautions described in this manual. - Page 40 Browser only. For security reasons, the operating system is not accessible anymore. A . 1 Siemens is not responsible for the loss of patient data and will refuse warranty in case of unauthorized (improper) use of the equipment (for example, surfing on the internet).
- Page 41 Safety General Safety Information Warning messages Your system monitors important resources like memory or disk A . 1 space. Warning messages may appear. A . 1 To avoid system behavior like freezing or delayed response time to user due to lack of memory resources, immediately restart your system if possible or at least close some applications and background activities.
-
Page 42: Specific National Regulations
A . 1 The SOMATOM system must only be used by persons with ✧ the necessary specialist knowledge, e.g., physicians, trained radiologists, or trained technologists, after an appropriate application training. 0 . 0 A.1-20 SOMATOM Spirit 0 . 0 0 . 0... -
Page 43: Information About Personal Safety
Information about CHAPTER A . 1 Personal Safety This chapter describes how you and the personnel can ensure personal safety, the safety of the patient and of people accom- panying the patient. A . 2 You will learn at which locations there is danger of collision, damage, and injury during system movements and how you can stop system movements in case of an emergency. - Page 44 Make sure that patient bedding cannot get caught between ✧ the parts of the patient table. Use positioning aids as described. ✧ A . 2 0 . 0 A.2-2 SOMATOM Spirit 0 . 0 0 . 0...
- Page 45 Safety Information about Personal Safety CAUTION A . 2 Improper patient positioning! A . 2 Possible injury of the patient by moving parts. A . 2 A . 2 Ensure that neither the patient’s clothing nor hair can get ✧ caught in mechanical parts.
- Page 46 This applies to table heights from a display value of 272 mm up to the maximum height and to examinations with a tilted gan- try. A . 2 0 . 0 A.2-4 SOMATOM Spirit 0 . 0 0 . 0...
-
Page 47: Laser Beam
Safety Information about Personal Safety Laser beam A . 2 Light marker (laser radia- The patient must be instructed not to look into the laser light tion) marker. If necessary, the user must ensure that the patient’s A . 2 eyes are protected (for example, if the patient is not responsive or if the eyelid closing reflex is impaired). - Page 48 Possible loss of eyesight due to laser radiation. A . 2 A . 2 Do not look directly into the laser beam or at its reflection ✧ on smooth, mirror-like surfaces during adjustment. 0 . 0 A.2-6 SOMATOM Spirit 0 . 0 0 . 0...
- Page 49 Additional dose of radiation A . 2 Please check table alignment accuracy regularly according ✧ to this manual and national quality assurance regulations. In case of misalignment, contact Siemens customer ser- vice. 0 . 0 A.2-7 04/2012 0 . 0...
- Page 50 Misadjustment and/or wrong definition of scan area require A . 2 new scan. Additional dose of radiation A . 2 Make sure that only trained staff performs the RTP laser ✧ adjustment. 0 . 0 A.2-8 SOMATOM Spirit 0 . 0 0 . 0...
- Page 51 Safety Information about Personal Safety A . 2 CAUTION A . 2 Laser misadjustment during laser adjustment procedure! A . 2 Misadjustment and/or wrong definition of scan area require A . 2 new scan. Additional dose of radiation. A . 2 After laser readjustment, check the accuracy of adjustment ✧...
-
Page 52: System Movement
A . 2 Unintentional patient movement! A . 2 Injury of the patient. A . 2 A . 2 Always fix and observe the patient during the measure- ✧ ment. 0 . 0 A.2-10 SOMATOM Spirit 0 . 0 0 . 0... - Page 53 Safety Information about Personal Safety A . 2 CAUTION A . 2 Unintentional patient movement! A . 2 Contusion of patient extremities at patient table and gantry. A . 2 A . 2 Always fix and observe the patient during system move- ✧...
- Page 54 The pictures of the components shown here are only examples. The appearance of your components will depend on the system configuration. A . 2 A . 2 A . 2 0 . 0 A.2-12 SOMATOM Spirit 0 . 0 0 . 0...
- Page 55 Safety Information about Personal Safety A . 2 0 . 0 A.2-13 04/2012 0 . 0 0 . 0...
-
Page 56: Terminating System Movements And Radiation
A . 2 If you want to continue working, you must reactivate the system with Continue and lock the patient table into its original posi- tion. A . 2 0 . 0 A.2-14 SOMATOM Spirit 0 . 0 0 . 0... - Page 57 Safety Information about Personal Safety Location of Stop keys The STOP keys are located on the gantry control panel and the A . 2 control box. A . 2 When these two STOP keys light up, it doesn’t mean any warn- ing of danger occurs or any urgent action must be taken.
- Page 58 Press STOP if the HOLD key does not respond during a scan. ✧ Press EMERGENCY OFF if the system does not respond to ✧ the STOP keys and there is danger. Shut down the system and notify the Siemens Customer ✧ Service if system malfunctions are detected. 0 . 0 A.2-16 SOMATOM Spirit 0 .
-
Page 59: Shut Down In Case Of Emergency
Safety Information about Personal Safety Shut down in case of emergency A . 2 In addition to the STOP keys at the CT unit, EMERGENCY OFF keys to be provided by the customer have to be easily visible and within easy reach. Country-specific regulations must be observed. -
Page 60: Radiation Protection
The gan- try and the patient table can be operated by remote control. A . 2 When scanning, operate the system from the console ✧ whenever possible. 0 . 0 A.2-18 SOMATOM Spirit 0 . 0 0 . 0... -
Page 61: Protective Measures
A . 2 A . 2 If a radiation warning lamp does not light up once a scan has been released, please contact Siemens Service. A . 2 Protective measures A . 2 Take the following measures to protect both yourself and the patient. - Page 62 (to avoid metal artifacts). Make sure that the system is clean. Residual contrast ✧ medium can cause artifacts. Observe the calibration and maintenance instructions in ✧ the manual. 0 . 0 A.2-20 SOMATOM Spirit 0 . 0 0 . 0...
-
Page 63: Image Artifacts
Safety Information about Personal Safety Image Artifacts A . 2 Even with a carefully manufactured, calibrated and maintained CT system, patterns can sometimes appear in images which are not part of the computed tomography image. Such patterns are called artifacts. A . - Page 64 Flaps at the head end outside of the scan range! A . 2 Image artifacts. A . 2 A . 2 Put these flaps under the patient. ✧ Try not to scan the footend region. ✧ 0 . 0 A.2-22 SOMATOM Spirit 0 . 0 0 . 0...
- Page 65 Safety Information about Personal Safety Partial volume effects Thick slices are often preferred instead of thin slices. This helps A . 2 to increase signal to noise ratio and to limit the examination time by reducing the number of slices. However, this may result in partial volume effects.
- Page 66 A . 2 Additional corrections and/or special kernel parameter settings (head modes) help to minimize these effects. Yet, they cannot fully eliminate them. A . 2 0 . 0 A.2-24 SOMATOM Spirit 0 . 0 0 . 0...
- Page 67 Safety Information about Personal Safety Metal artifacts Metal objects such as tooth fillings, surgical clips, jewelry, hair A . 2 clips, belts or hip prostheses, and so on, can cause extreme forms of beam hardening artifacts. Depending on density and size, they can lead to total absorption of the radiation.
-
Page 68: System Related Artifacts
Wrong diagnosis due to image artifacts. A . 2 Calibrate the system as part of the check-up. Repeat calibra- ✧ tion (Setup > Calibration) if ring artifacts occur. 0 . 0 A.2-26 SOMATOM Spirit 0 . 0 0 . 0... - Page 69 Safety Information about Personal Safety Calibration If the CT system is not properly setup (for example, no check-up A . 2 performed) CT scale displacements and inhomogeneities can result. This may result just after switching on the unit, during warm-up to operational temperature (calibration), or due to an extended length of service of the X-ray tube.
-
Page 70: Repeating Scans
A . 2 Persisting object related artifacts can be considered measure- ment-related with a high probability. They should be recogniz- able as such by an experienced radiologist. A . 2 0 . 0 A.2-28 SOMATOM Spirit 0 . 0 0 . 0... - Page 71 Safety Information about Personal Safety A . 2 CAUTION A . 2 Design of the RTP board generates image artifacts! A . 2 Additional dose due to scan repetition A . 2 A . 2 Image artifacts are normal during scanning with the RTP ✧...
- Page 72 Information about Personal Safety Safety 0 . 0 A.2-30 SOMATOM Spirit 0 . 0 0 . 0...
-
Page 73: Mechanical Safety
A . 3 Please observe the information given in (→ System Owner Manual) A . 3 For further details about system safety, please contact your Siemens Customer Service. A . 3 0 . 0 A.3-1 04/2012 0 . 0... -
Page 74: Maximum Loads
Bear in mind that only certain weights can be placed on posi- A . 3 (→ Page D.3-1 Accessories for Patient Position- tioning aids. ing) A . 3 0 . 0 A.3-2 SOMATOM Spirit 0 . 0 0 . 0... -
Page 75: Operating Conditions
Safety Mechanical Safety Operating conditions A . 3 The following requirements must be fulfilled for operation of the system. A . 3 General information A . 3 The system must be operated in rooms that are designated for medical use. A . -
Page 76: Protection Measures
The equipment must be installed according to specification DIN VDE 0100, Part 710 or must meet the respective national regulations. A . 3 0 . 0 A.3-4 SOMATOM Spirit 0 . 0 0 . 0... - Page 77 Safety Mechanical Safety Fire extinguishers fire extinguishers must be located in easily accessible and A . 3 visible locations. A . 3 Site on/off switch In compliance with the MDD (Medical Device Directive) an on/ A . 3 off switch must be installed on site by the customer. A .
-
Page 78: Safety Equipment
A . 3 This means that you might have to wait a certain time before you can continue with the examination as planned. A . 3 0 . 0 A.3-6 SOMATOM Spirit 0 . 0 0 . 0... - Page 79 Safety Mechanical Safety Overheating The possible causes of overheating are: A . 3 A . 3 Ambient temperature too high ❏ Ventilation openings covered ❏ Defective cooling system ❏ Dirty air filters ❏ For exchange of the air filters please refer to (→ System Owner Manual) A .
-
Page 80: Equipment Modifications
Equipment modifications A . 3 Modifications or upgrades of the system must be made in com- pliance with all legal stipulations by the Siemens Service or other authorized personnel. A . 3 For information about system maintenance, please refer to (→... - Page 81 Their signatures. ❏ Please note that this does not imply that the repairs are autho- rized. Siemens does not accept liability for repairs that are car- ried out without our written permission. A . 3 0 . 0 A.3-9 04/2012 0 .
- Page 82 If you connect additional equipment, you have to ensure ✧ that the configuration complies with standards and statu- tory regulations (for example IEC/EN 60601-1-1: 2000 or IEC 60601-1: 2005 ). Please contact your Siemens representative for more infor- ✧ mation. 0 . 0 A.3-10 SOMATOM Spirit 0 .
-
Page 83: Disposal Of The System
A . 3 Incorrect disposal! A . 3 Pollution of the environment. A . 3 A . 3 Please contact your Siemens representative when ordering ✧ information about disassembly of the unit. A . 3 CAUTION A . 3 Improper disposal of the system or parts of the system! A . - Page 84 Mechanical Safety Safety 0 . 0 A.3-12 SOMATOM Spirit 0 . 0 0 . 0...
-
Page 85: Software Related Safety Information
Software Related Safety CHAPTER A . 3 Information This chapter discusses software-related safety information. A . 4 Patient registration A . 4 Before you can examine a patient with your system, you must register him or her. A . 4 Registration means that you give your system all the informa- tion about a patient that it requires for an examination. -
Page 86: Patient Sex And Age
Wrong entry of patient position! A . 4 Wrong basis for diagnosis. A . 4 A . 4 Make sure that you enter the patient position correctly. ✧ 0 . 0 A.4-2 SOMATOM Spirit 0 . 0 0 . 0... -
Page 87: Scanning
Safety Software Related Safety Information Scanning A . 4 All the individual steps of an examination and the sequence in which they are performed are defined in a scan protocol. You can adapt the parameters suggested in a scan protocol to your individual requirements. - Page 88 A . 4 Reduced low contrast resolution at soft tissue tumors. A . 4 A . 4 Consider reduced low contrast resolution when identifying ✧ soft tissue tumors. 0 . 0 A.4-4 SOMATOM Spirit 0 . 0 0 . 0...
-
Page 89: Time Settings
Safety Software Related Safety Information Time settings A . 4 The scan protocols suggest a delay time suitable for the region to be examined. The delay time is the time from pressing the Start key to when the scan begins. A . -
Page 90: Reconstruction
A . 4 Wrong correction tables are used for reconstruction! A . 4 X-ray not or only partially usable. A . 4 A . 4 Run daily quality tests. ✧ 0 . 0 A.4-6 SOMATOM Spirit 0 . 0 0 . 0... -
Page 91: Field Of View
Safety Software Related Safety Information Field of view A . 4 With the graphic positioning of the fields of view (FOV), you can define what square areas of the slices are to be the visible images. A . 4 A . 4 CAUTION A . -
Page 92: Post-Processing
User is not instructed in how to operate the application! A . 4 Wrong basis for diagnosis. A . 4 A . 4 The operator must be qualified to use the application. ✧ 0 . 0 A.4-8 SOMATOM Spirit 0 . 0 0 . 0... - Page 93 Safety Software Related Safety Information Pixel lens A . 4 With the pixel lens, you can measure the average value of the gray scales (for example, Hounsfield values for CT images) of a small area of 5 x 5 pixels. This value can be displayed perma- nently in the image together with a pixel marker.
- Page 94 A . 4 Possible loss of image modifications. A . 4 Choose Patient > Save As... in order to save the image with ✧ modifications as a new image. 0 . 0 A.4-10 SOMATOM Spirit 0 . 0 0 . 0...
- Page 95 Safety Software Related Safety Information A . 4 CAUTION A . 4 Modifications in medical images are not saved automatically in the same way as image comment. Additionally, in case of a user A . 4 switch where the new user has no adequate access rights, mod- ifications of the image text may also be lost! A .
-
Page 96: Viewing
A . 4 A . 4 Basis for incorrect diagnosis. A . 4 Do not perform thickness and length measurements on MIP ✧ and SSD images. 0 . 0 A.4-12 SOMATOM Spirit 0 . 0 0 . 0... - Page 97 Safety Software Related Safety Information A . 4 Measurements A . 4 On the 3D task card, you have tools for region evaluation, mea- suring distances, lengths, and angles, and for pixel evaluation. A . 4 A . 4 CAUTION A .
- Page 98 A . 4 A . 4 Be careful when interpreting orientation labels. Keep the ✧ shape of the curved cut and its orientation in the volume in mind. 0 . 0 A.4-14 SOMATOM Spirit 0 . 0 0 . 0...
- Page 99 Safety Software Related Safety Information syngo Fly Through A . 4 syngo Fly Through allows you to visualize representations of the anatomy by creating 3-dimensional “object” models. It is used to visualize cavities, such as colon, bronchial system and arteries from positions within the volume.
-
Page 100: Syngo Neuro Perfusion Ct
1 image per second. Note that the primary anatomy that the software expects ✧ for its semi-automatic analysis are standard slices through the basal ganglia. 0 . 0 A.4-16 SOMATOM Spirit 0 . 0 0 . 0... - Page 101 Safety Software Related Safety Information Color representation A . 4 syngo Neuro Perfusion CT allows the display of parameter images in color similar to nuclear medicine. A . 4 A . 4 CAUTION A . 4 Inappropriate use of color display! A .
- Page 102 Only modify the limits manually if you have an adequate ✧ understanding of what the modification of these time points entails. Use the images calculated without optimization as a refer- ✧ ence. 0 . 0 A.4-18 SOMATOM Spirit 0 . 0 0 . 0...
-
Page 103: Syngo Body Perfusion Ct
Safety Software Related Safety Information syngo Body Perfusion CT A . 4 syngo Body Perfusion CT provides images of blood flow, blood volume and time to peak from one set of dynamic CT images. A . 4 Segmentation A . 4 A . -
Page 104: Image Display
A . 4 nique used. A . 4 Only perform distance measurements in the topogram in ✧ the longitudinal direction (head-foot direction). Do not perform angle measurements. ✧ 0 . 0 A.4-20 SOMATOM Spirit 0 . 0 0 . 0... -
Page 105: Scan Lines For Osteo Ct Examinations
Safety Software Related Safety Information Scan lines for Osteo CT examinations A . 4 After you have finished the topogram scan, you can see one or more examination ranges marked in the topogram. A . 4 A . 4 CAUTION A . -
Page 106: Data Compression
A . 4 Do not use lossy JPEG compression for sending data to a ✧ report or primary diagnosis workstation. Do not use lossy JPEG compression for archiving. ✧ 0 . 0 A.4-22 SOMATOM Spirit 0 . 0 0 . 0... -
Page 107: Filming
A . 4 Exposing images with a non-verified camera! A . 4 Wrong basis for diagnosis. A . 4 A . 4 Only use cameras that have been released by Siemens. ✧ 0 . 0 A.4-23 04/2012 0 . 0... -
Page 108: Print Modes
A . 4 Possible wrong diagnosis. A . 4 Be aware of image quality reduction if scalable page mode ✧ is configured. 0 . 0 A.4-24 SOMATOM Spirit 0 . 0 0 . 0... -
Page 109: Paper Printouts
Safety Software Related Safety Information Paper printouts A . 4 You can expose the images of an examination on film or print for documentation and reporting. A . 4 A . 4 CAUTION A . 4 Use of paper printouts for diagnosis! A . -
Page 110: Exporting Data
CDs, or CDs that have already been written to once or several times. A . 4 The setting of multi-session or single-session mode can be changed by Siemens Service (factory default is multi-session). A . 4 0 . 0 A.4-26 SOMATOM Spirit 0 . - Page 111 Safety Software Related Safety Information A . 4 CAUTION A . 4 A recording error may make a medium unusable! A . 4 In multi-session mode, all data previously stored on that A . 4 medium could be lost, too. If this happens, any archive flags set to this data in the database become invalid.
-
Page 112: Patient & File Management
A . 4 Make sure you have read and completed all preparatory ✧ steps. Back up your complete system as done after installation ✧ before activating the security system. 0 . 0 A.4-28 SOMATOM Spirit 0 . 0 0 . 0... - Page 113 Safety Software Related Safety Information A . 4 CAUTION A . 4 User access may be prevented due to forgotten or unknown accounts or passwords, or wrong setup (for example, in case of A . 4 an emergency)! A . 4 Inaccessible system.
-
Page 114: Emergency Login
(especially for the emergency account). The users shall contact you immediately in case of prob- ✧ lems. A . 4 0 . 0 A.4-30 SOMATOM Spirit 0 . 0 0 . 0... - Page 115 Safety Software Related Safety Information CAUTION A . 4 The system blocks when the audit trail is filled due to too many records, or too much drive space covered! A . 4 A . 4 In this case, it is not possible to work with the system. Emer- gency access is also not possible.
-
Page 116: Storage Commitment
A . 4 Double-check that the data is actually stored on the receiv- ✧ ing system. Use storage commitment whenever it is sup- ported by the sending and receiving systems. 0 . 0 A.4-32 SOMATOM Spirit 0 . 0 0 . 0... - Page 117 Safety Software Related Safety Information A . 4 CAUTION A . 4 Misleading or misinterpretation of the storage commitment flags AC/SC. Storage Commitment means storage to hard disk A . 4 but this may not fulfill or guarantee regulatory requirements about long-term archiving.
- Page 118 To completely avoid these inconsistencies, always delete the local patient data after you have successfully archived them. 0 . 0 A.4-34 SOMATOM Spirit 0 . 0 0 . 0...
-
Page 119: Delete Confirmation
Safety Software Related Safety Information Delete confirmation A . 4 The default setting is to have your system display a confirmation window before each deletion even if the data concerned have already reached the work status required for deletion. A . 4 A . -
Page 120: Rearranging Patient And Examination Data
A . 4 Rearrange the entire hierarchical group containing all ✧ objects with references in order to maintain the references. Only references found within the selection will be adapted. ✧ 0 . 0 A.4-36 SOMATOM Spirit 0 . 0 0 . 0... -
Page 121: Exporting And Recording Off-Line Files
Safety Software Related Safety Information Exporting and recording off-line files A . 4 You can copy one or several data objects to specific enabled directories of the system hard disk or within the network. A . 4 All files, for example, images in BMP format and sequences of images in AVI format, exported previously to a specific directory can be recorded automatically on CD-R. -
Page 122: Exiting The Program
A . 4 A . 4 Possible loss of data, data corruption or system damage. A . 4 Shut down the computer before switching off. ✧ 0 . 0 A.4-38 SOMATOM Spirit 0 . 0 0 . 0... -
Page 123: Network & Communication
Safety Software Related Safety Information Network & communication A . 4 Software installation and network A . 4 The syngo platform is shipped with precautions regarding data security and prevention of external access with bad intent. No additional protection (firewall) is included. A . - Page 124 Misuse of data handling! A . 4 Failure in diagnosis A . 4 A . 4 Ensure that only a trained user gets remote access to the ✧ system. 0 . 0 A.4-40 SOMATOM Spirit 0 . 0 0 . 0...
-
Page 125: Searching For Data
Safety Software Related Safety Information Searching for data A . 4 Like in the navigation area of the Patient Browser, with Patient Search you first search for the patient you require. A . 4 A . 4 CAUTION A . 4 If the Patient ID is not unique, studies may be listed which do not belong to the patient selected and displayed in the information A . -
Page 126: Transferring Manipulated Images
It is strongly recommended to base the final diagnosis always on the original images and not on modified or manipulated images. 0 . 0 A.4-42 SOMATOM Spirit 0 . 0 0 . 0... -
Page 127: Remote Service
Safety Software Related Safety Information Remote service A . 4 Your system can also be serviced by Siemens Service via modem. A . 4 A . 4 CAUTION A . 4 Terminating remote service without consultation with the ser- vice engineers! A . - Page 128 Software Related Safety Information Safety 0 . 0 A.4-44 SOMATOM Spirit 0 . 0 0 . 0...
-
Page 129: B System Description
PART A . 4 System Description B.1 System Overview B.1-1 Purpose of the equipment B.1-2 Equipment overview B.1-3 Components of the CT scanner B.1-4 Gantry (scan unit) B.1-4 Gantry operator panels and displays B.1-5 Patient table B.1-5 Console with input units B.1-5 Image reconstruction system B.1-5... - Page 130 Definitions and limit values B.3-4 B.4 Console Related Safety Advice B.4-1 Location of use B.4-1 Connections B.4-2 Navigator console B.4-2 Monitor B.4-3 Cleaning B.4-5 Transportation B.4-6 Safety instructions for the UPS B.4-7 0 . 0 SOMATOM Spirit 0 . 0 0 . 0...
- Page 131 System Description B.5 Console B.5-1 Functions B.5-1 Components B.5-1 Computers B.5-3 Computer software B.5-5 Service software B.5-5 Software updates B.5-6 Software version B.5-6 Input units B.5-7 Keyboard B.5-7 Mouse B.5-9 Control box B.5-10 Monitor B.5-13 Type of monitor B.5-13 Operating elements B.5-14 Uninterruptible power supply (UPS) B.5-15...
- Page 132 Systems for patient registration B.7-1 Phantoms B.7-1 Patient table and positioning accessories B.7-2 Positioning aids B.7-2 Paper roll holder (optional) B.7-3 Slicker B.7-4 Special examination accessories B.7-5 Osteo CT B.7-5 0 . 0 SOMATOM Spirit 0 . 0 0 . 0...
-
Page 133: System Overview
CHAPTER B . 0 System Overview This part gives an overview of the components of your com- puted tomography system and its optional equipment. B . 1 Please note that components which are described in this man- ual may not be part of the configuration that you have. B . -
Page 134: Purpose Of The Equipment
SOMATOM Spirit is suitable for the generation and processing of B . 1 tomographic images of patients for diagnostic purposes. B . 1 Site of application SOMATOM Spirit can be operated in the x-ray department of a B . 1 hospital or doctor’s office. B . 1 Authorized users SOMATOM Spirit must be used by persons with the necessary B . -
Page 135: Equipment Overview
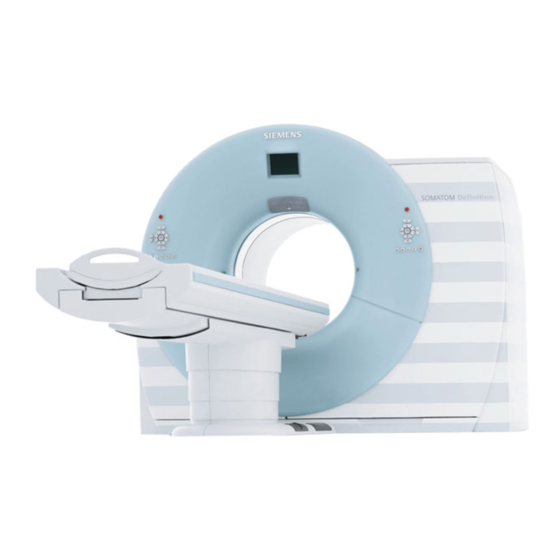
System Description System Overview Equipment overview B . 1 Your system consists of the following components: B . 1 Acquisition system: gantry and patient table ❏ Console: computers (including IRS), input units, monitor, ❏ control box and UPS The pictures of the components shown here are only examples. The appearance of your components depends on the system configuration. -
Page 136: Components Of The Ct Scanner
The gantry contains laser light markers for vertical and horizon- tal positioning as well as the microphone and loudspeaker for (→ Page B.2-1 Scan Unit (Gantry)) the intercom system. B . 1 0 . 0 B.1-4 SOMATOM Spirit 0 . 0 0 . 0... -
Page 137: Gantry Operator Panels And Displays
System Description System Overview Gantry operator panels and displays B . 1 To the left and right on the front of the gantry, there are gantry operator panels with keys and displays for gantry and patient (→ Page B.2-4 Gantry operator panels) table control. -
Page 138: Accessories
Expansion levels of the system B . 1 Please refer to the listing in your purchase contract for informa- tion about the expansion levels of your system. B . 1 0 . 0 B.1-6 SOMATOM Spirit 0 . 0 0 . 0... -
Page 139: Scan Unit (Gantry)
CHAPTER B . 1 Scan Unit (Gantry) This part describes displays and operating elements of the scan unit (gantry). B . 2 Components B . 2 You will find the following operating elements and displays on the gantry: B . 2 The pictures of the components shown here are only examples. -
Page 140: Design
Fast Ceramic) for processing low dose radiation with high image quality. B . 2 The x-ray tube and detector are aligned with one another and rotate around the patient. B . 2 0 . 0 B.2-2 SOMATOM Spirit 0 . 0 0 . 0... - Page 141 System Description Scan Unit (Gantry) Gantry tilt The gantry can be tilted forward (+) or backward (-) up to 25º or B . 2 30º depending on the system configuration. See (→ System Owner Manual) B . 2 B . 2 0 .
-
Page 142: Gantry Operator Panels
B . 2 The radiation warning lamps at the gantry front indicate whether a scan is being released. B . 2 0 . 0 B.2-4 SOMATOM Spirit 0 . 0 0 . 0... -
Page 143: Arrangement Of The Operating Elements And The Radiation Lamp
System Description Scan Unit (Gantry) Arrangement of the operating elements and the radiation lamp B . 2 Left and right gantry opera- tor panel B . 2 B . 2 (1) STOP button (2) Operating elements (3) Radiation warning lamp Press one key for motion control only at a time. - Page 144 B . 2 The values shown on the display here are only examples. B . 2 (1) Tube voltage (2) Tube current (3) Radiation (4) Scan time B . 2 0 . 0 B.2-6 SOMATOM Spirit 0 . 0 0 . 0...
- Page 145 System Description Scan Unit (Gantry) Position displays B . 2 (1) Gantry tilt (2) Horizontal table position (3) Table height The display value of the gantry tilt indicates the inclination of the gantry from the vertical position (0). B . 2 The display value of the horizontal table position indicates the B .
-
Page 146: Functions Of The Operating Elements
(1) Predefined table position A, B (2) Table out (3) Table up (4) Laser light marker (5) Table in (6) Gantry tilt (7) Table down (8) Table retraction 0 . 0 B.2-8 SOMATOM Spirit 0 . 0 0 . 0... - Page 147 System Description Scan Unit (Gantry) Press one key for motion control only at a time. B . 2 The operating elements illustrated on the left margin in follow- ing pages are from right gantry panel. You can use the operating elements on the left gantry panel as well.
- Page 148 B . 2 B . 2 The gantry is automatically set vertical first, if the gantry tilt dif- fers from 0. B . 2 0 . 0 B.2-10 SOMATOM Spirit 0 . 0 0 . 0...
- Page 149 System Description Scan Unit (Gantry) STOP keys B . 2 With the STOP keys, you can interrupt unit movements in an emergency (table movements and gantry tilting) and switch off radiation. B . 2 If you press one of the red STOP keys, unit movements are inter- B .
-
Page 150: Equipment For Communication With The Patient
Using the speaker and microphones, you can talk with the B . 2 patient. B . 2 You can operate the intercom with the keys on the control box. (→ Page B.5-10 Control box) B . 2 0 . 0 B.2-12 SOMATOM Spirit 0 . 0 0 . 0... -
Page 151: Patient Table
CHAPTER B . 2 Patient Table This part gives you an overview of the characteristics and oper- ating elements of the patient table. B . 3 You place the patient on the patient table and position him or her for the examination. B . -
Page 152: Operating Elements
B . 3 The pictures of the components shown here are only examples. The appearance of your components depends on the system configuration. B . 3 0 . 0 B.3-2 SOMATOM Spirit 0 . 0 0 . 0... - Page 153 System Description Patient Table Operating elements B . 3 B . 3 (1) Patient table with movable table top (2) Handle on the table top with locking device (3) Label: The patient table corresponds to a type B applied part. It is protected against electrical shock by limiting admissible leakage currents in accordance with IEC 60601-1.
-
Page 154: Definitions And Limit Values
(1) The head end is the end of the patient table closer to the gantry. (2) The foot end is the end of the patient table further away from the gantry. 0 . 0 B.3-4 SOMATOM Spirit 0 . 0 0 . 0... - Page 155 System Description Patient Table Directions B . 3 B . 3 (1) In (-z) and out (+z) (2) Scan field axis (3) Up (-y) and down (+y) 0 . 0 B.3-5 04/2012 0 . 0 0 . 0...
- Page 156 B . 3 Always ensure that the movement is not obstructed by any objects. B . 3 Do not place any objects underneath the patient table! B . 3 0 . 0 B.3-6 SOMATOM Spirit 0 . 0 0 . 0...
-
Page 157: Console Related Safety Advice
Console Related Safety CHAPTER B . 3 Advice Location of use B . 4 Console components B . 4 All console components shall only be operated outside the patient vicinity. B . 4 B . 4 Additional monitors If a CRT monitor is used in the examination room it shall only be B . -
Page 158: Connections
Do not open or remove the cladding of the equipment nor ✧ install third-party software. Electric shock hazard B . 4 Do not remove cover (or back), refer servicing to qualified ✧ personnel. B . 4 0 . 0 B.4-2 SOMATOM Spirit 0 . 0 0 . 0... -
Page 159: Monitor
Hazard of an electric shock. B . 4 B . 4 Never open the monitor. ✧ Leave all repairs to Siemens Service. ✧ Never place cups, glasses or other vessels containing liquid ✧ on or near the monitor, in case of accidental spillage. - Page 160 B . 4 This can cause injury and/or damage to the equipment. B . 4 Do not open or remove the cover of the equipment nor ✧ install third-party software. 0 . 0 B.4-4 SOMATOM Spirit 0 . 0 0 . 0...
-
Page 161: Cleaning
System Description Console Related Safety Advice Cleaning B . 4 B . 4 CAUTION B . 4 Cleaning of parts of the system while the system is connected to the power supply! B . 4 B . 4 Electric shock due to possible contact with line voltage. B . -
Page 162: Transportation
Injury of user, patient and other persons (implosion of the B . 4 monitor). B . 4 Never drop the monitor. ✧ For transport of the monitor call Siemens Service. ✧ 0 . 0 B.4-6 SOMATOM Spirit 0 . 0... -
Page 163: Safety Instructions For The Ups
System Description Console Related Safety Advice Safety instructions for the UPS B . 4 The following safety instructions are stated by the UPS manufac- turer. B . 4 B . 4 CAUTION B . 4 Wrong handling of batteries! B . 4 Electrical shock or burn from high short-circuit current. - Page 164 Console Related Safety Advice System Description 0 . 0 B.4-8 SOMATOM Spirit 0 . 0 0 . 0...
-
Page 165: Console
CHAPTER B . 4 Console This part describes the operating elements of the console com- ponents. B . 5 Functions B . 5 With the operating elements of the console, you switch the sys- tem on and off, enter patient data, plan the examination and trigger measurement. - Page 166 System Description B . 5 (1) Monitor (2) Control box (3) Keyboard (4) Mouse (5) Image control system (ICS) (6) Image reconstruction system (IRS) (7) Uninterruptible power supply (UPS) 0 . 0 B.5-2 SOMATOM Spirit 0 . 0 0 . 0...
-
Page 167: Computers
System Description Console Computers B . 5 The CT scanner is controlled by two main computers, the image control system and the image reconstruction system. B . 5 The pictures of the components shown here are only examples. The appearance of your components depends on the system configuration. - Page 168 It then passes on the data to the image control system. B . 5 The image reconstruction system does not require any special operation. B . 5 0 . 0 B.5-4 SOMATOM Spirit 0 . 0 0 . 0...
-
Page 169: Computer Software
System Description Console Computer software B . 5 ® Your unit uses the operating system Windows XP and the appli- cation software syngo. This software is used for examination and evaluation. B . 5 The syngo application software is described in detail in the Online Help and in the syngo CT Operator Manual. -
Page 170: Software Updates
(function, custom, and service packs) is listed in the Version dialog box. B . 5 You can display the Version dialog box with Options > Version in the main menu. B . 5 0 . 0 B.5-6 SOMATOM Spirit 0 . 0 0 . 0... -
Page 171: Input Units
System Description Console Input units B . 5 You can use keyboard, mouse and control box to inform the computer what actions to perform. B . 5 Keyboard B . 5 With the keyboard, you enter text, numbers and commands. B . - Page 172 The computer supports keyboards in different languages. B . 5 B . 5 For further information about the keyboard, please refer to the Online Help. B . 5 0 . 0 B.5-8 SOMATOM Spirit 0 . 0 0 . 0...
-
Page 173: Mouse
System Description Console Mouse B . 5 You can use the mouse to operate the software and to control the system. B . 5 The picture of the mouse shown here is only an example. The appearance of your device may be slightly different. B . -
Page 174: Control Box
The operating elements for the intercom system are also located B . 5 on the control box. With this system, you can talk to the patient or play back several permanently stored patient instructions. B . 5 0 . 0 B.5-10 SOMATOM Spirit 0 . 0 0 . 0... - Page 175 System Description Console Operating elements B . 5 B . 5 (1) Move key With this key, you move the table and gantry (tilt) to the next measuring position. B . 5 (2) Microphone (3) Start key With this key, you trigger scanning. B .
- Page 176 With this key, you stop scanning altogether in an emer- gency. B . 5 The picture shown here is only an example. The appearance of your device may be slightly different. B . 5 0 . 0 B.5-12 SOMATOM Spirit 0 . 0 0 . 0...
-
Page 177: Monitor
System Description Console Monitor B . 5 On the monitor, you can see and control the examination proce- dure and view the images. B . 5 Type of monitor B . 5 The monitor on the console is a 19" Liquid Crystal Display (LCD) color monitor with high resolution. -
Page 178: Operating Elements
Console System Description Operating elements B . 5 Your monitor has already been optimally configured by Siemens Service. Therefore you cannot make any changes to these set- tings. B . 5 Always leave the monitor switched on. It is switched on and off together with the system at the UPS. -
Page 179: Uninterruptible Power Supply (Ups
System Description Console Uninterruptible power supply (UPS) B . 5 The uninterruptible power supply compensates for voltage fluc- tuations and provides backup power during power failures for a short time for the computer system. B . 5 B . 5 0 . -
Page 180: On/Off Switch And Displays
(5) AC Boost Mode Indicator (6) AC Normal Indicator (7) On button (8) Off button (9) Battery Capacity & Load level Indicator (L1~L5) (10) Over Load Indicator (L6) 0 . 0 B.5-16 SOMATOM Spirit 0 . 0 0 . 0... -
Page 181: Ups Operating Modes
System Description Console UPS operating modes B . 5 The uninterruptible power supply can be operated in different modes. B . 5 Normal mode During normal operation, the mode indicator illuminates and B . 5 the load level indicators display the percentage of UPS load capacity being used by the protected equipment. -
Page 182: Documentation
The SOMATOM system supports the DICOM standard. Besides DICOM Print, various cameras are supported to commit the CT images to film. B . 5 You can obtain an up-to-date list of cameras supported from your Siemens representative. B . 5 0 . 0 B.5-18 SOMATOM Spirit 0 . -
Page 183: Support Of Postscript Printers
Console Support of postscript printers B . 5 A Siemens CT system is a medical device where under no cir- cumstances other software than the released syngo CT software may be installed. This also applies to printer drivers for post- script printers. - Page 184 Xerox Phaser 6250N ❏ Hewlett Packard Color Laser Jet 4650N ❏ Siemens recommends to use one of those two printers. In case you wish a different printer to be installed contact your service technician for support. B . 5 0 . 0 B.5-20...
-
Page 185: Storage Media And Drives
B . 6 CD-ROM ❏ CD-R ❏ DVD-ROM ❏ DVD-R ❏ Only use medical grade CD-Rs and DVD-Rs. Medical grade media are available through your Siemens representative. B . 6 0 . 0 B.6-1 04/2012 0 . 0 0 . 0... -
Page 186: Dvd Recorder
B . 6 Operating elements B . 6 B . 6 (1) DVD tray (2) LED (3) Opening for manual ejection of discs (4) Open/ Close/ Stop button 0 . 0 B.6-2 SOMATOM Spirit 0 . 0 0 . 0... - Page 187 System Description Storage Media and Drives B . 6 (1) DVD tray (2) Opening for manual ejection of discs (3) LED (4) Open / Close / Stop button 0 . 0 B.6-3 04/2012 0 . 0 0 . 0...
-
Page 188: Usb Devices
USB Devices B . 6 You can store data on USB devices. B . 6 Only use USB devices approved by Siemens. B . 6 More information about the supported USB devices can be obtained from your Siemens representative. B . 6 Connections B . - Page 189 System Description Storage Media and Drives Recommended USB hard The following two USB hard drives were tested successfully for drives version syngo CT 2010C. B . 6 B . 6 lomega 160 Gbyte External Hard Drive Hi-Speed USB 2.0 ❏ Maxtor One Touch 160 Gbyte External Hard Drive ❏...
- Page 190 Storage Media and Drives System Description 0 . 0 B.6-6 SOMATOM Spirit 0 . 0 0 . 0...
-
Page 191: Accessories
B . 7 Connection to HIS/RIS (hospital information system / radiol- ❏ ogy information system) Please ask your Siemens Customer Service Representative. B . 7 Phantoms B . 7 (→ Page F.1-6 Accesso- The following phantoms are provided: ries for quality measurement) B . -
Page 192: Patient Table And Positioning Accessories
(→ Page D.3-1 Accessories for Patient during measurement. Positioning) B . 7 Head holders and table top extension ❏ Supports and cushions ❏ Restraint straps ❏ Optional accessories, for example, baby mattress ❏ 0 . 0 B.7-2 SOMATOM Spirit 0 . 0 0 . 0... -
Page 193: Paper Roll Holder (Optional
System Description Accessories Paper roll holder (optional) B . 7 The paper roll holder is used for easy changing of the crepe paper on the table. It can be placed wherever you want, also on the table. B . 7 To rule out collisions, the paper roll holder should not be placed on the head end of the table while table height is set to the min- imum. -
Page 194: Slicker
Accessories System Description You can order crepe paper suitable for the paper roll holder under Order No. 9708900 from Siemens MED accessories cata- log and Product No. 7038003. Disposal of this crepe paper has to be environmentally compatible. B . 7 Slicker B . -
Page 195: Special Examination Accessories
System Description Accessories Special examination accessories B . 7 Osteo CT B . 7 Use the Osteo positioning mat to position the patient appropri- ately for the Osteo examination. B . 7 Table top mat It has a cut-out in the vertebral region for the reference phan- B . - Page 196 B . 7 B . 7 Other non-Osteo examina- For standard examinations, use the Osteo positioning mat with tions the PE pad. B . 7 B . 7 0 . 0 B.7-6 SOMATOM Spirit 0 . 0 0 . 0...
-
Page 197: C System Handling
PART B . 7 System Handling C.1 Operation of the Gantry C.1-1 Tilting the gantry C.1-1 C.2 Operation of the Patient Table C.2-1 Table movements C.2-1 Preparations C.2-2 Moving the patient table C.2-2 Moving the patient table manually C.2-8 Usage for Veterinary Purposes C.2-10 Immobilizing animal patients C.2-12... - Page 198 System Handling 0 . 0 SOMATOM Spirit 0 . 0 0 . 0...
-
Page 199: Operation Of The Gantry
CHAPTER C . 0 Operation of the Gantry Tilting the gantry C . 1 You can tilt the gantry up to +/- 25º or 30º from the vertical posi- tion (0) depending on the table height. C . 1 Press one key for motion control only at a time. C . - Page 200 So you have to switch it to Gantry tilt & Table position subtask card by deselecting the selected step. Then you can read the gantry tilt angle. 0 . 0 C.1-2 SOMATOM Spirit 0 . 0 0 . 0...
- Page 201 System Handling Operation of the Gantry Tilting the gantry forward (positive direction) C . 1 Press the lower key and hold it down as long as you want ✧ the tilting movement to continue. The gantry is inclined such that the top of it moves toward the patient table (positive angle).
- Page 202 Maximal positive or negative angle ❏ Final position defined by the current table position or scan ❏ program To continue movement release the key and press it again. C . 1 0 . 0 C.1-4 SOMATOM Spirit 0 . 0 0 . 0...
-
Page 203: Operation Of The Patient Table
Operation of the Patient CHAPTER C . 1 Table Table movements C . 2 During examination, the table movement is controlled from the console: C . 2 With the Move key on the control box, you move the table ❏ (→... -
Page 204: Preparations
C . 2 Always ensure that the movement is not obstructed by any objects. C . 2 Do not place any objects underneath the patient table. C . 2 0 . 0 C.2-2 SOMATOM Spirit 0 . 0 0 . 0... - Page 205 System Handling Operation of the Patient Table Displays The table height and relative table feed are displayed both on C . 2 the position displays on the gantry and on the screen. (→ Page B.2-4 Gantry operator panels) C . 2 C .
- Page 206 So you have to switch it to Gantry tilt & Table position subtask card by deselecting the selected step. Then you can read the values of the table position and table height. 0 . 0 C.2-4 SOMATOM Spirit 0 . 0 0 . 0...
- Page 207 System Handling Operation of the Patient Table Moving the table top verti- cally C . 2 Before you lower the patient table to a minimum height, you must completely retract the table top out of the gantry and posi- tion the gantry in the vertical position. C .
- Page 208 C . 2 Possible injury of the hand (warning label). C . 2 C . 2 Do not place your hand in the gap of the table top support. ✧ 0 . 0 C.2-6 SOMATOM Spirit 0 . 0 0 . 0...
- Page 209 C . 2 Apply the predefined position keys A or B to move the ✧ patient table into scanning position. The table reaches the predefined positions preset from the Siemens Service. C . 2 C . 2 0 . 0 C.2-7 04/2012 0 .
-
Page 210: Moving The Patient Table Manually
Press the lever towards the end of the table top and pull the ✧ table top out of the gantry. Before you continue work on the system, you must lock the tabletop back into its original position. C . 2 0 . 0 C.2-8 SOMATOM Spirit 0 . 0 0 . 0... - Page 211 System Handling Operation of the Patient Table Moving the table top verti- You can use the hand crank at the bottom of the table to move cally the table up or down manually. C . 2 C . 2 C . 2 (1) Hand crank (2) Hand crank under the patient table (3) Hole for the hand crank...
-
Page 212: Usage For Veterinary Purposes
(21 CFR 801.109(b)(1)). C . 2 Veterinary use shall not cover laboratory or other primary scien- tific animal use. C . 2 0 . 0 C.2-10 SOMATOM Spirit 0 . 0 0 . 0... - Page 213 System Handling Operation of the Patient Table C . 2 CAUTION C . 2 Body fluid (blood, urine etc.) comes into contact with electrical components! C . 2 C . 2 Possibility of electrical shock. C . 2 Always make sure that the animal cannot loose uncon- ✧...
-
Page 214: Immobilizing Animal Patients
C . 2 Wrong diagnose due to wrong image information. C . 2 C . 2 Always anesthetize or sedate the animal before scanning. ✧ C . 2 0 . 0 C.2-12 SOMATOM Spirit 0 . 0 0 . 0... - Page 215 Press STOP if the HOLD key does not respond during a scan. ✧ Press EMERGENCY OFF if the system does not respond to ✧ the STOP keys and there is danger. Shut down the system and notify the Siemens Customer ✧ Service if system malfunctions are detected. 0 . 0 C.2-13 04/2012 0 .
- Page 216 C . 2 Unintentional patient movement! C . 2 Injury of the patient. C . 2 C . 2 Always fix and observe the patient during the measure- ✧ ment. 0 . 0 C.2-14 SOMATOM Spirit 0 . 0 0 . 0...
-
Page 217: Use Of Storage Media
CHAPTER C . 2 Use of Storage Media Use of the DVD Drive C . 3 You can write new data onto recordable CDs (CD-R) and DVDs (DVD-R) in one action (single session mode) or in several record- ing steps (multi session mode). The session mode configured depends on the system configuration. - Page 218 Always store discs horizontally and in a dry, not too warm ❏ location. Only use CD-Rs that have been formatted in the CD-R drive ❏ of the CT unit or media that comply with the DICOM stan- dard. 0 . 0 C.3-2 SOMATOM Spirit 0 . 0 0 . 0...
- Page 219 System Handling Use of Storage Media Drives Do not leave a disc in the drive when turning off your sys- ❏ C . 3 tem. However, if a disc was left in the drive, remove the media shortly after you turned on the unit by pressing the release button.
-
Page 220: Dvd Recorder
If the status LED does not light up green after you have inserted the disc, the disc is damaged or dirty. C . 3 Take the disc out of the drive. C . 3 0 . 0 C.3-4 SOMATOM Spirit 0 . 0 0 . 0... - Page 221 System Handling Use of Storage Media Writing and reading data It takes some time to write data onto a CD or DVD. During C . 3 recording, the read/write status LED lights up green. C . 3 Do not write data onto CD or DVD during a patient examination. C .
- Page 222 Press the insert/eject key again. ✧ The drawer is retracted again. C . 3 If the status LED flashes red, a drive fault has occurred. Contact Siemens Service. C . 3 0 . 0 C.3-6 SOMATOM Spirit 0 . 0 0 . 0...
- Page 223 System Handling Use of Storage Media Removing the disc manually During a power failure or if a drive is defective, you can also C . 3 remove discs from the drive manually. C . 3 Switch the image control system computer off. ✧...
-
Page 224: Use Of Usb Devices
Please click Cancel if Found New Hardware window pops up, the USB disk function is still available. C . 3 0 . 0 C.3-8 SOMATOM Spirit 0 . 0 0 . 0... -
Page 225: Insertion And Removal
System Handling Use of Storage Media Insertion and removal C . 3 Inserting a USB device C . 3 C . 3 CAUTION C . 3 Using USB devices without own power supply! C . 3 The USB controller can be permanently damaged. C . - Page 226 C . 3 Loss of data, acquisition process disturbed. C . 3 Do not plug in or unplug USB devices during acquisition ✧ tasks or other critical processes. 0 . 0 C.3-10 SOMATOM Spirit 0 . 0 0 . 0...
-
Page 227: Formatting
System Handling Use of Storage Media Double-Click the USB icon in the status bar, when USB icon ✧ disappears in the status bar, USB device can be safely unplugged. Pull the device out of the USB port. ✧ C . 3 Formatting C . - Page 228 A message window is displayed informing the user that all data are lost during this action. C . 3 Confirm with OK to continue. ✧ A window above illustrates the process of formatting. C . 3 0 . 0 C.3-12 SOMATOM Spirit 0 . 0 0 . 0...
- Page 229 System Handling Use of Storage Media Setting Full Control access to At any computer with Windows XP operating system but not on group Everyone syngo Acquisition Workplace. C . 3 C . 3 Login as Administrator. ✧ Plug in USB hard drive. ✧...
- Page 230 Use of Storage Media System Handling 0 . 0 C.3-14 SOMATOM Spirit 0 . 0 0 . 0...
- Page 231 PART C . 3 Operation D.1 Switching the System On and Off D.1-1 Switching on D.1-1 Starting procedures D.1-3 Start-up of the operating system D.1-3 Start-up of syngo D.1-6 System checkup and calibration D.1-8 Shutting down the system D.1-11 Shutdown and switching off D.1-14 Shutdown and restart D.1-16...
- Page 232 Baby mattress (optional) D.3-24 Positioning mat D.3-28 Straps D.3-29 Body support straps D.3-30 Forehead support strap D.3-32 Chin support strap D.3-33 Osteo CT accessories (optional) D.3-34 RTP accessories (optional) D.3-36 0 . 0 SOMATOM Spirit 0 . 0 0 . 0...
- Page 233 Operation D.4 Positioning the Patient D.4-1 Important safety information D.4-2 Positioning a patient D.4-6 Using standard accessories D.4-16 Positioning for cranial examinations D.4-17 Positioning for examinations in neck region and for cervical vertebrae D.4-23 Positioning for examinations of thorax and abdomen D.4-27 Positioning for examinations of extremities D.4-32 Using optional accessories...
- Page 234 Operation 0 . 0 SOMATOM Spirit 0 . 0 0 . 0...
-
Page 235: Switching The System On And Off
Switching the System On CHAPTER D . 0 and Off In this chapter, you will first learn how to start the system: switching it on and off, starting the operating system and the syngo software, checking and calibrating the system. D . - Page 236 ✧ Switch the system on again. ✧ A warning signal sounds when the UPS has switched to battery D . 1 power during power failure. D . 1 0 . 0 D.1-2 SOMATOM Spirit 0 . 0 0 . 0...
-
Page 237: Starting Procedures
Operation Switching the System On and Off Starting procedures D . 1 After you have switched on the system, booting runs in the fol- lowing phases: D . 1 Start-up of the operating system ❏ Start-up of syngo ❏ System checkup and calibration (optional) ❏... - Page 238 The login dialog box is displayed. D . 1 Enter a user name and, if necessary, a password and con- ✧ firm your entries. Booting is continued. D . 1 0 . 0 D.1-4 SOMATOM Spirit 0 . 0 0 . 0...
- Page 239 D . 1 D . 1 You cannot use the system due to an incorrect license number. D . 1 Call Siemens Service. ✧ D . 1 Starting a new system for When you start a newly supplied system for the first time or ✓...
-
Page 240: Start-Up Of Syngo
After the operating system has started, syngo is started auto- matically. D . 1 Check if syngo starts up without displaying an error mes- ✧ sage. The Start-up window is displayed. D . 1 D . 1 0 . 0 D.1-6 SOMATOM Spirit 0 . 0 0 . 0... - Page 241 D . 1 D . 1 Click on Cancel. ✧ Starting is interrupted. D . 1 D . 1 Log off and call Siemens Service. ✧ D . 1 0 . 0 D.1-7 04/2012 0 . 0 0 . 0...
-
Page 242: System Checkup And Calibration
Wrong diagnosis due to image artifacts. D . 1 Calibrate the system as part of the check-up. Repeat calibra- ✧ tion (Setup > Calibration) if ring artifacts occur. 0 . 0 D.1-8 SOMATOM Spirit 0 . 0 0 . 0... - Page 243 Operation Switching the System On and Off The Checkup dialog box is displayed. ✓ D . 1 Performing checkup Now, you must perform the series of test scans required for cal- D . 1 ibration. D . 1 During checkup and calibration, the patient table is automati- cally retracted.
- Page 244 The message “Scan system should not be used” is displayed. D . 1 D . 1 The checkup failed several times. The system is not ready for examination. D . 1 Call the system administrator and/or Siemens Customer ✧ Service. D . 1 0 . 0 D.1-10 SOMATOM Spirit 0 .
-
Page 245: Shutting Down The System
Operation Switching the System On and Off Shutting down the system D . 1 The system shuts down in three stages: D . 1 Shutdown of the scan system ❏ Termination of syngo ❏ Shutdown of the operating system ❏ Before you can shut down the system, you must exit all exami- D . - Page 246 D . 1 D . 1 If you do not want to exit syngo, click on Cancel. You return to D . 1 the user interface. D . 1 0 . 0 D.1-12 SOMATOM Spirit 0 . 0 0 . 0...
- Page 247 Operation Switching the System On and Off Maintenance shutdown During a maintenance shutdown, the system cleans up unused D . 1 pixel data and defragments the image directories for faster access. This operation may take several hours. D . 1 During the maintenance shutdown access to the user interface or operating system is not possible.
-
Page 248: Shutdown And Switching Off
A dialog box is displayed if applications are still active. ✓ tions D . 1 D . 1 A similar dialog is displayed when a patient examination is ✓ still running. 0 . 0 D.1-14 SOMATOM Spirit 0 . 0 0 . 0... - Page 249 Operation Switching the System On and Off Click on Yes. ✧ D . 1 All applications will be closed. The system will continue to shut down. D . 1 D . 1 Click on No. ✧ D . 1 You return to the user interface. D .
-
Page 250: Shutdown And Restart
D . 1 Confirm with Yes in the dialog box displayed. ✧ D . 1 The applications will be terminated and syngo will be restarted automatically. D . 1 0 . 0 D.1-16 SOMATOM Spirit 0 . 0 0 . 0... -
Page 251: Restart After System Emergency Stop
Operation Switching the System On and Off Restart after System Emergency Stop D . 1 In case the system has been switched off by pressing the emer- gency key in the examination room (for example, by accident), a controlled restart has to be done. D . -
Page 252: Exceptional Situations
Restart If the system or a component is shut down, a restart is per- D . 1 formed once the exceptional situation has been remedied. D . 1 0 . 0 D.1-18 SOMATOM Spirit 0 . 0 0 . 0... -
Page 253: Gantry Temperature Outside Permissible Range
Operation Switching the System On and Off Gantry temperature outside permissible range D . 1 Accurate measurements are only possible if the temperature inside the gantry is within a certain range. D . 1 If the temperature in the gantry falls below a specific limit, the D . - Page 254 Confirm with OK in the dialog box displayed. ✧ The dialog box is closed. D . 1 A text is displayed in the status bar during countdown. D . 1 D . 1 0 . 0 D.1-20 SOMATOM Spirit 0 . 0 0 . 0...
-
Page 255: Overheating Of The Computer System
Operation Switching the System On and Off Return to the user interface The temperature moves back into the permissible range. ✓ D . 1 Countdown stops. A dialog box is displayed. ✓ Confirm with OK. ✧ The dialog box is closed. D . - Page 256 A message is dis- played in the status bar. D . 1 Restart When the computer system has cooled down, you can restart D . 1 the system. D . 1 0 . 0 D.1-22 SOMATOM Spirit 0 . 0 0 . 0...
- Page 257 Operation Switching the System On and Off Resolving the temperature Temperature warning dialog box is displayed. ✓ warning D . 1 Check the room temperature and the ventilation slots of ✧ the computer. Confirm with OK in the dialog box displayed. ✧...
-
Page 258: Power Failure
D . 1 down is initiated. D . 1 Restart As soon as the normal power supply is reactivated you can D . 1 restart your system. D . 1 0 . 0 D.1-24 SOMATOM Spirit 0 . 0 0 . 0... - Page 259 Operation Switching the System On and Off Resetting the system A corresponding dialog box is displayed. ✓ D . 1 Confirm with OK. ✧ The dialog box is closed. D . 1 Call up Setup > Continue. ✧ The system will be reset. D .
-
Page 260: Standby Mode
In this operating state, the gantry stops rotating after a while. D . 1 Cancel standby mode Start with the next scan. ✧ D . 1 The gantry starts rotating. Standby mode is cancelled. D . 1 0 . 0 D.1-26 SOMATOM Spirit 0 . 0 0 . 0... -
Page 261: Function Tests
CHAPTER D . 1 Function Tests To ensure that the system is ready for operation and all func- tions relevant to safety are working correctly, you must perform function tests daily before beginning with the actual examina- tion procedures. D . 2 For further information, please refer to (→... -
Page 262: Performing The Tests
The operating elements illustrated on the left margin in follow- ing pages are from right gantry panel. You can use the operating elements on the left gantry panel as well. D . 2 0 . 0 D.2-2 SOMATOM Spirit 0 . 0 0 . 0... - Page 263 The laser light marker does not work. D . 2 D . 2 Stop scanning to rule out any danger to patients. ✧ Call Siemens Customer Service. ✧ D . 2 Checking the intercom sys- Apply the Hear Patient and Call Patient keys on the control ✧...
- Page 264 ✧ the examination room is opened When the door is closed again you must restore system readi- D . 2 ness with Setup > Continue. D . 2 0 . 0 D.2-4 SOMATOM Spirit 0 . 0 0 . 0...
- Page 265 Operation Function Tests Checking the STOP keys D . 2 Press one of the table setting keys on the gantry operator ✧ panel and hold it down. D . 2 When the table moves, press a STOP key. ✧ The table movement must stop immediately. D .
- Page 266 Function Tests Operation 0 . 0 D.2-6 SOMATOM Spirit 0 . 0 0 . 0...
-
Page 267: Accessories For Patient Positioning
Accessories for Patient CHAPTER D . 2 Positioning This chapter gives you an overview of the available positioning aids. D . 3 Use the positioning aids to position the patient safely and com- fortably. Thus, you prevent motion artifacts. D . 3 The following positioning aids are available: D . -
Page 268: Important Safety Information
Positioning aids are subject to wear and tear. They must be D . 3 replaced with original parts if they become dirty or damaged. D . 3 0 . 0 D.3-2 SOMATOM Spirit 0 . 0 0 . 0... -
Page 269: Head Holder, Headrest And Table Top Extension
Operation Accessories for Patient Positioning Head holder, headrest and table top extension D . 3 You can plug the accessories described in this section into the head end of the patient table. D . 3 Safety instructions D . 3 D . - Page 270 Cuts and other injuries. D . 3 D . 3 Pluggable positioning aids must not bear weights of more ✧ than a special value shown on a warning label. 0 . 0 D.3-4 SOMATOM Spirit 0 . 0 0 . 0...
- Page 271 Operation Accessories for Patient Positioning The pictures shown here are only examples. The appearance of D . 3 the positioning aids depends on the system configuration. D . 3 Attaching positioning aids The head holder, table top extension and the head-arm support D .
-
Page 272: Cfk Head Holder
(for example, sinuses). D . 3 D . 3 (1) Velcro strips (2) Release button 0 . 0 D.3-6 SOMATOM Spirit 0 . 0 0 . 0... - Page 273 Operation Accessories for Patient Positioning Safety instructions D . 3 D . 3 CAUTION D . 3 If a head holder or support does not engage securely, it can come loose! D . 3 D . 3 Possible injury of the patient. D .
- Page 274 Using the CFK head holder Use this accessory for positioning the head for cranial ✧ D . 3 examinations, for examinations in the neck region and for examinations of the cervical vertebrae. 0 . 0 D.3-8 SOMATOM Spirit 0 . 0 0 . 0...
-
Page 275: Coronal Supine Head Holder (Optional
Operation Accessories for Patient Positioning Coronal supine head holder (optional) D . 3 D . 3 Safety instructions D . 3 Warning label: Coronal supine head holder D . 3 Use of the coronal supine head holder! D . 3 Possible injury of the patient when the gantry is tilted. -
Page 276: Coronal Prone Head Holder (Optional
❏ loosening the support screw, moving it to the desired posi- tion and retightening the screw firmly. D . 3 (1) Adjustable forehead support (2) Adjustable chin support 0 . 0 D.3-10 SOMATOM Spirit 0 . 0 0 . 0... - Page 277 Operation Accessories for Patient Positioning Safety instructions D . 3 D . 3 CAUTION D . 3 Improper use of positioning aids! D . 3 Injury of the patient or damage to the system are possible. D . 3 D . 3 Use the positioning aids exclusively for their original pur- ✧...
-
Page 278: Bocollo Cushion (Headrest) (Optional
The Bocollo cushion (headrest) is for the comfortable position- ing of the patient’s head at the plate of the patient positioning table. D . 3 D . 3 0 . 0 D.3-12 SOMATOM Spirit 0 . 0 0 . 0... - Page 279 Operation Accessories for Patient Positioning Table top extension D . 3 The table top extension is only intended to be an extension for the feet. D . 3 D . 3 (1) Release button Safety instructions D . 3 Warning label: Maximum weight D .
-
Page 280: Supports And Cushions
The following positioning aids are used to position the patient comfortably. D . 3 Head-arm support for thorax, abdomen and pelvis examinations D . 3 D . 3 0 . 0 D.3-14 SOMATOM Spirit 0 . 0 0 . 0... - Page 281 Operation Accessories for Patient Positioning Safety instructions D . 3 D . 3 CAUTION D . 3 Use of the head-arm support! D . 3 Increased risk that the gantry might collide with the arms of D . 3 the patient. D .
- Page 282 Velcro straps on both sides. Here, you can fix the patient’s hands. These supports are not recommended for head and neck exam- D . 3 inations. D . 3 0 . 0 D.3-16 SOMATOM Spirit 0 . 0 0 . 0...
-
Page 283: Arm Support (Optional
Operation Accessories for Patient Positioning Arm support (optional) D . 3 The arm supports can be used for examinations in which the patient’s arms need to be positioned next to his or her body. The arm supports are used in pairs and allow a safe and more com- fortable positioning of the arms. -
Page 284: Knee Support
D . 3 Using the knee support Place the knee support under the knees and the lower legs. ✧ D . 3 0 . 0 D.3-18 SOMATOM Spirit 0 . 0 0 . 0... -
Page 285: Cushion Set
Operation Accessories for Patient Positioning Cushion set D . 3 This cushion set consists of the following positioning aids: D . 3 Cushion, flat ❏ Head cushion 15° ❏ Head cushion 25° ❏ Pad, thin (one pair) ❏ Pad, thick (one pair) ❏... - Page 286 Positioning with head cushions (15° or 25°) for brain exam- ❏ inations. D . 3 (1) Head cushion (2) Pad: thin, thick (3) Velcro straps (4) Cushion, flat 0 . 0 D.3-20 SOMATOM Spirit 0 . 0 0 . 0...
- Page 287 Operation Accessories for Patient Positioning Safety instructions D . 3 Warning label: Insert pads D . 3 Use of insert pads! D . 3 Increased risk of the head of the patient hitting the gantry. D . 3 Always watch the patient while the table is moving - espe- ✧...
- Page 288 D . 3 D . 3 (1) Head cushion 15° (2) Head cushion 25° Place the head cushion in the head support instead of the ✧ flat cushion. 0 . 0 D.3-22 SOMATOM Spirit 0 . 0 0 . 0...
- Page 289 Operation Accessories for Patient Positioning Using the thin or thick pad The pads ensure secure but not unpleasant immobilization of D . 3 the head. D . 3 D . 3 (1) Pad thin (2) Pad thick Push the pads between the ear and the head holder on the ✧...
-
Page 290: Baby Mattress (Optional
D . 3 D . 3 (1) Body support (2) Mat (3) Head support (4) Velcro straps for arm fixation (5) Velcro straps for head and body fixation (6) Cushions 0 . 0 D.3-24 SOMATOM Spirit 0 . 0 0 . 0... - Page 291 Operation Accessories for Patient Positioning Body support The body support is an underlay for the mat. There are different D . 3 positions for the Velcro strap fixation on both sides of the body support. D . 3 The mat provides a comfortable and secure position of the baby D .
- Page 292 When positioning large babies, use the Velcro straps for body D . 3 fixation to fix the flaps. D . 3 The body of the baby is immobilized. D . 3 0 . 0 D.3-26 SOMATOM Spirit 0 . 0 0 . 0...
- Page 293 Operation Accessories for Patient Positioning Using the Velcro straps for The baby is positioned and immobilized on the baby mat- ✓ arm fixation tress. D . 3 Fix the Velcro straps for arm fixation parallel to each other. ✧ There are different positions for fixation of the Velcro straps. D .
-
Page 294: Positioning Mat
Using the positioning mat Use this accessory to provide a comfortable position for the D . 3 patient on the table top. D . 3 D . 3 0 . 0 D.3-28 SOMATOM Spirit 0 . 0 0 . 0... -
Page 295: Straps
Operation Accessories for Patient Positioning Straps D . 3 Straps are used to restrain the patient. D . 3 Head support straps are used to immobilize the patient's head. They restrain the head in a stable position to avoid motion arti- facts. -
Page 296: Body Support Straps
Body support straps D . 3 D . 3 Dimensions: 10 cm x 165 cm D . 3 D . 3 Dimensions: 20 cm x 180 cm D . 3 0 . 0 D.3-30 SOMATOM Spirit 0 . 0 0 . 0... - Page 297 Operation Accessories for Patient Positioning Using the body support Use one or several immobilizing straps to position and immobi- straps lize the patient, depending on the requirement (mobility, coop- D . 3 eration). D . 3 D . 3 CAUTION D .
-
Page 298: Forehead Support Strap
D . 3 Run the soft fabric straps over the patient's forehead and ✧ fasten them to the Velcro fixing strips on the outside of the head holder. 0 . 0 D.3-32 SOMATOM Spirit 0 . 0 0 . 0... -
Page 299: Chin Support Strap
Operation Accessories for Patient Positioning Chin support strap D . 3 D . 3 Using the chin support strap Use the chin support strap if you want to position and immobi- D . 3 lize the patient's head/jaw even more effectively. D . -
Page 300: Osteo Ct Accessories (Optional
Normally, there is a space between the spine of the patient and D . 3 the reference phantom. This falsifies the evaluation. D . 3 Use the gel pack to fill the space. ✧ 0 . 0 D.3-34 SOMATOM Spirit 0 . 0 0 . 0... - Page 301 Operation Accessories for Patient Positioning Storing the Osteo position- With the Velcro strap supplied you can hang the Osteo mat on ing mat the wall when not in use. D . 3 D . 3 D . 3 Attach the self-adhesive Velcro strap vertically to the wall in ✧...
-
Page 302: Rtp Accessories (Optional
Treatment Planning (RTP). D . 3 The RTP mattress is used with the following CT system: D . 3 SOMATOM Spirit Power ❏ Using the RTP mattress The RTP mattress is used to ensure that the patient lies flat dur- D . - Page 303 Operation Accessories for Patient Positioning The pictures of the components shown here are only examples. D . 3 The appearance of your components depends on the system configuration. D . 3 D . 3 0 . 0 D.3-37 04/2012 0 . 0 0 .
- Page 304 The mattress must be positioned on the table in a way that the D . 3 logo on the mattress is located at the foot end of the table. D . 3 0 . 0 D.3-38 SOMATOM Spirit 0 . 0 0 . 0...
- Page 305 Operation Accessories for Patient Positioning Remove the standard mattress. ✧ Place the RTP mattress on the table top. ✧ D . 3 Press the mattress onto the Velcro fixing points. ✧ The mattress is now fixed to the table and cannot move. D .
- Page 306 Velcro straps in such a way that the mat lays flat against the wall. Please observe the manufacturer’s notes in the attached assem- D . 3 bly instructions. D . 3 0 . 0 D.3-40 SOMATOM Spirit 0 . 0 0 . 0...
-
Page 307: Positioning The Patient
CHAPTER D . 3 Positioning the Patient This chapter gives you information about positioning the patient. D . 4 We will start with important information about positioning. Then, you will learn how to position the patient correctly. D . 4 After that, the standard accessories for positioning and their use in various examinations is discussed. -
Page 308: Important Safety Information
Positioning accessories To avoid danger of injuring the patient during table or gantry D . 4 movements, only positioning accessories approved by Siemens should be used. In this way also artifacts can be avoided which impair the image quality.(→ Page D.3-1 Accessories for Patient Positioning) D . - Page 309 Operation Positioning the Patient Cleanliness Remove all impurities, especially residual contrast medium, ✧ D . 4 (→ Page E.3-1 Cleaning and Disin- as quickly as possible. fecting) Artifacts When positioning the patient, please ensure that the object of D . 4 interest is as near to the center of the measuring field as possi- ble.
- Page 310 Explain to the patient that he or she must hold his or her ✧ breath for a relatively long time. Use the intercom system to give the patient breathing ✧ instructions. 0 . 0 D.4-4 SOMATOM Spirit 0 . 0 0 . 0...
- Page 311 Operation Positioning the Patient Patient weight Patients weighing up to 140 kg (300 lbs) can be examined with- D . 4 out any restriction. D . 4 Patients weighing up to 200 kg (440 lbs) can be positioned on the table and examined. The stability of the patient table is not at risk.
-
Page 312: Positioning A Patient
✧ objects are below the patient table. Move the table up or down. Be aware of any objects in the ✧ path of table movement. D . 4 0 . 0 D.4-6 SOMATOM Spirit 0 . 0 0 . 0... - Page 313 Operation Positioning the Patient The positioning mat has to be fastened onto the table top so D . 4 that its position marker is aligned with the corresponding marker of the table top. D . 4 The positioning mat must be correctly secured. D .
- Page 314 Take special care with those patients. ✧ Position the straps below the mat. ✧ Close them on top of the patient with the Velcro strip. ✧ D . 4 0 . 0 D.4-8 SOMATOM Spirit 0 . 0 0 . 0...
- Page 315 Operation Positioning the Patient Applying infusion tubes D . 4 D . 4 CAUTION D . 4 Use of short infusion tubes! D . 4 Tensile stress on the infusion tubes when moving the table D . 4 top. Tubes can get caught. D .
- Page 316 ✧ necessary. D . 4 Table movement D . 4 Use the keys to move the table up or down / in or out. ✧ D . 4 0 . 0 D.4-10 SOMATOM Spirit 0 . 0 0 . 0...
- Page 317 Operation Positioning the Patient Using the laser light marker The light markers are laser beams that emanate from three D . 4 points in the gantry opening. These points are marked. The laser beams fan out so that you see lines as a mark or a cross at the intersection of the beams.
- Page 318 The vertical light marker helps you to adjust the height until that the examination region is in the isocenter. D . 4 From now on, the patient must lie still. D . 4 0 . 0 D.4-12 SOMATOM Spirit 0 . 0 0 . 0...
- Page 319 Operation Positioning the Patient Checking the patient posi- D . 4 tion D . 4 CAUTION D . 4 Wrong entry of patient position! D . 4 Wrong basis for diagnosis. D . 4 D . 4 Make sure that you enter the patient position correctly. ✧...
- Page 320 Before starting the examination, make sure that table top ✧ movement toward the gantry opening is not obstructed. Ensure that the patient cannot be injured by a movement of ✧ the table or gantry. 0 . 0 D.4-14 SOMATOM Spirit 0 . 0 0 . 0...
- Page 321 Operation Positioning the Patient Monitoring patients As long as the table or scanning unit is moving during scanning, D . 4 the patient must always be visible and the intercom system must be switched on to hear the patient. D . 4 Special care is required if contrast medium is injected intrave- nously during an examination with table feed (for example, spi- ral scans).
-
Page 322: Using Standard Accessories
Accessories for Patient Positioning). D . 4 Please pay attention to the safety information given there. D . 4 Use positioning aids as described in the following. D . 4 0 . 0 D.4-16 SOMATOM Spirit 0 . 0 0 . 0... -
Page 323: Positioning For Cranial Examinations
Operation Positioning the Patient Positioning for cranial examinations D . 4 Cranial examinations, su- pine D . 4 D . 4 (1) CFK head holder (2) Head cushion (3) Restraint strap (4) Pad: thin, thick (5) Velcro straps (6) Knee support 0 . - Page 324 Make sure that there is no metal in the scanning area. ✧ Positioning D . 4 The yellow segment in the schematic representation indicates starting position and radiation direction for topogram. D . 4 D . 4 0 . 0 D.4-18 SOMATOM Spirit 0 . 0 0 . 0...
- Page 325 Operation Positioning the Patient Cranial examinations, su- pine with coronal supine head holder D . 4 D . 4 (1) Coronal supine head holder (2) Positioning mat 0 . 0 D.4-19 04/2012 0 . 0 0 . 0...
- Page 326 Immobilize the head with the straps, if necessary. ✧ Positioning D . 4 The yellow segment in the schematic representation indicates starting position and radiation direction for topogram. D . 4 D . 4 0 . 0 D.4-20 SOMATOM Spirit 0 . 0 0 . 0...
- Page 327 Operation Positioning the Patient Cranial examinations, prone We recommend this position for direct coronal slices. D . 4 D . 4 D . 4 (1) CFK head holder (2) Head cushion (3) Restraint strap (4) Pad: thin, thick (5) Velcro straps (6) Knee support 0 .
- Page 328 D . 4 The chin of the patient is placed in the CFK head holder. The head is tilted backward as far as possible. D . 4 D . 4 0 . 0 D.4-22 SOMATOM Spirit 0 . 0 0 . 0...
-
Page 329: Positioning For Examinations In Neck Region And For Cervical Vertebrae
Operation Positioning the Patient Positioning for examinations in neck region and for cervical vertebrae D . 4 Examinations in the neck re- You can support positioning of the head by placing the head gion cushion under the head with the thick end in the caudal direc- D . - Page 330 Make sure that there is no metal in the scanning area. ✧ Positioning D . 4 The yellow segment in the schematic representation indicates starting position and radiation direction for topogram. D . 4 D . 4 0 . 0 D.4-24 SOMATOM Spirit 0 . 0 0 . 0...
- Page 331 Operation Positioning the Patient Examinations of the cervical vertebrae D . 4 D . 4 (1) CFK head holder (2) Knee support (3) Pad: thin, thick (4) Velcro straps 0 . 0 D.4-25 04/2012 0 . 0 0 . 0...
- Page 332 Make sure that there is no metal in the scanning area. ✧ Positioning D . 4 The yellow segment in the schematic representation indicates starting position and radiation direction for topogram. D . 4 D . 4 0 . 0 D.4-26 SOMATOM Spirit 0 . 0 0 . 0...
-
Page 333: Positioning For Examinations Of Thorax And Abdomen
Operation Positioning the Patient Positioning for examinations of thorax and abdomen D . 4 Thoracic and abdominal ex- aminations D . 4 D . 4 (1) Head-arm support with straps and cushion (optional) (2) Straps (optional) (3) Knee support 0 . 0 D.4-27 04/2012 0 . - Page 334 When positioning the table top or tilting the gantry, make ✧ sure that the knees and the arms do not collide with the gantry. 0 . 0 D.4-28 SOMATOM Spirit 0 . 0 0 . 0...
- Page 335 Operation Positioning the Patient Positioning D . 4 The yellow segment in the schematic representation indicates starting position and radiation direction for topogram. D . 4 D . 4 (1) Lung, liver, pancreas (2) Pancreas (beginning at the sternum) (3) Pelvis (beginning at the pelvic crest) 0 .
- Page 336 Velcro straps. When positioning the table top or tilting the gantry, make ✧ sure that the knees and the arms do not collide with the gantry. 0 . 0 D.4-30 SOMATOM Spirit 0 . 0 0 . 0...
- Page 337 Operation Positioning the Patient Positioning D . 4 The yellow segment in the schematic representation indicates starting positioning and radiation direction for topogram. D . 4 D . 4 (1) Thoracic vertebrae (2) Lumbar vertebrae 0 . 0 D.4-31 04/2012 0 .
-
Page 338: Positioning For Examinations Of Extremities
✧ patient at the foot end of the patient table. In this case, it is not possible to use the head holder. D . 4 D . 4 0 . 0 D.4-32 SOMATOM Spirit 0 . 0 0 . 0... - Page 339 Operation Positioning the Patient Position the patient so that he or she is lying supine with his ✧ or her arms crossed above the head. When using the baby mattress, close the flaps to immobi- ✧ lize the body of the baby. It is only possible to scan the region of the body that is inside the D .
-
Page 340: Using Optional Accessories
Head examinations in prone The coronal prone head holder is used to produce direct coronal position using the coronal slices. D . 4 prone head holder D . 4 0 . 0 D.4-34 SOMATOM Spirit 0 . 0 0 . 0... - Page 341 Operation Positioning the Patient D . 4 Accessories ( 1 ) (1) Coronal prone head holder (optional) (2) Velcro straps (3) Positioning mat 0 . 0 D.4-35 04/2012 0 . 0 0 . 0...
- Page 342 Immobilize the head/arms using the straps, if necessary. ✧ Positioning D . 4 The yellow segment in the schematic representation indicates starting position and radiation direction for topogram. D . 4 D . 4 0 . 0 D.4-36 SOMATOM Spirit 0 . 0 0 . 0...
-
Page 343: Positioning For Examinations Of Extremities
Operation Positioning the Patient Positioning for examinations of extremities D . 4 Examinations of the lower extremities with the table top extension D . 4 D . 4 (1) Table top extension (optional) (2) Bocollo cushion (headrest) Attach the table top extension to the head end of the ✧... - Page 344 The yellow segment in the schematic representation indicates starting position and radiation direction for topogram. D . 4 D . 4 (1) Ankle (2) Knee (3) Hip joint 0 . 0 D.4-38 SOMATOM Spirit 0 . 0 0 . 0...
-
Page 345: Vertebrae Examinations With Osteo
Operation Positioning the Patient Vertebrae examinations with Osteo D . 4 Vertebrae examinations with Osteo D . 4 D . 4 (1) Head-arm support (2) Reference phantom with gel pack (optional) (3) Osteo positioning mat (optional) (4) Knee support (→ Page D.3-34 Osteo CT accessories (optional)) ✓... - Page 346 Positioning the Patient Operation D . 4 CAUTION D . 4 Use of other than original Siemens Osteo Phantom! D . 4 Wrong diagnosis caused by wrong information. D . 4 D . 4 Only the original Siemens reference phantom must be ✧...
- Page 347 Operation Positioning the Patient D . 4 CAUTION D . 4 Air between the reference phantom and the region of interest! D . 4 Unusable results. D . 4 D . 4 Fill the free space with the gel pack. ✧...
- Page 348 D . 4 The yellow segment in the schematic representation indicates starting position and radiation direction for topogram. D . 4 D . 4 (1) Gel packs (2) Reference phantom 0 . 0 D.4-42 SOMATOM Spirit 0 . 0 0 . 0...
- Page 349 E.1-1 Maintenance E.1-2 Malfunctions E.1-2 Maintenance contract E.1-2 Maintenance intervals E.1-3 Service E.1-4 Siemens local branch office and customer service E.1-6 E.2 Cleaning Agents and Disinfectants E.2-1 Disinfectants E.2-2 Cleaning agents E.2-3 Unsuitable cleaning agents and disinfectants E.2-4 Veterinary use E.2-5...
- Page 350 Maintenance 0 . 0 SOMATOM Spirit 0 . 0 0 . 0...
-
Page 351: Maintenance And Service
(→ Page E.3-1 Cleaning and Disinfecting) by Siemens Service. E . 1 Technical documents On request, technical documents can be obtained from Siemens E . 1 at a small charge. E . 1 0 . 0 E.1-1... -
Page 352: Maintenance
E . 1 On request, you can have maintenance work performed regu- larly by the Siemens Customer Service. E . 1 Please contact your Siemens Service to agree on a mainte- ✧ nance contract for your system. 0 . 0 E.1-2... -
Page 353: Maintenance Intervals
Maintenance Maintenance and Service Maintenance intervals E . 1 E . 1 CAUTION E . 1 Missing maintenance of the scanning system! E . 1 Scan abortion or reduced image quality due to malfunction E . 1 of the scanner. E . -
Page 354: Service
Maintenance and Service Maintenance Service E . 1 If you require technical support or additional assistance with applications, please call your local Siemens branch office or cus- tomer service or contact us in Germany. E . 1 Siemens application hotline Phone number ❏... - Page 355 Your name and your telephone number ❏ Warranty For warranty terms, please refer to your purchase contract. E . 1 E . 1 Contacting local Siemens Enter the name and telephone number here: ✧ branch office and customer service E . 1 0 .
-
Page 356: Siemens Local Branch Office And Customer Service
Maintenance and Service Maintenance Siemens local branch office and customer service E . 1 Siemens branch office : E . 1 Name : E . 1 Telephone number : E . 1 Fax number : E . 1 Internet : E . -
Page 357: Cleaning Agents And Disinfectants
Cleaning Agents and CHAPTER E . 1 Disinfectants In this section, you will learn which agents are suitable for clean- ing and disinfecting and which are unsuitable. E . 2 E . 2 CAUTION E . 2 Not observing the instructions of the disinfectant manufacturer! E . - Page 358 Use of disinfectants containing alcohols or quaternary com- pounds will impair the surface of immobilization straps. E . 2 Organic acids and peroxide compounds can be used without restriction. E . 2 0 . 0 E.2-2 SOMATOM Spirit 0 . 0 0 . 0...
-
Page 359: Cleaning Agents
Maintenance Cleaning Agents and Disinfectants Cleaning agents E . 2 You can use the following commercially available cleaning agents with the given restrictions to clean the sides of the table, the tabletop cover, gantry cover, cushions, armrests, knee sup- ports and head holder: E . -
Page 360: Unsuitable Cleaning Agents And Disinfectants
Silicone decays over time and can form sticky deposits that interfere with electrical contacts. E . 2 Disinfectants based on substituted phenols or disinfectants ❏ that release chlorine. 0 . 0 E.2-4 SOMATOM Spirit 0 . 0 0 . 0... -
Page 361: Veterinary Use
Maintenance Cleaning Agents and Disinfectants Veterinary use E . 2 Veterinary use of the SOMATOM CT system requires that you sufficiently clean the table and positioning aids. In case of mixed operation for both animal and human patients, the clean- ing media used should also be approved for humans. - Page 362 Cleaning Agents and Disinfectants Maintenance 0 . 0 E.2-6 SOMATOM Spirit 0 . 0 0 . 0...
-
Page 363: Cleaning And Disinfecting
CHAPTER E . 2 Cleaning and Disinfecting This chapter informs you how to clean special parts of the sys- tem. E . 3 Safety instructions E . 3 E . 3 CAUTION E . 3 Cleaning of parts of the system while the system is connected to the power supply! E . - Page 364 Never rub or wipe the surface or use chemical solutions and cleaning liquids. Certain substances (for example, ammonia vapors) can contaminate the surface of the disk making it unreadable. E . 3 0 . 0 E.3-2 SOMATOM Spirit 0 . 0 0 . 0...
- Page 365 Maintenance Cleaning and Disinfecting Cleaning the mouse You should clean the ball and rollers of the mouse from time to E . 3 time to ensure proper functioning. E . 3 Release the ring around the ball under the mouse by turn- ✧...
- Page 366 Cleaning and Disinfecting Maintenance 0 . 0 E.3-4 SOMATOM Spirit 0 . 0 0 . 0...
-
Page 367: F Quality Assurance
PART E . 3 Quality Assurance F.1 General Information F.1-1 Accessories for quality measurement F.1-6 F.2 Daily Quality Measurements F.2-1 Performing quality measurements F.2-2 Safety instructions F.2-2 F.3 Constancy Test F.3-1 Performing the constancy test F.3-1 The individual tests F.3-7 Output of results F.3-35 F.4 Low Contrast Test (Optional) - Page 368 Quality Assurance 0 . 0 SOMATOM Spirit 0 . 0 0 . 0...
-
Page 369: General Information
CHAPTER F . 0 General Information To ensure a constantly high image quality, you must perform quality measurements regularly. F . 1 After switch on Whenever you start the system, you can perform automatic F . 1 (→ Page D.1-8 System checks and a series of warm-up scans. - Page 370 F . 1 We recommend having the constancy test performed by Siemens Customer Service as part of a service contract. (→ Page F.3-1 Constancy Test) F . 1 All parameters and images shown in this manual are examples.
- Page 371 Quality Assurance General Information Mounting the set of phan- Mount the phantoms at the head end of the patient table ✧ toms with the phantom holder in the following order: water F . 1 phantom - slice thickness phantom - wire phantom. F .
- Page 372 F . 1 Positioning the phantoms F . 1 Set the gantry vertical (0°). ✧ F . 1 Activate the light marker. ✧ F . 1 0 . 0 F.1-4 SOMATOM Spirit 0 . 0 0 . 0...
- Page 373 Quality Assurance General Information Set the appropriate table height using the light marker. ✧ F . 1 The numerical value for the correct table height will be dis- played after the phantom position check. F . 1 Move the patient table into the gantry. ✧...
-
Page 374: Accessories For Quality Measurement
F . 1 thickness phantom and the wire phantom. F . 1 F . 1 (1) Water phantom (2) Slice thickness phantom (3) Reference marks (4) Wire phantom 0 . 0 F.1-6 SOMATOM Spirit 0 . 0 0 . 0... - Page 375 Quality Assurance General Information Assembly After delivery, the phantom set is assembled by a technician. F . 1 F . 1 Accessories for daily quality The following components are required for the daily quality measurement measurement: F . 1 F . 1 Phantom holder ❏...
- Page 376 General Information Quality Assurance 0 . 0 F.1-8 SOMATOM Spirit 0 . 0 0 . 0...
-
Page 377: Daily Quality Measurements
Daily Quality CHAPTER F . 1 Measurements The daily quality measurements only require checking of three parameters on the water phantom: F . 2 The Pixel noise of images is calculated as a standard devia- ❏ tion. Tube voltages are measured directly on the x-ray tube. ❏... -
Page 378: Performing Quality Measurements
Position the phantom set. ✧ tion) All parameters and images shown in this manual are examples. Only the parameters displayed by your system are definite. F . 2 0 . 0 F.2-2 SOMATOM Spirit 0 . 0 0 . 0... - Page 379 Quality Assurance Daily Quality Measurements Activating daily quality test Call up Setup > Quality. ✧ F . 2 The Daily Quality Check dialog box is displayed. F . 2 F . 2 In the Quality Daily Check dialog box, the vertical table height value 145 mm is an example.
- Page 380 F . 2 Triggering radiation In the Daily Quality Check dialog box, you are prompted to ✓ F . 2 initiate radiation. F . 2 0 . 0 F.2-4 SOMATOM Spirit 0 . 0 0 . 0...
- Page 381 Quality Assurance Daily Quality Measurements Press the Start key on the control box. ✧ The position of the phantom set is checked and displayed. Then, the first measurement is started automatically. F . 2 F . 2 For incorrect positioning of the phantom set, a message is dis- played.
- Page 382 The Quality/Daily measurement is aborted. F . 2 You have to repeat the quality measurement from the begin- ning before you start the actual examinations. F . 2 0 . 0 F.2-6 SOMATOM Spirit 0 . 0 0 . 0...
- Page 383 F . 2 The Quality/Daily measurement is terminated. F . 2 Test results of the Quality/Daily measurement are out of toler- ance. F . 2 Call your Siemens Customer Service. ✧ F . 2 0 . 0 F.2-7 04/2012 0 . 0...
- Page 384 Daily Quality Measurements Quality Assurance 0 . 0 F.2-8 SOMATOM Spirit 0 . 0 0 . 0...
-
Page 385: Constancy Test
CHAPTER F . 2 Constancy Test Together with other characteristic values, the daily test values are checked for constancy monthly. These tests are performed on the complete set of phantoms. F . 3 In addition, the CTDI (CT Dose Index) must be measured at least once every six months. - Page 386 Click the Quality Assurance button to display the Quality ✧ dialog window. Select the Constancy procedure. ✧ The Quality Constancy dialog box is displayed. F . 3 F . 3 0 . 0 F.3-2 SOMATOM Spirit 0 . 0 0 . 0...
- Page 387 Quality Assurance Constancy Test F . 3 (1) Title bar (2) Mode button (s) (3) Quality functions (4) Content area (5) Status and error message area (6) Command buttons 0 . 0 F.3-3 04/2012 0 . 0 0 . 0...
- Page 388 In reference mode, the individual selected tests are marked by an “R”. The test results will be used as reference data in the future. F . 3 F . 3 We recommend that Siemens Service always performs your ref- erence measurements. F . 3 0 . 0 F.3-4 SOMATOM Spirit 0 .
- Page 389 Quality Assurance Constancy Test Starting the constancy test A reference measurement follows the same sequence as a nor- F . 3 mal constancy test. F . 3 Confirm selection of the constancy test with Go. ✧ F . 3 You are prompted to enter the name of the tester and the serial numbers of the phantoms.
- Page 390 You can interrupt each test within a constancy measurement. F . 3 test F . 3 Click the Cancel button. ✧ F . 3 The current measurement is aborted. F . 3 0 . 0 F.3-6 SOMATOM Spirit 0 . 0 0 . 0...
-
Page 391: The Individual Tests
Quality Assurance Constancy Test The individual tests F . 3 In the constancy test, the following factors are checked: F . 3 Phantom and phantom position check ❏ Position of the lightmarker; Lightmarker ❏ Position of the sagittal and coronal lightmarker; Sag/Cor. ❏... - Page 392 (→ Page F.1-1 General Informa- slice thickness phantom. tion) The Lightmarker test mode is loaded. ✓ You are prompted to press Start. ✓ 0 . 0 F.3-8 SOMATOM Spirit 0 . 0 0 . 0...
- Page 393 Quality Assurance Constancy Test Press the Start key on the control box. ✧ Scanning is started. F . 3 In the image area, the phantom is displayed as a circle in the image. For the light marker test, both the short and the long F .
- Page 394 Record a new image and compare the position of the strips ✧ again. Repeat image recording and correction of the table position ✧ until you have set the correct z-position. Click Continue. ✧ F . 3 0 . 0 F.3-10 SOMATOM Spirit 0 . 0 0 . 0...
- Page 395 Quality Assurance Constancy Test The internal z-position is set to 0, the display of the table posi- tion shows 0. The result of the test is output in the content area of the Quality Constancy dialog box. F . 3 F .
- Page 396 In the image, the middle of the phantom is determined. The result is the deviation from the horizontal and vertical middle of F . 3 the image to the middle of the phantom. F . 3 0 . 0 F.3-12 SOMATOM Spirit 0 . 0 0 . 0...
- Page 397 Quality Assurance Constancy Test The result of the test is output in the content area of the Quality Constancy dialog box. F . 3 F . 3 In the status and error message area the result of this test (in tol- erance or out of tolerance) is output.
- Page 398 F . 3 F . 3 Move the horizontal line and mark the position of the mid- ✧ dle of the slice thickness phantom. 0 . 0 F.3-14 SOMATOM Spirit 0 . 0 0 . 0...
- Page 399 Quality Assurance Constancy Test Click Go. ✧ F . 3 The patient table moves automatically to the marked position. F . 3 Scanning is started. F . 3 In the image area, the phantom is displayed as a circle in the image.
- Page 400 Record a new image and compare the position of the strips ✧ again. Repeat image recording and correction of the table position ✧ until you have set the correct z-position. Click Continue. ✧ F . 3 0 . 0 F.3-16 SOMATOM Spirit 0 . 0 0 . 0...
- Page 401 Quality Assurance Constancy Test The result of the test is output in the content area of the Quality Constancy dialog box. F . 3 F . 3 In the status and error message area, the result of this test (in tolerance or out of tolerance) is output.
- Page 402 An image of the slice thickness phantom is displayed in the image area and the slice thickness is calculated. The procedure is repeated automatically. F . 3 F . 3 0 . 0 F.3-18 SOMATOM Spirit 0 . 0 0 . 0...
- Page 403 Quality Assurance Constancy Test After all slice thicknesses have been evaluated, the result of the test is output in the content area of the Quality Constancy dia- log box. F . 3 F . 3 Use the vertical scroll bar to view all test results. F .
- Page 404 CT values are displayed. F . 3 The difference between the mean values of the central ROI and the peripheral ROIs is displayed. F . 3 F . 3 0 . 0 F.3-20 SOMATOM Spirit 0 . 0 0 . 0...
- Page 405 Quality Assurance Constancy Test The measurement is repeated automatically for other tube volt- ages. The results of the test are output in the content area of the Quality Constancy dialog box. F . 3 F . 3 Use the vertical scroll bar to view all test results. F .
- Page 406 F . 3 The following evaluations are displayed: F . 3 ❏ Mean value of the CT value ❏ Sigma value (pixel noise) ❏ F . 3 0 . 0 F.3-22 SOMATOM Spirit 0 . 0 0 . 0...
- Page 407 Quality Assurance Constancy Test The measurement is repeated automatically for every tube volt- age. The results of the test are output in the content area of the Quality Constancy dialog box. F . 3 F . 3 Use the vertical scroll bar to view all test results. F .
- Page 408 The MTF is represented graphically as a function of the local fre- quency (LP/cm). In addition, three characteristic values, 50% MTF, 10% MTF and 2% MTF are displayed. F . 3 0 . 0 F.3-24 SOMATOM Spirit 0 . 0 0 . 0...
- Page 409 Quality Assurance Constancy Test The scan is displayed in the image area. The result image is cal- culated and stored in the local database. F . 3 F . 3 The result image can be displayed in the Viewing task card after (→...
- Page 410 The evaluation is done for all detector rows using different ker- nels. The results of the test are output in the content area of the Quality Constancy dialog box. F . 3 F . 3 0 . 0 F.3-26 SOMATOM Spirit 0 . 0 0 . 0...
- Page 411 Quality Assurance Constancy Test Use the vertical scroll bar to view all test results. F . 3 In the status and error message area, the result of this test (in tolerance or out of tolerance) is output. F . 3 Performing the Contrast test With this test, you measure the contrast scale by a measure- F .
- Page 412 F . 3 In the status and error message area, the result of this test (in tolerance or out of tolerance) is output. F . 3 F . 3 0 . 0 F.3-28 SOMATOM Spirit 0 . 0 0 . 0...
- Page 413 Quality Assurance Constancy Test Performing the table posi- With this quality measurement, you test whether the actual tion test table position matches the table position displayed. F . 3 F . 3 The Table Position test is performed without triggering radia- tion.
- Page 414 The table top now moves stepwise into the gantry (300 mm) and back. F . 3 Enter the actual values at the 300 mm and the 0 mm posi- ✧ tion in the entry field again. 0 . 0 F.3-30 SOMATOM Spirit 0 . 0 0 . 0...
- Page 415 Quality Assurance Constancy Test The deviations of the actual from the displayed positions are cal- culated. The results of the test are output in the content area of the Quality Constancy dialog box. F . 3 F . 3 Use the vertical scroll bar to view all test results. F .
- Page 416 F . 3 F . 3 Read off the value on the dosimeter and enter it in the pro- ✧ tocol. Continue with the next kV values. ✧ 0 . 0 F.3-32 SOMATOM Spirit 0 . 0 0 . 0...
- Page 417 Quality Assurance Constancy Test The results of the test are output in the content area of the Quality Constancy dialog box. F . 3 F . 3 Use the vertical scroll bar to view all test results. F . 3 In the status and error message area, the result of this test (in tolerance or out of tolerance) is output.
- Page 418 Close the Local Service window. ✧ You return to the syngo user interface. F . 3 Confirm closing of the service session with OK in the dialog ✧ displayed. 0 . 0 F.3-34 SOMATOM Spirit 0 . 0 0 . 0...
-
Page 419: Output Of Results
Quality Assurance Constancy Test Output of results F . 3 A defined number of results are stored. Older values are over- written by new values. F . 3 Images The images recorded during measurement are stored as images F . 3 of the “Quality Assurance Patient”. - Page 420 Double-click a quality test in the list to have more detailed ✧ information displayed. — or — F . 3 Select the entry in the list and click Details. ✧ F . 3 0 . 0 F.3-36 SOMATOM Spirit 0 . 0 0 . 0...
- Page 421 Quality Assurance Constancy Test A click the Extract button generates a compressed file of report data and stores this file in a specific folder. This function is for service purposes only. F . 3 The results of the selected quality test are displayed in the con- tent area.
- Page 422 You can print out an individual report. F . 3 F . 3 Click Print. ✧ F . 3 The displayed report is sent to the connected printer. F . 3 0 . 0 F.3-38 SOMATOM Spirit 0 . 0 0 . 0...
- Page 423 Quality Assurance Constancy Test Viewing quality test images You can view the quality images (i.e., the result images of the F . 3 MTF test) in the Viewing task card. F . 3 Open the Patient Browser. ✧ Select the desired images of the “Quality Assurance ✧...
- Page 424 Constancy Test Quality Assurance 0 . 0 F.3-40 SOMATOM Spirit 0 . 0 0 . 0...
-
Page 425: Low Contrast Test (Optional)
F . 4 The availability of the low contrast test is country-specific. It has to be activated by Siemens Service. F . 4 Low contrast phantom sec- The low contrast phantom section consists of a 165 mm diame- tion ter, 25 mm thick, water-equivalent, brown plastic cylinder. -
Page 426: Performing The Low Contrast Test (For Usa)
(1) Water phantom (2) Slice thickness phantom (3) Wire phantom (4) Low contrast phantom Attach the low-contrast phantom section to the Siemens ✧ phantom combination, using the mounting bracket and four mounting screws. Mount the phantom assembly on the patient table at nor- ✧... - Page 427 Quality Assurance Low Contrast Test (Optional) Starting the test The Low Contrast test is performed in the Quality Constancy F . 4 dialog box of the Local Service window. F . 4 Call up the Quality Constancy dialog box. ✧ Select the Phantom Check and the Low Contrast test.
- Page 428 The phantom position and the gantry inclination are checked. F . 4 The image of the low contrast phantom is displayed in the image area. F . 4 F . 4 F . 4 0 . 0 F.4-4 SOMATOM Spirit 0 . 0 0 . 0...
- Page 429 Quality Assurance Low Contrast Test (Optional) Evaluating the test Normally one scan is sufficient to discern the pins in the row F . 4 with the smallest diameter (3 mm). However, the procedure may be repeated if desired. Low contrast measurements are directly effected by the level of noise (“sigma”) in the CT system, which may vary from scan to scan within a specified range.
- Page 430 In the status and error message area the result of this test (in tol- erance or out of tolerance) is output. F . 4 F . 4 Test is out of tolerance. F . 4 Contact Siemens Customer Service. ✧ F . 4 0 . 0 F.4-6 SOMATOM Spirit 0 .
-
Page 431: Performing The Low Contrast Test (For Other Countries)
(1) Water phantom (2) Slice thickness phantom (3) Wire phantom (4) Low contrast phantom Attach the low-contrast phantom section to the Siemens ✧ phantom combination, using the mounting bracket and four mounting screws. Mount the phantom assembly on the patient table at nor- ✧... - Page 432 The Patient Registration window is closed and you return to the Examination task card. F . 4 In the Examination task card, cut the Topogram entry of ✧ the chronicle. 0 . 0 F.4-8 SOMATOM Spirit 0 . 0 0 . 0...
- Page 433 Quality Assurance Low Contrast Test (Optional) Setting scan and recon pa- You must set special scan and recon parameter to perform the rameters low contrast test adequately. F . 4 F . 4 F . 4 Scan parameter F . 4 F .
- Page 434 Press the Start key on the control box. ✧ The image of the low contrast phantom is displayed in the tomo segment. F . 4 F . 4 F . 4 0 . 0 F.4-10 SOMATOM Spirit 0 . 0 0 . 0...
- Page 435 F . 4 The low contrast test is in tolerance if the resolution is at least 5.0 mm. F . 4 Test is out of tolerance. F . 4 Contact Siemens Customer Service. ✧ F . 4 0 . 0 F.4-11 04/2012 0 .
- Page 436 Low Contrast Test (Optional) Quality Assurance 0 . 0 F.4-12 SOMATOM Spirit 0 . 0 0 . 0...
-
Page 437: Camera Test
CHAPTER F . 4 Camera Test In the camera test, the image quality and the camera settings are checked. F . 5 You can also film test images of the quality measurement in order to meet requirements for documentation. F . 5 Image quality of the camera The camera was set for optimum image quality during installa- F . -
Page 438: Performing The Camera Test
✧ F . 5 erence Images” patient to the Viewing task card. In the Viewing task card, film the test images of the “Refer- ✧ ence Images” patient. 0 . 0 F.5-2 SOMATOM Spirit 0 . 0 0 . 0... -
Page 439: Examples Of Test Images
Quality Assurance Camera Test Examples of test images F . 5 F . 5 0 . 0 F.5-3 04/2012 0 . 0 0 . 0... -
Page 440: Example
X-RITE 331. Enter the measured values in the constancy test report. ✧ Test is out of tolerance. F . 5 Contact Siemens Customer Service. ✧ F . 5 Example F . 5 Here is an example of test image 1 with measurement fields marked by the technologist: F . -
Page 441: Constancy Test Of The Monitor
Constancy Test of the CHAPTER F . 5 Monitor Monitors are subjected to a constancy test to ensure that the image quality and measured values lie within a defined range. F . 6 Constancy test requirements for image display devices (moni- tors) may vary according to different national regulations. - Page 442 F . 6 Test image source (imaging device) ❏ Test images: ❏ Technical images (1, 2, 3) F . 6 Clinical reference images (4, 5, 6) F . 6 0 . 0 F.6-2 SOMATOM Spirit 0 . 0 0 . 0...
-
Page 443: Performing The Monitor Test
Quality Assurance Constancy Test of the Monitor Performing the monitor test F . 6 In the Patient Browser window, you can select the test images stored in the database under Local database /Reference / Images. F . 6 You also have the option of filming the images of a previous constancy test to check the camera settings. - Page 444 Owner Manual) All measurement and test results must be confirmed with the date and initials. F . 6 Test is out of tolerance. F . 6 Contact Siemens Customer Service. ✧ F . 6 0 . 0 F.6-4 SOMATOM Spirit 0 .
-
Page 445: Examples Of Test Images
Quality Assurance Constancy Test of the Monitor Examples of test images F . 6 F . 6 0 . 0 F.6-5 04/2012 0 . 0 0 . 0... -
Page 446: The Individual Tests
In test image 1, the squares for the maximum grayscale value , bright field) and the minimum grayscale value (L max. min. black field) are used. F . 6 0 . 0 F.6-6 SOMATOM Spirit 0 . 0 0 . 0... - Page 447 Quality Assurance Constancy Test of the Monitor With the luminance meter, measure the minimum contrast ✧ ) and the maximum contrast (L min. max. The ratio L is calculated as maximum contrast MK max. min. (≥ 40:1). F . 6 You can simply increase the contrast ratio by reducing the envi- ronmental lighting intensity.
- Page 448 Visual interference such as ghosting, artifacts, overshoots, light or dark spots, flickering, and so on, encountered. F . 6 Please consult your service technician. ✧ F . 6 0 . 0 F.6-8 SOMATOM Spirit 0 . 0 0 . 0...
- Page 449 APPENDIX F . 6 Technical Specifications The technical specification for the SOMATOM system equip- ment is given in: (→ System Owner Manual) G . 0 0 . 0 04/2012 0 . 0 0 . 0...
- Page 450 Technical Specifications 0 . 0 SOMATOM Spirit 0 . 0 0 . 0...
- Page 451 Standards and Statutory APPENDIX G . 0 Regulations A SOMATOM system complies with the statutory regulations and standards. H . 0 For further information, please refer to: (→ System Owner Manual) H . 0 0 . 0 04/2012 0 . 0 0 .
- Page 452 Standards and Statutory Regulations 0 . 0 SOMATOM Spirit 0 . 0 0 . 0...
- Page 453 APPENDIX H . 0 Forms The samples of the appropriate quality assurance forms and user’s opinion form is contained in: (→ System Owner Manual) J . 0 0 . 0 04/2012 0 . 0 0 . 0...
- Page 454 Forms 0 . 0 SOMATOM Spirit 0 . 0 0 . 0...
- Page 455 APPENDIX J . 0 DIP Report For further information please refer to: (→ System Owner Man- ual) K . 0 0 . 0 04/2012 0 . 0 0 . 0...
- Page 456 DIP Report 0 . 0 SOMATOM Spirit 0 . 0 0 . 0...
- Page 457 APPENDIX K . 0 Location of Labels For an overview of the warning and identification labels dis- played on the system and its accessories, please refer to: (→ System Owner Manual) L . 0 0 . 0 04/2012 0 . 0 0 .
- Page 458 Location of Labels 0 . 0 SOMATOM Spirit 0 . 0 0 . 0...
- Page 459 APPENDIX L . 0 Glossary M . 0 Algorithm General computation procedure. M . 0 M . 0 In this case: image reconstruction from the measured raw data. M . 0 Anode Positive electrode in the x-ray tube (source of radiation). M .
- Page 460 M . 0 achieve optimum image quality while reducing the radiation and contrast medium dose for the patient. M . 0 CD-R Compact Disk Recordable. M . 0 M . 0 0 . 0 SOMATOM Spirit 0 . 0 0 . 0...
- Page 461 Glossary Cluster A chain of slices acquired rapidly in Sequence CT mode within a M . 0 breath-hold. M . 0 Convolution Mathematical procedure for image reconstruction in computed M . 0 tomography. M . 0 Central Processing Unit, part of the computer that performs the M .
- Page 462 CT dosimetry phantom, expressed in terms of absorbed dose to air (mGy). M . 0 0 . 0 SOMATOM Spirit 0 . 0 0 . 0...
- Page 463 Glossary M . 0 Density determination Quantitative evaluation of the CT values in a CT image. M . 0 M . 0 Detector Component of the scanning system which measures the beam M . 0 intensity after radiation has passed through the object being scanned.
- Page 464 File Unit of data stored on the storage medium in the computer. A M . 0 file might be an image, a database or a program. M . 0 0 . 0 SOMATOM Spirit 0 . 0 0 . 0...
- Page 465 Glossary Flying focal spot Electromagnetic deflected focal spot for sampling each object M . 0 detail from two slightly different perspectives. Used to reduce sampling artifacts. M . 0 Focal spot Focal spot of an x-ray tube. M . 0 M .
- Page 466 CT system. M . 0 Hounsfield unit Unit used to measure the CT value. M . 0 M . 0 Abbreviation of Hounsfield Unit. M . 0 M . 0 0 . 0 SOMATOM Spirit 0 . 0 0 . 0...
- Page 467 Glossary M . 0 Interventional Computed Tomography. M . 0 M . 0 Acquisition method providing more space between the patient table and gantry, e.g., for use of a C-arm. M . 0 Image control system (ICS) Computer on which the CT scanner is controlled (Navigator). M .
- Page 468 Milliampere per second product; unit used to measure the prod- M . 0 uct of the tube current (mA) and scan time (s). Equivalent to the applied radiation dose. M . 0 0 . 0 M-10 SOMATOM Spirit 0 . 0 0 . 0...
- Page 469 Glossary Motion Artifact Correction Algorithm: algorithm correcting M . 0 motion artifacts. M . 0 Measurement field The field from which the detector array acquires data in the gan- M . 0 try. M . 0 MinIP Minimum Intensity Projection, like MIP but visualization of the M .
- Page 470 Semiautomatic bone mineral density measurement and evalua- M . 0 tion method for the quantitive assessment of bone mineral con- tent in the lumbar spine. M . 0 0 . 0 M-12 SOMATOM Spirit 0 . 0 0 . 0...
- Page 471 M . 0 PACS Picture Archiving & Communication System. M . 0 M . 0 Siemens network for archiving and transmitting medical images. M . 0 Page Mode In page mode filming, the entire film sheet is composed in the M .
- Page 472 (rotation) is finished. M . 0 Real Time Recon Reconstruction synchronous to scanning with an additional M . 0 delay for displaying the first image. M . 0 0 . 0 M-14 SOMATOM Spirit 0 . 0 0 . 0...
- Page 473 Glossary Reconstruction FOV see FOV. M . 0 M . 0 Rendering General procedure for constructing images using a computer. M . 0 M . 0 Radiology Information System. M . 0 M . 0 Network for transmitting patient data and displays to radiology departments, see also HIS.
- Page 474 Shaded Surface Display: Rendering technique for the 3D surface M . 0 construction ; only voxels the CT values of which exceed a defined threshold value are considered. M . 0 0 . 0 M-16 SOMATOM Spirit 0 . 0 0 . 0...
- Page 475 M . 0 M . 0 Ultra-Fast Ceramic. M . 0 M . 0 Detectors from Siemens with short decay time for fast scans. M . 0 Uninterrupted Power Supply ensures operation even during M . 0 short power failures.
- Page 476 Display of a selectable portion of the CT values using optimized M . 0 contrast range of the monitor. M . 0 Working memory see RAM. M . 0 M . 0 0 . 0 M-18 SOMATOM Spirit 0 . 0 0 . 0...
- Page 477 APPENDIX M . 0 Index Climatic conditions A.3-3 N . 0 N . 0 Communication N . 0 Accessories N . 0 Equipment B.2-12 N . 0 Quality Computer measurement F.1-6 N . 0 N . 0 Connections B.4-2 Arm support D.3-17 N .
- Page 478 N . 0 Disinfection E.2-1 N . 0 Displays N . 0 Position B.2-7 N . 0 Radiation B.2-6 N . 0 Disposal of the system A.3-11 N . 0 0 . 0 SOMATOM Spirit 0 . 0 0 . 0...
- Page 479 Index Examination Forehead support N . 0 strap D.3-32 N . 0 Abdominal D.4-39 N . 0 Cervical vertebrae D.4-25 N . 0 N . 0 Coronal slice, cranial D.4-34 Gantry B.1-4 N . 0 N . 0 Cranial D.4-17, D.4-19, Components B.2-1 N .
- Page 480 N . 0 Patient D.4-8 N . 0 Indications N . 0 Safety information A.1-1 N . 0 Infusions D.4-9 N . 0 Intercom system B.2-12 N . 0 0 . 0 SOMATOM Spirit 0 . 0 0 . 0...
- Page 481 Index Overheating A.3-7 N . 0 N . 0 Computer system D.1-21 N . 0 Modification N . 0 of equipment A.3-8 N . 0 N . 0 Modulation transmission function F.3-24 Paper roll holder B.7-3 N . 0 N . 0 Monitor B.5-13 Patient N .
- Page 482 RTP D.3-36 N . 0 Straps D.3-29 N . 0 Supports and cushions D.3-14 N . 0 Positioning mat D.3-28 N . 0 Power connection A.3-4 N . 0 0 . 0 SOMATOM Spirit 0 . 0 0 . 0...
- Page 483 Index Standby mode D.1-26 N . 0 N . 0 Start up N . 0 Radiation warning lamps N . 0 Error D.1-7 N . 0 Location A.3-5 N . 0 syngo D.1-6 N . 0 Respiration N . 0 System D.1-3 N .
- Page 484 N . 0 Devices B.6-4 N . 0 Drives B.6-4 N . 0 N . 0 Proper A.1-17 N . 0 N . 0 Virus scanner A.1-10 N . 0 0 . 0 SOMATOM Spirit 0 . 0 0 . 0...
Need help?
Do you have a question about the SOMATOM Spirit and is the answer not in the manual?
Questions and answers