
Related Manuals for Sunjoy L-GZ604PCO-C3


Summary of Contents for Sunjoy L-GZ604PCO-C3
- Page 1 1-866-578-6569 MONDAY-FRIDAY 11:30 AM TO 8:30 PM PACIFIC STANDARD TIME MONDAY-FRIDAY 8:30 AM TO 5:30 PM EASTERN STANDARD TIME SUNJOY INDUSTRIES GROUP LIMITED 619 Slack Street Steubenville, Ohio 43952 USA...
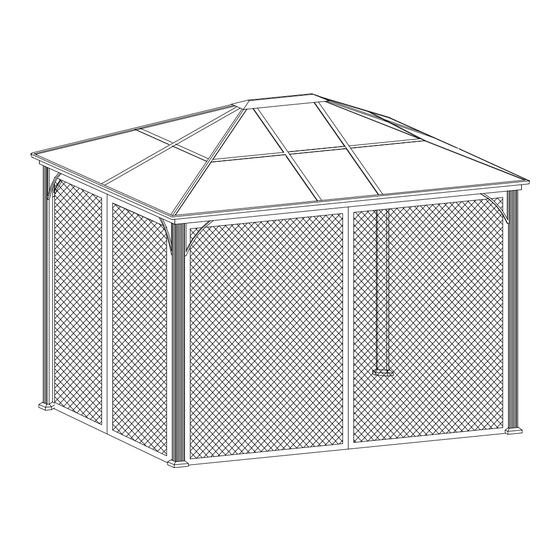
- Page 2 ASSEMBLY INSTRUCTIONS ITEM# L-GZ604PCO-C3 SKU# 125626 THIS UNIT IS HEAVY! NEWPORT GAZEBO 10’x12’ WARNING: In order to reduce the risk of personal injury and damage to equipment, basic safety precautions should always be followed when assembling and using this product. Read all instructions carefully before assembly and use.
-
Page 3: Parts List
IMPORTANT: 1. Keep all children and pets away from assembly area. Children and pets should be supervised when they are in the area of gazebo construction. 2. The area for assembly should not be less than 6 feet from any obstruction such as fence, garage, house, overhanging branches, laundry line or electrical wires. - Page 4 Decorative slot 4 Corner Support F shape panel 1 F shape panel 2 F shape panel 3 Slot 1 Slot 2 Slot 3 Slanting Bar Connector Bean Connector Top Bar Top Slanting Bar Upside left PC top Upside right PC top Bottom left PC top Bottom right PC top Middle PC top...
-
Page 5: Hardware Pack
Bottom top roof Cover 1 Cover 2 Hook Long mosquito netting pipe Short mosquito netting pipe Mosquito netting Hardware Pack 1 M6X15 Bolt 64PCS M6 Washer 82PCS M6X15 Bolt 18PCS M6 Wrench 2PCS... - Page 6 Fig.1: Insert decorative slot (E1 & E3) into decorative slot (E2 & E4), tighten by bolt (AA) and washer (BB). Fig.2: Attach Bean Connector (I2) to the middle of decorative slot 3 (E3) and decorative slot 4 (E4) by bolt (AA) and washer (BB).
- Page 7 Hardware Pack 2 M6X15 Bolt 16PCS M6 Washer 56PCS M6X15 Bolt 22PCS M6X25 Bolt 32PCS Smaller M6 Washer 16PCS Fig.10: Insert base cover (B) into post (A), then attach base (C) to post (A) by bolt (CC) and washer (BB). Fig.11: Raise up the assembled top, then attach post (A) to the corner of the decorative slot by blot (AA) and washer (GG).
- Page 8 Fig.13: Insert middle PC top (K5) into top bar (J1), then insert slot 3 (H3) into top bar (J1). Finally, insert middle PC top (K5) into top bar (J1) and slot 3 (H3). Make sure they are completely inserted in the roof bar’s track. Fig.14: Insert upside left PC top (K1)/ Upside right PC top (K2) into top bar (J1) and top slanting bar (J2), then insert slot 1(H1) / Slot 2 (H2) into top bar (J1) and top slanting bar (J2), finally, insert Bottom left PC top (K3)/ Bottom right PC top (K4) into top bar (J1), top slanting bar (J2) and slot 1(H1)/ Slot 2 (H2).
- Page 9 Fig.17: Hanging the mosquito netting (P) on mosquito netting pipe (O1 & O2) by plastic ring (EE). Fig.18: Lift up the base cover (B), fix the gazebo on the ground by stake (FF). Now, your gazebo is ready for use. Made in China...
Need help?
Do you have a question about the L-GZ604PCO-C3 and is the answer not in the manual?
Questions and answers