Advertisement
Quick Links
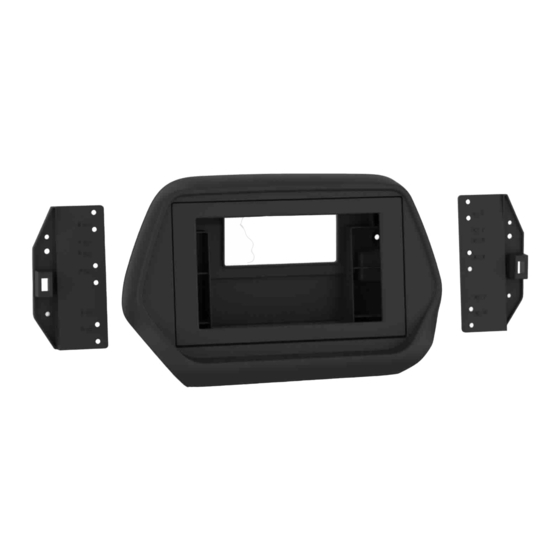
KIT COMPONENTS
•A) Display Screen Housing •B) Display Screen Trim Bezel •C) Display Screen Trim •D) Brackets •E) Panel Clips •F) Phillips Screws (4)
Not Shown: Radio Interface, LD-GMLAN09-PIO, LD-GMLAN10-PIO, AXEXH-GM09, AXEXH-GM10, LD-BACKCAM-MOST, LD-GMSWC, AD-EU5, 40-GPS-PIO, PR04AVIC-PIO /
PRO4-PIORCA, LD-AX-SPK, AXUSB-GM6
A
B
AxxessInterfaces.com
Chevrolet Camaro
2016-2018
Visit
AxxessInterfaces.com
for more detailed information about the product and
up-to-date vehicle specific applications.
KIT FEATURES
)
• Designed for Pioneer DMH-WC5700NEX receivers
• Allows for the retention and adjustment of the factory personalization
menu through the Pioneer radio
• Provides a visual view of HVAC and gauges on the Pioneer screen
(cannot be adjusted via the screen)
(cont. on page 2)
C
D
© COPYRIGHT 2021 METRA ELECTRONICS CORPORATION
E
F
AXPIO-CAM1
I N S TA L L AT I O N I N S T R U C T I O N S
TABLE OF CONTENTS
Interface Installation .............................................2
Dash Disassembly ...............................................2-3
Connections ........................................................4-5
Kit Assembly ..........................................................6
Radio Operations ................................................7-8
WIRING & ANTENNA CONNECTIONS (sold separately)
• Antenna Adapter: 40-EU55
• Steering Wheel Control Interface: AXSWC
• RGB Extension Cable: Pioneer part # CD-RGB150E
(not sold by Metra)
TOOLS REQUIRED
• Panel removal tool • Phillips screwdriver
• 9/32" socket wrench
ATTENTION: With the key out of the ignition,
disconnect the negative battery terminal
before installing this product. Ensure that all
installation connections are secure before
cycling the ignition to test this product.
NOTE: Refer to the instructions included with
the aftermarket radio.
REV. 12/13/21 INSTAXPIO-CAM1
Advertisement

Subscribe to Our Youtube Channel
Related Manuals for Axxess AXPIO-CAM1


Summary of Contents for Axxess AXPIO-CAM1
-
Page 1: Table Of Contents
AXPIO-CAM1 I N S TA L L AT I O N I N S T R U C T I O N S Chevrolet Camaro 2016-2018 TABLE OF CONTENTS Interface Installation ..........2 Visit AxxessInterfaces.com for more detailed information about the product and Dash Disassembly ..........2-3... -
Page 2: Interface Installation
• Complete Plug-n-Play installation • Retains audio controls on the steering wheel 1. Using the panel removal tool, gently unclip, • Includes dash kit with Axxess interface and • Works in both single and dual-zone vehicles unplug, and remove the radio control trim vehicle-specific T-harness •... - Page 3 DASH DISASSEMBLY (CONT.) If using the LD-LAN09-PIO: Models equipped with an 8-inch touchscreen radio: 1. Using the panel removal tool, carefully 1. Using the panel removal tool, unclip the unclip and remove the trim surrounding the plastic shroud around the steering wheel radio controls. (Figure C) column. (Figure E) 2.
-
Page 4: Connections
AUX (INCL. W/RADIO) (USE INSTEAD) (CONNECT TO PIO HARNESS) NECT T TO PIO O HA NESS) LOOSE ENDED CONNECT GREEN/BLACK CONNECT TO CLIMATE PANEL AXXESS INTERFACE PRO4-PIORCA Low-Level CAMERA (IOB) LOCATED (N/A) AT STEERING 18P (M) (IO5 or IO6) COLUMN LOCATED... - Page 5 HDMI EXTERNAL SPEAKER AD-EU5 CARSIDE CONNECTORS (CONNECT TO EXTENSION) USB/AUX AUX (INCL. W/RADIO) (USE INSTEAD) (CONNECT TO PIO HARNESS) CONNECT TO CLIMATE PANEL AXXESS INTERFACE PRO4-PIORCA Low-Level CAMERA (IOB) (N/A) 18P (M) (IO5 or IO6) LOCATED 18P (F) AT HMI...
-
Page 6: Kit Assembly
Using the radio assembly. Metra recommends the holes stamped “7”, secure the using the proper mating adapter from display screen to the brackets using (6) Metra and/ or Axxess. screws supplied with the radio. (Figure A) (Figure C) (Figure B) 6. -
Page 7: Radio Operations
RADIO OPERATIONS Vehicle Selection • Allows the selection of the vehicle the Pioneer radio is being installed in. • Select Make, Model and Trim to activate the extended functions of the radio. • Press Confirm to lock in the selection. • The vehicle type must be selected to activate HVAC functions and steering wheel controls. - Page 8 RADIO OPERATIONS (CONT.) Customizations Menu : Allows full control of vehicle personalization options. Vehicle Information Screen : The source for accessing all vehicle information and options. Access this menu by selecting the gear icon on the previous screenshot: • Provides SWC Configuration. • Dual Assignment: Assign (2) functions to a single SWC button.
- Page 9 REV. 12/13/21 INSTAXPIO-CAM1...
- Page 11 REV. 12/13/21 INSTAXPIO-CAM1...
- Page 12 AXPIO-CAM1 I N S TA L L AT I O N I N S T R U C T I O N S Having difficulties? We’re here to help. Contact our Tech Support line at: 386-257-1187 Or via email at: techsupport@metra-autosound.com...
Need help?
Do you have a question about the AXPIO-CAM1 and is the answer not in the manual?
Questions and answers