Table of Contents
Advertisement
Available languages
Available languages
Quick Links
INTERFACE FEATURES
• Provides accessory power (12-volt 10-amp)
• Maintains the retained accessory power (R.A.P.) feature
• Provides NAV outputs (parking brake, reverse, speed sense)
• Retains rear seat entertainment (R.S.E.)
• Retains satellite radio
• Retains SYNC
† Excluding Sony/THX
APPLICATIONS
See inside front cover
AxxessInterfaces.com
Ford Data Interface
2007-up*
*Visit AxxessInterfaces.com for up-to-date vehicle specific applications.
INTRODUCTION
The AX-ADFD01 harness is designed for, and must be used with, the
AX-ADBOX1 or AX-ADBOX2 interface (sold separately). Please refer to the
AX-ADBOX1 or AX-ADBOX2 for the 16-pin connector with stripped leads.
• Retains the factory AUX-IN jack
• Pre-wired ASWC-1 harness (ASWC-1 sold separately)
• Can be used in both non-amplified and amplified models
(including Sony/THX)
• Retains balance and fade†
• Micro "B" USB updatable
© COPYRIGHT 2018 METRA ELECTRONICS CORPORATION
AX-ADFD01
I N S TA L L AT I O N I N S T R U C T I O N S
TABLE OF CONTENTS
For models with a Sony/THX amplifier .........4-5
AX-ADBOX1 ...........................................................5
AX-ADBOX2 ..........................................................6
Adjusting the AX-ADFD01 ......................................7
Extra features .........................................................7
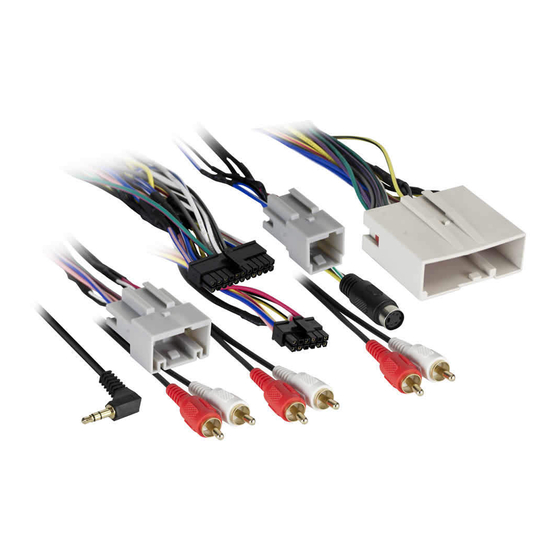
INTERFACE COMPONENTS
• AX-ADFD01 harness
TOOLS REQUIRED
• Crimping tool and connectors or solder gun,
solder, and heat shrink • Wire cutter • Zip ties
• Small flat-blade screwdriver • Tape
CAUTION!
All accessories, switches, climate
controls panels, and especially air bag indicator
lights must be connected before cycling the
ignition. Also, do not remove the factory radio
with the key in the on position, or while the
vehicle is running.
REV. 6/26/18 INSTAX-ADFD01
Advertisement
Chapters
Table of Contents

Related Manuals for Axxess AX-ADFD01


Summary of Contents for Axxess AX-ADFD01
-
Page 1: Table Of Contents
For models with a Sony/THX amplifier ..4-5 INTRODUCTION Installing & programming the AX-ADFD01 The AX-ADFD01 harness is designed for, and must be used with, the AX-ADBOX1 or AX-ADBOX2 interface (sold separately). Please refer to the AX-ADBOX1 ............5 AX-ADBOX1 or AX-ADBOX2 for the 16-pin connector with stripped leads. -
Page 2: Connections To Be Made
Note: If installing either an ASWC-1 or AX-LCD (both sold separately), connect the (2) Red Mariner 2008-2011 F-150 * 2009-2012 wires on the AX-ADFD01 harness as well. Milan 2010-2011 F-150 STX/FX2 base/XLT base 2013 • If the vehicle is equipped with a factory subwoofer, connect the Blue/White wire to the... - Page 3 Green, Green/Black, Purple, Purple/Black “SUBWOOFER” to the subwoofer out jack. From the AX-ADFD01 harness to the aftermarket radio: • Disregard the Red RCA jack labeled “CENTER CHANNEL”, it will not be used in this application. • Connect the Black wire to the ground wire.
-
Page 4: For Models With A Sony/Thx Amplifier
AX-ADFD01 harness as well. • Connect the Blue/White wire to the amp turn on wire. This wire must be connected to From the AX-ADFD01 harness to the aftermarket radio: hear sound from the factory amplifier. • Connect the Black wire to the ground wire. -
Page 5: Installing & Programming The Ax-Adfd01
• Connect the AX-ADFD01 harness to the wiring harness in the vehicle. • Tape off and disregard the following (4) wires, they will not be used in this application: • If an ASWC-1 (sold separately) will be used, do not connect it until the AX-ADFD01 is Green, Green/Black, Purple, Purple/Black programmed and fully functional. -
Page 6: Ax-Adbox2
2. Press and hold the reset button for two seconds, then let go to reset the interface. • If an ASWC-1 (sold separately) will be used, do not connect it until the AX-ADFD01 is 3. Refer to “Programming the AX-ADFD01 Interface” from this point. -
Page 7: Adjusting The Ax-Adfd01
• With the vehicle and radio turned on, turn the volume up 3/4 of the way. If the vehicle is equipped with RSE, satellite radio, or SYNC, the AX-ADFD01 can retain these features. • With a small flat-blade screwdriver, adjust the potentiometer clockwise to raise the audio •... - Page 8 AX-ADFD01 I N S TA L L AT I O N I N S T R U C T I O N S IMPORTANT If you are having difficulties with the installation of this product, please call our Tech Support line at 1-800-253-TECH. Before doing so, look over the instructions a second time, and make sure the installation was performed exactly as the instructions are stated.
- Page 9 Para modelos sin amplificador de Sony/THX ...3 Para modelos con amplificador de Sony/THX ..4 INTRODUCCIÓN Instalación y programación el AX-ADFD01 El arnés AX-ADFD01 está diseñado para, y debe usarse con, el AX-ADBOX1 ............5 Interfaz AX-ADBOX1 o AX-ADBOX2 (se vende por separado). Consulte AX- AX-ADBOX2 ............6 ADBOX1 o AX-ADBOX2 para el conector de 16 pines con cables pelados.
-
Page 10: Conexiones Que Se Deben Hacer
APLICACIONES CONEXIONES QUE SE DEBEN HACER FORD LINCOLN ¡Atención! Esta interfase funcionará con modelos que equipado con no amplificador o amplificador. Siga las instrucciones cuidadosamente para su modelo de vehículo. Ignorar las instrucciones ocasionará Econoline * 2014 y mas 2007-2010 se producirá... - Page 11 • Si el vehículo está equipado con un subwoofer de fábrica, conecte la toma blanca RCA con la etiqueta “SUBWOOFER” al jack de salida del subwoofer. Desde el arnés AX-ADFD01 al radio de mercado secundario • Ignore la roja toma RCA con la etiqueta “CENTER CHANNEL”, no se utilizará en esta aplicación.
-
Page 12: Para Modelos Con Amplificador De Sony/Thx
• Conecte el cable verde claro al cable de freno de mano. rojos en el arnés AX-ADCH02 también. Desde el arnés AX-ADFD01 al radio de mercado secundario • Si el vehículo está equipado con un subwoofer de fábrica, conecte el cable azul/blanco al amplificador encienda el cable. -
Page 13: Instalación Y Programación El Ax-Adfd01
• Conecte el arnés AX-ADFD01 al arnés de cableado del vehículo. • Si se usa un ASWC-1 (se vende por separado), no lo conecte hasta que el AX-ADFD01 esté • Encinte e ignore los siguientes (4) cables, ya que no se utilizarán en esta aplicación: programado y sea completamente funcional. -
Page 14: Ax-Adbox2
1. El botón de reinicio azul se encuentra dentro de la interfaz, entre los dos conectores. El botón es accesible fuera de la interfaz, no es necesario abrir la interfaz. • Si se usa un ASWC-1 (se vende por separado), no lo conecte hasta que el AX-ADFD01 esté programado y sea completamente funcional. -
Page 15: Ajuste Del Ax-Adfd01
• Con el vehículo y el radio encendidos, aumente el volumen hasta 3/4 de su totalidad. Si su vehículo está equipado con RSE, radio por satelite o SYNC, el AX-ADFD01 puede conservar • Con un pequeño destornillador de hoja plana, ajuste el potenciómetro hacia la derecha para estas funciones. - Page 16 AX-ADFD01 I N S T R U C C I O N E S D E I N S TA L AC I Ó N IMPORTANTE Si tiene dificultades con la instalación de este producto, llame a nuestra línea de soporte técnico al 1-800-253-TECH. Antes de hacerlo, revise las instrucciones por segunda vez y asegúrese de...
Need help?
Do you have a question about the AX-ADFD01 and is the answer not in the manual?
Questions and answers