Table of Contents
Advertisement
Quick Links
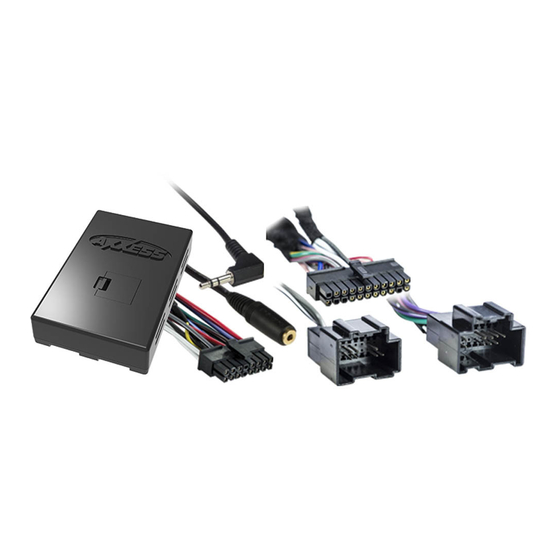
INTERFACE COMPONENTS
• AXDIS-GMLN11 interface • AXDIS-GMLN11 harness
• 16-pin harness with stripped leads • 4-pin to 4-pin resistor pad harness
• Female 3.5mm connector with stripped leads
APPLICATIONS
CHEVROLET
PONTIAC
Cobalt
2007-2010
G5
HHR
2006-2011
G6 (5th digit of VIN must
Malibu
2008-2012
AxxessInterfaces.com
GM Data Interface with SWC
INTERFACE FEATURES
• Provides accessory power
(12-volt 10-amp)
• Retains R.A.P. (retained
accessory power)
• Provides NAV outputs (parking
brake, reverse, speed sense)
• Retains chimes
• Retains audio controls on the
steering wheel
PONTIAC (CONT)
2007-2009
G6
Solstice
be a J, K, or L)
2009
• Retains OnStar / OE Bluetooth
• Adjustable OnStar level
• Retains the factory AUX-IN jack
• Can be used in non-amplified
or amplified models
• Retains balance and fade
• Micro "B" USB updatable
SATURN
Aura
2010
2006-2009
Sky
© COPYRIGHT 2020 METRA ELECTRONICS CORPORATION
AXDIS-GMLN11
I N S TA L L AT I O N I N S T R U C T I O N S
2006-2012
TABLE OF CONTENTS
Connections to be made ................................... 2-4
- For models without an amplifier .......................2
- For models with an analog amplifier ................3
Installing the AXDIS-GMLN11 .................................4
Programming the AXDIS-GMLN11.................................... 5
Adjusting the AXDIS-GMLN11 .................................5
Steering wheel control settings .......................6-8
- L.E.D. feedback ....................................................6
- Changing radio type ...........................................6
Troubleshooting .....................................................9
TOOLS REQUIRED
• Wire cutter • Crimp tool • Solder gun • Tape
• Connectors (example: butt-connectors, bell
caps, etc.) • Small flat-blade screwdriver
CAUTION!
controls panels, and especially air bag indicator
lights must be connected before cycling the
2007-2009
ignition. Also, do not remove the factory radio
2007-2009
with the key in the on position, or while the
vehicle is running.
All accessories, switches, climate
REV. 1/22/20 INSTAXDIS-GMLN11
Advertisement
Table of Contents

Related Manuals for Axxess AXDIS-GMLN11


Summary of Contents for Axxess AXDIS-GMLN11
-
Page 1: Table Of Contents
- Dual assignment instructions (long button press) ...8 INTERFACE COMPONENTS Troubleshooting .............9 • AXDIS-GMLN11 interface • AXDIS-GMLN11 harness TOOLS REQUIRED • 16-pin harness with stripped leads • 4-pin to 4-pin resistor pad harness • Wire cutter • Crimp tool • Solder gun • Tape •... -
Page 2: Connections To Be Made
CONNECTIONS TO BE MADE Attention! This interface will work with models that are either factory amplified, or non- From the AXDIS-GMLN11 harness to the aftermarket radio: amplified. Please follow the instructions carefully for your model vehicle. Failure to do so will •... -
Page 3: For Models With An Analog Amplifier
Green, Green/Black, Purple, Purple/Black • Connect the Red wire to the accessory wire. From the AXDIS-GMLN11 harness to the aftermarket radio: • Connect the Blue/White wire to the amp turn on wire. This wire must be connected to hear • Connect the Black wire to the ground wire. -
Page 4: Mm Jack Steering Wheel Control Retention
SWC buttons. Contact the radio manufacturer for more information. • For all other radios: Connect the 3.5mm jack from the AXDIS-GMLN11 harness into the jack on the aftermarket radio designated for an external steering wheel control interface. Please refer to the... -
Page 5: Programming The Axdis-Gmln11
2. Connect the AXGMLAN11-SWC harness to the wiring harness in the vehicle. 10. If the interface fails to function, refer to Resetting the AXDIS-GMLN11, then resume from step 7. 3. The L.E.D. will initially turn on solid Green, then turn off for a few seconds while it auto Notes: detects the radio installed. -
Page 6: Steering Wheel Control Settings
* Note: If the AXDIS-GMLN11 flashes Red (7) times, and you do not have an Alpine radio connected 5. Once the desired radio number has been selected, press and hold the Volume-Down button to it, that means the AXDIS-GMLN11 does not detect a radio connected it. -
Page 7: Remapping The Steering Wheel Control Buttons
(1) second until the L.E.D. comes on, and then release the Volume-Up button. This 1. Eclipse (Type 1) 7. Alpine 13. LG will tell the AXDIS-GMLN11 that this function is not available and it will move on to the next 2. Kenwood 8. Visteon 14. Parrot function. -
Page 8: Dual Assignment Instructions (Long Button Press)
6. ATT/Mute 11. Play/Enter 15. Fan-Up * The AXDIS-GMLN11 has the capability to assign (2) functions to a single button, except Volume- 7. Preset-Up Up and Volume-Down. Follow the steps below to program the button(s) to your liking. 2. Not allowed 12. -
Page 9: Troubleshooting
TROUBLESHOOTING Resetting the AXDIS-GMLN11 1. The Blue reset button is located inside the interface, between the two connectors. The button is accessible outside the interface, no need to open the interface. 2. Press and hold the reset button for two seconds, and then let go to reset the interface. - Page 11 REV. 1/22/2020 INSTAXDIS-GMLN11...
- Page 12 AXDIS-GMLN11 I N S TA L L AT I O N I N S T R U C T I O N S IMPORTANT If you are having difficulties with the installation of this product, please call our Tech Support line at 1-800-253-TECH. Before doing so, look over the instructions a second time, and make sure the installation was performed exactly as the instructions are stated.
Need help?
Do you have a question about the AXDIS-GMLN11 and is the answer not in the manual?
Questions and answers