Table of Contents
Advertisement
Quick Links
www.MetraOnline.com
MetraOnline.com may be
used to assist with dash
assembly instructions.
Simply enter your Year,
Make, Model vehicle into
the vehicle fit guide and
look for the Dash Kit
Installation Instructions.
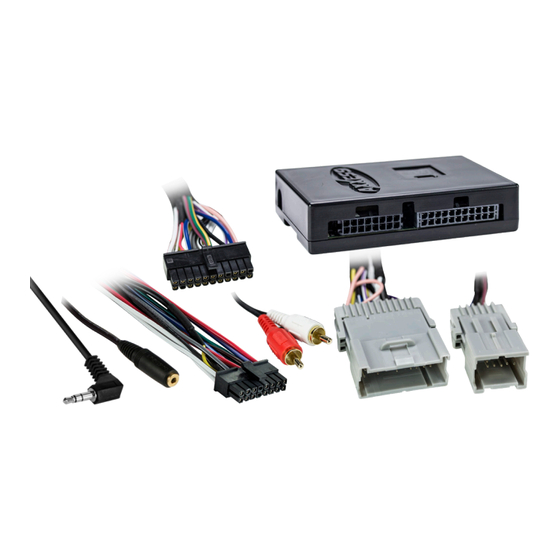
INTERFACE COMPONENTS
• AXDIS-CL2 interface
• AXDIS-CL2 harness
• 16-pin harness with stripped leads • 4-pin to 4-pin resistor pad
• Female 3.5mm connector with stripped leads
AxxessInterfaces.com
GM Data Interface with SWC
INTERFACE FEATURES
• Designed for non-amplified, or
analog/digital amplified models
• Provides accessory power
(12-volt 10-amp)
• Retains R.A.P. (Retained
Accessory Power)
• Provides NAV outputs (parking
brake, reverse, speed sense)
• Retains chimes
Product Info
• Retains audio controls on the
steering wheel
* The RSE must be activated by the factory radio
TOOLS REQUIRED
• Wire cutter
• Tape
• Connectors (example: butt-connectors, bell caps, etc.)
APPLICATIONS
See inside front cover
© COPYRIGHT 2024 METRA ELECTRONICS CORPORATION
2000-2013
• Retains OnStar
®
/OE Bluetooth
• Adjustable OnStar
®
level
• Retains RSE
(Rear Seat Entertainment) *
• Retains SAT (satellite radio)
• Retains balance and fade
(excludes digital amplified
models)
• Micro "B" USB updatable
• Crimp tool
• Solder gun
• Small flat-blade screwdriver
AXDIS-CL2
I N S TA L L AT I O N I N S T R U C T I O N S
TABLE OF CONTENTS
Applications ...........................................................2
Connections
®
Non-amplified Models ........................................3
Amplified Models ................................................4
Installation .............................................................5
Programming .....................................................5-6
Adjusting the AXDIS-CL2 .......................................7
Extra features ..................................................... 7-8
Steering wheel control settings ......................9-12
L.E.D. feedback ....................................................9
Changing radio type ......................................... 10
Remapping ........................................................ 10
Dual assignment instructions ..................... 11-12
Troubleshooting....................................................12
ATTENTION: With the key out of the ignition,
disconnect the negative battery terminal before
installing this product. Ensure that all installation
connections, especially the air bag indicator lights, are
plugged in before reconnecting the battery or cycling
the ignition to test this product.
NOTE: Refer also to the instructions included with the
aftermarket accessory before installing this device.
REV. 4/18/24 INSTAXDIS-CL2
Advertisement
Table of Contents

Related Manuals for Axxess AXDIS-CL2


Summary of Contents for Axxess AXDIS-CL2
-
Page 1: Table Of Contents
(12-volt 10-amp) • Retains RSE Programming .............5-6 • Retains R.A.P. (Retained (Rear Seat Entertainment) * Adjusting the AXDIS-CL2 ........7 Accessory Power) • Retains SAT (satellite radio) Extra features ............. 7-8 • Provides NAV outputs (parking • Retains balance and fade Steering wheel control settings ......9-12... -
Page 2: Applications
APPLICATIONS BUICK CHEVROLET (CONT) OLDSMOBILE Century ..........2004-2005 Express..........2003-2007 Canyon ..........2004-2012 Alero ............2001-2004 Century ..........2005-2009 Impala ..........2000-2005 Envoy * ..........2002-2004 Bravada * ..........2002-2004 Kodiak C4500-C8500 ......2003-2009 Rainier * ............2004 Envoy ..........2005-2009 Intrigue ............2002 Malibu ..........2001-2003 Rainier ..........2005-2007 Savana ..........2003-2007... -
Page 3: Non-Amplified Models
CONNECTIONS: FOR NON-AMPLIFIED MODELS Radio Connections Brown - Not Used Red - Accessory Orange/White - Illumination Green - Not Used Green/Black - Not Used For NON-AMPLIFIED Green/Purple - Reverse backup camera LD-2NAVAMP Light Green - E-Brake models ONLY, omit Blue/White - AMP turn on Blue/Pink - Not Used LD-GMOS100RPAD. -
Page 4: Amplified Models
CONNECTIONS: FOR AMPLIFIED MODELS Radio Connections Brown - Not Used Red - Accessory Orange/White - Illumination Green - Not Used Green/Black - Not Used For AMPLIFIED Green/Purple - Reverse backup camera LD-2NAVAMP models ONLY, use Light Green - E-Brake Blue/White - AMP turn on LD-GMOS100RPAD. -
Page 5: Retains The Factory Aux-In Jack Installation
BUICK CHEVROLET PONTIAC Attention! Do not connect the AXDIS-CL2 harness to the wiring harness in the vehicle just yet. Century ....2004-2005 Corvette ....2005-2013 Aztec .....2001-2005 Attention! If retaining steering wheel controls, ensure that the jack/wire is connected to the LaCrosse .... -
Page 6: Programming
9. Test all functions of the installation for proper operation, before reassembling the dash. Red flashes there are. This will help in troubleshooting, if need be. Refer to the L.E.D. 10. If the interface fails to function, refer to Resetting the AXDIS-CL2, then resume from step 7. feedback section for more information. -
Page 7: Adjusting The Axdis-Cl2
• If the vehicle does not come equipped with steering wheel controls, locate the Black/ • VOLUME UP – Enter Yellow wire on the AXDIS-CL2 harness. is speaking, tap the Black/Yellow wire to ground. Once the OnStar • While OnStar ®... -
Page 8: Extra Features
EXTRA FEATURES (CONT) • Listed below are the advanced menu options: • Show Text – Exits menu. • Set Tuning Mode – Allows the user to select tuning by preset or channel. • Set Preset – Allows the user to program presets. •... -
Page 9: Steering Wheel Control Settings
STEERING WHEEL CONTROL SETTINGS L.E.D. Feedback: The (24) Red L.E.D. flashes represent a different radio manufacturer for the SWC interface to detect. For example, if you are installing a JVC radio, the SWC interface will flash Red (5) times, then stop. Following is the L.E.D Feedback Legend, which indicates the flash count of the radio manufacturer. L.E.D. -
Page 10: Changing Radio Type
L.E.D. goes solid. The L.E.D. will remain on for about (3) 1. Ensure the AXDIS-CL2 is visible so you can see the L.E.D. flashes to confirm button seconds while it stores the new radio information. -
Page 11: Dual Assignment Instructions
(1) second until the L.E.D. comes on, and then release the Volume-Up button. Note: Seek-Up and Seek-Down come pre-programmed as Preset-Up and Preset-Down This will tell the AXDIS-CL2 that this function is not available and it will move on to the for a long button press. -
Page 12: Troubleshooting
Saturday: 10:00 AM - 5:00 PM TROUBLESHOOTING Sunday: 10:00 AM - 4:00 PM Resetting the AXDIS-CL2 1. The Blue reset button is located inside the interface, between the two connectors. The button is accessible outside the interface, no need to open the interface.
Need help?
Do you have a question about the AXDIS-CL2 and is the answer not in the manual?
Questions and answers