Table of Contents
Advertisement
Quick Links
BAHAMA ALUMNINUM SHUTTER STYLE AWNING
OWNER'S MANUAL & INSTALLATION INSTRUCTIONS (For 5ft, 6ft, 7ft, & 8 ft
Widths)
Contents
ATTENTION: Warning Statement .................................................................................................... 2
Hardware for different surface applications ..................................................................................... 2
Parts List .......................................................................................................................................... 3
Parts Included:.............................................................................................................................. 3
Assembly for 5ft, 6ft, 7ft, and 8ft Width Bahama Awnings ............................................................... 5
Count every part for your specific width and projection ............................................................... 5
Step 1: Assembling the (b3) Full Top Bar and (c3) Full Front Bar ............................................... 5
Step 2: Assembling ¾ of the Bahama Frame .............................................................................. 6
Step 3: Installing the (e)/(e2) Middle Support(s) to the (b3) Full Top Bar .................................... 7
Step 4: Assembling the Shutters .................................................................................................. 8
Step 5: Assemble Shutters onto the Complete Frame............................................................... 10
Step 6: Installing the (c3) Front Bar to the (d1/d2) Left/Right Frame, and the Middle Supports.
.................................................................................................................................................... 11
Center Middle Support ............................................................................................................... 12
Step 8: Attaching the (m) Projection Arms to the (d1/d2) Left/Right Frame .............................. 13
Step 9: Attaching the (q) Top Bar Bracket to the (b) Top Bar and Mounting .............................. 14
Step 10: Attaching the (m) Projection Arms to the Surface ....................................................... 15
Step 11: Your Finished Bahama Awning! ................................................................................... 15
Advertisement
Table of Contents

Related Manuals for Awntech BAHAMA


Summary of Contents for Awntech BAHAMA
-
Page 1: Table Of Contents
Parts List ............................3 Parts Included:..........................3 Assembly for 5ft, 6ft, 7ft, and 8ft Width Bahama Awnings ............... 5 Count every part for your specific width and projection ............... 5 Step 1: Assembling the (b3) Full Top Bar and (c3) Full Front Bar ..........5 Step 2: Assembling ¾... -
Page 2: Attention: Warning Statement
There are a variety of installation surfaces as shown in the table below. Given the wide variety of mounting surfaces, please be aware that Awntech does not supply mounting hardware. You will need to purchase installation hardware at your local hardware store. We recommend the following hardware for different installation applications: ¼... -
Page 3: Parts List
Parts List Parts Included: Page | 3... - Page 4 Page | 4...
-
Page 5: Assembly For 5Ft, 6Ft, 7Ft, And 8Ft Width Bahama Awnings
Assembly for 5ft, 6ft, 7ft, and 8ft Width Bahama Awnings For video assistance on our Bahama Awning assembly, please navigate to our YouTube page at: https://youtu.be/b5KOY-8TVUI Count every part for your specific width and projection Step 1: Assembling the (b3) Full Top Bar and (c3) Full Front Bar (b3) Full Top Bar Assembly. -
Page 6: Step 2: Assembling ¾ Of The Bahama Frame
Step 2: Assembling ¾ of the Bahama Frame Positioning the Frame Parts Before Installation (The backside of each frame part should face upwards in this entire step) Place the (d1) Left Frame and (d2) Right Frame parallel to each other. The pre-drilled holes should be furthest from top bar when installed. -
Page 7: Step 3: Installing The (E)/(E2) Middle Support(S) To The (B3) Full Top Bar
Step 3: Installing the (e)/(e2) Middle Support(s) to the (b3) Full Top Bar Installation for 5ft Widths: Refer to Figure A3.1 3b) Installation for 6, 7, and 8ft Widths: Refer to Turn the ¾ Frame over to the front side. Figure A3.2 Refer to Figure A1.1 Attach the top of 3-(f) Middle Support... -
Page 8: Step 4: Assembling The Shutters
Step 4: Assembling the Shutters For additional instruction here, please refer to the Bahama Assembly link on YouTube: https://youtu.be/b5KOY-8TVUI Assembling One Set of Shutters Determine the amount of (i) Shutter Slats for one Shutter Set Attach the right side of each (i) Shutter Slats in to an individual “Slit” on 1-(h) Louver l- Frame. - Page 9 Figure A4.1: Inserting the (i) Shutter Slats into (h) Louver I-frames. Figure A4.2: Inserting the (j) Left Shutter Slat Mounting Braces and (k) Right Shutter Slat Mounting Braces How To: Insert the Shutter Slat Braces 1. Put Shutter Sets side by side with the smooth side facing upward and at a downward angle.
-
Page 10: Step 5: Assemble Shutters Onto The Complete Frame
Step 5: Assemble Shutters onto the Complete Frame Insert the First Set of Shutters into the ¾ assembled frame Ensure that the ¾ frame is oriented so that the (b) Top Bar is furthest from you Ensure that the first Shutter Set is oriented where the slats point downwards towards you iii. - Page 11 Step 6: Installing the (c3) Front Bar to the (d1/d2) Left/Right Frame, and the Middle Supports. Installing the (c3) Full Front bar to the ¾ assembled Frame Attach 2 (a) Black Nylon “L” Connectors to the ends of the (c3) Full Front Bar. Attach the top of the (f) Middle Support Connectors to the pre-drilled hole on inside of the (c3) Full Front Bar and installing with 1-(l) Sheet Screw each.
-
Page 12: Step 7: Installing The Shutters To The (D1/D2) Left/Right Frame, (E) Middle Support, And (E2) Center Middle Support
Step 7: Installing the Shutters to the (d1/d2) Left/Right Frame, (e) Middle Support, and (e2) Center Middle Support Installing the Shutter Sets to the (d1) and (d2) Left and Right Frame and (e) Middle Support Be sure the Shutter Slats are evenly lined up with each other and also between the grooves of the (d1) and (d2) Left and Right Frame and (e) Middle Support. -
Page 13: Step 8: Attaching The (M) Projection Arms To The (D1/D2) Left/Right Frame
Step 8: Attaching the (m) Projection Arms to the (d1/d2) Left/Right Frame Attaching the (m) Projection Arms to the (d1) Left Frame, (d2) Right Frame, and (e2) Center Middle Support Flip the awning back over to view the backside of the awning (Refer to Figure A1.1) Line up the four holes on the plate of the (n) Frame/Wall Bracket, to the four holes on the back of the (d1) Left Frame, (d2) Right Frame, and (e2) Center Middle Support. -
Page 14: Step 9: Attaching The (Q) Top Bar Bracket To The (B) Top Bar And Mounting
Step 9: Attaching the (q) Top Bar Bracket to the (b) Top Bar and Mounting Installing the (q) Top Bar Bracket to the Back of the (b) Top Bar Line up the two holes of the smaller half of the (q) Top Bar Bracket to one the set of holes on the back side of the (b) Top Bar. -
Page 15: Step 10: Attaching The (M) Projection Arms To The Surface
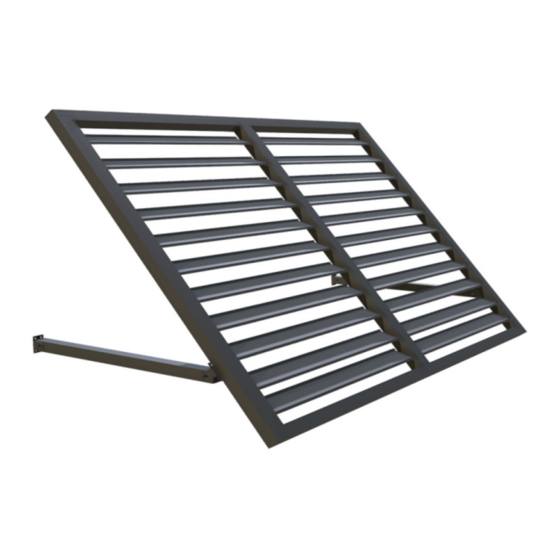
Refer to Figure A10 Figure A10.1: Install the (n) Wall Bracket to the (m) Projection Arms and to the Wall Step 11: Your Finished Bahama Awning! Figure A11.1: Final Installation Page | 15... - Page 16 Promptly notify Awntech Corporation of any claims. • At Awntech’ s request the purchaser may be required to provide a photographs or videos (if necessary) • of any defective parts. The purchaser may also be required to pay a deposit until the defective parts are returned to Awntech Corporation for inspection.
- Page 17 To the extent permitted by law, Awntech Corporation shall have no liability to the purchaser or any other • person for incidental, special, consequential, indirect or similar damages of any kind or nature...
- Page 18 Awntech in re-stock condition. There will be a 25% restock fee applicable. Concealed damage must be reported within 7 days from the receipt of the awning.
Need help?
Do you have a question about the BAHAMA and is the answer not in the manual?
Questions and answers