
Related Manuals for Queclink GV300LAU


Summary of Contents for Queclink GV300LAU
- Page 1 GV300C Series User Manual GV300LAU User Manual GSM/GPRS/WCDMA/LTE Cat4/GNSS Tracker QSZTRACGV300LAUUM0100 Version: 1.00...
- Page 2 QSZTRACGV300LAUUM0100 General Notes Queclink offers this information as a service to its customers, to support application and engineering efforts that use the products designed by Queclink. The information provided is based upon requirements specifically provided to Queclink by the customers. Queclink has not undertaken any independent search for additional relevant information, including any information that may be in the customer’s possession.
-
Page 3: Table Of Contents
2.2. LED Description ........................3 2.3. Parts List ..........................4 3. Interface Definition ........................5 4. GV300LAU Device Cable Color ...................... 6 5. Getting Started ..........................7 5.1. Opening and Closing the Case ..................... 7 5.2. Installing a SIM Card ......................7 5.3. -
Page 4: Revision History
GV300LAU User Manual 0. Revision History Version Date Author Description of Change 1.00 2021-01-30 Arry Wang Initial QSZTRACGV300LAUUM0100... -
Page 5: Introduction
GV300LAU User Manual 1. Introduction The GV300LAU is a compact GPS tracker designed for a wide variety of vehicle tracking applications. It has multiple I/O interfaces that can be used for monitoring or controlling external devices. The GV300LAU supports various bands of LTE CAT4/WCDMA/GSM used by Latin America and Middle East cellular operators. -
Page 6: Product Overview
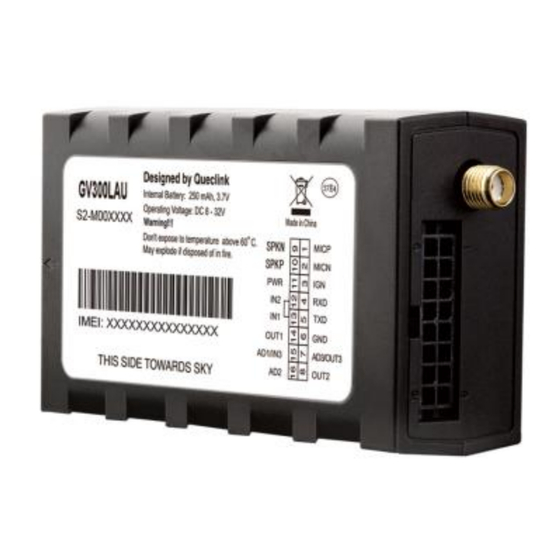
USB Interface Figure 1. GV300LAU Product View 2.2. LED Description Figure 2. GV300LAU LEDs There are three LEDs on GV300LAU. For details, please see the table below. Table 4. GV300LAU LED Description Device Status LED Status Device is searching CEL network. -
Page 7: Parts List
4. Slow flashing: About 200ms ON/1000ms OFF 2.3. Parts List Before starting, check whether all the following items have been included with your GV300L. If anything is missing, please contact your supplier. Table 5. GV300LAU Parts List Name Picture Description... -
Page 8: Interface Definition
The GV300L has a 16-pin interface connector which contains the connections for power, I/O, RS232, MIC, etc. The sequence and definition of the 16-pin connector are shown in the following figure: Figure 3. The 16-pin Connector on the GV300LAU Table 6. Description of 16-pin Connections Pin No. -
Page 9: Gv300Lau Device Cable Color
GV300LAU User Manual 4. GV300LAU Device Cable Color Table 7. GV300LAU Cable Color Definition Definition Color Cable Color Definition OUT2 Yellow Brown/White ADIN2 ADIN3/OUT Brown Green ADIN1/IN3 Black Blue OUT1 White/Black Orange Pink Orange/Black White MICN Gray/Black Purple/White SPKP MICP... -
Page 10: Getting Started
GV300LAU User Manual 5. Getting Started 5.1. Opening and Closing the Case Figure 4. Opening and Closing the Case To open: Insert the opener into the gap of the case as shown above, and push the opener up until the case is unsnapped. -
Page 11: Installing The Internal Backup Battery
GV300L has an internal backup Li-ion battery. Figure 6. Backup Battery Installation 5.4. Switching on the Backup Battery To use the GV300LAU backup battery, the switch must be at the ON position. The switch and the ON/OFF position are shown as below. Internal Battery Switch Figure 7. -
Page 12: Power Supply Connection
GV300LAU User Manual 5.6. Power Supply Connection PWR (pin 11)/GND (pin 6) are the power input pins. The input voltage range for this device is from 8V to 32V. The device is designed to be installed in vehicles that operate on 12V or 24V systems without the need for external transformers. -
Page 13: Analog Input/Digital Output
GV300LAU User Manual The following picture shows the recommended connection of a digital input. Figure 11. Digital Input Connection 5.9. Analog Input/Digital Output This is a special I/O can be configured as a 0-32V analog input or an open drain output with 150mA max drive current. - Page 14 GV300LAU User Manual Figure 14. Typical Connection with a Relay Figure 15. Typical Connection with a LED Note: OUT1 will latch the output state during reset. Warning: Many modern relays come with a flyback diode pre-installed internal to the relay itself.
-
Page 15: Serial Port/Uart Interface
GV300LAU User Manual 5.11. Serial Port/UART Interface There are two lines dedicated to the Serial Port/UART interface (TXD/RXD). TXD/RXD is standard RS232 signal. Figure 16. Connection with RS232 Port QSZTRACGV300LAUUM0100... -
Page 16: Installation Precautions
GV300LAU User Manual 6. Installation Precautions ◆ Firmly install the device to a reliable surface to prevent falling off. ◆ Make the side with antenna face sky to have better signal reception. ◆ Do not install the device under metal surface or in enclosed environments having difficulty in getting GPS and network signal. -
Page 17: Troubleshooting And Safety Info
GV300LAU User Manual 7. Troubleshooting and Safety Info 7.1. Troubleshooting Table 11. GV300LAU Troubleshooting List Problem Possible Reason Solution After the device is The signal is too weak. The Move the device to a place device isn’t registered to the turned on, the CEL LED with good network coverage. -
Page 18: Appendix: Supported Accessories
GV300LAU User Manual 8. Appendix: Supported Accessories ◆ DATA_CABLE_M ◆ 1-Wire temperature sensor ◆ Relay with socket ◆ RS232 Camera ◆ Antenna_GPS_SMA_3M ◆ UFS300 ◆ Garmin ◆ RFID reader (DR102) ◆ DUT-E ◆ RF 433MHz accessories (WRT100, WTH100, WTS100) QSZTRACGV300LAUUM0100... -
Page 19: Fcc Statement
GV300LAU User Manual 9. FCC Statement This equipment complies with FCC radiation exposure limits set forth for an uncontrolled environment. This equipment should be installed and operated with minimum distance of 20 cm between the radiator and your body. This transmitter must not be co-located or operating in conjunction with any other antenna or transmitter.
Need help?
Do you have a question about the GV300LAU and is the answer not in the manual?
Questions and answers