Table of Contents
Advertisement
Quick Links
Advertisement
Table of Contents

Subscribe to Our Youtube Channel
Related Manuals for Elcometer 6014


Summary of Contents for Elcometer 6014
- Page 1 Elcometer 6014 Shade and Opacity Meter Operating Instructions...
- Page 2 The Elcometer 6014 Shade and Opacity Meter has been tested in accordance with EU regulations governing Electro-magnetic compliance and it meets the required directives. Note: Readings may be affected if the unit is operated within a radio frequency electromagnetic strength of greater than 3 V/m.
-
Page 3: Table Of Contents
CONTENTS Section Page About your gauge ..............2 Getting started. -
Page 4: About Your Gauge
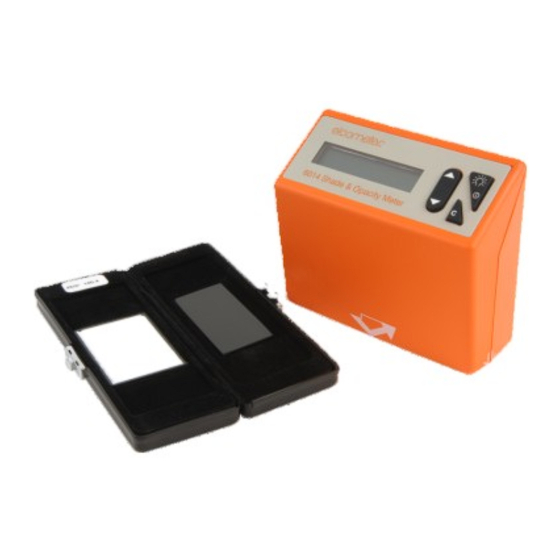
1 ABOUT YOUR GAUGE The Elcometer 6014 Shade and Opacity Meter can be used to assess either the shade of a surface (a simple indication of colour based on lightness/darkness) or calculate the opacity of a coating, plastic film or paper sample. - Page 5 The Elcometer 6014 contains a light source, a light detector and a system of lenses. A converging beam of light illuminates the specimen at a set angle of incidence. The light detector is set at the same angle of incidence and measures a small aperture area of light reflected from the specimen. Shade and opacity readings are calculated by the gauge and displayed as a percentage.
- Page 6 1.2 STANDARDS Your Elcometer 6014 Shade and Opacity Meter can be used in accordance with the following National and International Standards: ISO 2814 ISO 6504 BS 3900-D4 ASTM E1347 ASTM D4214 ASTM D2805 ASTM E97 1.3 WHAT THE BOX CONTAINS •...
-
Page 7: Getting Started
2 GETTING STARTED 2.1 FITTING BATTERIES The Elcometer 406L uses dry cell batteries only. Sealed alkaline batteries are recommended. 5 x LR03 (AAA) alkaline batteries are supplied in the kit. To fit or replace the batteries: 1. Locate the two screws which retain the battery compartment cover at the rear of the gauge. - Page 8 45/0 measurements. It is not possible to switch off the Elcometer 6014 manually. The unit will automatically switch off XX seconds after the last key press, where XX is user-defined between 30 and 120 seconds (see “Changing settings using Novo-Soft™” on page 29).
- Page 9 2.4 THE CONTROLS The Elcometer 6014 is a menu-operated gauge and it has three control keys: READ/SELECT This button has three functions: Power: Press to switch the gauge on. Read: In measurement mode, press to take a new measurement. Select: When navigating the set-up menus, press to select an item or confirm a previous selection.
-
Page 10: Taking A Reading - Shade
3 TAKING A READING - SHADE 1. Switch on the gauge. 2. Check that the gauge is set to shade mode - see “Setting measurement mode (Shade/Opacity)” on page 23. 3. Check calibration - see “Checking the calibration value ” on page 19. 4. - Page 11 The Elcometer 6014 has a special feature which allows large surfaces to be checked quickly - ‘Move and Read’. 1. While taking measurements, press and hold the READ/SELECT key. The gauge will start to take a measurement. 2. Continue to hold the READ/SELECT key and slide the gauge carefully to the next area to be measured.
-
Page 12: Taking A Reading - Opacity
4 TAKING A READING - OPACITY To measure the opacity of a coating it must be drawn down on a Leneta opacity chart (or similar) at the required film weight and allowed to dry fully. To measure the opacity of plastic film, paper, textile or any other semi-opaque material, place the sample to be measured over a black and white test bed. - Page 13 7. To switch to black, press and release the CANCEL key. The display will now show: BLACK Value 8. Take up to six measurements over the black substrate (use the same 45/0 procedure as when measuring over white). If necessary, it is possible to switch between black and white measurements at any time (by pressing the CANCEL button to change) and make up to six measurements on each part of the sample.
-
Page 14: Deleting Data
5 DELETING DATA 1. Press the SCROLL UP/ Shade mode Opacity mode DOWN key until either of Delete Sample Delete Sample the following messages is WHITE 90.6 45/0 97.6 displayed (message depends upon operating mode - opacity or shade): 2. Press the READ/SELECT key. ARE YOU SURE ? The display will show: Press Read Key... -
Page 15: Viewing Measurement Statistics
6 VIEWING MEASUREMENT STATISTICS Your gauge calculates a statistical analysis of readings as they are taken. To view the statistics: 1. Switch on the gauge and wait until the gauge is ready to take measurements. 2. Press the SCROLL UP/ Shade mode Opacity mode DOWN... -
Page 16: Calibration
7 CALIBRATION 7.1 CERTIFIED CALIBRATION TILE Before taking readings it is necessary to adjust the calibration of the gauge using the certified calibration tiles. Black (zero) calibration The calibration tiles are supplied certified in tile a clean and defect-free condition. A visual inspection for smears or damage is recommended before each subsequent calibration as dirty or defective tiles may... - Page 17 7.2 CALIBRATION MODE - AUTOMATIC / MANUAL The Elcometer 6014 has two calibration adjustment modes; Automatic and Manual. • Automatic calibration (default mode, set at factory) - sets the gauge to the value of the calibration tile pre-programmed in the memory of the unit.
- Page 18 The gauge will then return to the measurement mode and is ready for use. Note: In the Automatic Calibration Mode the Elcometer 6014 has an Possible Error automatic standard tile check routine. If the calibration tile is dirty or...
- Page 19 The tile must then be carefully cleaned and inspected (see “Maintaining your calibration tiles” on page 31). The calibration procedure must then be repeated. A new calibration tile will be required if permanent marks are present. ARE YOU SURE ? Press Read Key 7.4 CALIBRATING IN MANUAL MODE The manual calibration procedure is as follows:...
- Page 20 6. Place the gauge carefully on the black calibration tile. 7. Press the READ/SELECT key. Calibrate After a short delay during which a ‘Please Wait’ message appears, Sample High Ref the display will show: 8. Place the gauge carefully on the white calibration tile. 9.
-
Page 21: Set-Up Options
7.5 CHECKING THE CALIBRATION VALUE To check the calibration value stored in the gauge: 1. Check that the gauge is set to shade mode - see “Setting measurement mode (Shade/Opacity)” on page 23. 2. Place the gauge on the white calibration tile and take a reading by pressing the READ/SELECT key. 3. - Page 22 2. Release the keys. The display will show: SET STD CAL VAL. The number shown (93.2 in this example) represents the gloss value 45/0° 93.2 of the calibration tile stored in the gauge memory. 3. Press the READ/SELECT key. The display will show: SET STD CAL VAL.
- Page 23 8.2 ZERO CALIBRATION - SWITCHING OFF/ON During the calibration procedure your gauge must be placed first on the black tile (zero ref.) and then on the white tile (high ref.) - this is the factory default setting. As an option the gauge can be set to calibrate on the white tile only.
- Page 24 8.3 SWITCHING BACKLIGHT ON/OFF To extend the life of the batteries it is possible to switch off the backlight. The backlight can be switched on and off using the following procedure: 1. Press and hold the SCROLL DOWN key and the CANCEL key until System Set-up the display shows: 2.
- Page 25 8.5 SETTING MEASUREMENT MODE (SHADE/OPACITY) When the instrument is set to Shade mode the measurement screen will ANGLE Value show ‘ANGLE’ in the top left corner: 45/0 When the instrument is set to Opacity mode the measurement screen will WHITE Value show ‘WHITE’...
- Page 26 6. Press the READ/SELECT key to confirm. 7. The display will show: Inst Type Change Old Data LOST! ARE YOU SURE ? Press Read Key 8. Press the READ/SELECT key to confirm or CANCEL to cancel. 9. The gauge will revert to measurement mode, ready to take readings. Note: Changing the measurement mode (from Shade to Opacity and vice versa) will reset the internal memory - all readings in the memory will be deleted.
-
Page 27: Novo-Soft™ Software
9 NOVO-SOFT™ SOFTWARE The Elcometer 6014 Shade and Opacity Meter is supplied with Novo-Soft™ Quality Control Software. This software allows the user to: • Transfer readings data from the gauge to a PC. • Adjust some of the features of the gauge. - Page 28 The following will be shown: Click ‘no, not this time’ and then click ‘next’. Click ‘Install from a list or specific location’ then click ‘next’.
- Page 29 Click ‘search removable media’ then click ‘next’. The PC should find the driver and install it from the disc.
- Page 30 To run the program: Click Start > All programs > Novo-Soft > Novo-Soft The screen shown will appear: Click on the Set-up button and choose gauge type ‘6014’ and then click on ‘Connect’ to download data or upload gauge operating settings.
-
Page 31: Storage And Transit
9.4 SAMPLE DATA To enable you to test some of the features of Novo-Soft before downloading any real data, files containing sample data are installed with the software. To access the data, click on ‘Load’ and look for the ‘.res’ files in the directories listed. 9.5 UPLOADING AND ANALYSING READINGS For instructions on how to upload and analyse data from the gauge click on the HELP icon in Novo-Soft™. -
Page 32: Menu Structure
11 MENU STRUCTURE SWITCH ON SHADE MODE OPACITY MODE hold hold MEASURE DELETE System Set-up MEASURE SWITCH CALCULATE DELETE BLACK/WHITE OPACITY SET CAL VALUE CALIBRATE CALIBRATE ZERO CALIBRATION OFF/ON STATISTICS STATISTICS STATISTICS ON/OFF BACKLIGHT ON/OFF INSTRUMENT TYPE (OPACITY/SHADE) -
Page 33: Maintenance
12 MAINTENANCE The Elcometer 6014 Shade and Opacity Meter is designed to give many years reliable service under normal operating and storage conditions. Regular calibration checks over the life of the gauge and the certified Last Certified: calibration tile are a requirement of quality management procedures, e.g. -
Page 34: Statistics Terminology
12.2 MAINTAINING YOUR GAUGE Before use, check that the metal base of your gauge is clean and free of any damage. The optical cavities and lenses must also be free of dust or any other contamination. When the battery voltage falls below the required level to operate the gauge, the display will briefly show a warning message, see below, and then switch itself off. -
Page 35: Technical Specification
14 TECHNICAL SPECIFICATION Measurement units: Shade: 0% (black) to 100% (white) Opacity: 0% (transparent) to 100% (opaque) Resolution: 0.1% 0.2% Repeatability 0.5% Reproducibility Memory capacity: 200 readings Measurement area: 15 mm x 10 mm (0.59" x 0.39") ellipse Display: Liquid Crystal Display (LCD) 3½ digits Character height: 10 mm (0.4") Display languages:... -
Page 36: Spares
T99920213 16 RELATED EQUIPMENT In addition to the Elcometer 6014 Shade and Opacity Meter, Elcometer produces a wide range of other equipment for measuring the appearance of surface coatings. Users of the Elcometer 6014 Shade and Opacity Meter may also benefit from the following Elcometer products: •...
Need help?
Do you have a question about the 6014 and is the answer not in the manual?
Questions and answers