H3C SecPath M9000 Quick Manual
Switching fabric module
Hide thumbs
Also See for SecPath M9000:
- Installation, quick start (15 pages) ,
- Manual (90 pages) ,
- Compliance and safety manual (57 pages)
Advertisement
Manual version: APW100-20200316
H3C SecPath M9000 NSQM1FAB08E0 switching
1 Identifier
The module identifier NSQM1FAB08E0 is on the far left of the front panel.
2 About the module
The NSQM1FAB08E0 switching fabric module provides one console port.
3 Specifications
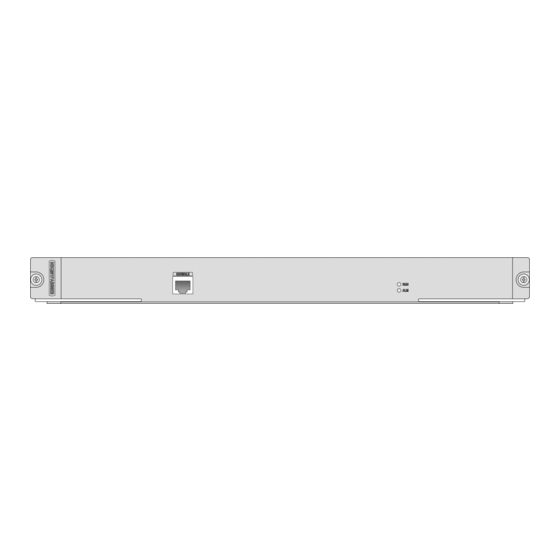
Figure 1 Front panel
(1) Console port (CONSOLE)
(3) Captive screw
Table 1 Module specifications
Item
Dimensions (H × W × D)
Power consumption
Weight
Hot swapping
Connector type
Port
Ambient temperature
Ambient humidity
Compatible device model and slot
fabric module
(2) Status LEDs
(4) Ejector lever
Specification
40 × 426 × 298 mm (1.57 × 16.77 × 11.73 in)
101 W to 135 W
2.77 kg (6.11 lb)
Supported
RJ-45
1 × console port
•
Operating: 0°C to 45°C (32°F to 113°F)
•
Storage: –40°C to +70°C (–40°F to +158°F)
•
Operating: 5% RH to 95% RH, noncondensing
•
Storage: 5% RH to 95% RH, noncondensing
M9016-V gateway (slots 10 to 13)
i
BOM: 3123A1Y9
Advertisement
Table of Contents

Related Manuals for H3C SecPath M9000


Summary of Contents for H3C SecPath M9000
- Page 1 Manual version: APW100-20200316 BOM: 3123A1Y9 H3C SecPath M9000 NSQM1FAB08E0 switching fabric module 1 Identifier The module identifier NSQM1FAB08E0 is on the far left of the front panel. 2 About the module The NSQM1FAB08E0 switching fabric module provides one console port.
- Page 2 Manual version: APW100-20200316 BOM: 3123A1Y9 IMPORTANT: An M9016-V gateway requires a minimum of three switching fabric modules, and slots 10 and 11 must be installed with switching fabric modules. 4 LEDs The module provides LEDs to show its operating status. Table 2 LED description Status Description...
- Page 3 Manual version: APW100-20200316 BOM: 3123A1Y9 Figure 2 Aligning and inserting the module into the slot Close the ejector levers. Make sure the module is in close contact with the backplane. Figure 3 Closing the ejector levers Use a Phillips screwdriver to fasten the captive screws on the module. Removing the module Use a Phillips screwdriver to loosen the captive screws on the module until all pressure is released.
- Page 4 If you are not to install a new module, install a filler panel in the slot to prevent dust and ensure good ventilation in the device. Copyright © 2020 New H3C Technologies Co., Ltd. The information in this document is subject to change without notice.
Need help?
Do you have a question about the SecPath M9000 and is the answer not in the manual?
Questions and answers