Table of Contents
Advertisement
Voltage Regulators
Cooper Power System's VR-32 Regulator and CL-2A Control
Installation, Operation and Maintenance Instructions
Parts Replacement Information
TABLE OF CONTENTS
Introduction .....................................................
Receiving ........................................................
INSPECTlON ...............................................
UNLOADING ................................................
STORING .....................................................
Installation .......................................................
PRE-INSTALLATlON INSPECTlON .............
NAMEPLATE.................................................
SYSTEMS CONNECTIONS ........................
MOUNTING .................................................
Removal From Service ...................................
DETERMINING NEUTRAL POSITlON ........
DE-ENERGIZING THE REGULATOR .........
Maintenance Program ....................................
PERIODIC INSPECTlONS ..........................
REMOVAL OF CL-2A FRONT PANEL .........
Refer to page 1-2 of these instructions for the definitions of warning and caution alerts.These instructions do not claim to cover all details or varia-
tions in the equipment, procedure, or process described, nor to provide direction for meeting every possible contingency during installation, opera-
tion, or maintenance. When additional information is desired to satisfy a problem not covered sufficiently for the user's purpose, please contact your
Cooper Power Systems representative.
October 1992, reprint of 2/91
●
©
1992
Cooper Power Systems, Inc.
REPLACEMENT OF CL-2A FRONT PANEL .......
UNTANKING THE REGULATOR .........................
RETANKING THE REGULATOR .........................
MAINTENANCE....................................................
Construction...........................................................
SURGE PROTECTION ........................................
POSlTlON lNDlCATOR & ADD-AMP ....................
WIRING DIAGRAMS ......................................... 1-10
Introduction ............................................................
Specifications.........................................................
Pre-Installation Operational Check ......................
In-Service Calibration Check ...............................
Setting the CL-2A Control for Service .................
Control Operation Modes .....................................
CL-2A Control Operation ......................................
DEVELOPMENT OF POTENTIALS .....................
LINE DROP COMPENSATOR..............................
MOTOR CIRCUIT ................................................ 2-10
Automatic/Manual Operation ............................... 2-10
Acquisition (SCADA) ............................................ 2-10
Voltage Reduction ................................................. 2-11
Retrofitting a CL-2A Control ................................. 2-11
Tap Changer Operation ........................................
Motor .......................................................................
Reversing Switch ..................................................
Drive Mechanisms .................................................
Contacts .................................................................
1-3
Operating Sequence .............................................
1-3
1-3
Complete Regulator In Service ............................
1-3
EXTERNAL CHECK .............................................
1-3
DEFINING THE PROBLEM .................................
1-3
JUNCTlON BOX TROUBLE SHOOTlNG .............
1-3
POSlTlON lNDlCATOR REPLACEMENT ............
1-4
FRONT PANEL TROUBLE SHOOTING ..............
1-4
CIRCUIT BOARD TROUBLE SHOOTlNG............
1-5
CIRCUIT BOARD REMOVAL ............................... 4-10
1-5
1-6
ACCESSORIES - SECTlON 5.................................
1-6
SPARE PARTS - SECTION 6 .................................
1-6
APPENDIX - SECTION 7 ........................................
1-6
Serial Numbers.......................................................
1-6
List of Tables .........................................................
1-7
List of Diagrams .....................................................
Cooper Power Systems
Service Information
1-7
1-7
1-7
1-8
1-8
1-8
1-8
2-2
2-2
2-2
2-2
2-3
2-4
2-4
2-7
2-9
3-1
3-1
3-1
3-2
3-3
3-3
4-1
4-1
4-1
4-1
4-2
4-3
4-4
5-1
6-1
7-1
7-1
7-1
7-1
1
Advertisement
Table of Contents
Troubleshooting

Related Manuals for Cooper VR-32


Summary of Contents for Cooper VR-32
-
Page 1: Table Of Contents
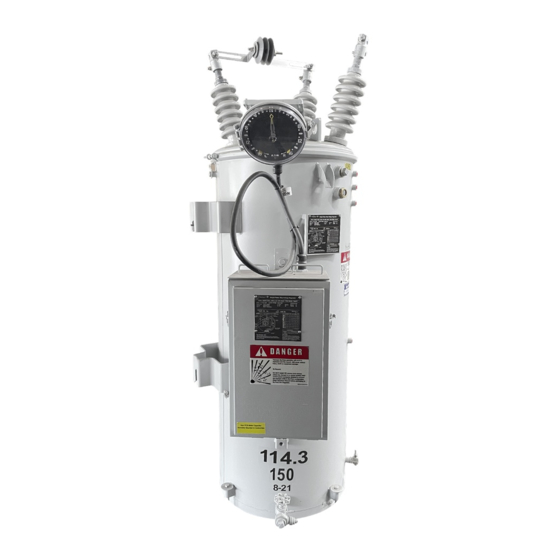
Voltage Regulators Cooper Power Systems Cooper Power System's VR-32 Regulator and CL-2A Control S225-10-5 Installation, Operation and Maintenance Instructions Service Information Parts Replacement Information REPLACEMENT OF CL-2A FRONT PANEL ..UNTANKING THE REGULATOR ......RETANKING THE REGULATOR ......MAINTENANCE............ Construction............ - Page 2 21. INTERNAL ASSEMBLY LIFTING LUGS 22. PANEL-TYPE RADIATORS (Not Shown) Figure 1-2 Features of the VR-32 Voltage Regulator. DEFINITlONS OF ALERTS: PLEASE READ THE FOLLOWING CAREFULLY AND HEED THE WARNINGS CAUTlONS, AND NOTICES HEREIN. CAUTION: A CAUTION describes a potentially...
-
Page 3: Regulators - Section
BONUS CAPACITY is stated on the nameplate (such as 167/187 kVA for a nominal 167 kVA regulator), and is avail- able when the ADD-AMP feature is not in use. All Cooper CAUTION: Do not subject tap changer to tempera- Power System's regulators are manufactured and tested to ANSI standard C57.15. -
Page 4: Nameplate
12 percent capacity without loss of normal insulation life. The nameplate is stamped with pertinent rating information and includes the schematic diagram of the VR-32 internal design. Refer to the nameplate to determine the correct adjust- ment for the required regulated load voltage. A movable peg on the nameplate indicates the tap and load voltage in use. -
Page 5: Mounting
This information is avail- able in Table 3-1, page 3-1, by noting the S(Substation) suf- fix to the kVA. A Cooper Power System's elevating structure (Figure 1-4) can be used to simplify substation installation of regulators requiring a specific live part-to-ground clear- ance. -
Page 6: Removal From Service
VR-32 Regulator and CL-2A Control 9. Close the LOAD (L) disconnect switch. To Return The Regulator To Neutral 10. Open the BYPASS Switch. 1. Use the control to RAISE or LOWER the regulator until it is 11. Replace the 6 A motor fuse, close the V 1 knife switch [and in the neutral position. -
Page 7: Removal Of Cl-2A Front Panel
S225-10-5 Since the usable life of a regulator is affected by its applica- CAUTION: Before intanking a fan-cooled regula- tion, it may be desirable to periodically remove the regulator- tor, (1) lower the oil level below the thermometer, from service and untank the unit to verify contact wear, oil then (2) remove the thermometer will. -
Page 8: Maintenance
SHUNT ARRESTERS adjustment. Settings other than those with stops are not recom- A shunt arrester is an optional accessory on the VR-32 regula- mended. The raise and lower limits need not be the same tor for protection of the shunt winding. The shunt arrester is a value. - Page 9 335/375 418/468 **55/65 C rise rating on VR-32 regulators gives an additional 12% increase in capacity if the tap changer’s maximum current rating has not been exceeded. For loading in excess of the above values please refer to the factory.
-
Page 10: Internal Constructlon
VR-32 Regulator and CL-2A Control INTERNAL CONSTRUCTION & and therefore, the ADD-AMP feature is not applicable. The preventive auto or bridging reactor is a core-form design, WIRING DIAGRAMS consisting of a coil on each leg of the core. The inside half of one... - Page 11 S225-10-5 Figure 1-10. Power circuit-series winding located on the load-side. (ANSI Type A) Figure 1-12. Series transformer design. Figure 1-11. Power circuit-series transformer.
- Page 12 VR-32 Regulator and CL-2A Control Figure 1-13. Internal wiring of spring-drive regulator with series winding located on the source side. 1-12...
- Page 13 S225-10-5 Figure 1-14. Internal wiring of direct-drive regulator with series winding located on the load side. 1-13...
- Page 14 VR-32 Regulator and CL-2A Control Figure 1-15. Internal wiring of regulator with series winding on input side, with differential potential transfomrer. 1-14...
- Page 15 S225-10-5 Figure 1-16. Internal wiring of regulator with load winding on output side, with differential potential transformer. 1-15...
- Page 16 VR-32 Regulator and CL-2A Control Figure 1-17. Back panel signal circuit. 1-16...
- Page 17 S225-10-5 NOTES: 1-17...
- Page 18 VR-32 Regulator and CL-2A Control Figure 2-1. CL-2A Front Panel.
-
Page 19: Cl-2A Regulator Control - Section
S225-10-5 CL-4C REGULATOR CONTROL • Section 2 7. Move the AUTO/OFF/MANUAL switch to AUTO. Turn the coarse VOLTAGE SETTING counterclockwise for a LOWER INTRODUCTION operation. Permit the tap changer to operate for approxi- The CL-2A Control mately eight to ten steps. Check to ensure that the operation The purpose of the CL-2A Control, as any control, is to initiate counter is registering tap changes. -
Page 20: Setting The Cl-2A Control For Service
120 seconds. A fea- Voltage Setting All Cooper Power Systems VR-32 regulators have provisions ture of this control, called time doubling, permits time delay for operation at system voltages lower than the nameplate rat- sequences up to 240 seconds to occur. -
Page 21: Control Operation Modes
To select the proper R and X values, the user must know sev- onds. An error-averaging characteristic is inherent with the eral factors about the line being regulated. Cooper Power voltage averaging mode. Systems has prepared reference document R225-10-1 to assist To permit sufficient time for the microprocessor to average in this determination. - Page 22 VR-32 Regulator and CL-2A Control Figure 2-3. VR-32 Regulator and CL-2A Control wiring schematic.
- Page 23 S225-10-5...
- Page 24 Development of Potentials (Voltage Circuits) To calculate the appropriate voltage setting for system voltages All Cooper Power Systems VR-32 regulators have provisions other than that shown, the following formula can be used (along for operation at system voltages lower than the nameplate rat- with Table 2-1) ing, as illustrated by Table 2-1.
- Page 25 S225-10-5 Figure 2-4. Internal tap terminals.
-
Page 26: Line Drop Compensator
VR-32 Regulator and CL-2A Control Line Drop Compensator (Current Circuit) All VR-32 regulators are designed with an internal current trans- former for the line drop compensator and optional metering devices. Table 2-2 provides the application information for the var- ious C.T.’s used on the Cooper Power regulators. These C.T.’s provide 200 mA rated secondary output for the full load C.T. -
Page 27: Motor Circuit
S225-10-5 Motor Circuit 7. The microprocessor now recognizes that current is flowing in the holding switch circuit, and performs three actions: (1 ) an The motor circuit power is brought from the 6-ampfuse, through a output is issued which partially increments the operations set of back-to-back diodes (for current division), to the AUTO/ counter, (2) the RAISE relay is deenergized, thus opening its OFF/MANUAL selector switch. -
Page 28: Voltage Reduction
The total range is usually 0 to 10%. equipment. This scheme accommodates the following func- NOTE: This discussion assumes that the Cooper Power Systems tions: voltage reduction accessory is not being used, and SCADA 1. - Page 29 1. Count the number of wires in the existing control cable to determine which wiring schematic applies to your regulator. All VR-32 regulators produced in this period had either 8, 9, or 10 conductors in the control cable (Figure 2-10, 2-11, or 2- 12).
- Page 30 VR-32 Regulator and CL-2A Control The following applies to CL-1 design regulators only: 1. Unless there is a need to replace the back panel or cabinet due to physical damage, the upgrade to CL-2A can be accomplished by replacing the front panel (part code #6030) only.
-
Page 31: Regulator Tap Changer - Section
S225-10-5 VR-32 REGULATOR TAP CHANGER • Section 3 Table 3-1 TAP CHANGER OPERATION Tap Changer Model Application Chart. Spring- and Direct-drive Tap Changers Rated Load Regulators for low-current applications employ stored-energy Volts Current Rated spring-drive tap changers. Commonly, they are used on ratings... -
Page 32: Drive Mechanisms
VR-32 Regulator and CL-2AControl DRIVER MECHANISM - Spring-drive complete revolutions per tap change. The motion of the geneva pinion turns a six-tooth geneva gear, a main drive shaft, and a Two steel extension springs are arranged in a triangular con- scroll cam 180 degrees per tap change. -
Page 33: Contacts
S225-10-5 4. Motor holding switch closes, assuring that one tap change CONTENTS will be completed. All movable and stationary contacts employ copper-tungsten or 5. Geneva pinion completes first revolution and continues to silver tips at points subjected to arcing duty. Contact points not rotate. -
Page 34: Trouble Shooting Guide • Section 4
VR-32 Regulator and CL-4C Control TROUBLE SHOOTING GUIDE • Section 4 COMPLETE REGULATOR IN SERVICE I. If steps B, D, and G do not provide voltage readings, measure the voltage between VM and G on terminal board TB2. The reading should be approximately the set voltage setting. - Page 35 S225-10-5 Figure 4-1. Junction box wiring diagram. Position Indicator Replacement E. Set the CONTROL switch on LOWER. The following instructions apply only to the junction box F. Measure the voltage between terminals L and G on ter- mounted position indicator construction that was initiated in minal board.
-
Page 36: Front Panel Trouble Shooting
VR-32 Regulator and CL-2A Control 14. Connect a 120-volt ac external power supply to the control. Since this is not a calibration type measurement, there may be 15. Run the tap changer manually to verify alignment of the some variation in these measurements depending upon how position indicator hand and the neutral light. - Page 37 S225-10-5 B. Switch the LDC control to (+X+R) and operate the and one volt below the 12O-volt nominal setting with an coarse REACTANCE control through all positions. accuracy of .3 volt. The voltage reading in each switch position should be half If this is not true, proceed with the trouble shooting section.
- Page 38 VR-32 Regulator and CL-2A Control Figure 4-2. Physical wiring.
- Page 39 S225-10-5...
- Page 40 VR-32 Regulator and CL-2A Control Figure 4-3. Printed circuit board schematic.
- Page 41 S225-10-5...
- Page 42 VR-32 Regulator and CL-2A Control Now, with the input voltage set at nominal (in band), the fol- CHECK NO. 4 - MOTOR CURRENT SENSE lowing power supply voltages should be obtained between the To test the motor current sensing circuitry of the circuit board, specified test point and TP 0 : approximately .120 amps of current must be applied to the...
-
Page 43: Circuit Board Removal
No attempt should be made to further analyze these problems lem may be a defective IC 7 . or to replace IC 1 . Contact Cooper Power Systems service for 9. Now, remove the multimeter from TP 0 and TP 9 , and set it board exchange. - Page 44 VR-32 Regulator and CL-2A Control Figure 4-4. Printed circuit board removed. 4-11...
-
Page 45: Accessories - Sectlon 5
S225-10-5 ACCESSORIES - Section 5 The following accessories are available for use with the regu- lator control to perform various functions. They can be mount- ed in the same enclosure as the control; however, if a number of them are used, a second enclosure is required. Most can be either installed at the factory or retrofit in the field by the customer. - Page 46 It is 0.2ampere control current supply to a usable 2.5-ampere or specifically designed for installation on Cooper Power Systems 5.0ampere source for special metering purposes. The two CL-1, CL-2, or CL-2A control panels. However, the Meter Pac...
- Page 47 S225-10-5 DATA READER The optional hand-held DATA READER allows the operator to copy all of the Function Code parameters from the Meter Pac for transfer to a personal computer. operation of the control is not affected by the DATA READER. The DATA READER can store data from 100 different Meter Pac Controls before the memory must be purged.
-
Page 48: Spare Parts - Section 6
Additional parts and installation information for tap changers is When ordering replacement parts or field-installable acces- found in bulletin S225-10-2. sories for your Cooper Power Systems VR-32 step-voltage reg- ulator, provide the following information: 1. Regulator serial number (found on control nameplate). - Page 49 S225-10-5 Figure 6-1. High-voltage bushing. Figure 6-2. Replacement parts for spring-drive tap changers 928D and 170C.
- Page 50 VR-32 Regulator and CL-2A Control Figure 6-3 Replacement parts for direct-drive tap changer 770B. Figure 6-4 Replacement for direct-drive tap changer 660C.
-
Page 51: List Of Tables
Side, with Differential Potential Transformer 1-15 1-17 Back Panel Signal Circuit 1-16 Dipswitch Location on Printed Circuit Board VR-32 Regulator and CL-2A Control Wiring Schematic Diagram SCADA Connections to CL-2A Control 2-11 SCADA Connections Basic Scheme 2-12... - Page 52 Cooper Power Systems Quality from Cooper Industries Cooper Power Systems, Inc. P.O. Box 2850, Pittsburgh, PA, 15230 is a registered trademark of Cooper Industries, Inc. Quality from Cooper Industries...
Need help?
Do you have a question about the VR-32 and is the answer not in the manual?
Questions and answers