Table of Contents
Advertisement
Available languages
Available languages
Quick Links
Installation Instructions
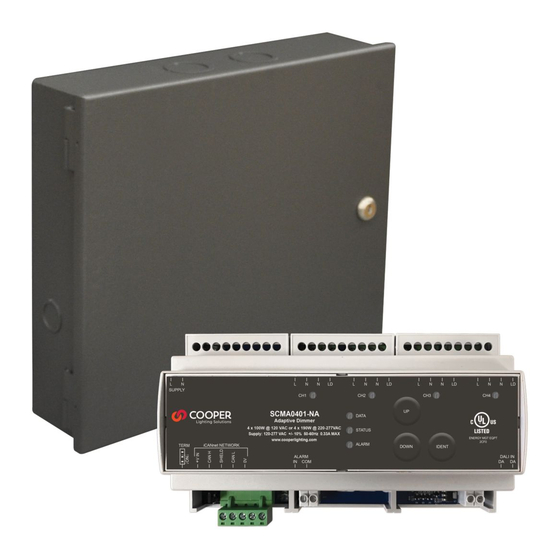
IL Area Controller with
SCMA0401 Adaptive Dimmer
IMPORTANT: Read carefully before installing product. Retain for future reference.
Failure to comply with these instructions may result in serious injury (including death)
and property damage.
Risk of Fire, Electrical Shock, Cuts or other Casualty Hazards- Installation and maintenance of this product must be
performed by a qualified electrician. This product must be installed in accordance with the applicable installation code
by a person familiar with the construction and operation of the product and hazards involved. For continued protection
against shock hazard replace all covers and guards after field wiring is completed.
Before installing or performing any service, the power MUST be turned OFF at the branch circuit breaker. According to NEC
240-83(d), if the branch is used as the main switch for a fluorescent lighting circuit, the circuit breaker should be marked
with "SWD". All installations should be in compliance with the National Electric Code and all state and local codes.
Risk of Fire and Electric Shock- Make certain power is OFF before starting installation or attempting any maintenance.
Disconnect power at fuse or circuit breaker. WaveLinx Wired models may contain circuits from more than one power
source.
Risk of Burn- Disconnect power and allow product to cool before handling or servicing.
Risk of Personal Injury- Due to sharp edges, handle with care. Always use at least two people when lifting and mounting
heavy or large units
DISCLAIMER OF LIABILITY: Cooper Lighting Solutions assumes no liability for damages or losses of any kind that may arise from the
improper, careless, or negligent installation, handling or use of this product.
NOTICE: Product may become damaged and/or unstable if not installed properly.
Note: Specifications and dimensions subject to change without notice.
ATTENTION Receiving Department: Note actual product description of any shortage or noticeable damage on delivery receipt.
File claim for common carrier (LTL) directly with carrier. Claims for concealed damage must be filed within 15 days of delivery. All
damaged material, complete with original packing must be retained.
NOTICE: If a room is wired for two circuits using two separate hot leads, it is very important to connect only one circuit per relay.
Both circuits must be fed from the same phase.
NOTICE: Ensure that all modules are firmly seated on the DIN rails before beginning field wiring.
NOTICE: The high voltage supply should be fed to the cabinet via an external isolation breaker with sufficient capacity for the planned
installation.
NOTICE: Ensure that the supply is fully isolated at an external breaker before opening doors. Test that power has been removed before
starting to handle conductors.
NOTICE: Ensure that high voltage and low voltage wiring remains separate.
NOTICE: All new wiring must be fully verified before applying power.
NOTICE: Designed for indoor installation and use only. Dry location rated.
WARNING
WaveLinx Wired
Applies to Model #s:
ILS-SCMA0401-1
ILM-SCMA0401-2
ILM-SCMA0401-3
Advertisement
Table of Contents

Related Manuals for Cooper WaveLinx Wired ILS-SCMA0401-1


Summary of Contents for Cooper WaveLinx Wired ILS-SCMA0401-1
- Page 1 Risk of Personal Injury- Due to sharp edges, handle with care. Always use at least two people when lifting and mounting heavy or large units DISCLAIMER OF LIABILITY: Cooper Lighting Solutions assumes no liability for damages or losses of any kind that may arise from the improper, careless, or negligent installation, handling or use of this product.
-
Page 2: General Information
Important points for consideration 25-43/64” [652mm] • The cabinets are designed for surface mounting. Please consult Cooper Lighting Solutions before attempting flush mounting. Installation steps: • Use suitable conduits and couplers to link the raceways to Mount enclosure the controller chassis. -
Page 3: Mounting The Enclosure
WaveLinx Wired IL Area Controller with SCMA0401 Adaptive Dimmer Mounting the enclosure To mount the enclosure The WaveLinx Wired modules consist of an enclosure with Choose a dry location convenient to the circuit breaker interior DIN rail modules. Interior DIN rail modules include: panel that meets the operating temperature requirements. -
Page 4: Connecting The Supply
WaveLinx Wired IL Area Controller with SCMA0401 Adaptive Dimmer Wiring flow is bonded to the main backplane of the chassis and the outer panels. All cabinets have been designed to provide a clear layout and logical progression for all power circuits. Please consult the image below for details about the maximum permissible supply wire gauges for the various controller The main supply conductors enter at the top panel. - Page 5 WaveLinx Wired IL Area Controller with SCMA0401 Adaptive Dimmer Single channel AC Dual channel AC Line Line Line Neutral Neutral Single channel load Dual channel load Mains Power Loads Mains Power Loads www.cooperlighting.com IB50301922 page 5 May 2022...
- Page 6 WaveLinx Wired panels. The lighting network is a daisy-chain and requires one in and one out connection. The lighting network also requires a terminating jumper installed at the two ends of the network Lighting network wire should use Cooper Lighting Solutions LCCP or LCCNP wire (alternate: Belden 1502, 1502P). Lighting network wiring detail...
-
Page 7: Typical Connection Diagram
(red Data LED flashes) Warranties and Limitation of Liability Please refer to www.cooperlighting.com for our terms and conditions. Cooper Lighting Solutions 1121 Highway 74 South © 2022 Cooper Lighting Solutions Peachtree City, GA 30269 Canada Sales All Rights Reserved. P: 770-486-4800 5925 McLaughlin Road www.cooperlighting.com... -
Page 8: Instructions D'installation
Risque de blessures – À cause des arêtes tranchantes, manipulez ce produit avec précaution. EXONÉRATION DE RESPONSABILITÉ : Cooper Lighting Solutions n’assume aucune responsabilité pour les dommages ou pertes de quelque nature que ce soit pouvant découler d’une installation, d’une manipulation ou d’une utilisation inappropriée, imprudente ou négligente de ce produit. -
Page 9: Renseignements Généraux
• Les armoires sont conçues pour un montage en saillie. Veuillez Raccordement des câbles du réseau WaveLinx Wired consulter Cooper Lighting Solutions avant de procéder à un montage Vérification de tous les câbles du circuit d’alimentation encastré. pour déceler toutes erreurs •... - Page 10 WaveLinx Wired Contrôleur de zone IL avec gradateur adaptatif SCMA0401 Montage de l’enceinte Pour monter l’enceinte Les modules WaveLinx Wired comportent une enceinte dotée Choisissez un endroit sec et pratique qui répond aux de modules de rail DIN à l’intérieur. Les modules de rail DIN exigences relatives à...
-
Page 11: Raccordement De L'alimentation
WaveLinx Wired Contrôleur de zone IL avec gradateur adaptatif SCMA0401 Flux des câbles Consultez le diagramme ci-dessous pour obtenir les détails sur le câblage. La borne de mise à la terre principale est située Toutes les armoires ont été conçues pour fournir une près de la borne neutre. - Page 12 WaveLinx Wired Contrôleur de zone IL avec gradateur adaptatif SCMA0401 CA à un canal CA à deux canaux Ligne Ligne Ligne Neutre Neutre Charge à un canal Charge à deux canaux Charges de l’alimentation secteur Charges de l’alimentation secteur IB50301922 page 12 www.cooperlighting.com Mai 2022...
- Page 13 Ce réseau exige également l’installation d’une bretelle de terminaison installée aux deux extrémités. Le câble du réseau d’éclairage doit utiliser le câble LCCP ou LCCNP de Cooper Lighting Solutions (alternative : Belden 1502, 1502P). Détails sur le câblage du réseau d’éclairage Renseignements sur le câblage :...
- Page 14 Garanties et limitation de responsabilité Veuillez consulter le site www.cooperlighting.com pour obtenir les conditions générales. Cooper Lighting Solutions 1121 Highway 74 South © 2022 Cooper Lighting Solutions Peachtree City, GA 30269 Tous droits réservés. P: 770-486-4800 Service des ventes du Canada www.cooperlighting.com...
-
Page 15: Instrucciones De Instalación
Risque de blessures – À cause des arêtes tranchantes, manipulez ce produit avec précaution. RENUNCIA DE RESPONSABILIDAD: Cooper Lighting Solutions no asume ninguna responsabilidad por daños o pérdidas de ningún tipo que puedan surgir por la instalación, manipulación o uso inadecuado, descuidado o negligente de este producto. -
Page 16: Información General
• Los recintos están diseñados para montaje en superficie. Consulte a Conecte el cableado del circuito derivado. Cooper Lighting Solutions antes de intentar el montaje al ras. Conecte el cableado del bus de datos de 2 hilos. • Utilice los conductos y los acopladores adecuados para conectar las Conecte el cableado de la red WaveLinx Wired. - Page 17 WaveLinx Wired Controlador de área IL con atenuador adaptativo SCMA0401 Montaje del recinto Para montar el recinto Los módulos WaveLinx Wired consisten en un recinto con Elija una ubicación seca que sea conveniente para el panel módulos interiores de riel DIN. Los módulos interiores de riel del interruptor de potencia y que cumpla con los requisitos DIN incluyen lo siguiente: de temperatura de funcionamiento.
-
Page 18: Conexión De La Fuente De Alimentación
WaveLinx Wired Controlador de área IL con atenuador adaptativo SCMA0401 Flujo del cableado acoplador para introducir el cableado de origen de forma segura en el chasis. Todos los recintos se diseñaron para ofrecer una disposición clara y una progresión lógica de todos los circuitos de Consulte el siguiente diagrama para ver los detalles de alimentación. - Page 19 WaveLinx Wired Controlador de área IL con atenuador adaptativo SCMA0401 Canal único de CA Doble canal de CA Línea Linea Linea Neutro Neutro Carga de canal único Carga de doble canal Cargas de la alimentación principal Cargas de la alimentación principal www.cooperlighting.com IB50301922 page 19 Mayo 2022...
- Page 20 La red de iluminación también requiere un puente de terminación instalado en los dos extremos de la red. El cable de la red de iluminación debe utilizar el cable LCCP o LCCNP de Cooper Lighting Solutions (alternativo: Belden 1502, 1502P).
- Page 21 IDENT durante 5 segundos. Garantías y Limitación de Responsabilidad Visite www.cooperlighting.com para conocer nuestros términos y condiciones. Cooper Lighting Solutions © 2022 Cooper Lighting Solutions 1121 Highway 74 South Todos los derechos reservados. Peachtree City, GA 30269 Servicio de ventas de Canada...
Need help?
Do you have a question about the WaveLinx Wired ILS-SCMA0401-1 and is the answer not in the manual?
Questions and answers