Table of Contents
Advertisement
Quick Links
Advertisement
Table of Contents

Subscribe to Our Youtube Channel
Related Manuals for Saluki S5800E Series


Summary of Contents for Saluki S5800E Series
- Page 1 S5800E Series Field Comm Analyzer User Manual Saluki Technology Inc.
- Page 2 This manual applies to the instruments of the following models: S5800EA Field Comm Analyzer (9kHz - 4.0GHz). S5800EB Field Comm Analyzer (9kHz - 6.0GHz). Standard Accessories of S5800E series field comm analyzer: Item Name Qty. Main Machine 1 pcs...
- Page 3 Tel: 886.909 602 109 Email: sales@salukitec.com www.salukitec.com Option No. Item Description S5800-12 Directional Active Log Periodic Frequency range: 9 kHz to 20MHz S5800-13 Directional Active Log Periodic Frequency range: 20MHz to 200MHz S5800-14 Directional Active Log Periodic Frequency range: 200MHz to 500MHz S5800-15 Directional Active Log Periodic Frequency range: 500MHz to 3GHz...
- Page 4 Tel: 886.909 602 109 Email: sales@salukitec.com www.salukitec.com Preface Thanks for choosing S5800E series field comm analyzer produced by Saluki Technology Inc. Please read this quick guide carefully for your convenience. We devote ourselves to meeting your demands, providing you high-quality measuring instrument and the best after-sales service.
-
Page 5: Table Of Contents
Tel: 886.909 602 109 Email: sales@salukitec.com www.salukitec.com CONTENTS Chapter 1 General Information........................10 1.1 Overview..............................10 1.2 Standard Accessories..........................10 1.3 Available Product Measurement Options....................11 1.4 Preventative Maintenance........................12 1.5 Calibration Requirements & Annual Verification..................12 1.6 ESD Caution............................12 1.7 Battery Replacement..........................13 1.8 Soft Carrying Case...........................13 Chapter 2 Instrument Overview........................ - Page 6 Tel: 886.909 602 109 Email: sales@salukitec.com www.salukitec.com 3.2 Swept SA..............................30 3.2.1 Basic measurement......................... 30 3.2.2 Basic parameters setting......................... 42 3.2.3 Measurement parameters setting....................52 3.2.4 Basic usages............................56 3.3 Channel Power............................64 3.3.1 Basic measurement......................... 64 3.3.2 Basic parameter setup........................70 3.3.3 Measurement parameter setup......................
- Page 7 Tel: 886.909 602 109 Email: sales@salukitec.com www.salukitec.com 5.1 TDD-LTE..............................93 5.1.1 Power vs. Resource block.......................94 5.1.2 Constellation........................... 98 5.1.2 Control channel power......................... 100 5.1.3 Summary............................100 5.1.4 OTA scanner..........................101 5.1.5 Tx Test............................103 5.1.6 Channel Power..........................104 5.1.7 ACLR............................104 5.1.8 Occupied bandwidth........................105 5.1.9 Power vs.
- Page 8 Tel: 886.909 602 109 Email: sales@salukitec.com www.salukitec.com 6.2 SS Outdoor............................138 6.2.1 Coverage measure........................138 6.2.2 Save file............................140 6.3 TDLTE Outdoor.............................141 6.4 FDLTE Outdoor.............................142 6.5 Net Clean Outdoor..........................143 Chapter 7 Track Generator..........................145 Chapter 8 File Managing..........................147 8.1 File Saving.............................147 8.1.1 Image file saving..........................
- Page 9 Tel: 886.909 602 109 Email: sales@salukitec.com www.salukitec.com 10.1.3 Special characters in commands....................166 10.1.4 Parameters in commands......................166 10.1.5 Variable parameters........................167 10.1.6 Block program data........................167 10.2 Instructions............................167 10.2.1 Common command........................167 10.2.2 System command........................168 10.2.3 Spectrum control command......................168...
-
Page 10: Chapter 1 General Information
Tel: 886.909 602 109 Email: sales@salukitec.com www.salukitec.com Chapter 1 General Information Introduction This chapter provides a general description of the S5800E Series Field Comm Analyzer. Topics covered in the section include the following: Overview Standard Accessories Available Measurement Options ... -
Page 11: Available Product Measurement Options
Tel: 886.909 602 109 Email: sales@salukitec.com www.salukitec.com Crossover LAN Cable USB Cable RF Connector Site Workbench Software and Documentation disc Soft Carrying Case NOTE: When using the Vehicle charger, Make sure that the supply is rated for a minimum of 60 Watts at 12 VDC, and the socket is clean without any dirt or debris. -
Page 12: Preventative Maintenance
The software-enabled measurement options can be added at the time of purchase, or at a later date as your test needs evolve – without having to return the product to Saluki Instruments or one of its authorized service centers. 1.4 Preventative Maintenance The S5800E series preventive maintenance consists of inspecting and cleaning the unit, all RF connectors, and all accessories. -
Page 13: Battery Replacement
NOTE: Saluki recommends removing the battery for long-term storage of the instrument. 1.8 Soft Carrying Case The S5800E series can be operated while in the soft carrying case. On the back of the case there is a large storage pouch for accessories and power supply. - Page 14 Tel: 886.909 602 109 Email: sales@salukitec.com www.salukitec.com Fig.1.2 Soft carrying case...
-
Page 15: Chapter 2 Instrument Overview
The S5800E series are capable of approximately 3.5 hours of continuous operation with a fully charged, field-replaceable battery. The S5800E series can also be operated from a 12 VDC source (which will also simultaneously charge the battery). This can be achieved with either the AC-DC adapter or automotive cigarette lighter adapter. Both items are included in the instrument. -
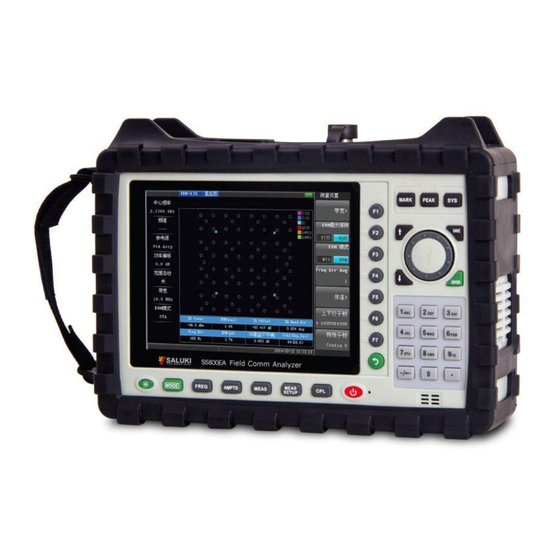
Page 16: Front Panel Overview
2.1.1 Front panel overview The S5800E series menu-driven interface is easy to use and requires little training. The S5800E uses the keypad for data input. The five main menu keys below the screen and eight submenu keys on the right side are menu keys. -
Page 17: Test Panel Connector Overview
Tel: 886.909 602 109 Email: sales@salukitec.com www.salukitec.com Press this key to finalize data input or select a highlighted item from a list. “↑ ↓” Arrow Keys The arrow keys can often be used to change a value or to change a selection from a list. This function is similar to the function of the rotary knob. -
Page 18: Ui Overview
Tel: 886.909 602 109 Email: sales@salukitec.com www.salukitec.com RF In 50Ω Type-N female connector. Maximum input is +30 dBm at ±50 VDC. RF Out RF output, 50Ω impedance, for tracking generator output. Maximum input is +25 dBm at ±50VDC. 2.2 UI Overview 2.2.1 Screen information Fig.2.3 describes some of the important information for Spectrum Analysis measurement mode, Swept SA measurement type. -
Page 19: Symbols And Indicators
Tel: 886.909 602 109 Email: sales@salukitec.com www.salukitec.com Press the corresponding menu, and the parameter shows in the middle of the screen. Use the numeric keys, arrow keys or Rotary Knob to set the parameter, and press the Enter key to exit. Example: Menu of “Cent Freq”. -
Page 20: Data Entry
Tel: 886.909 602 109 Email: sales@salukitec.com www.salukitec.com Red: Battery is 0% to 10% charged; ☆ Bolt and Scroll Bar: Battery is being charged. ☆ No battery and only use adapter. ☆ : When either the AC-DC Adapter or the 12 VDC adapter is connected, the battery automatically receives a charge, and the battery symbol with the lightning bolt is displayed. -
Page 21: Menu Trees
Tel: 886.909 602 109 Email: sales@salukitec.com www.salukitec.com Fig.2.4 Measurement mode selection 2.4 Menu Trees This part lists the menu trees that ordered by characters. Some menus only can be activated in the instrument with corresponding options. NOTE: We will list menus as far as possible. Because some measurements are option functions, and some of instruments may be without some menus. - Page 22 Tel: 886.909 602 109 Email: sales@salukitec.com www.salukitec.com Spectrum Analysis Mode -> Channel Power, ACP and Occupied Bandwidth Type ...
-
Page 23: Cpl
Tel: 886.909 602 109 Email: sales@salukitec.com www.salukitec.com 2.4.2 CPL This key works for the same way in any measurements. -
Page 24: Freq
Tel: 886.909 602 109 Email: sales@salukitec.com www.salukitec.com 2.4.3 FREQ This key works for the different way in different measurements. Spectrum Analysis Mode -> Swept SA Type Spectrum Analysis Mode -> Channel Power, ACP and Occupied Bandwidth Type ... -
Page 25: Mark
Tel: 886.909 602 109 Email: sales@salukitec.com www.salukitec.com 2.4.4 MARK This key works for the different way in different measurements. Spectrum Analysis Mode -> Swept SA Type ... -
Page 26: Meas
Tel: 886.909 602 109 Email: sales@salukitec.com www.salukitec.com Spectrum Analysis Mode -> Channel Power, ACP and Occupied Bandwidth Type 2.4.5 MEAS This key works for the different way in different measurements. Spectrum Analysis Mode ... -
Page 27: Meas Setup
Tel: 886.909 602 109 Email: sales@salukitec.com www.salukitec.com 2.4.6 MEAS SETUP This key works for the different way in different measurements. Spectrum Analysis Mode -> Swept SA Type (The first one) Spectrum Analysis Mode -> Channel Power Type (The second one) ... -
Page 28: Peak
Tel: 886.909 602 109 Email: sales@salukitec.com www.salukitec.com 2.4.7 PEAK This key works for the different way in different measurements. Spectrum Analysis Mode -> Swept SA Type ... -
Page 29: Sys
Tel: 886.909 602 109 Email: sales@salukitec.com www.salukitec.com Spectrum Analysis Mode -> Channel Power, ACP and Occupied Bandwidth Type 2.4.8 SYS This key works for the same way in any measurements. -
Page 30: Chapter 3 Spectrum Measurement
Tel: 886.909 602 109 Email: sales@salukitec.com www.salukitec.com Chapter 3 Spectrum Measurement Introduction The main contents are: Swept SA function and usage Channel power function and usage Adjacent channel power function and usage Occupied BW function and usage ... - Page 31 Tel: 886.909 602 109 Email: sales@salukitec.com www.salukitec.com Fig.3.2 Frequency menu (page 1) Fig.3.3 Frequency menu (page 2) Center Frequency Pressing “Center Freq” soft-key, user can change the current center frequency. There are three methods to input the frequency value: Directly input the number: Press the number keys, and the “Unit” menu will appear. Select the unit in this menu, and then user can finish the center frequency change.
- Page 32 Tel: 886.909 602 109 Email: sales@salukitec.com www.salukitec.com Fig.3.4 Cent frequency setting NOTE: 1. In most parameter input cases, the information about the item and the input value will display on the screen. 2. The frequency range is from 0 to 3GHz, if the input is little/ more than 0Hz/ 3GHz it will be treated as 0Hz/ 3GHz. Center Frequency Pressing “Start Freq”...
- Page 33 Tel: 886.909 602 109 Email: sales@salukitec.com www.salukitec.com Stop Frequency After pressing “Stop Freq” soft-key, user can change the stop frequency. There are three methods to change the stop frequency value: Directly input the number, press the “Up/Down” step key tochange freq and rotate the knob. Span Span equals the stop frequency minus the start frequency.
- Page 34 Tel: 886.909 602 109 Email: sales@salukitec.com www.salukitec.com Fig.3.7 Wide span frequency Full Span Pressing this sift-key will change the span to 3000MHz. Zero Span Pressing this sift-key will change the span to 0Hz. This is the time domain information of selected frequency. Zero spam is very useful to observe the characters of AM and FM signal and the signal of time domain.
- Page 35 Tel: 886.909 602 109 Email: sales@salukitec.com www.salukitec.com Fig.3.8 Signal standard setting After pressing the “Signal Tab” soft-key and setting it to “On”, we can use the sub-menu .By pressing the “ Select Signal” soft-keys the dialog box shown as Fig.3.9 will appear. Fig.3.9 Signal standard dialog box By up/down key or knob, we can choose the signal standard.The center frequency will be set by inputting the frequency channel number.
- Page 36 Tel: 886.909 602 109 Email: sales@salukitec.com www.salukitec.com Fig.3.10 Amplitude menu Reference Level Reference level is display on the up-left of the screen, which is signed as “ Ref ” . The default value of “ Ref ” is 98.8dBµV. NOTE: The smallest value of reference value is changed according to the different attenuator setting. The details will be introduced in next section.
- Page 37 Tel: 886.909 602 109 Email: sales@salukitec.com www.salukitec.com Fig.3.11 Reference level setting Attenuator Attenuator is an important part of the instrument. It can reduce the signal distortion by attenuating the power level of the mixer input signal. The value of attenuator is from 0 to 55dB with 5dB step, the default value is 10dB. Increasing the value of attenuator can diminish the mixer distortion, but the base noise of the system will increase too that will reduce the range of measurable signal.
- Page 38 Tel: 886.909 602 109 Email: sales@salukitec.com www.salukitec.com voltage difference ΔV. In most cases, the instrument is in logarithm state, but in some special cases (for example when measuring the modulation degree of AM), the line state is the better choice. The common used unit in logarithmic state is dBm, dBµV and dBmV.
- Page 39 Tel: 886.909 602 109 Email: sales@salukitec.com www.salukitec.com Fig.3.15 Amplitude Unit NOTE: The change of unit will not cause the change of “Log/Line” state. Scale/Div The scale/div is displayed on the upside of the screen. In logarithm state: the default value is 10dB/grid. After pressing “Scale/Div” soft-key user can enter the integer number from 1 to 40 or decimal number from 0.1 to 0.9 to change the scale to the state wanted.
- Page 40 Tel: 886.909 602 109 Email: sales@salukitec.com www.salukitec.com Fig.3.17 Scale is 5 dB/ in logarithmic state Fig.3.18 Scale is ×1 in line state (default value) Fig.3.19 Scale is ×2 in line state...
- Page 41 3.21. Fig.3.20 Ref Offset is Off Fig.3.21 Ref Offset is 10 dB Pre Amplifier There is a preamplifier in S5800E series. By pressing “Pre Amp” soft-key, user can set the “On/Off” state of this amplifier according to the signal intensity.
-
Page 42: Basic Parameters Setting
Tel: 886.909 602 109 Email: sales@salukitec.com www.salukitec.com Fig.3.22 Pre Amplifier is off Fig.3.23 Pre Amplifier is on 3.2.2 Basic parameters setting Basic parameters of Swept SA measurement refer to RBW, VBW, sweep mode, sweep time, trig mode and etc. The CPL keys about these settings are located on the right top of front panel. - Page 43 Tel: 886.909 602 109 Email: sales@salukitec.com www.salukitec.com Fig.3.24 Basic parameters menu (page 1) Fig.3.25 Basic parameters menu (page 2) 1. BW Set Resolution bandwidth (RBW) refers to the IF filter bandwidth of spectrum analyzer. RBW defines the smallest frequency difference of two adjacent signals that can be distinguished by the spectrum analyzer. So the narrower the RBW is set, the higher precision the spectrum has.
- Page 44 Tel: 886.909 602 109 Email: sales@salukitec.com www.salukitec.com Fig.3.26 Marked is “UNCAL” The RBW can be changed from 1kHz to 3MHz, taking the step of 1 and 3. After setting the “Res BW” to “Manu” state, user can change the RBW by inputting the number, pressing the “Up/Down” cursor or rotating the knob.The symbol of "#"...
- Page 45 Tel: 886.909 602 109 Email: sales@salukitec.com www.salukitec.com Fig.3.28 Narrow VBW Video Average Set the “Video Avg” to “On”, then the spectrum will calculate the average value of current trace and previous traces values. The default state of “Video Avg” is “Off”. Fig.3.29 Video average on Turn on the “Video Avg”.
- Page 46 Tel: 886.909 602 109 Email: sales@salukitec.com www.salukitec.com Fig.3.30 Sweep time is 5s Sweep type There are two sweep modes; one is continuous (Cont) and the other is single (Sigl). The default mode is continuous mode. If user wants to set the sweep mode to single mode, user can set the “Sweep” soft-key in Fig.3.18 to “Sigl” state or press the “Single Sweep”...
- Page 47 Tel: 886.909 602 109 Email: sales@salukitec.com www.salukitec.com 100MHz and the minimum span is 1MHz. The maximum RBW is 1MHz and the minimum RBW is 30kHz. Fig.3.32 Fast sweep mode The veracity and sweep speed of measurement in the performance sweep type is intervenient between the fast and No FFT type.
- Page 48 Tel: 886.909 602 109 Email: sales@salukitec.com www.salukitec.com Fig.3.34 No FFT mode 3. Multi-trace Function Pressing Trace sub-key, the follow menu will appear: Fig.3.35 Trace menu Trace Selection There are three traces that user can choose 1, 2 or 3. User can switch during these trace by press “Trace” soft-key. What are called three traces are the different waves of the same input that only were viewed in different time and different parameter settings.
- Page 49 "Min Hold" is similar to "Max Hold", it saves the level value of the lowest points. 4. Detector Mode The S5800E series have 5 detector modes. Sample Detector sample the data point in the middle time of VBW filter’s output of each sweep point, and displayed it. It is...
- Page 50 Tel: 886.909 602 109 Email: sales@salukitec.com www.salukitec.com Fig.3.37 Sample detector mode Positive-Peak Detector sample the positive value of VBW filter output of each sweep point, and display it. If the sweep time is long enough, this detector can put out the maximum envelop of the modulated signal. Fig.3.38 Positive-peak detector mode Negative-Peak This detector is opposite to “Posi-Peak”...
- Page 51 Tel: 886.909 602 109 Email: sales@salukitec.com www.salukitec.com Fig.3.39 Negative-peak detector mode Normal This detector continuously samples the positive-peak value of the signal, while alternately samples the positive and the negative peak value of the noise and display it. Fig.3.40 Normal detector mode Average The output as this detector mode is the average value of all detected values for each sweep point.
-
Page 52: Measurement Parameters Setting
Tel: 886.909 602 109 Email: sales@salukitec.com www.salukitec.com Fig.3.41 Average detector mode 5. Trigger Mode Press Trigger soft-key, and then the submenu will appear.The default mode is free trigger one and instrument process nothing in free trigger mode. Fig.3.42 Trigger mode 3.2.3 Measurement parameters setting User can press MEAS SETUP key to set some special function for measurement. - Page 53 Tel: 886.909 602 109 Email: sales@salukitec.com www.salukitec.com Fig.3.43 Measurement parameter setting 1. Display Line Set “Disp Line” to “On”, a red line will appear in the mid of the screen and the amplitude of it will appear on the up-right of the screen. Fig.3.44 Display line ON After setting “Disp Line”...
- Page 54 Tel: 886.909 602 109 Email: sales@salukitec.com www.salukitec.com Fig.3.45 NdB setting menu Pressing “NdB BW” soft-key and set the state of it to “On”. The system will display the information of N dB bandwidth that indicates the character of current used filter on the up-right of the screen. The default value is -3dB and the output is the frequency difference of two points which amplitude is 3dB lower than the peak value.
- Page 55 Tel: 886.909 602 109 Email: sales@salukitec.com www.salukitec.com Fig.3.47 Limit setting menu Pressing “Limit up” or “Limit down” soft-key and the limit setting dialog box will pop up as following figure showed. Fig.3.48 Limit setting dialog box Rotating wheel or the up/down keys to move the focus to the dialog box, press the Enter key, and you can switch the limit between on and off.
-
Page 56: Basic Usages
Tel: 886.909 602 109 Email: sales@salukitec.com www.salukitec.com Fig.3.49 Limit measurement result 3.2.4 Basic usages In this section, we will introduce the operations of marker, peak and etc. 1. Mark Operation Pressing MARK key, the first page of menu will appear, and pressing the “Next page” sub-key the second page of menu will appear. - Page 57 Tel: 886.909 602 109 Email: sales@salukitec.com www.salukitec.com Fig.3.51 Mark menu (page 2) If there is no marker on, the system will automatically set the normal marker to on. If there are some “On” markers, the state of these markers will remain unchanged. Normal Marker After pressing “Mkr Normal”...
- Page 58 Tel: 886.909 602 109 Email: sales@salukitec.com www.salukitec.com Fig.3.52 Delta mark Fixed Mark “Fixed Mark” is similar to “Delta Mark”: the main function is also to view the deference of two markers and the method to change the position of the second signal is the same. But the first marker will be frozen after setting the “Fixed Mark”...
- Page 59 Tel: 886.909 602 109 Email: sales@salukitec.com www.salukitec.com Fig.3.54 After marker to Ref Level Fig.3.55 Before marker to Center Frequency Fig.3.56 Before marker to Center Frequency...
- Page 60 Tel: 886.909 602 109 Email: sales@salukitec.com www.salukitec.com Multi-marker and Marker Table The instrument can display 6 markers simultaneously. After pressing “Select Mkr” soft-key, User can switch between these markers and set the “On/Off” state of it. After selecting the marker and set the state of it to “On”, user can change the marker’s position by the same way of changing “Normal Mkr”.
- Page 61 Tel: 886.909 602 109 Email: sales@salukitec.com www.salukitec.com Fig.3.58 Marker noise on Noise/Hz Set “Noise/Hz” to “On”, the difference between current amplitude, and the average noise power will display on the screen. 10) Trace Selection Pressing "Sel Trace" soft-key, submenu as Fig.3.59 will appear. There are three traces .One of them is not at the Blank state as it is at activate.
- Page 62 Tel: 886.909 602 109 Email: sales@salukitec.com www.salukitec.com Fig.3.60 Peak menu (page 1) Fig.3.61 Peak menu (page 2) If there is no marker setting to “On”, the system will search the peak signal in the span and set marker on it when user press the PEAK key.
- Page 63 Tel: 886.909 602 109 Email: sales@salukitec.com www.salukitec.com frequency/amplitude of current marker to center frequency/reference level. Search Conditions Press the "Search Para" key, and then the below menu will pop up. The search criteria are used to set the search for peak conditions.
-
Page 64: Channel Power
Tel: 886.909 602 109 Email: sales@salukitec.com www.salukitec.com Fig.3.63 Peak table 3.3 Channel Power Channel Power refers to the whole power of the signal in certain span. Set the type of measurement for channel power, and the following menu will pop up. Fig.3.64 Channel bandwidth measurement The area between the two lines is the Channel Bandwidth;... - Page 65 Tel: 886.909 602 109 Email: sales@salukitec.com www.salukitec.com power measurement. The method of setup is same as the setup of Swept SA. Fig.3.65 Frequency setting 2. Amplitude Pressing AMPTD key, the following menu will appear. The default set of system is Auto level status. If the signal has relatively large fluctuations, the system will automatically adjust the attenuator and amplifier, in order to make sure that the input power is ether too overload or low.
- Page 66 Tel: 886.909 602 109 Email: sales@salukitec.com www.salukitec.com Fig.3.67 Reference level is -45dB Fig.3.68 Reference level is -30dB Attenuator and Amplifier Attenuator is an important part of the Instrument. It can reduce the signal distortion by attenuating the power level of the mixer input signal. The value of attenuator is from 0 to 55dB with 5dB step, the default value is 10dB. In auto mode, the system can automatically provide a suitable value of attenuator.
- Page 67 Tel: 886.909 602 109 Email: sales@salukitec.com www.salukitec.com measurement requirements, you can switch on this amplifier to increase the system test range. Fig.3.69 Attenuator is 5dB Fig.3.70 Attenuator is 30dB Fig.3.71 and 3.72 show the measurement results between the amplifier close and open. From the channel power measurement parameters and the blue background height of channel power, we can see the impact of amplifier on the waveform.
- Page 68 Tel: 886.909 602 109 Email: sales@salukitec.com www.salukitec.com Fig.3.71 Amplifier is off Fig.3.72 Amplifier is on Scale/Div The valid value of Scale/Div is 1-40. The default value is 10dB/grid. After pressing “Scale/Div” soft-key user can enter the integer number from 1 to 40 or decimal number from 0.1 to 0.9 to change the scale to the state wanted. Decreasing the value, the waveform will be amplified, and it is easy to observe the waveform details.
- Page 69 Tel: 886.909 602 109 Email: sales@salukitec.com www.salukitec.com Fig.3.73 5dB/Div Ref Offset If level offset is opened, the amplitude of waveform will be magnified and the channel power will also be changed according to the waveform. The following figure shows the measurement results under different conditions of the level offset.
-
Page 70: Basic Parameter Setup
Tel: 886.909 602 109 Email: sales@salukitec.com www.salukitec.com Fig.3.75 Level offset is 30dB 3.3.2 Basic parameter setup The basic parameter setup is only about the video average and scan type. Other parameters such as resolution BW, video BW and scan time are configured by system default. By pressing the CPL key, change the basic parameter, and the following menu of figure will appear: Fig.3.76 Basic parameter setting The basic parameter setup and theory of span power is same as frequency scanning method. - Page 71 Tel: 886.909 602 109 Email: sales@salukitec.com www.salukitec.com Fig.3.77 Measurement parameter setting Channel BW 1. After select center frequency, user can set the channel BW by inputting the frequency manually. The default channel BW is 8MHz. In order to measure accurately, the span frequency is set to 1.5 times the channel BW. Channel bandwidth is proportional to span.
-
Page 72: Basic Usage
Tel: 886.909 602 109 Email: sales@salukitec.com www.salukitec.com measured and set. The limit settings dialog box is shown below after turn on the limit. Fig.3.79 Limit value setting The limit setting dialog box is shown below after turn on the limit. There are upper and lower limit settings for limit of Channel power and power bandwidth, rotating wheel or the up/down keys to move the focus to the dialog box. -
Page 73: Burst Rf Basic Parameters Setup
Tel: 886.909 602 109 Email: sales@salukitec.com www.salukitec.com Fig.3.80 Mark menu 2.Peak Function Pressing PEAK key, the following menu will pop up. Peak function includes next peak, next left peak, next right peak, search condition, peak-peak and minimum value. Fig.3.81 Peak menu 3.3.5 Burst RF basic parameters setup The operation of frequency and amplitude of Burst RF and continuous RF measurement is the same. -
Page 74: Burst Rf Measurement Setup
Tel: 886.909 602 109 Email: sales@salukitec.com www.salukitec.com Fig.3.82 Burst RF interface Pressing CPL key, the menu of parameters setting of Burst RF will pop up. The Sweep Mode and Trigger should be noticed. Sweep mode only includes "no FFT" mode, and the default of Trigger is trust RF. If you choose the free triggered, it would lead to Burst RF into the Continuous RF. -
Page 75: Adjacent Channel Power
Tel: 886.909 602 109 Email: sales@salukitec.com www.salukitec.com triggers succeeds. If not, trigger fails. Fig.3.84 Trigger fails Fig.3.85 Trigger succeeds 4.Gate RBW This set time slot wave spectrum resolution bandwidth. 5.Gate VBW This set time slot wave spectrum resolution bandwidth. 6.Gate Type Trigger mode is divided into the rising and falling trigger. -
Page 76: Basic Measurement
Tel: 886.909 602 109 Email: sales@salukitec.com www.salukitec.com will appear that looks like below: Fig.3.86 Adjacent channel power 3.4.1 Basic measurement 1.Frequency Pressing FREQ key, the menu of Adjacent Channel Power will pop up, user can measure center frequency and step frequency. -
Page 77: Basic Parameter Setup
Tel: 886.909 602 109 Email: sales@salukitec.com www.salukitec.com Fig.3.88 Amplitude menu 3.4.2 Basic parameter setup The parameter config of Adjacent Channel Power is same as channel power. It is only about the video average and scan type; other parameters are set by system default. Pressing CPL key, user can set the basic parameters. -
Page 78: Measurement Parameter Setup
Tel: 886.909 602 109 Email: sales@salukitec.com www.salukitec.com Fig.3.90 Basic parameter setting (page 2) 3.4.3 Measurement parameter setup User can set some parameters for Adjacent Channel Power by pressing MEAS SETUP key. Fig.3.91 Measurement parameter setting 1.Parameter Setup Pressing soft-key, the dialog box will pop up. Set current focus for setup by knob the drop-down menu or manually input, set the required parameters, and then press "OK"... - Page 79 Tel: 886.909 602 109 Email: sales@salukitec.com www.salukitec.com Fig.3.92 Parameter setup User can select the "Restore Default" item to set the parameters to default value. The default value is satisfying with most measurement. 2.Limit The setup of limit is shown as follow figure. Fig.3.93 Limit value setting The function is controlled by a the master switch and respective switch.
-
Page 80: Basic Usage
Tel: 886.909 602 109 Email: sales@salukitec.com www.salukitec.com Fig.3.94 Limit measurement result 3.4.4 Basic usage 1.Marker Function The figure will pop up after pressing MARK key. It is about normal mark and delta mark. Fig.3.95 Mark menu 2.Peak Function Press PEAK key, the menu of peak will pop up as following figure. -
Page 81: Occupied Bw
Tel: 886.909 602 109 Email: sales@salukitec.com www.salukitec.com Fig.3.96 Peak menu Peak function includes next peak, next left peak, next right peak, search condition, peak-peak and minimum value. 3.5 Occupied BW Occupied Bandwidth is the frequency range, which represents certain percent of the whole power. In Channel Measurement Menu, user can press soft-key “Setting”... -
Page 82: Basic Measurement
Tel: 886.909 602 109 Email: sales@salukitec.com www.salukitec.com the setting span and calculates the total power first. Secondly find the greatest signal point, and set the difference of this signal frequency and the center frequency as “Fc” and display it on the screen. Finally little by little expand the power integral span around the greatest signal, until the equation the integral power equal to total power multiply the result of Occupied BW divide Power. -
Page 83: Basic Parameter Setup
Tel: 886.909 602 109 Email: sales@salukitec.com www.salukitec.com 3.5.2 Basic parameter setup The basic parameter setup of occupied BW is same as channel power setup; it is only about the video average and scan type. Other parameter such as resolution BW, video BW and scan time are configured by system default. By pressing CPL key, change the basic parameter, and the follow menu of figure will appear: Fig.3.100 Basic parameter setting 3.5.3 Measurement parameter setup... -
Page 84: Basic Usage
Tel: 886.909 602 109 Email: sales@salukitec.com www.salukitec.com 2.Occupied Bandwidth % Press "Occupied Bandwidth % key" to change the percent of Occupied Bandwidth. The default value is 99%. It can also be changed by digital inputs, up and down key and knob. 3.Limit The setup of limit is shown as following figure. -
Page 85: Field Strength
Tel: 886.909 602 109 Email: sales@salukitec.com www.salukitec.com Fig.3.103 Mark menu 2.Peak Function Pressing PEAK key, the menu will pop up as follow. Fig.3.104 Peak menu Peak function includes next peak, next left peak, next right peak, search condition, peak-peak and minimum value. -
Page 86: Fm/Am
Tel: 886.909 602 109 Email: sales@salukitec.com www.salukitec.com Fig.3.105 Field strength 1.Support unit: dBm/m2, dBV/m, dBmV/m, dBμV/m, Volt/m, Watt/ m2. 2.Three kinds of representation of antenna coefficient: Antenna gain Gain(G)[1/m], Antenna gain(g)[dBi], Antenna factor(AF)[dB(1/m)]. 3.The basic measurements: The figure will pop up after pressing MARK key. It is about normal mark and delta mark. By pressing CPL key, change the basic parameter, the follow menu of figure will appear. - Page 87 Tel: 886.909 602 109 Email: sales@salukitec.com www.salukitec.com The basic measurements: The figure will pop up after press MARK key. It is about normal mark and delta mark. By pressing CPL key, and changing the basic parameter, the follow menu of figure will appear. Press FREQ AMPTD PEAK to change the frequency, amplitude, peak.
-
Page 88: Chapter 4 Interferometric Analysis
Tel: 886.909 602 109 Email: sales@salukitec.com www.salukitec.com Chapter 4 Interferometric Analysis Press the MODE button, select the interference analysis of measurement model, and following menu will pop up shown as Fig.4.1: Fig.4.1 Interference analysis 4.1 Spectrogram Pressing the spectrogram soft key, system will pop up shown as Fig.4.2 menu: Fig.4.2 Spectrogram menu Pressing the soft key of Record we can set Time Span, Interval, Data type and location, etc. -
Page 89: Signal Strength
Tel: 886.909 602 109 Email: sales@salukitec.com www.salukitec.com 4.2 Signal Strength Pressing the MEAS and selecting signal strength measuring interface shown as Fig.4.3 will pop up. Fig.4.3 Signal strength menu Signal strength is used to measure dot frequency signal strength. The largest scale and the minimum scale are used to set the current the range of the signal strength. -
Page 90: Channel Scan
Tel: 886.909 602 109 Email: sales@salukitec.com www.salukitec.com Fig.4.5 Replay choose 4.4 Channel Scan Pressing the MEAS and selecting Chan Scan measuring interface shown as Fig.4.6 will pop up. Fig.4.6 Measuring interface Pressing the PEAK AMPTD CPL function keys back, amplitude, frequency and other basic settings can be done separately. -
Page 91: Difference Spectrum
Tel: 886.909 602 109 Email: sales@salukitec.com www.salukitec.com Fig.4.7 Interference localization Frequency spectrographs can be located after installing GPS positioning, and browse map. Press FREQ AMPTD CPL to change the frequency, amplitude, and other basic Setting. 4.6 Difference Spectrum Pressing the MEAS and selecting Difference spectrum measuring interface will pop up shown as Fig.4.8. Fig.4.8 Difference spectrum Press the PEAK AMPTD MARK CPL function keys to set PEAK, amplitude, frequency and other basic settings separately. - Page 92 Tel: 886.909 602 109 Email: sales@salukitec.com www.salukitec.com Fig.4.9 Signal ID Press the FREQ PEAK AMPTD MARK CPL function keys to set frequency, PEAK, amplitude, mark and other basic settings separately.
-
Page 93: Chapter 5 Basic Stations Analyzer
Tel: 886.909 602 109 Email: sales@salukitec.com www.salukitec.com Chapter 5 Basic Stations Analyzer Pressing the MODE button, and selecting the BS Analyzer of measurement model, menu will pop up shown as Fig.5.1. Fig.5.1 BS analyzer menu 5.1 TDD-LTE Select TDD-LTE soft-key to enter TDD-LTE menu, shown as the following pictures. Fig.5.2 TDD - LTE menu (page 1) -
Page 94: Power Vs. Resource Block
Tel: 886.909 602 109 Email: sales@salukitec.com www.salukitec.com Fig.5.3 TDD - LTE menu (page 2) Fig.5.4 TDD - LTE menu (page 3) 5.1.1 Power vs. Resource block Press the Pow vs RB soft key, and enter into the menu of Pow vs RB, shown as the following figure:... - Page 95 Tel: 886.909 602 109 Email: sales@salukitec.com www.salukitec.com Fig.5.5 Pow vs RB menu Auto scale Select the “Auto scale” to get RB power color images automatically. Fig.5.6 Auto scale...
- Page 96 Tel: 886.909 602 109 Email: sales@salukitec.com www.salukitec.com Max value, Range and Threshold Choose the “Max Value”, “Range” or “Threshold” to set the power of the RB. Fig.5.7 Set RB manually Pressing the FREQ AMPTD function keys can set frequency and amplitude separately. Fig.5.8 Mark the RB...
- Page 97 Tel: 886.909 602 109 Email: sales@salukitec.com www.salukitec.com Pressing the MARK key can mark the Resource Block and SubFrame. Fig.5.9 Mark the subFrame Pressing the MEAS SETUP key can set the basic parameter. Choose the bandwidth, open or close the EVM Max Hold, select the EVM Mode and open or close every channel.
-
Page 98: Constellation
Tel: 886.909 602 109 Email: sales@salukitec.com www.salukitec.com Pressing the PEAK key can peak search, and find the SubFrame of the Free Maker’s max value. Fig.5.11 Peak search 5.1.2 Constellation Select “Constell” to enter the menu, shown as the following figure. Fig.5.12 Constellation menu QPSK points, QAM16 Point and QAM64 points These buttons are used to set the number of points. - Page 99 Tel: 886.909 602 109 Email: sales@salukitec.com www.salukitec.com Fig.5.13 Reference point and data legend open Fig.5.14 Reference point off Fig.5.15 Data legend off...
-
Page 100: Control Channel Power
Tel: 886.909 602 109 Email: sales@salukitec.com www.salukitec.com Pressing the FREQ AMPTD MEAS SETUP function keys can set frequency, amplitude, and means separately. 5.1.2 Control channel power Select the “Control CH Power” into the Control channel Power mode. The menu is the setup menu. Fig.5.16 Control CH power measure Pressing the FREQ AMPTD function keys can set frequency and amplitude separately. -
Page 101: Ota Scanner
Tel: 886.909 602 109 Email: sales@salukitec.com www.salukitec.com 5.1.4 OTA scanner The menu is shown as below. Fig.5.18 OTA scanner menu Sort Select the method and the selected numbers order by value. Fig.5.19 Selection of sort (page 1) - Page 102 Tel: 886.909 602 109 Email: sales@salukitec.com www.salukitec.com Fig.5.20 Selection of sort (page 2) Modulation results “Mod Result” can set the modulation results to open or close. Fig.5.21 Mod Result close Select "Bar >" to enter the submenu of bar, shown as Fig.5.22 .
-
Page 103: Tx Test
Tel: 886.909 602 109 Email: sales@salukitec.com www.salukitec.com Fig.5.22 Selection of Bar Pressing the FREQ AMPTD MEAS SETUP function keys can set frequency, amplitude and means separately. 5.1.5 Tx Test Tx Test measurements are optimized for remote radio heads and MIMO systems. The first table in Tx Test replicates the Scanner table measurements except the measurement scans the presence of up to 3 cell IDs. -
Page 104: Channel Power
Tel: 886.909 602 109 Email: sales@salukitec.com www.salukitec.com Fig.5.24 Mod Result close Pressing the FREQ AMPTD function keys can set frequency and amplitude separately. 5.1.6 Channel Power Select the “Channel Spectrum” to enter the submenu. Fig.5.25 Channel power menu The Channel Power in the mode of TDD-LTE is basically the same as that in Spectrum Analyzer. 5.1.7 ACLR Select the “ACLR”... -
Page 105: Occupied Bandwidth
Tel: 886.909 602 109 Email: sales@salukitec.com www.salukitec.com Fig.5.26 ACLR menu Choose the “Setting=>” or “Limit=>”; the window will pop up; and you can set the parameter. The ACLR in the mode of TDD-LTE is basically the same as that in Spectrum Analyzer. 5.1.8 Occupied bandwidth Select the “Occupied BW”... -
Page 106: Cci
Tel: 886.909 602 109 Email: sales@salukitec.com www.salukitec.com Fig.5.28 Power vs. Time menu Spectrum: Press to select either Frame or Sub-Frame. Spectrum sub-Frame: If Sub-Frame is opened, press to enter the desire sub-frame to Spectrum. Fig.5.29 Spectrum close Pressing the FREQ PEAK AMPTD MARK function keys can set frequency, PEAK, amplitude and mark separately. - Page 107 Tel: 886.909 602 109 Email: sales@salukitec.com www.salukitec.com Fig.5.30 CCI menu Frame: change the value of Frame, which is 1 or 2. Fig.5.31 One frame Max: Press to open or close max holds.
-
Page 108: Uli
Tel: 886.909 602 109 Email: sales@salukitec.com www.salukitec.com Fig.5.32 Max. holds Min: Press to open or close min holds. Fig.5.33 Min. holds Rest Holds: Remove max and min holds, and then hold again. Pressing the FREQ AMPTD MARK function keys can set frequency, amplitude and mark separately. 5.1.11 ULI Select the “ULI”... - Page 109 Tel: 886.909 602 109 Email: sales@salukitec.com www.salukitec.com Fig.5.34 ULI menu Menu Sub-Frame: input needed sub-frame number. Window Set: set the parameters of the window. Fig.5.35 Window set menu Window: press to open or close the window.
-
Page 110: Mimo
Tel: 886.909 602 109 Email: sales@salukitec.com www.salukitec.com Fig.5.36 Window closed Press the FREQ PEAK AMPTD MARK function keys to set frequency, PEAK, amplitude and mark separately. 5.1.12 MIMO Select the “MIMO” to enter submenu. Fig.5.37 MIMO menu Antenna: press the submenu to select the antenna number. -
Page 111: Fdd-Lte
Tel: 886.909 602 109 Email: sales@salukitec.com www.salukitec.com Fig.5.38 Antenna submenu Thres: press the submenu to set the RS Pow Diff and Time Align. Fig.5.38 Thres submenu Press the FREQ AMPTD function keys to set frequency and amplitude separately. 5.2 FDD-LTE Select FDD-LTE soft-key to enter FDD-LTE menu, shown as the following pictures. -
Page 112: Power Vs. Resource Block
Tel: 886.909 602 109 Email: sales@salukitec.com www.salukitec.com Fig.5.40 FDD-LTE menu (page 1) Fig.5.41 FDD-LTE menu (page 2) 5.2.1 Power vs. Resource block Press the Pow vs. RB soft key to enter into the menu of Pow vs. RB, showing as the following figure:... - Page 113 Tel: 886.909 602 109 Email: sales@salukitec.com www.salukitec.com Fig.5.42 Pow vs. RB menu Auto scale Select the "Auto scale" to get RB power color images automatically. Fig.5.43 Auto scale Max value, Range and Threshold Choose the “Max Value “, "Range" or “Threshold” to set the power of the RB the parameters of the color.
- Page 114 Tel: 886.909 602 109 Email: sales@salukitec.com www.salukitec.com Fig.5.44 Set RB manually Press the FREQ AMPTD function keys to set frequency and amplitude separately. Press the MARK key to mark the Resource Block and Subframe. Fig.5.45 Mark the RB...
- Page 115 Tel: 886.909 602 109 Email: sales@salukitec.com www.salukitec.com Fig.5.46 Mark the subframe Press the MEAS SETUP key to set the basic parameter. Choose the bandwidth, open or close the EVM Max Hold, select the EVM Mode and open or close every channel. Fig.5.47 Setup Press the PEAK key to peak search and find the Subframe of the Free Maker’s max value.
-
Page 116: Constellation
Tel: 886.909 602 109 Email: sales@salukitec.com www.salukitec.com Fig.5.48 Peak search 5.2.2 Constellation Select "Constell" to enter the menu, showing as the following figure: Fig.5.49 Constellation menu QPSK points, QAM16 Point and QAM64 points These buttons set the number of points. Reference Point and Data Legend Press the “Ref Point”... - Page 117 Tel: 886.909 602 109 Email: sales@salukitec.com www.salukitec.com Fig.5.50 Reference point and data legend open Fig.5.51 Reference point off Fig.5.52 Data legend off...
-
Page 118: Control Channel Power
Tel: 886.909 602 109 Email: sales@salukitec.com www.salukitec.com Press the FREQ AMPTD MEAS SETUP function keys to set frequency, amplitude and means separately. 5.2.3 Control channel power Select the "Control CH Power" into the control channel power mode. Fig.5.53 Control CH power measure Ng: press into Ng submenu to choose Ng number. -
Page 119: Ota Scanner
Tel: 886.909 602 109 Email: sales@salukitec.com www.salukitec.com Fig.5.55 Summary measure Press the FREQ AMPTD function keys to set frequency and amplitude separately. 5.2.5 OTA scanner The menu is shown as following: Fig.5.56 OTA scanner menu Sort Select the method and the selected numbers order by value. - Page 120 Tel: 886.909 602 109 Email: sales@salukitec.com www.salukitec.com Fig.5.57 Selection of sort (page 1) Fig.5.58 Selection of sort (page 2) Modulation results “Mod Result” can set the modulation results to open or close.
-
Page 121: Tx Test
Tel: 886.909 602 109 Email: sales@salukitec.com www.salukitec.com Fig.5.59 Mod Result close Select "Bar >" to enter the submenu of bar, shown as Fig.5.60 . Fig.5.60 Selection of Bar Pressing the FREQ AMPTD MEAS SETUP function keys can set frequency, amplitude and means separately. 5.2.6 Tx test Tx Test measurements are optimized for remote radio heads and MIMO systems. -
Page 122: Channel Power
Tel: 886.909 602 109 Email: sales@salukitec.com www.salukitec.com Fig.5.61 Tx test measure "Mod Result" can set the modulation results to open or close. Fig.5.62 Mod result close Press the FREQ AMPTD function keys c to set frequency and amplitude separately. 5.2.7 Channel power Select the “channel spectrum”... -
Page 123: Aclr
Tel: 886.909 602 109 Email: sales@salukitec.com www.salukitec.com Fig.5.23 Channel power menu The Channel Power in the mode of FDD-LTE is basically the same as that in Spectrum Analyzer. 5.2.8 ACLR Select the “ACLR” to enter the submenu. Fig.5.64 ACLR menu Choose the “Setting=>”... -
Page 124: Sem
Tel: 886.909 602 109 Email: sales@salukitec.com www.salukitec.com Fig.5.65 Occupied BW menu The Occupied BW in the mode of FDD-LTE is basically the same as that in Spectrum Analyzer. 5.2.10 SEM Select the “SEM” to enter the submenu. Fig.5.66 SEM menu Category: press to enter the submenu of SEM Category. -
Page 125: Cci
Tel: 886.909 602 109 Email: sales@salukitec.com www.salukitec.com Fig.5.67 Submenu of category Summary: press to open or close the summary. Fig.5.68 Summary closed Press the FREQ AMPTD CPL function keys to set frequency, amplitude and other basic settings separately. 5.2.11 CCI Select the “CCI”... - Page 126 Tel: 886.909 602 109 Email: sales@salukitec.com www.salukitec.com Fig.5.69 CCI menu Frame: change the value of Frame, which is 1or 2. Fig.5.70 One frame Max: Press to open or close max holds.
-
Page 127: Mimo
Tel: 886.909 602 109 Email: sales@salukitec.com www.salukitec.com Fig.5.71 Max holds Min: Press to open or close min holds. Fig.5.72 Min holds Rest Holds: Remove max and min holds, and then hold again. Press the FREQ AMPTD MARK function keys to set frequency, amplitude and mark separately. 5.2.12 MIMO Select the “MIMO”... - Page 128 Tel: 886.909 602 109 Email: sales@salukitec.com www.salukitec.com Fig.5.73 MIMO menu Antenna: press into the submenu to select antenna number. Fig.5.74 Antenna submenu Thres: press into the submenu to set the RS Pow Diff and Time Align.
- Page 129 Tel: 886.909 602 109 Email: sales@salukitec.com www.salukitec.com Fig.5.75 Thres submenu Press the FREQ AMPTD function keys to set frequency and amplitude separately.
-
Page 130: Chapter 6 Coverage Mapping
Tel: 886.909 602 109 Email: sales@salukitec.com www.salukitec.com Chapter 6 Coverage Mapping Press the MODE button, select the Coverage Mapping of measurement mode, and then menu shown as Fig.6.1 will pop up. Fig.76.1 Coverage mapping menu 6.1 SS Indoor Select the “SS indoor” to enter the measure. Fig.6.2 SS indoor menu 6.1.1 Measure setting Measure: the status of the measure. - Page 131 Tel: 886.909 602 109 Email: sales@salukitec.com www.salukitec.com Fig.6.3 Measure stop Brower: If it is bigger than the screen, the map can be move to the browse. Fig.6.4 Browser operating menu Setting: press to enter the setting menu. You can select time mode or free mode to measure. And if you choose time mode, the time interval can be set.
- Page 132 Tel: 886.909 602 109 Email: sales@salukitec.com www.salukitec.com Fig.6.5 Setting menu Threshold: press to enter the menu of threshold. You can choose the threshold needed. Fig.6.6 Threshold menu NOTE: Press to enter the note menu, you can note the message of the measure.
-
Page 133: Coverage Measure
Tel: 886.909 602 109 Email: sales@salukitec.com www.salukitec.com Fig.6.7 Note menu 6.1.2 Coverage measure Indoor coverage measure has two types: time measure and free measure. 1.Time Measure Press the MARK key to begin measuring. Insure that the measurement starts and the time interval is set. Fig.6.8 MARK menu Move Mark: There is a mark in the screen;... - Page 134 Tel: 886.909 602 109 Email: sales@salukitec.com www.salukitec.com Fig.6.9 Sign (time interval is 1sec) Clear: press to clear all the signed points. Fig.6.10 Clear all Undo: press to clear the points last sign action.
-
Page 135: Save File Of Measure
Tel: 886.909 602 109 Email: sales@salukitec.com www.salukitec.com Fig.6.11 Undo 2.Free Measure Sign: press to sign point where the mark is currently. Fig.6.12 Sign free Other operations are same as the step of Time Measure. 6.1.3 Save file of measure Pressing the “Save” key, when the measure finished, the saving menu will pop up. And you should choose the “Meas Result >”. -
Page 136: Open File
Tel: 886.909 602 109 Email: sales@salukitec.com www.salukitec.com Fig.6.13 Save file menu Fig.6.14 Save “Meas Result” menu File Name: input file’s name. Location: press to choose where the file is saved, location or USB. Type: press to choose the file’s type. 6.1.4 Open file When the Measure’s status stops, press the “SYS”... - Page 137 Tel: 886.909 602 109 Email: sales@salukitec.com www.salukitec.com Fig.6.15 System menu Fig.6.16 File manager menu Choosing the “Meas Result” button and a window will pop up.
-
Page 138: Ss Outdoor
Tel: 886.909 602 109 Email: sales@salukitec.com www.salukitec.com Fig.6.17 Measure file manager 6.2 SS Outdoor Select the “SS outdoor” to enter the measurement menu. Fig.6.18 SS outdoor menu 6.2.1 Coverage measure Status: press to start or stop measuring if the machine installs the GPS. Cur Location: press to change the way by which getting the current position. - Page 139 Tel: 886.909 602 109 Email: sales@salukitec.com www.salukitec.com Fig.6.19 Map browser menu Fig.6.20 Satellite map Setting: press to enter the setting menu. You can select time mode or distance mode to measure. And if you choose time mode, the time interval can be set.
-
Page 140: Save File
Tel: 886.909 602 109 Email: sales@salukitec.com www.salukitec.com Fig.6.21 Setting menu Threshold: same as the step of SS indoor. NOTE: If the current location is auto, when you browse the map, the current location become manual. 6.2.2 Save file Press the “Save” key. When the measure finished, the saving menu will pop up. And you should choose the “Meas Result >”. -
Page 141: Tdlte Outdoor
Tel: 886.909 602 109 Email: sales@salukitec.com www.salukitec.com Fig.6.23 File type Open File is same as the step of SS indoor. Press the FREQ AMPTD function keys to set frequency and amplitude separately. 6.3 TDLTE Outdoor Select the “TDLTE outdoor” to enter the measurement menu. Fig.6.24 TDLTE outdoor menu Setting: press to enter the setting menu. -
Page 142: Fdlte Outdoor
Tel: 886.909 602 109 Email: sales@salukitec.com www.salukitec.com Fig.6.25 Setting menu Fig.6.26 Measurement menu The other operations of TDLTE outdoor are same as the step of SS outdoor. 6.4 FDLTE Outdoor Select the “FDLTE outdoor” to enter the measurement menu. -
Page 143: Net Clean Outdoor
Tel: 886.909 602 109 Email: sales@salukitec.com www.salukitec.com Fig.6.27 FDLTE outdoor menu The operations of FDLTE outdoor are same as the step of TDLTE outdoor. 6.5 Net Clean Outdoor Select the “Net Clean outdoor” to enter the measurement menu. Fig.6.28 Net clean outdoor menu Setting: press to enter the setting menu. - Page 144 Tel: 886.909 602 109 Email: sales@salukitec.com www.salukitec.com Fig.6.29 Setting menu The other operations of TDLTE outdoor are same as the step of SS outdoor. Press the FREQ PEAK AMPTD MARK CPL function keys to set frequency, PEAK, amplitude, mark and other basic settings separately.
-
Page 145: Chapter 7 Track Generator
Tel: 886.909 602 109 Email: sales@salukitec.com www.salukitec.com Chapter 7 Track Generator After tracking source option to be installed, transmission measurements can be done. Press the MODE button, and select the Track Generator of measurement mode to enter following menu. Fig.7.1 Track generator menu Track Generator function need to connect RF OUT and RF IN. - Page 146 Tel: 886.909 602 109 Email: sales@salukitec.com www.salukitec.com Fig.7.3 Rack generator closed Power Level: if the Tracker is open, press to input it. Normalize: press to make the wave a line. Disp Line: press to open or close it. If it’s opened, you can change it by inputting. Ndb BW: press to open or close it and it is used to measure current wave’s bandwidth of Ndb.
-
Page 147: Chapter 8 File Managing
Tel: 886.909 602 109 Email: sales@salukitec.com www.salukitec.com Chapter 8 File Managing This chapter provides an overview of File Saving and File Managing. 8.1 File Saving Pressing SAVE key, the submenu of it will appear. We can switch the file type during Image, Status and Trace + Status. Fig.8.1 File saving 8.1.1 Image file saving Pressing “Image”... -
Page 148: Status File Saving
Tel: 886.909 602 109 Email: sales@salukitec.com www.salukitec.com 1.File Name Pressing “File name” soft-key, the follow menu will appear. Input the file name and then press the “Entre” soft-key. The file will be saved. The file name is made up by numbers and characters. Fig.8.3 File name editing 2.Location Pressing “Location”... -
Page 149: Trace+Status File Saving
Tel: 886.909 602 109 Email: sales@salukitec.com www.salukitec.com The method of saving is same as the method of image file. Inputting file name and then pressing “Enter” soft-key, the file will be saved. The status file is post fixed by “.sta ”. If location is the local, the file will be saved in the folder “/status”. -
Page 150: Image File Management
Tel: 886.909 602 109 Email: sales@salukitec.com www.salukitec.com Fig.8.6 File managing 8.2.1 Image file management Pressing “Image” soft-key, the follow menu will appear, and the dialog box will pop up. Fig.8.7 Image file management 1.File Selection Pressing “ Location ” soft-key, we can switch the file paths between local and flash disk. All files in the selected location will be listed in the dialog box. - Page 151 Tel: 886.909 602 109 Email: sales@salukitec.com www.salukitec.com Fig.8.8 No flash disk Set the cursor position on the file by pressing the “Up/Down” key or rotating the knob and then pressing ENTER key, the file will be selected. Pressing the “Select All”, all files which are listed in the dialog box will be selected. The selected files will be marked by “√”.
-
Page 152: Image File Management
Tel: 886.909 602 109 Email: sales@salukitec.com www.salukitec.com Fig.8.10 File loaded Copy: Copy the selected files from local to flash disk or from local disk to local. If no flash disk, the operation of copying file is not allowed. 8.2.1 Image file management Pressing “Image”... -
Page 153: Limit File Management
Tel: 886.909 602 109 Email: sales@salukitec.com www.salukitec.com Fig.8.12 Trace+Status file management menu We will choose the file type from “Data”and”CSV”. Then we can load, delete or copy files as same as the image operations. 8.2.3 Limit file management Pressing “Image” soft-key, the follow menu will appear. The limit file management includes the Swept SA Down limit and Swept SA Up limit. - Page 154 Tel: 886.909 602 109 Email: sales@salukitec.com www.salukitec.com Fig.8.14 Limit file management dialog box...
-
Page 155: Chapter 9 Other Functions And Settings
Tel: 886.909 602 109 Email: sales@salukitec.com www.salukitec.com Chapter 9 Other Functions and Settings This chapter mainly introduces the system parameter and inquiry system parameter and inquiry system information by pressing SYS key. The 9.1 Menu will pop up, and press "Next Page" the 9.2 menu will be shown. Fig.9.1 System menu (page 1) Fig.9.2 System menu (page 2) -
Page 156: System Calibration
Tel: 886.909 602 109 Email: sales@salukitec.com www.salukitec.com Fig.9.3 System menu (page 3) 9.1 System Calibration For the analyzer to meet its specifications and characteristics the self-calibration routines should be performed periodically or whenever the ambient temperature changes. System calibration includes frequency calibration and amplitude calibration. Frequency calibration is to rectify the frequency error caused by IF filter. -
Page 157: Help Menu
Tel: 886.909 602 109 Email: sales@salukitec.com www.salukitec.com “RESET” key. The second and third keys are "USE" and "CANCEL" function for calibration data and frequency response data. User can cancel the calibration according to the demand. After select "cancel" mode, the dialog shown Fig.9.5 will pop up. Fig.9.5 Calibration and response off 9.2 Help Menu Press “Help”... - Page 158 Tel: 886.909 602 109 Email: sales@salukitec.com www.salukitec.com Fig.9.7 Instrument information Figure 9-8 shows hardware information including the Total/free space of disk, battery status, temperature and etc. It will be closed if pressing enter key. Fig.9.8 Hardware information Press the sysspace format or the userspace format, and then the cofirm format dialog will pop up. If we choose “yes”, we will format the system space or the user space.
- Page 159 Tel: 886.909 602 109 Email: sales@salukitec.com www.salukitec.com Fig.9.9 Format space Fig.9.10 shows software information including the ARM and SPEC Software release time and etc. It will be closed if press enter key. Fig.9.10 Software information Fig.9.11 shows the option information. It will be closed if press enter key.
-
Page 160: System Configuration
Pressing "Preset" soft-key, we can set the measurement as the default measurement. The default one is the Swept SA mode. 9.3.3 Network setting Now S5800E series only supports LAN communication. The S5800E can be remote controlled by PC. Please refer to chapter 6. Press the Network Settings key, and the follow menu will pop up. - Page 161 Tel: 886.909 602 109 Email: sales@salukitec.com www.salukitec.com Fig.9.12 Network setting DHCP: Select between DHCP IP mode and Static IP mode. The default is a static IP, which can be selected through the drop-down list; IP address: IP address of the button in the network settings, you can set the machine's IP address; Subnet Mask: use a fixed IP environment;...
-
Page 162: Printer Setting
Tel: 886.909 602 109 Email: sales@salukitec.com www.salukitec.com 9.3.4 Printer setting Press the “Printer” soft-key, and then the following menu will pop up. Fig.9.14 Printer setting We can input the IP number and the port number of the printer. The printer will be netted. 9.3.5 Data &... -
Page 163: Buzzer Config
Tel: 886.909 602 109 Email: sales@salukitec.com www.salukitec.com 9.3.6 Buzzer config The S5800E series has a built-in buzzer for buzzing when error occurred. User can set the buzzer switch operation. Press the "Beep Settings", and the menu will pop up shown as below. Fig.9.16 Buzzer setting The difference of the prompt beep and alarm beep is the size of the volume. -
Page 164: Software Update
Tel: 886.909 602 109 Email: sales@salukitec.com www.salukitec.com If user has not bought the GPS option, the button is gray. 9.4 Software Update When you need to upgrade software, contact our company for the latest firmware. Software can only be upgraded by USB disk mode. -
Page 165: Chapter 10 Programming Guide
Tel: 886.909 602 109 Email: sales@salukitec.com www.salukitec.com Chapter 10 Programming Guide 10.1 SCPI Language Basics This section is not intended to teach you everything about the SCPI (Standard Commands for Programmable Instruments) programming language. The SCPI Consortium or IEEE can provide that level of detailed information. For more information, please refer to: IEEE Standard 488.1-1987, IEEE Standard Digital Interface for Programmable Instrumentation. -
Page 166: Special Characters In Commands
Tel: 886.909 602 109 Email: sales@salukitec.com www.salukitec.com 10.1.3 Special characters in commands Char Meaning Example A vertical stroke between parameters Command: TRIGger:SOURce indicates alternative choices. The effect of EXTernal|INTernal|LINE the command is different depending on The choices external, internal, and which parameter is selected. -
Page 167: Variable Parameters
Tel: 886.909 602 109 Email: sales@salukitec.com www.salukitec.com 10.1.5 Variable parameters Default Unit Parameters Means Acceptable Units (Optional) <integer> An integer value <real> A floating point number <freq> A positive rational number Hz, kHz, MHz, GHz <bandwidth> <time> seconds ks s, ms, us, ns A rational number <seconds>... -
Page 168: System Command
Tel: 886.909 602 109 Email: sales@salukitec.com www.salukitec.com Ex1: Get the serial number Command: *IDN? Return: Instrument name, SN and factory name 10.2.2 System command Command Means UPGRade Software Upgrade DISPlay:ENABle<Boolean> DISPlay:ENABle? /Get displays function state 10.2.3 Spectrum control command 1. Frequency Command Means [SENSe:]FREQuency:CENTer<freq>... - Page 169 Tel: 886.909 602 109 Email: sales@salukitec.com www.salukitec.com 2. Amplitude Command Means DISPlay:WINDow:TRACe:Y[:SCALe]:RLEV Set /Get the reference level el <ampl> DISPlay:WINDow:TRACe:Y[:SCALe]:RLEV UNIT:POWer DBM|DBMV|DBUV|V|MV|UV|NV Set /Get the unit of the ref UNIT:POWer? [:SENSe]:POWer[:RF]:ATTenuation < rel_ampl > Set /Get the attenuation [:SENSe]:POWer[:RF]:ATTenuation? [:SENSe]:POWer[:RF]:ATTenuation:AUTO Set /Get the attenuation auto state <Boolean>...
- Page 170 Tel: 886.909 602 109 Email: sales@salukitec.com www.salukitec.com Return: Means the current att is 10 dB 3. CPL (RBW, VBW, Sweep Time, Average) Command Means [SENSe:]BANDwidth|BWIDth[:RESolutio Set/ Get RBW n]<bandwidth> [SENSe:]BANDwidth|BWIDth[:RESolutio n]? [SENSe:]BANDwidth|BWIDth[:RESolutio Set /Get the RBW auto state n]:AUTO <Boolean> [SENSe:]BANDwidth|BWIDth[:RESolutio n]:AUTO? [SENSe:]BANDwidth|BWIDth:VIDeo...
- Page 171 Tel: 886.909 602 109 Email: sales@salukitec.com www.salukitec.com Ex4: Get the average state Command: AVER? Return: Means the average is off. Ex5: Set RBW,VBW sweep time to auto Command: COUPLe ALL 4. Detector, Trigger, Demodulate Command Means [SENSe:]DETector[:FUNCtion] Set /Get the detector POSitive|NEGative|SAMPl|AVERage|NO RMAL [SENSe:]DETector[:FUNCtion]? Set /Get the trigger source...
- Page 172 Tel: 886.909 602 109 Email: sales@salukitec.com www.salukitec.com Ex3: Set the line trigger is line 16 Command: TRIGger:LINE 17 NOTE: The line trigger must be done before setting trigger, otherwise this statement doesn't work. Similar with the words (such as TRIGer) content, if not set, the setting (LINE) may not work. The same way works as below. 5.
- Page 173 Tel: 886.909 602 109 Email: sales@salukitec.com www.salukitec.com 6. Trace Command Means TRACe[:DATA]? Get the trace data 7. NdB Command Means Set /Get the NdB measurement state CALCulate:BANDwidth: STATe<Boolean> CALCulate:BANDwidth: STATe? Set /Get the reload NdB measurement state CALCulate: BWIDth: STATe<Boolean> CALCulate: BWIDth: STATe? CALCulate:BANDwidth:NDB<rel_ampl>...
Need help?
Do you have a question about the S5800E Series and is the answer not in the manual?
Questions and answers