
Related Manuals for Blastrac BMS-220 ADB UC


Summary of Contents for Blastrac BMS-220 ADB UC
- Page 1 Original instructions OPERATING INSTRUCTIONS BMS-220 ADB UC VERSION 2.0 From serialnumber 28579B and up...
- Page 2 Inspection comments Inspection before initial operation on: __________________________________________ __________________________________________ Date of initial operation: __________________________________________ Serial number & Year of manufacture: __________________________ _____________ Recurring inspections / maintenance log Date / Hour counter Findings Repairs / Cleaning Test *Competent person...
-
Page 3: Table Of Contents
Table of contents Maintenance log 1. Introduction 2. Machine description Machine description 3. Safety Work area safety Electrical safety Personal safety Machine safety general Maintenance safety Hydraulic safety Battery safety Transport safety Signs on the machine 4. Initial operation Checkpoints of electrical safety Checkpoints of machine safety Seat adjustment and proper seatbelt use 5. -
Page 4: Introduction
This machine is not intended for use by persons (including children) with reduced physical, sensory or mental capabilities, or lack of experience and knowledge. Blastrac BV offers a course on the use of the machine in order to make the operating and maintenance personnel familiar with all elements of the machine. -
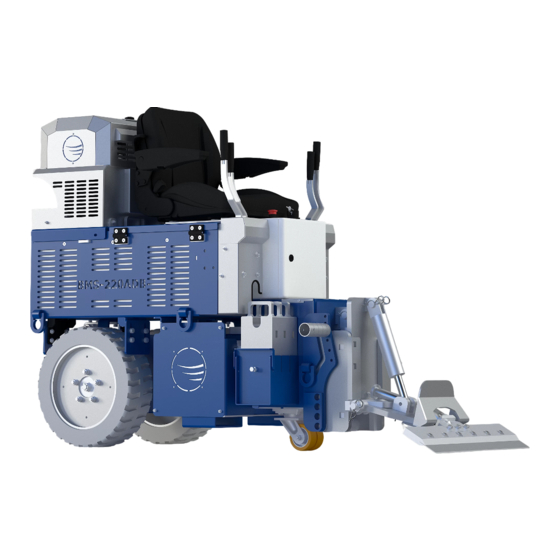
Page 5: Machine Description
Left wheel handle Tool angle handle Tool pitch handle Right wheel steer handle Adjustable seat Charger connection Oil filter Wheel scrapers Blade-holders Chisels Blades E10000 Toolbox E10000 Contains: + ALL blades + ALL chisels + ALL blade-holders + Professional tool set E10108... -
Page 6: Safety
3. Safety Warning! Read all safety warnings and all instructions. Failure to follow the warnings and instructions may result in electric shock, fire, explosions and / or serious injuries. It is the responsibility of the user to analyse the surface to be treated. The surface may not contain any substances which could pose a fire-, explosion- or health risk when treated. -
Page 7: Personal Safety
Always disconnect on board charger before operating machine. g) All repair work has to be done by qualified Blastrac personnel, this guarantees a safe and reliable machine. h) Always use original Blastrac spare parts and cutting blades. This will ensure the best performance. -
Page 8: Battery Safety
In the event of operational malfunctions the machine must be shut down immediately and secured! Battery safety a) Only use Blastrac approved batteries. Blastrac cannot guarantee the safety of the machine when other batteries are used. b) Every service work on batteries should only be done by trained personnel. - Page 9 Always drive backwards when driving up to a ramp or grade, and forwards when driving of the ramp. k) Chock wheels for transport and keep control handles in neutral position. Don’t leave the machine unsecured on jobsites. m) Park the machine always on a flat horizontal and levelled surface. n) Store the cleaned and dry machine in a humid free room.
- Page 10 Be aware of your surroundings and machine operating level. Do not side hill, do not run on steep incline, this could cause machine to tip over. Always drive backwards when driving up to a ramp or grade, and forwards when driving of the ramp. ...
-
Page 12: Signs On The Machine
Signs on the machine The following stickers are placed on the machine. Meanings of these symbols are: Wear a dust mask class FFP3 or ! Danger Hazardous voltage in motor higher. even when solid state controller is OFF. Disconnect main power before servicing motor, controller or associated wiring. -
Page 13: Initial Operation
4. Initial operation Before using the machine it is essential to inspect the machine every day. It is not permitted to use the machine if the machine safety is not according the checkpoints below. Checkpoints of electrical safety: Check if the power supply cable of the charger is unplugged and the cable is stored into the machine. ... -
Page 14: Operation
Seat belt usage is necessary to: • Reduce the possibility of being thrown from the machine. • Reduce the possibility of injuries to the body during an accident or collision. • Hold the driver in a position which allows better control of the machine. ... -
Page 15: Switching On The Machine
Switching the machine on Take place on the seat (4) and put your feet on the footrests. Fasten the seatbelt. Operating the machine when you are not sitting in the operator seat is not possible because of the safety switch inside the seat. -
Page 16: Controlling Tool Position Cylinder
Controlling tool angle cylinder The tool angle cylinder is controlled by left inner handle. Push the handle to angle the tool downwards and pull the handle to angle the tool upwards to the proper cutting angle. Continuing to push the handle will jack up the front of the machine. This will need to be done when doing maintenance on the machine. -
Page 17: Tool Pitch Cylinder
Tool pitch cylinder The BMS-220ADB machines are standard with dual lift system from Serial number 30340B and up. This allows the operator to adjust the blade pitch while remaining seated, this to have the best blade angle during the work. Move the right-hand inner handle forwards or backwards to move the pitch up or down. -
Page 18: Drive Adjustment System
Drive adjustment system It could be possible that after intensive usage the machine has a tendency to turn slightly to the left, or turn slightly to the right when driving. The drive adjustment system allows the user to adjust the rotation speed of the left or right driving wheel so the machine will drive in a straight line again. -
Page 19: Battery Operation
During normal operation our batteries will not release any harmful gasses and will not leak any acidic electrolyte into the environment. Only use Blastrac approved batteries. Blastrac cannot guarantee the safety of the machine when other batteries are used. -
Page 20: Information About Safety And Maintenance From Producer
Information about safety and maintenance from producer: Parameter which is important for batteries is the temperature in which they work. Optimum range is from -10⁰ C to 45⁰ C . Batteries may not be left in minimum temperature for a long time. The low temperature can cause the batteries to freeze which can damage them. -
Page 21: Charger Operation
7. Charger operation The BMS-220 is equipped with an On-board battery charger. It is mounted on the back of the machine to have a easy access. Machines are built with a 60A charger E14536 From serial number 31509B & up. Turn the contact switch to ‘OFF’... -
Page 22: Fault Indicators
Fault indicators When a fault occurs, LED2(100%) + LED3(75%) + LED4(50%) will blink at the same time. When a fault occurs, LED2(100%)/LED3(75%)/LED4(50%)will blink at the same time. Blinking Fault cause Solution Frequency The batteries are not connected, or 1) Check battery connection is correct. The battery voltage is too low 2) Check charger connection is correct. -
Page 23: Charging Profile
3 conductor, 1.5 mm² minimum, and rated appropriate for use in the country of destination and, on the other end, an output grounding type IEC 60320 C14 plug. Never open the charger without permission from a Blastrac technician. Opening the charger without permission will void the warranty. -
Page 24: Proper Battery Charging & Long Term Storage
Proper battery charging & long term storage For a healthy battery life, always keep the charger plugged in when the machine is not in use. Do not worry about over-charging the batteries because the special program in the on-board chargers prevents over-charging. -
Page 25: Vibration / Sound Data
8. Sound and vibration data Sound level: 77 dB(A) relative to 20μPa. Ear protection is recommended with the use of this equipment. Vibration level: Declared hand- arm vibration emission in accordance to EN 12096 The total vibration value to which the hand-arm system is subjected, does not exceed 2,5 m/s². Vibration test code EN-ISO 20643 The total vibration value to which the whole body is subjected, does not exceed 0,5 m/s². -
Page 26: Maintenance
Store the cleaned and dry machine in a dry and humid free room. Protect the electrical motors from moisture, heat, dust and shocks. All repair work must to be done by qualified Blastrac personnel, this to guarantee a safe and reliable machine. Any guarantee on the machine expires when: Non original Blastrac parts have been used ... -
Page 27: Hydraulic System Instruction
Hydraulic system instruction To refill the oil you need HV46 hydraulic oil. (Part number E00481 – Hydraulic oil) Only work with the hydraulic oil in an area that is well-ventilated, otherwise you must wear suitable respiratory protection. Always wear Personal Protective Equipment when handling the oil: ... -
Page 28: Oil Change
Oil change The oil in the system and the filter should be replaced at least annually. For this operation the charger needs to be disconnected from the power source and the machine should be turned off. To remove the oil, the drain plug (3) needs to be removed. -
Page 29: Leak At Thread End/Seat
Leak at thread end/seat Before doing any maintenance disconnect the power and block the machine in a stable position. Because most of the fittings in the machine are O-ring style, it is important is to know how to solve O-ring leaks. Fittings should be tightened with the proper wrench size. -
Page 30: Cutting Head
10.1 Cutting head 1) Blade – depending on the needs 2) Blade holder – lower part 3) Blade holder – upper part 4) Tool holder 5) Debris deflector – new holder shape 6) Universal lower cutting head support Always wear protective gloves before handling the blades. -
Page 31: Blade Setting
10.2 Blade setting • Dull blades greatly reduce the cutting ability. Re-sharpen or replace as needed. • Proper blade size and placement, depending on material and sub-floor type, affects performance. • The harder a job comes up, for best results, use a smaller blade. •... -
Page 32: Blades Application
11. Blades application Efficient and fast work can be achieved when you use the correct blades and settings. The operator must remember to prepare the correct angle and also keep the blade sharp. During work the blade will become dull. To reduce this process the operator can add extra weights to the front or change the angle between the blade and the ground. - Page 33 Re-sharpening blades Dull blades can be sharpened by using an electric grinder with disc 120 grit (or finer). Also a tooth hand file can be used. Caution is required during sharpening, always wear Personal Protective Equipment during these activities. Always mind your surroundings, and work with caution.
-
Page 34: Types Of Blades
The cutting heads are used to mount the blades. They are made in different sizes to adjust them to the material which we want to remove. Changing the blade inside the cutting head is easy and quick: The top and bottom part are screwed together with M10 bolts. The cut-out on the lower plate ensures a accurate and reliable fixation of the blade. - Page 35 Using the correct blades is a only half of the success. The second most important thing is to put the tool in the optimal geometry to the ground. Below you will find information about the most popular materials: Highest hole Lowest hole VCT tiles : Cutting head in the lowest hole.
-
Page 36: Ditching
11.2 Ditching Cross room ditching Ditch 50 Tile 300 To 155mm To 600mm Run the machine in the same direction as the ditches are made When removing hard to remove ceramic, VCT or VAT, cross-room ditching will help to make the removal easier. - Page 37 Instead of large gummy rolls of carpet, there are small squares that can be rolled, palletized, put on a dolly or folded with the sticky side in. This makes removing the debris faster, easier and reduces the amount of debris. For more information or questions contact us at www.Blastrac.eu...
-
Page 38: Technical Data
Despite the fact that this guide is made with care, Blastrac takes no liability for errors in the manual and the possible consequences. We are naturally very interested in your findings and additions. No part of this publication may be reproduced... - Page 39 12.1 Long term storage of a BMS-220: The best way: Keep the charger plugged in all the time during storage. (24/7) This way the charger will keep the batteries full and healthy. (even if the machine is stored for months) This is the preferred way to treat the BMS-220 for long term storage.
- Page 40 BLASTRAC EUROPE WE’RE READY TO ASSIST YOU! BLASTRAC THE NETHERLANDS BLASTRAC POLAND BLASTRAC FRANCE EUROPEAN HEAD OFFICE SALES & SERVICE CENTRE SALES & SERVICE CENTRE Utrechthaven 12 Golina, ul. Dworcowa 47E ZI - 29, Av. des Temps Modernes NL - 3433 PN Nieuwegein...
Need help?
Do you have a question about the BMS-220 ADB UC and is the answer not in the manual?
Questions and answers