Weinmann MEDUMAT Easy CPR Service And Repair Instructions
Hide thumbs
Also See for MEDUMAT Easy CPR:
- Instructions for use manual (148 pages) ,
- Instructions for use manual (116 pages) ,
- Description and instructions for use (76 pages)
Table of Contents
Advertisement
Quick Links
Advertisement
Table of Contents

Related Manuals for Weinmann MEDUMAT Easy CPR


Summary of Contents for Weinmann MEDUMAT Easy CPR
- Page 1 MEDUMAT Easy CPR Ventilator WM 28140 Service and Repair instructions...
-
Page 2: Table Of Contents
© Copyright WEINMANN GmbH & Co. KG. The content and presentation are copyright protected and may only be used by authorised WEINMANN Service Partners in the course of their service operations. The content must not be reproduced or passed on to third parties. The complete documents... -
Page 3: Introduction
Introduction For decades WEINMANN has been developing, have already received from WEINMANN, you now manufacturing and marketing devices for count as “trained expert personnel” and can emergency medical care, oxygen therapy and therefore give your customers appropriate inhalation therapy. instructions, remedy problems on your own and... -
Page 4: Overview
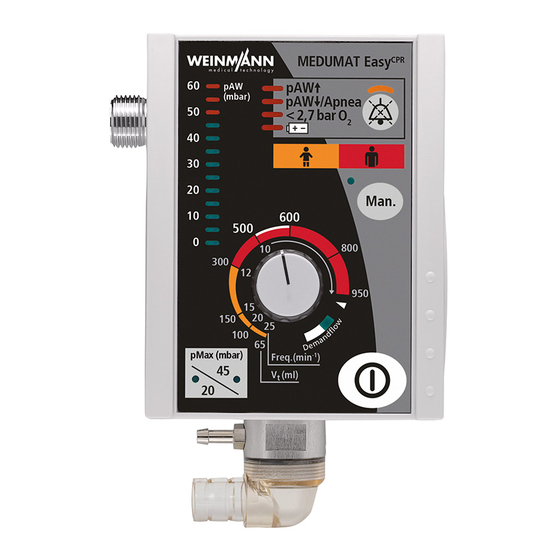
1. Overview Control panel MEDUMAT Easy CPR 2 Ventilation pressure 3 Alarm panel indicator (bar graph) MEDUMAT Easy CPR mbar Stenosis 4 Alarm mute Disconnection < 2,7 bar O 5 Colour code 6 CPR key and indicator LED 7 Adjuster knob, ventilation parameters... -
Page 5: Special Symbols On The Ventilator
0 ,6 0 ,3 Inlet 2,7 - 6 bar O Languages available for the device MEDUMAT Easy CPR device information plate Serial number of device Year of manufacture 3.6 V lithium battery CE symbol (confirms that the product conforms to the applicable European directives) - Page 6 MEDUtrigger MEDUtrigger device information plate BF protection class Do not dispose of the device in domestic waste CE symbol (confirms that the product conforms to the applicable European directives) Protection against ingress of water and dust IP54 Protection class II, protective insulation Date of manufacture Overview...
-
Page 7: Description
2. Description 2.1 Uses MEDUMAT Easy CPR is an automatic oxygen ventilation device (short-term ventilator) with additional inhalation facility. You can use MEDUMAT Easy CPR: • to revive patients at the site of the emergency; • for longer periods in more protracted emer- gencies;... -
Page 8: Ventilation Function
2.2 Ventilation function MEDUMAT Easy CPR operates within a pressure range of 2.7 to 6 bar and at a flow rate of not less than 70 l/min O . It has a built-in power supply. It uses high-pressure, medicinal-grade oxygen. An external pressure reducer brings this down to the required operating pressure. -
Page 9: Patient Valve
The gas for inspiration is channelled into the patient’s airways through the patient valve. The valve is designed to enable spontaneous breathing in the event of failure of the MEDUMAT Easy CPR. 18 19 24 2.5 Audio response The device has an audio response facility which can be switched on for user guidance, especially for users with little practice. - Page 10 The following languages are assigned to the individual LEDs. Device number mbar Language Icelandic Finnish Norwegian Swedish Danish Portuguese WM 28140 WM 28150 (French Spanish variant) Dutch Italian French English German Audio response off Farsi Thai Indonesian Turkish Arabic Japanese WM 28160 Chinese Czech...
-
Page 11: Switching The Metronome On And Off
2.6 Switching the metronome on and off 1. With the device switched off, press and hold the CPR key. 2. Press the On/Off switch briefly. 3. Release the CPR key. 4. Press CPR key. 50 mbar LED (red) comes on: the metronome is activated 45 mbar LED (green) comes on: the metronome is deactivated... -
Page 12: Final Check
• membrane for the spontaneous breathing valve to the device. tube; MEDUMAT Easy CPR must not be used if the final • membrane for the expiration tube. check reveals defects or deviations from the specified values. -
Page 13: Preparation For The Final Check
3.4 Check for leaks and check pressure display 3.4.1 Check for leaks on inlet side CP R 1. Provide a pressurized gas supply to MEDUMAT Easy CPR and to the flow meter. 2. Switch off device. 3. Open oxygen cylinder. -
Page 14: Self-Test After The Device Is Switched On
Requirement: 3.5 Self-test after the device is switched on CP R 1. Provide a pressurized gas supply to MEDUMAT Easy CPR and to the flow meter. 2. Connect the patient circuit to MEDUMAT Easy CPR. 3. Open oxygen cylinder. 4. Switch on device. -
Page 15: Function Check Of Controls (Key Test)
3.6 Function check of controls (key test) CP R 1. Provide a pressurized gas supply to MEDUMAT Easy CPR and to the flow meter. 2. Open oxygen cylinder. 3. Switch on device. 4. Switch from mask ventilation to tube ventilation. - Page 16 3.7.1 Test stenosis alarm 1. Switch to tube ventilation ( and seal off the patient valve outlet. 2. Operate device at setting freq. = 30 min and V = 0.1 l . The stenosis alarm must be triggered after 2 ventilation operations. The red LED of the Requirement: stenosis alarm must come on.
-
Page 17: Battery Voltage
3.8 Battery voltage 3.8.1 3.0 V battery (board) As the 3.0 V lithium cell is hard to reach, its charge status can be called up both via the interface and via a corresponding menu. 1. Switch on device and simultaneously keep the alarm mute key depressed. The device is in battery control mode for 3 seconds and then switches to normal operating mode. -
Page 18: Function Check Of Frequency Setting
Orifice 10 mbar open Flow meter 1. Provide a pressurized gas supply to MEDUMAT Easy CPR and to the flow meter. 2. Open oxygen cylinder. 3. Switch on device. 4. Connect ventilation tube to 10 mbar orifice and to flow meter. -
Page 19: Function Check Of Breath Volume
Orifice set to 10 mbar. Flow meter 1. Provide a pressurized gas supply to MEDUMAT Easy CPR and to the flow meter. 2. Open oxygen cylinder. 3. Switch on device. 4. Operate device at setting freq. = 14 min and V = 1.1 l. -
Page 20: Test O Concentration
3.11 Test O concentration CP R 1. Provide a pressurized gas supply to MEDUMAT Easy CPR and to the flow meter. 2. Open oxygen cylinder. 3. Switch on device. 4. Operate device at setting freq. = 10 min = 1.1 l and 100 % O concentration must be >... -
Page 21: Function Check Of Venting Valve Without Patient Valve
9. Close oxygen cylinder. 10. Disconnect pressurized gas supply from device. 3.13 Function check of venting valve without patient valve 1. Provide pressurized gas supply to MEDUMAT Easy CPR. 2. Open oxygen cylinder. 3. Remove lip membrane from patient valve. -
Page 22: Test Communication Socket
3.15 Test communication socket C PR 0, 9 1. Switch off device. 2. Connect the MEDUtrigger connection to the communication socket on the rear of the device via test adapter WM 20907. 3. Press the CPR key and the alarm mute key simultaneously and keep them depressed. 4. -
Page 23: Documentation
3.17 Documentation 1. Note down items as well as the test date and tester number in the test record. 3.16 2. Restore the operator’s settings: – switch audio response on/off – switch metronome on/off Final check... -
Page 24: Servicing
You can also have servicing and the safety check performed by WEINMANN. Be sure to check the following items: • Check equipment for completeness; • Check system components: portable systems, oxygen fittings, secretion suction system, hose •... -
Page 25: Batteries
MEDUMAT Easy CPR cover as well. 4.3 Storage If you do not intend to use MEDUMAT Easy CPR for a long period, we recommend the following storage precautions: 1. Clean and disinfect the device (see “5. Important Hygienic Preparation” in the operating Remember that devices still require servicing at the instructions). -
Page 26: Troubleshooting
On/Off button defective Change fascia film (6.12, Page 32) Pressure gauge hose on MEDUMAT Easy CPR or on patient MEDUMAT Easy CPR is valve has slipped off functioning, but without any Check pressure gauge hose Kink in pressure gauge hose... - Page 27 Fault Cause Remedy Make correct setting (Chapter 6.5 of Incorrect setting selected on device operating instructions) Check membranes and O-ring, Patient valve not in order replace if necessary (Chapter 6.7 of operating instructions) Patient valve or test bag not correctly Check hose connections and test Pressure limit (P ) not in...
- Page 28 Fault Cause Remedy No Stenosis alarm when patient valve closed during functional check (see Patient valve not working properly Check lip membrane “Checking the breath volume” in the operating instructions) Wait until the expiration phase is The MEDUtrigger does not Respiratory stroke triggered during over to trigger the respiratory stroke trigger a respiratory stroke...
-
Page 29: Repair Information And Instructions
6. Repair information and instructions 6.1 General Always perform repairs to MEDUMAT Easy CPR at an ESD-protected workplace. • Observe the safety information in the Operating • Be sure to carry out a final check after every Instructions for MEDUMAT Easy CPR. -
Page 30: Open The Device
6.3 Open the device Materials and tools required • ESD-protected workplace • Size 1 Phillips screwdriver • Tubular hexagon box wrench, 10 mm • Special tool WM 22829 from special tool set WM 15349 • Flat-nose pliers 1. Use a coin to open battery compartment latch and remove battery De ma nd flo w... - Page 31 8. Take the connector for the MEDUtrigger off terminal X1003 on the board. X1003 9. Detach the connector for cable harness from terminal X1001 on the board. Note: This is most easily achieved using flat-nose pliers. However, under no circumstances damage the board with the flat-nose pliers.
-
Page 32: Close The Device
6.4 Close the device Materials and tools required • ESD-protected workplace • Torque wrench 50 ± 5 Ncm, • Torque wrench 200 ± 10 Ncm, • Tubular hexagon box wrench, 10 mm • Special tool WM 22829 from special tool set WM 15349 •... - Page 33 11. Connect the electrical connection for speaker and put it in the opening in the underside of the housing . The centering lug of the speaker must be inserted in the corresponding groove in the underside of the housing. 12. Pass the retaining pin for the knob through the bore in the board and put the two halves of the housing together.
-
Page 34: Replacing Button Cell
6.5 Replacing button cell Tools and equipment required • ESD-protected workplace, • Phillips screwdriver, size 1, • Tubular hexagon box spanner 10 mm, • Torque spanner 50 ±5 Ncm, • Torque spanner 200 ±10 Ncm, • Special tool WM 22829 from special tool set WM 15349, •... -
Page 35: Changing The Speaker
6.6 Changing the speaker Tools and equipment required • ESD-protected workplace, • Phillips screwdriver, size 1, • Tubular hexagon box spanner 10 mm, • Torque spanner 50 ±5 Ncm, • Torque spanner 200 ±10 Ncm, • Special tool WM 22829 from special tool set WM 15349. 1. -
Page 36: Changing The Board
6.7 Changing the board Tools and equipment required: • ESD-protected workplace, • Phillips screwdriver, size 1, • Tubular hexagon box spanner 10 mm, • Torque spanner 50 ±5 Ncm, • Torque spanner 200 ±10 Ncm, • Special tool WM 22829 from special tool set WM 15349, •... -
Page 37: Replacing The Pneumatic Block
6.8 Replacing the pneumatic block Tools and equipment required: • ESD-protected workplace, • Phillips screwdriver, size 2, • Tubular hexagon box spanner 10 mm, • Torque spanner 50 ±5 Ncm, • Torque spanner 200 ±10 Ncm, • Special tool WM 22829 from special tool set WM 15349, •... - Page 38 9. Press the catch towards the elbow connector and pull the pneumatic block off the tube When you remove the pneumatic block from Catch the lower part of the housing, the O-ring will fall out of the connection. Make sure that the O-ring does not fall out of the relief out- let valve.
-
Page 39: Replacing The 3/2-Way Magnetic Valve
6.9 Replacing the 3/2-way magnetic valve Tools and equipment required: • ESD-protected workplace, • Phillips screwdriver, size 2, • Phillips screwdriver, size 0, • Tubular hexagon box spanner 10 mm, • Torque spanner 50 ±5 Ncm, • Torque spanner 200 ±10 Ncm, •... -
Page 40: Calibrating The Potentiometer (After Changing Pneumatic Block Including Potentiometer)
6.10 Calibrating the potentiometer (after changing pneumatic block including potentiometer) When the pneumatic block including potentiometer is changed, the potentiometer must be recalibrated for the board. 1. Make sure the device is switched off. 2. Press the On/Off switch and immediately hold down the alarm mute button and the MEDUMAT... -
Page 41: Changing Upper Part Of Housing
6.11 Changing upper part of housing Tools and equipment required: • ESD-protected workplace, • Phillips screwdriver, size 2, • Tubular hexagon box spanner 10 mm, • Torque spanner 50 ±5 Ncm, • Torque spanner 200 ±10 Ncm, • Special tool WM 22829 from special tool set WM 15349, •... -
Page 42: Changing The Fascia Film
6.12 Changing the fascia film Tools and equipment required: • ESD-protected workplace, • Phillips screwdriver, size 2, • Tubular hexagon box spanner 8 mm, • Tubular hexagon box spanner 10 mm, • Torque spanner 50 ±5 Ncm, • Torque spanner 200 ±10 Ncm, •... -
Page 43: Replace Lower Part Of Housing
7. Refit the grommet in the upper part of the housing 8. Refit the board (see “6.7 Changing the board” on page 36, steps 9. Close the device (see “6.4 Close the device” on page 32). 10. Perform a final check (see "3. Final check" on Page 8). - Page 44 7. Use a sharp object to push the blanking plug of the interface connection out of lower part of the housing from the inside. 8. Take O-ring out of lower part of the housing 9. Turn the special counter tool onto pressurized gas connection 10.
- Page 45 29. Refit the pneumatic block (see “6.8 Replacing the pneumatic block” on page 37, steps 30. Close the device (see "6.4 Close the device" on page 32). 31. Perform a final check (see "3. Final check" on page 12). Repair information and instructions...
-
Page 46: Spare Parts
7.1 Spare parts list Note: The item numbers in the following table are identical to the numbers in the text of these Service and Repair Instructions and in the Operating Instructions. The instructions for use can be found at www.weinmann.de. Pos.-Nr. Bezeichnung Bestell-Nr. - Page 47 Lower part of housing, MEDUMAT Easy CPR, DE, GB, FR, IT, NL, ES, PT, DK, SE, NO, FI, IS, Service* WM 28202 comprising: – Lower part of housing – Rating plate – Label for O input – Label for excess pressure valve –...
-
Page 48: Service Sets
Set, MEDUMAT tubes, WM 15058 consisting of: – tube, silicone, 65 mm long – tube, silicone, 25 mm long – tube, silicone, 35 mm long – Y connector – oxygen inlet tube, 42 mm long Pressure screw 1158 Screen set, WM 15284 consisting of: –... - Page 49 2x O–ring 11 x 1.5 for elbow outlet Service 12 years Set, WM 15465 comprising: • Set WM 15463 • Printed circuit board (PCB) MEDUMAT Easy CPR WM 28170 • O-ring 26 x 2 for battery compartment lid Spare parts...
-
Page 50: Tools And Test Equipment
• Torque spanner 50 ±5 Ncm; • Torque spanner 200 ±10 Ncm. 8.2 Special tools The following tools can be obtained from WEINMANN: • Special tool set, comprising: WM 15349 – Special counter tool G 3/8, WM 22827... -
Page 51: Testing Equipment
8.3 Testing equipment • Oxygen concentration meter, type Oxycontrol WM 13550 • Volume flow meter Typ Flow Analyser PF-300 Type EKU VIP ventilator tester obtainable from: imtmedical ag obtainable from: Gewerbestraße 8 EKU Elektronik GmbH CH-9470 Buchs Feldstraße 9a Tel.: + 41 81 750 66 99 D-56291 Leiningen Fax: + 41 81 750 66 Tel.: 0049 6746-1018... -
Page 52: Technical Data
9. Technical data MEDUMAT Easy CPR MEDUMAT Easy CPR Patient valve 15 mm socket Product category – Inspiration tube 22 mm plug according to II b ISO 5356-1 93/42/EEC Patient valve 30 mm socket Dimensions 100 x 145 x 90 –... -
Page 53: Pneumatic / Electronic Systems
9.1 Pneumatic / electronic systems The input pressure at p is max. 6bar. This is dynamically reduced by V1 to 2.5 bar. This is the input pressure at V2, V3 and V4. Inspiration An electrical impulse to V2 opens V3 and closes V4. Oxygen flows through the ventilation hose to the patient valve. -
Page 54: Technical Changes
10. Technical Changes Technical Changes From Device No. Date Technical Changes... -
Page 55: Repairs And Maintenance Protocols
11. Repairs and maintenance protocols Repairs and maintenance protocols... - Page 56 Test record as per Servicing and Repair Instructions WM 67308 (Medumat Easy CPR) Page 1 of 4 Device type: MEDUMAT Easy CPR WM 28140 Type of device: Emergency ventilator Serial no.: Manufacturer: Weinmann GmbH + Co. KG Date of...
- Page 57 Test record as per Servicing and Repair Instructions WM 67308 (Medumat Easy CPR) Page 2 of 4 Preparation 3.1. Testing equipment ( as per Servicing and Repair Instructions WM 67308) 3.2. Preparation for the final check ( as per Servicing and Repair Instructions WM 67308) 3.3.
- Page 58 Test record as per Servicing and Repair Instructions WM 67308 (Medumat Easy CPR) Page 3 of 4 3.9. Function check of frequency setting • Frequency 14 ± 2 min • Frequency 10 ± 2 min • Frequency 30 ± 2 min Function check of breath volume at 4.5 bar input pressure and 10 mbar back...
- Page 59 Test record as per Servicing and Repair Instructions WM 67308 (Medumat Easy CPR) Page 4 of 4 Check equipment and accessories (system components) Present • Patient circuit with patient valve undamaged and in working order • Test set for function check complete •...
- Page 60 Weinmann Geräte für Medizin GmbH+Co.KG P.O.Box 540268 • D-22502 Hamburg Kronsaalsweg 40 • D-22525 Hamburg T: +49-(0)40-5 47 02-0 F: +49-(0)40-5 47 02-461 E: info@weinmann.de www.weinmann.de Center for Production, Logistics, Service Weinmann Geräte für Medizin GmbH+Co.KG Siebenstücken 14 D-24558 Henstedt-Ulzburg...
Need help?
Do you have a question about the MEDUMAT Easy CPR and is the answer not in the manual?
Questions and answers