Sign In
Upload
Download
Table of Contents
Contents
Add to my manuals
Delete from my manuals
Share
URL of this page:
HTML Link:
Bookmark this page
Add
Manual will be automatically added to "My Manuals"
Print this page
×
Bookmark added
×
Added to my manuals
Manuals
Brands
Weinmann Manuals
Fan
MEDUMAT Standard
Description and instructions for use
Weinmann MEDUMAT Standard Description And Instructions For Use
Hide thumbs
1
Table Of Contents
2
3
4
5
6
7
8
9
10
11
12
13
14
15
16
17
18
19
20
21
22
23
24
25
26
27
28
29
30
31
32
33
34
35
36
37
38
39
40
41
42
43
44
45
46
47
48
49
50
51
52
53
54
55
56
57
58
59
60
61
62
63
64
65
66
67
68
page
of
68
Go
/
68
Contents
Table of Contents
Troubleshooting
Bookmarks
Table of Contents
Table of Contents
Overview
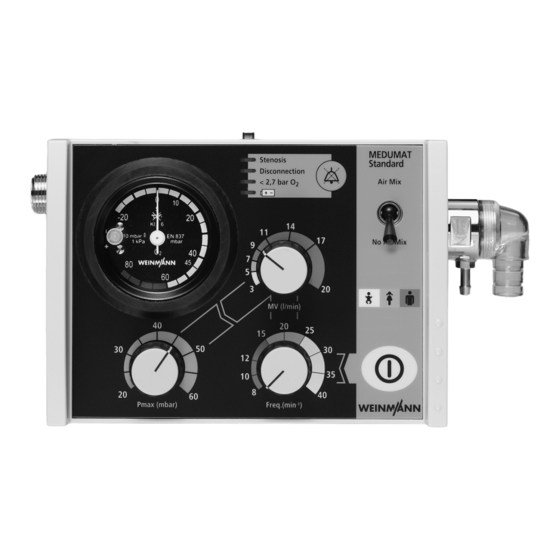
Device
Symbols Used on the Ventilator
Description of Ventilator
Intended Use
Owner/Operator and User Qualification
Ventilation Function
Patient Hose System with Patient Valve
Modules
Safety Instructions
Safety Regulations
Installation
Wall Mounting for STATION MEDUMAT
Installation Kit for the Wall Mounting
Connecting up the Oxygen Cylinder18
Ventilation Hose
Using the Ventilator
Switching On/Self Test
Selecting the Ventilation Settings
Performing Ventilation
Monitoring Ventilation
Ventilation with PEEP Valve
Ventilation with HME Filter
Ventilating with Bacteria Filter
Terminating Ventilation
Alarm Signals
Calculation of Oxygen Content/Remaining Operating Time
Alternative Ventilation Procedures
Hygienic Preparation
MEDUMAT Standard
Patient Valve
Hose System
Components and Accessories
Fittings
Cleaning, Disinfecting and Sterilizing
Functional Checks
Obligatory Checks
Check for Leaks in the System
Checking Patient Hose System
Checking the Minute Volume
Check of Maximal Ventilation Pressure
Check of Alarm Systems
Troubleshooting
Batteries
Cut-Out System
Adjustment of Manometer
Servicing
Intervals
Storage
Disposal
Supply Schedule
Standard Supply Schedule
Accessories
Spare Parts
Technical Data
Pneumatics
Content When Using Air MIX
Switching from Air MIX to
No Air MIX
Warranty
Declaration of Conformity
Advertisement
Quick Links
Download this manual
MEDUMAT Standard
Ventilator
Description and instructions for use
Table of
Contents
Previous
Page
Next
Page
1
2
3
4
5
Advertisement
Table of Contents
Need help?
Do you have a question about the MEDUMAT Standard and is the answer not in the manual?
Ask a question
Questions and answers
Related Manuals for Weinmann MEDUMAT Standard
Fan Weinmann MEDUMAT Transport Quick Start Manual
Information on correct use of the battery (28 pages)
Fan Weinmann MEDUMAT Easy CPR Instructions For Use Manual
(116 pages)
Fan Weinmann MEDUMAT Easy CPR Service And Repair Instructions
(60 pages)
Fan Weinmann MEDUMAT Standard a Description And Instructions For Use
(76 pages)
Fan Weinmann MEDUMAT Easy Description And Instructions For Use
(68 pages)
Fan Weinmann MEDUMAT Standard2 Instructions For Use Manual
(272 pages)
Fan Weinmann Emergency MEDUMAT Easy Description And Instructions For Use
(70 pages)
Fan Weinmann BiLevel ST 22 Operating Instructions Manual
(56 pages)
This manual is also suitable for:
Medumat easy
Wm 3285
Table of Contents
Print
Rename the bookmark
Delete bookmark?
Delete from my manuals?
Login
Sign In
OR
Sign in with Facebook
Sign in with Google
Upload manual
Upload from disk
Upload from URL


Need help?
Do you have a question about the MEDUMAT Standard and is the answer not in the manual?
Questions and answers