
Related Manuals for ApexDesk Vortex M Edition


Summary of Contents for ApexDesk Vortex M Edition
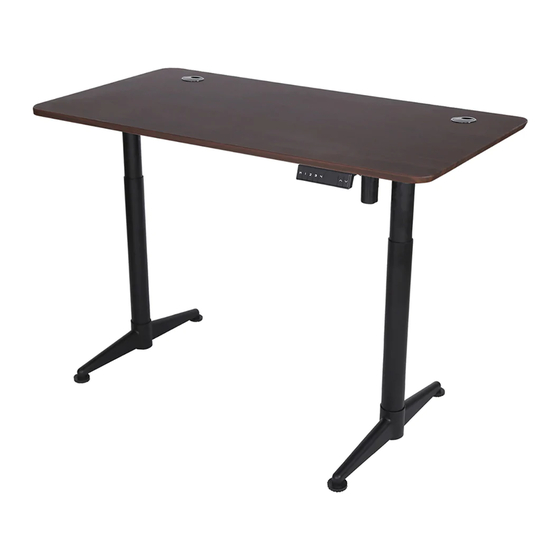
- Page 1 ELECTRIC HEIGHT‐ADJUSTED SIT TO STAND DESK Vortex M Edition Desk Assembly Guide 10/20/2019 ...
-
Page 2: Table Of Contents
Table of Contents CAUTION, USE & LIABILITY .......................... 3 HARDWARE LIST .............................. 4 PARTS / COMPONENT DIAGRAMS ...................... 5 ASSEMBLY INSTRUCTIONS ........................ 6 HOW TO USE MEMORY CONTROLLER .................... 11 TROUBLESHOOTING ........................... 12 SPECIFICATIONS ............................ 15 WARRANTY INFORMATION ........................ 16 Vortex M Edition Desk Assembly Guide 2 | P a g e ... -
Page 3: Caution, Use & Liability
CAUTION, USE & LIABILITY CAUTION Make sure no obstacles are in the desk’s path. Make sure the desk top is not touching any walls. Make sure all cords are of appropriate lengths to accommodate the change in desk height. Read and understand this manual before attempting to install or operate . This product is not intended for use by young children or for those who require supervision Do not sit or stand on the desk. Do not crawl or lie under the desk. Do not place any objects taller than 20” underneath the desk. Do not open any of the components – lifting columns, control box, or controller. There is a risk of electric shock. USE & LIABILITY This sit‐to‐stand adjustable desk has electric motors and is designed for use in an indoor environment and dry work areas only. The desk height is adjustable so that it can be positioned at the most suitable height. Any other use is at user’s risk. Under no circumstances does the manufacturer accept warranty claims or liability claims for damages caused from improper use or handling of the desk. Vortex M Edition Desk Assembly Guide 3 | P a g e ... -
Page 4: Hardware List
HARDWARE LIST TOOLS REQUIRED Allen wrench 4mm x 1 Phillips screwdriver (Not provided) HARDWARE INCLUDED USAGE Qty M6x20 Secure feet 9 M6x14 Secure top, control box & support brackets 20 ST3.5x19 Secure controller 4 Desktop Washer Install on support brackets & cross beam 8 Cable Clip Cable management 4 Extra screws are provided. Please save them for later use. ... -
Page 5: Parts / Component Diagrams
PARTS / COMPONENT DIAGRAMS No. PARTS / COMPONENT LIST Qty 1 Cross beam 1 2 Lifting column (Pre‐assembled to cross beam) 2 3 Foot 2 4 Top support bracket 2 5 Control box 1 6 Controller 1 7 Power Cord 1 8 Leveling Stud 4 Vortex M Edition Desk Assembly Guide 5 | P a g e ... -
Page 6: Assembly Instructions
ASSEMBLY INSTRUCTIONS BEFORE YOU BEGIN 1. Lay out all components and hardware to ensure that you have everything listed on Page 4 & 5. Don’t contact retailers for missing parts. Email to support@apexdesk.com. 2. Assemble on soft and non‐abrasive surface to avoid scratch or damage STEP 1 Install leveling studs. Use 4mm Allen wrench and secure each foot to lifting column with four M6x20 screws. STEP 2 Use 4mm Allen wrench and secure each top support bracket to beam with two M6x14 screws. Vortex M Edition Desk Assembly Guide 6 | P a g e ... - Page 7 Vortex M Edition Desk Assembly Guide 7 | P a g e ...
- Page 8 STEP 3 Install six anti‐vibration washers on support brackets and two on crossbeam. Some users forgo this step. Install six anti-vibration washers on support brackets and two on crossbeam. Some users don’t install them. This is optional. Use 4mm Allen wrench to secure control box with two M6x14 screws. ...
- Page 9 STEP 4 This step is a two‐person job. Carefully move the assembled frame onto the desktop. Align the holes on the support brackets to pre‐installed anchors on the top. Secure each side with three M6x16mm screws. Adjust leveling studs on the feet if needed. Make sure the stubs make solid contact with the floor and the desk does not wobble due to uneven contact with the floor. Vortex M Edition Desk Assembly Guide 9 | P a g e ...
- Page 10 STEP 5 Use screwdriver to secure controller with four ST3.5x19 screws and use 4mm wrench to secure control box with two M6x14 screws. Pilot holes for controller are only pre-drilled for the right side. Vortex M Edition Desk Assembly Guide 10 | P a g e ...
-
Page 11: How To Use Memory Controller
HOW TO USE MEMORY CONTROLLER RESET may be needed from time to time in events like prolonged non‐operation, sudden power outage, overload, overheat and etc. Most issues get resolved with a reset. Please note that resetting desk involves more than a conventional power‐off and a power‐on like that of most electronic devices. Press on hold both UP and DOWN buttons for 5 seconds, RST will appear on the controller display and desk will start going down to the lowest position if it is not at that position. Keep holding both buttons until the desk reaches the lowest point. The reset is complete when you hear a beep. PRESETS: Factory default setting for Preset 1, 2 , 3 and 4 is 28.3”, 33.6”, 35.5” and 47.2” respectively and can be changed by following instruction below. 1. Press UP or DOWN button to go to a desired height 2. Press M button for 3 seconds and displayed height will start flashing 3. Press and hold Preset button 1, 2, 3 or 4. If 1 button is pressed, P1 will flash briefly. Preset is complete when flashing displayed height becomes solid. To go to your preset height, simply press preset button once. Vortex M Edition Desk Assembly Guide 11 | P a g e ... -
Page 12: Troubleshooting
TROUBLESHOOTING Issues(s) Solution Error code: E01 Reset desk Error code: E04/E08 Overload. Reduce the load under 175 lbs and reset desk Error code: HOT Overheat. Stop using the desk for 15 minutes. Reset desk if needed. Both control box LED and controller do Check all connections. Make sure the wall outlet has power, not illuminate power cord is firmly plugged into the control box and controller is connected to the control box. Control box LED illuminates but not Replace controller controller Controller illuminates but not responsive Contact dealer with no error code Desk wobbles excessively It is normal that desk wobbles slightly at standing height. Make sure all the screws are sufficiently tightened and adjust leveling studs to make sure the feet make firm contact with floor. Desk is noisy It is normal that the desk is noisier when one stage extends into the other. Apply silicon based lubricant if it is unusually noisy. Vortex M Edition Desk Assembly Guide 12 | P a g e ... - Page 13 INSTALLING CABLE MANAGEMENT TRAY (NOT INCLUDED & SOLD SEPARATELY) Step 1: Locate two screw holes on the backside of the beam and mount metal connector as illustrated below with two wing screws and washers, attach the tray to the metal connector with wing screws and slip adapters. Vortex M Edition Desk Assembly Guide 13 | P a g e ...
- Page 14 Step 2: If adjustment is needed, loosen the screws below, slide the tray to the left or right and tighten the screws. Step 3: Mount cable clamps Vortex M Edition Desk Assembly Guide 14 | P a g e ...
-
Page 15: Specifications
SPECIFICATIONS Height range without desktop 28.55'' ‐ 47.25'' <50dB Noise Level (dB)without Load Max Load Capacity 175 Lbs Speed at Full Load 1” /per second Input (VAC) 100‐240V Lowest position 28.55'' Highest position 47.25'' Frame Width 1050MM / 41.5'' Foot Length 650MM / 25.6'' Overload Protection Yes Controller Type Memory with 4 pre‐sets Anti‐collision Yes Net/ Gross Weight 47/ 55 Lbs Package Dimension 43x30x 8” Vortex M Edition Desk Assembly Guide 15 | P a g e ... -
Page 16: Warranty Information
WARRANTY INFORMATION SCOPE OF WARRANTY Apex Furniture LLC (“ApexDesk”) warrants to the original purchaser its new desk (except for components not warranted under “Exclusions”) manufactured by ApexDesk to be free from defects in material and workmanship under normal use and service. ApexDesk’s obligation under this warranty is limited to the repair or replacement, at ApexDesk’s sole option, of the parts or products the defect of which are reported to ApexDesk within the applicable warranty period and which, upon examination by ApexDesk, prove to be defective. APPLICABLE WARRANTY PERIOD The applicable warranty period, measured from the date of delivery to the original user, shall be two (2) years on electric parts, five (5) years on non‐electric parts. EXCLUSIONS This limited warranty does not cover and ApexDesk shall not be liable for the following: (1)repairs and replacements because of misuse, abuse, negligence, alteration, accident, freight damage, or tampering; (2) products which are not installed, used, stored and properly cleaned as required in the ApexDesk “Assembly Guide” for this product; (3) products considered to be of a consumable nature; (4) Shipping to or from repair center; (5) accessories or parts not manufactured by ApexDesk; (6) charges by anyone for adjustments, repairs, replacement parts, installation, or other work performed upon or in connection with such products which is not expressly authorized in writing in advance by ApexDesk. EXCLUSIVE REMEDY ApexDesk’s only obligation under this warranty is the repair or replacement of defective parts. ApexDesk shall not be liable for any direct, special, indirect, incidental, exemplary, or consequential damages or delay, including, but not limited to, damages for loss of profits or loss of use. CONTACT INFORMATION Apex Furniture LLC (“ApexDesk”) 18467 Railroad Street, City of Industry, CA 91748 Email: support@apexdesk.com (877) 516‐DESK www.apexdesk.com For technical assistance, please call us or visit us at www.apexdesk.com/support. Vortex M Edition Desk Assembly Guide 16 | P a g e ...
Need help?
Do you have a question about the Vortex M Edition and is the answer not in the manual?
Questions and answers