Advertisement
Quick Links
Advertisement

Related Manuals for ApexDesk Vortex M Edition


Summary of Contents for ApexDesk Vortex M Edition
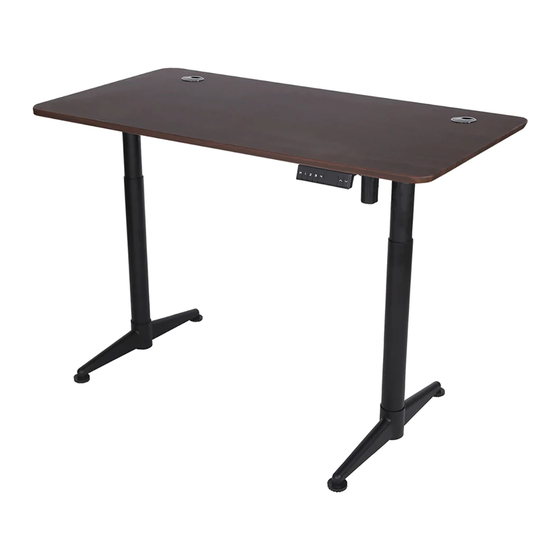
- Page 1 ELECTRIC HEIGHT-ADJUSTED SIT TO STAND DESK Vortex M Edition Desk Assembly Guide...
-
Page 2: Table Of Contents
Table of C ontents CAUTION, USE & LIABILITY ........................ 3 HARDWARE LIST ..........................PARTS / COMPONENT DIAGRAMS ....................5 ASSEMBLY INSTRUCTIONS ....................... 6 HOW TO USE MEMORY CONTROLLER ........ -
Page 3: Caution, Use & Liability
Any other use is at user’s risk. Under no circumstances does the manufacturer accept warranty claims or liability claims for damages caused from improper use or handling of the desk. Vortex M Edition Desk Assembly Guide P a g e... -
Page 4: Hardware List
HAR DWAR E LIS T TOOLS R E QUIR E D Allen wrench 4mm x 1 Phillips screwdriver (Not provided) Allen wrench 5mm x 1 HAR DWAR E INC LUDE D Rubber Grommet US AGE M6x20 Secure feet M6x14 Secure top, control box & support brackets ST3.5x19 Secure controller Rubber Grommet... -
Page 5: Parts / Component Diagrams
PARTS / COMPONENT DIAGRAMS PAR TS / C OMPONE NT LIS T C ross beam Lifting column (Pre-assembled to cross beam) Foot Top support bracket Control box Controller Power cord Leveling stud P a g e Vortex M Editiom n Desk Assembly Guide... -
Page 6: Assembly Instructions
1. Lay out all components and hardware to ensure that you have everything listed on Page 4 & 5 . Don’ t contact retailers for missing parts. Email to support@apexdesk.com 2. Assemble on soft and non-abrasive surface to avoid scratch or damage S TE P 1 Use 5mm Allen wrench and secure each foot to lifting column with four M6x20 screws. - Page 7 S TE P 2 Use 4mm Allen wrench and secure each top support bracket to beam with four M6x14 screws Please note the edges of the bracket needs to face outwards not fold over the crossbar. Vortex M Edi on Desk Assembly Guide P a g e...
- Page 8 S TE P 3 Vortex M Edi on Desk Assembly Guide P a g e...
- Page 9 S TE P 4 person job. Carefully move the assembled frame on t o t h This step is a two Align the holes on the support brackets to pre - installed anchors on the top. Secure each side with contact with the floor a Vortex M Edi on Desk Assembly Guide P a g e...
- Page 10 S TE P 5 Use screwdriver to secure controller with four ST3.5x19 screws. Connect the power cord and motor cable to the control box and controller to the control box. *** Pilot holes for controller are only pre-drilled for the right side. Vortex M Edi on Desk Assembly Guide 10 | P a g e...
- Page 11 HOW T TO USE M MEMORY Y CONTR ROLLER RESET ma ay be neede ed from time e to time in events like p prolonged n non-operatio on, sudden power outage, ove erload, over rheat and et tc. Most issu ues get reso olved with a a reset.
-
Page 12: Troubleshooting
Desk is noisy It is normal that the desk is noisier when one stage extends into the other. Apply silicon based lubricant if it is unusually noisy. Vortex M Edition Desk Assembly Guide 12 | P a g e... - Page 13 Step 1: Locate two screw holes on the backside of the beam and mount metal connector as illustrated below with two wing screws and washers, attach the tray to the metal connector with wing screws and slip adapters. Vortex M Edition Desk Assembly Guide 13 | P a g e...
- Page 14 Step 2: If adjustment is needed, loosen the screws below, slide the tray to the left or right and tighten the screws. Step 3: Mount cable clamps Vortex M Edition Desk Assembly Guide 14 | P a g e...
-
Page 15: Specifications
Frame Width 1050MM / 41.5'' Foot Length 650MM / 25.6'' Overload Protection Controller Type Memory with 4 pre-sets Anti-collision Net/ Gross Weight 47/ 55 Lbs Package Dimension 43x30x 8” Vortex M Edition Desk Assembly Guide 15 | P a g e... -
Page 16: Warranty Information
ApexDesk’s obligation under this warranty is limited to the repair or replacement, at ApexDesk’s sole option, of the parts or products the defect of which are reported to ApexDesk within the applicable warranty period and which, upon examination by ApexDesk, prove to be defective.
Need help?
Do you have a question about the Vortex M Edition and is the answer not in the manual?
Questions and answers