Advertisement
Quick Links
Manufactured by:
Backyard Discovery
3305 Airport Drive, Pittsburg, KS 66762
800-856-4445
Basepoint Business Centre: Rivermead Drive,Westlea, Swindon SN5 7EX Phone: 0800-118-2476
J.P. Coenstraat 7, The Bridge, The Hague, 2595 WP, Netherlands Phone: 0800-567-8990
LITTLE COUNTRY WORKSHOP
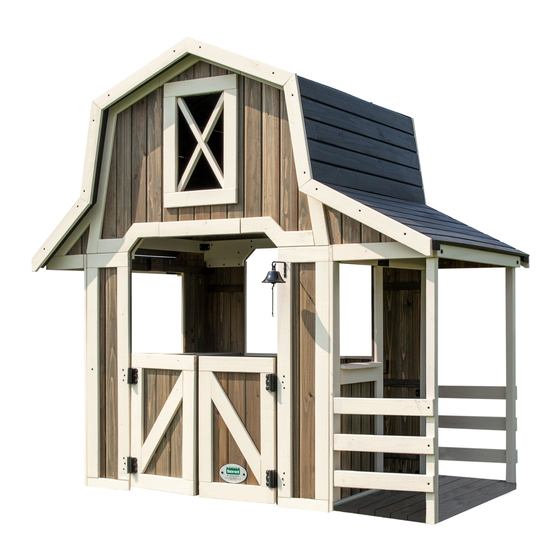
PLAYHOUSE
MODEL: # 1804319
WARNING
Adult Assembly Required.
Not suitable for children under two years due to sharp points and small parts.
FOR DOMESTIC USE ONLY. INTENDED FOR OUTDOOR USE.
For the most up to date assembly manual, to register your product, or to order replacement parts
Please visit www.backyarddiscovery.com
Para obtener instrucciones en español, visite www.backyarddiscovery.com
EASY STEP-BY-STEP
3D INTERACTIVE INSTRUCTIONS
DOWNLOAD THE FREE APP
INSTALLATION
SERVICES
AVAILABLE!
See inside for details
INS-1804319-A-LITTLE COUNTRY WORKSHOP-ENG 11-10-21
*
Made in China
Advertisement

Related Manuals for Backyard Discovery LITTLE COUNTRY WORKSHOP


Summary of Contents for Backyard Discovery LITTLE COUNTRY WORKSHOP
- Page 1 For the most up to date assembly manual, to register your product, or to order replacement parts Para obtener instrucciones en español, visite www.backyarddiscovery.com EASY STEP-BY-STEP INSTALLATION 3D INTERACTIVE INSTRUCTIONS SERVICES DOWNLOAD THE FREE APP AVAILABLE! See inside for details Made in China INS-1804319-A-LITTLE COUNTRY WORKSHOP-ENG 11-10-21...
- Page 2 INSTALLATION SERVICES AVAILABLE! Need a helping hand? Let our team of professionals handle the installation for you! *Installation services are only available to U.S. customers. With Go Con! gure, we bring you 18 years of experience right to your doorstep. We service a wide array of indoor and outdoor recreation products that most consumers don’t have the time or ability to deliver &...
- Page 3 Owner’s Manual Please Read This Before Starting Assembly MISSING A PART? CALL US BEFORE GOING BACK TO THE STORE The store where you made your purchase does not stock parts for this item. If you have assembly questions or you are missing or have damaged parts, please call 1-800-856-4445 you can also visit www.backyarddiscovery.com...
-
Page 4: Limited Warranty
All wood carries a five (5) year warranty against rot and decay from the original purchase date. Backyard Discovery Metal Play Structure Backyard Discovery warrants this metal play product to be free from defects in materials and workmanship for a period of five (5) years from the original date of purchase. General Warranty Information This warranty applies to the original owner and registrant and is non-transferable. - Page 5 Owner’s Manual Operating Instructions and Safety Warnings WARNING: BURN HAZARD • Pay special attention to plastic and metal surfaces as they may be hot enough to cause burns. • Always check the temperature of the product before NOTE: letting your children play on it. •...
- Page 6 Owner’s Manual Please Read This Before Starting Assembly Positioning Your Playhouse Suggested Playground Surfacing • The playhouse is designed to be installed on a • Do not install home playground equipment over concrete, asphalt, packed earth, grass, carpet, level surface by an Adult with an Adult helper. or any other hard surface.
- Page 7 Owner’s Manual Please Read This Before Starting Assembly APPENDIX A X3.1.3.2 Do not install loose- ll surfacing over hard The following information is from the United States surfaces such as concrete or asphalt. Consumer Product Safety Commission’s Information X3.1.4 Poured-In-Place Surfaces or Pre-Manufactured Sheet for playground surfacing material;...
- Page 8 • Check all moving parts including swing seats, Backyard Discovery assumes no responsibility or ropes, cables, and chains for wear, rust, or other liability for any charge incurred by the Customer for deterioration.
-
Page 9: Instructions For Proper Maintenance
About Our Wood Backyard Discovery uses 100% Cedar (C. Lanceolata) wood. Although we take great care in selecting the best quality lumber available, wood is still a product of nature and susceptible to weathering which can change the appearance of your set. - Page 10 Owner’s Manual Assembly Tips Protrusion Hazard Incorrect Correct If you see exposed threads and your bolt protrudes beyond the T-Nut you may have over tightened the bolt or used incorrect hardware. If you’ve overtightened, remove the bolt and add washers to eliminate the protrusion.
-
Page 11: Assembly Tip
Owner’s Manual Assembly Tips ASSEMBLY TIP: Keep and eye out for these boxes which will contain helpful pictures and information making the assembly process as quick and painless as possible. Sorting Wood When removing the wood from the boxes we recommend arranging them by part number before you begin assembly. - Page 12 Electronics Safety Warnings Owner's Manual Note: This equipment has been tested and found to comply with the limits for a Class B digital device, pursuant to part 15 of the FCC Rules. These limits are designed to provide reasonable protection against harmful interference in a residential installation. This equipment generates, uses and can radiate radio frequency energy and, if not installed and used in accordance with the instructions, may cause harmful interference to radio communications.
- Page 13 Owner's Manual Tools Required for Installation...
- Page 14 Basic Setup Dimensions & Assembly Notes Owner's Manual Selecting the correct location for your play product is important for your children’s safety and the product’s longevity The safe play area refers to a zone extending 6'-7" (2m) beyond the play product on all sides, including the space •...
- Page 15 Wood Components (Not to Scale) | ROOF TRIM-W4L15750 (x2) | 5/8"x2 3/8"x16 15/16" (16x60x429) | ROOF TRIM-W4L15751 | 5/8"x2 3/8"x16 15/16" (16x60x429) (x4) | ROOF TRIM-W4L15752 (x4) | 5/8"x2 3/8"x21 3/16" (16x60x538) | ROOF TRIM-W4L15753 | 5/8"x2 3/8"x23 7/16" (16x60x595) (x2) | SIDE FASCIA TRIM-W4L15756 | 5/8"x2 3/8"x36 1/16"...
- Page 16 Wood Components (Not to Scale) | PORCH WINDOW LEDGE-W4L15762 | 5/8"x2 3/8"x12 1/2" (16x60x317) (x1) | WINDOW LEDGE GUSSET-W4L15763 | 15/16"x2 3/8"x2 3/8" (24x60x60) (x4) | PORCH POST-W4L15764 | 1 7/16"x1 7/16"x40 3/16" (36x36x1020) (x2) | PORCH DOOR COLUMN-W4L15765 | 1 1/16"x3 3/8"x37 13/16" (27x86x960) (x1) | PORCH DOOR HEADER-W4L15766 (x1)
- Page 17 Wood Components (Not to Scale) | INSIDE BRACE BOARD-W4L15772 | 5/8"x5 1/4"x23 1/2" (16x134x597) (x4) | HEAD BOARD-W4L15773 (x2) | 5/8"x2 3/8"x33 7/8" (16x60x860) | FLOOR PANEL BOARD-W4L15774 (x1) | 15/16"x1 5/16"x16" (24x34x406) | FLOOR PANEL BOARD-W4L15775 | 15/16"x1 5/16"x15 1/16" (24x34x382) (x1) | FLOOR PANEL BOARD-W4L15776 (x1)
- Page 18 Wood Components (Not to Scale) | ROOF PANEL ASSEMBLY-W2A03291 | ROOF PANEL ASSEMBLY-W2A03290 (x2) | 1 3/8"x16 1/2"x40 15/16" (35x419x1040) (x1) | 1 3/8"x16 1/4"x40 15/16" (35x412x1040) | ROOF PANEL ASSEMBLY-W2A03293 | ROOF PANEL ASSEMBLY-W2A03292 | 1 3/8"ax9 15/16"x40 15/16" (35x252x1040) (x1) (x2) | 1 3/8"x21"x40 15/16"...
- Page 19 Wood Components (Not to Scale) | REAR BTM RIGHT PANEL ASSY -W2A03302 WP02 WP03 | REAR BTM RIGHT PANEL ASSY-W2A03303 | 1 1/4"x8 15/16"x40 3/16" (32x227x1020) (x1) (x1) | 1 1/4"x7/16"x40 3/16" (32x227x1020) WP04 | REAR BTM MID PANEL ASSY-W2A03304 WP05 | REAR BTM LEFT PANEL ASSY-W2A03313 | 1 1/4"x21 7/8"x29 1/16"...
- Page 20 Wood Components (Not to Scale) WP09 | FRONT TOP LEFT PANEL ASSY -W2A03296 WP08 | RIGHT SIDE PANEL FRONT SIDE-W2A03309 | 1 1/4"x10 1/4"x5 7/8" (32x261x290) (x1) (x1) | 1 1/4"x439x40 3/16" (32x439x1020) WP10 | MID TOP PANEL ASSY-W2A03297 WP11 | WINDOW PANEL ASSY-W2A03298 | 1 1/4"x15 9/16"x29 9/16"...
- Page 21 Wood Components (Not to Scale) WP14 | REAR TOP RIGHT PANEL ASSY -W2A03305 WP15 | REAR TOP LEFT PANEL ASSY-W2A03306 (x1) | 1 1/4"x11 7/16"x18 1/8" (32x290x420) (x1) | 1 1/4"x10 1/4"x11 7/16" (32x261x290) DP02 | DOOR PANEL ASSY-W2A03311 DP01 | DOOR PANEL ASSY-W2A03310 (x1) | 1 1/4"x13 5/8"x22 1/16"...
- Page 22 Hardware Components (Not to Scale) H100385 | SCREW PFH BLK H100408 | SCREW PWH BLK H100488 | BOLT WH BLK (x2) | 8x1 (x2) | 8x1/2 (x9) | 1/4x2 H100387 | SCREW PFH BLK H100202 | SCREW PWH BLK (x40) | 8x1 1/4 (x30) | 8x5/8...
- Page 23 Accessory Components (Not to Scale) A100314 | "A" REVISION TAG A4M00555 | 90° L-BRACKET - BLK A4M00528 (x1) (x33) | BYD ID TAG (MEDIUM) AGES 2 TO 10 (x1) A4M01089 A4M00997 | SPRING HINGE (x1) | METAL CLEAT (x4) A4M01420 | METAL TIE STRAP A4M00527 | GROUND STAKE REBAR...
- Page 24 Accessory Components (Not to Scale) A6P00495-5 A4M01045 | DRILL A6P00495-1 | HAMMER | BELL ASSEMBLY (x1) (x1) (x1) | SCREWDRIVER A6P00495-7 | DRILL BIT A6P00495-6 | FLAT HEAD BIT A6P00495-3 (x1) (x1) (x1) A6P00495-4 A6P00495-2 | SAW | ADJUSTABLE WRENCH (x1) (x1)
- Page 25 STEP 1 PLAYHOUSE ASSEMBLY WP05 | REAR BTM LEFT PANEL ASSY-W2A03313 WP03 | REAR BTM RIGHT PANEL ASSY-W2A03303 (x1) | 1 1/4"x8 15/16"x40 3/16" (32x227x1020) | 1 1/4"x7/16"x40 3/16" (32x227x1020) (x1) | CLEAT-W4L15757 H100200 | SCREW PFH BLK | 5/8"x2 3/8"x3 1/4" (16x60x82) (x4) | 8x1 1/2 (x 16)
- Page 26 STEP 2 PLAYHOUSE ASSEMBLY | CLEAT-W4L15757 (x3) | 5/8"x2 3/8"x3 1/4" (16x60x82) | LEFT SIDE PANEL ASSY BACK SIDE-W2A03307 WP06 | 1 1/4"x18 1/16"x40 3/16" (32x460x1020) (x1) H100200 | SCREW PFH BLK (x 12 ) | 8x1 1/2 | LEFT SIDE PANEL FRONT SIDE-W2A03308 WP07 | 1 1/4"x18"x40 3/16"...
- Page 27 STEP 3 PLAYHOUSE ASSEMBLY H100382 | SCREW PFH BLK H100387 | SCREW PFH BLK (x 1 ) | 8x1 3/ 4 (x 1 ) | 8x1 1/4 | TABLE MOUNT BOARD-W4L15769 (x1) | 15/16"x2 3/8"x6 3/4" (24x60x172) H100392 | SCREW PWH BLK A4M00555 (x 3 ) | L-BRACKET-BLK (x 5) | 8x3/4...
- Page 28 STEP 4 PLAYHOUSE ASSEMBLY | PORCH DOOR COLUMN-W4L15765 A4M00555 | 1 1/16"x2 3/8"x37 13/16" (27x86x960) (x1) H100392 | SCREW PWH BLK (x 6 ) | 8x3/4...
- Page 29 STEP 5 PLAYHOUSE ASSEMBLY | FLOOR PANEL BOARD-W4L15775 | FLOOR PANEL BOARD-W4L15774 (x1) | 15/16"x1 5/16"x15 1/16" (24x34x382) (x1) | 15/16"x1 5/16"x16" (24x34x406) | FLOOR PANEL BOARD-W4L15776 | 15/16"x1 5/16"x16" (24x34x406) (x1) H100392 | SCREW PWH BLK H100398 | T-NUT BLK (x 8 ) | 8x3/4 (x 2 ) | 1/4 | FLOOR PANEL BOARD-W4L15777...
- Page 30 STEP 6 PLAYHOUSE ASSEMBLY H100488 | BOLT WH BLK H100405 | WASHER LOCK EXT BLK (x 2 ) | 1/4x2 (x 2 ) | 6x15 WP08 | RIGHT SIDE PANEL FRONT SIDE-W2A03309 (x1) | 1 1/4"x439x40 3/16" (32x439x1020)
- Page 31 STEP 7 PLAYHOUSE ASSEMBLY H100392 | SCREW PWH BLK H100382 | SCREW PFH BLK (x 1 ) | 8x1 3/4 (x 1 ) | 8x3/4 | PORCH DOOR HEADER-W4L15766 | 1 1/16"x2 3/8"x18 3/4" (27x60x476) (x1) H100202 | SCREW PWH BLK H100406 | BOLT WH BLK (x 4 ) | 8x5/8...
- Page 32 STEP 8 PLAYHOUSE ASSEMBLY H100387 | SCREW PFH BLK (x 27 ) | 8x1 1/4 PFP1 | PORCH FLOOR PANEL ASSY-W2A03295 (x1) | 5/8"x16 15/16"x36 1/16" (16x430x916)
- Page 33 STEP 9 PLAYHOUSE ASSEMBLY H101026 | BOLT WH BLK (x1) | 1/4x1 3/4 A4M00555 (x 4) | L-BRACKET-BLK WP01 | FRONT BTM LEFT PANEL ASSY-W2A03301 (x1) | 1 1/4"x8 15/16"x40 3/16" (32x227x1020) H100653 | NUT LOCK-1/4" H100392 | SCREW PWH BLK (x1) (x 5) | 8x3/4...
- Page 34 STEP 10 PLAYHOUSE ASSEMBLY H101026 | BOLT WH BLK | FRONT BTM RIGHT PANEL ASSY -W2A03302 WP02 | 1/4x1 3/4 A4M00555 (x1) (x 4 ) | L-BRACKET-BLK | 1 1/4"x8 15/16"x40 3/16" (32x227x1020) (x1) H100653 H100392 | SCREW PWH BLK | NUT LOCK-1/4"...
- Page 35 STEP 11 PLAYHOUSE ASSEMBLY H100797 | SCREW PWH BLK (x 8 ) | 8x1 A4M01420 | METAL TIE STRAP (x1)
- Page 36 STEP 12 PLAYHOUSE ASSEMBLY H100382 | SCREW PFH BLK | TABLE MOUNT BOARD-W4L15769 H100387 | SCREW PFH BLK (x 1 ) | 8x1 3/4 | 15/16"x2 3/8"x6 3/4" (24x60x172) (x1) (x 1 ) | 8x1 1/4...
- Page 37 STEP 13 PLAYHOUSE ASSEMBLY H100391 | SCREW PFH BLK (x 4 ) | 8x2 | SIDE WINDOW LEDGE-W4L15761 (x1) | 5/8"x3 3/8"x19 1/16" (16x86x484) | WINDOW LEDGE GUSSET-W4L15763 H100200 | SCREW PFH BLK (x2) | 15/16"x2 3/8"x2 3/8" (24x60x60) (x 4 ) | 8x1 1/2...
- Page 38 STEP 14 PLAYHOUSE ASSEMBLY | TABLE TOP BOARD-W4L15767 (x1) | 5/8"x3 3/8"x33 15/16" (16x86x862) H100200 | SCREW PFH BLK (x 8 ) | 8x1 1/2 | TABLE TOP BOARD-W4L15768 | 5/8"x4 7/16"x33 15/16" (16x112x862) (x1)
- Page 39 STEP 15 PLAYHOUSE ASSEMBLY H100391 | SCREW PFH BLK (x 4 ) | 8x2 | BACK WINDOW LEDGE-W4L15760 | 5/8"x3 3/8"x29 1/16" (16x86x738) (x1) | WINDOW LEDGE GUSSET-W4L15763 | 15/16"x2 3/8"x2 3/8" (24x60x60) H100200 | SCREW PFH BLK (x2) (x 5 ) | 8x1 1/2...
- Page 40 STEP 16 PLAYHOUSE ASSEMBLY H100200 | SCREW PFH BLK | PORCH WINDOW LEDGE-W4L15762 (x 2 ) | 8x1 1/2 (x1) | 5/8"x2 3/8"x12 1/2" (16x60x317)
- Page 41 STEP 17 PLAYHOUSE ASSEMBLY | PORCH POST-W4L15764 | 1 7/16"x1 7/16"x40 3/16" (36x36x1020) H100398 | T-NUT BLK (x2) (x 8 ) | 1/4...
- Page 42 STEP 18 PLAYHOUSE ASSEMBLY H100999 | BOLT WH BLK H100488 | BOLT WH BLK (x2) | 1/4x2 1/2 (x 4 ) | 1/4x2 | SIDE FASCIA TRIM-W4L15771 (x1) | 5/8"x2 3/8"x36 1/16" (16x60x916) H100405 | WASHER LOCK EXT BLK (x 6 ) | 6x15...
- Page 43 STEP 19 PLAYHOUSE ASSEMBLY A4M00555 H100202 | SCREW PWH BLK (x 6) | L-BRACKET-BLK (x 12 ) | 8x 5/8 | PORCH RAILING-W4L15770 (x6) | 5/8"x2 3/8"x15 7/8" (16x60x404) H100382 | SCREW PFH BLK (x 6 ) | 8x1 3/4...
- Page 44 STEP 20 PLAYHOUSE ASSEMBLY WP11 | WINDOW PANEL ASSY-W2A03298 WP12 | MID TOP PANEL ASSY -W2A03299 | 1 1/4"x16 1/4"x30 9/16" (32x412x776) (x1) | 1 1/4"x15 9/16"x29 9/16" (32x396x751) (x1) WP10 | MID TOP PANEL ASSY-W2A03297 | 1 1/4"x15 9/16"x29 9/16" (32x396x751) (x1) | INSIDE BRACE BOARD-W4L15772 (x2)
- Page 45 STEP 21 PLAYHOUSE ASSEMBLY H100385 | SCREW PFH BLK H100200 | SCREW PFH BLK (x 1 ) | 8x1 | CLEAT-W4L15757 (x 15 ) | 8x1 1/2 (x4) | 5/8"x2 3/8"x3 1/4" (16x60x82)
- Page 46 STEP 22 PLAYHOUSE ASSEMBLY WP11 | WINDOW PANEL ASSY-W2A03298 WP12 | MID TOP PANEL ASSY -W2A03299 (x1) | 1 1/4"x16 1/4"x30 9/16" (32x412x776) WP10 | MID TOP PANEL ASSY-W2A03297 (x1) | 1 1/4"x15 9/16"x29 9/16" (32x396x751) | 1 1/4"x15 9/16"x29 9/16" (32x396x751) (x1) | INSIDE BRACE BOARD-W4L15772 | 5/8"x4 3/4"x23 1/2"...
- Page 47 STEP 23 PLAYHOUSE ASSEMBLY H100385 | SCREW PFH BLK H100200 | SCREW PFH BLK (x 1 ) | 8x1 | CLEAT-W4L15757 (x 15 ) | 8x1 1/2 (x4) | 5/8"x2 3/8"x3 1/4" (16x60x82)
- Page 48 STEP 24 PLAYHOUSE ASSEMBLY | WASHER LOCK EXT BLK H100392 | SCREW PWH BLK H100405 H100488 | BOLT WH BLK | 6x15 A4M00555 (x 1 ) (x 2 ) | 8x 3/4 (x 1) | L-BRACKET-BLK (x 1 ) | 1/4x2 H100200 | SCREW PFH BLK H100653 H101026...
- Page 49 STEP 25 PLAYHOUSE ASSEMBLY H100200 | SCREW PFH BLK H100405 | WASHER LOCK EXT BLK H100392 | SCREW PWH BLK H100488 | BOLT WH BLK (x 1 ) | 6x15 (x 6 ) | 8x1 1/2 (x 2) | 8x 3/4 (x 1 ) | 1/4x2...
- Page 50 STEP 26 PLAYHOUSE ASSEMBLY H100202 | SCREW PWH BLK A4M00555 | HEAD BOARD-W4L15773 (x 4) | L-BRACKET-BLK (x 8 ) | 8x 5/8 (x2) | 5/8"x2 3/8"x33 7/8" (16x60x860)
- Page 51 STEP 27 PLAYHOUSE ASSEMBLY | X-BRACE-W4L15758 | 15/16"x15/16"x19 7/16" (24x24x494) (x2) H100387 | SCREW PFH BLK (x 8 ) | 8x1 1/4 | X-BRACE-W4L15759 | 15/16"x15/16"x19 11/16" (24x24x500) (x2)
- Page 52 STEP 28 PLAYHOUSE ASSEMBLY H100202 | SCREW PWH BLK A4M00555 (x 2) | L-BRACKET-BLK (x4) | 8x 5/8 | SIDE FASCIA TRIM-W4L15756 (x1) | 5/8"x2 3/8"x36 1/16" (16x60x916)
- Page 53 STEP 29 PLAYHOUSE ASSEMBLY H100391 | SCREW PFH BLK (x 4 ) | 8x2 | ROOF PANEL ASSEMBLY-W2A03290 | 1 3/8"x16 1/4"x40 15/16" (35x412x1040) (x1)
- Page 54 STEP 30 PLAYHOUSE ASSEMBLY H100391 | SCREW PFH BLK (x 4 ) | 8x2 | ROOF PANEL ASSEMBLY-W2A03291 (x1) | 1 3/8"x16 1/2"x40 15/16" (35x419x1040)
- Page 55 STEP 31 PLAYHOUSE ASSEMBLY H100391 | SCREW PFH BLK (x 4 ) | 8x2 | ROOF PANEL ASSEMBLY-W2A03292 (x1) | 1 3/8"x21"x40 15/16" (35x534x1040)
- Page 56 STEP 32 PLAYHOUSE ASSEMBLY H100391 | SCREW PFH BLK (x 4 ) | 8x2 | ROOF PANEL ASSEMBLY-W2A03292 (x1) | 1 3/8"x21"x40 15/16" (35x534x1040)
- Page 57 STEP 33 PLAYHOUSE ASSEMBLY H100391 | SCREW PFH BLK (x 4 ) | 8x2 | ROOF PANEL ASSEMBLY-W2A03291 (x1) | 1 3/8"x16 1/2"x40 15/16" (35x419x1040)
- Page 58 STEP 34 PLAYHOUSE ASSEMBLY H100391 | SCREW PFH BLK (x 2 ) | 8x2 | ROOF PANEL ASSEMBLY-W2A03293 | 1 3/8"ax9 15/16"x40 15/16" (35x252x1040) (x1)
- Page 59 STEP 35 PLAYHOUSE ASSEMBLY H100391 | SCREW PFH BLK (x 4 ) | 8x2 | ROOF PANEL ASSEMBLY-W2A03294 (x1) | 1 3/8"x12 7/8"x40 15/16" (35x327x1040)
- Page 60 STEP 36 PLAYHOUSE ASSEMBLY DP01 | DOOR PANEL ASSY-W2A03310 DP02 | DOOR PANEL ASSY-W2A03311 A4M01089 (x1) | 1 1/4"x13 5/8"x22 1/16" (32x346x560) (x1) | 1 1/4"x13 5/8"x22 1/16" (32x346x560) | SPRING HINGE (x4) H100804 | T-NUT H100806 | SCREW POH-MS BLK (x 12 ) | 8/32 (x 12 ) | 8/32x1 1/8...
- Page 61 STEP 37 PLAYHOUSE ASSEMBLY H101078 | SCREW POH BLK H101074 | LOCKNUT H101075 | WASHER FLAT BLK (x1 2 ) | 8/32x1 1/2 (x1 2) | 8/32 (x1 2 ) | 4x9...
- Page 62 STEP 38 PLAYHOUSE ASSEMBLY | ROOF TRIM-W4L15752 | ROOF TRIM-W4L15750 (x2) | 5/8"x2 3/8"x21 3/16" (16x60x538) | 5/8"x2 3/8"x16 15/16" (16x60x429) (x1) H100200 | SCREW PFH BLK (x13) | 8x1 1/2 | ROOF TRIM-W4L15753 | ROOF TRIM-W4L15751 (x1) | 5/8"x2 3/8"x23 7/16" (16x60x595) (x2) | 5/8"x2 3/8"x16 15/16"...
- Page 63 STEP 39 PLAYHOUSE ASSEMBLY | ROOF TRIM-W4L15752 | ROOF TRIM-W4L15750 (x2) | 5/8"x2 3/8"x21 3/16" (16x60x538) | 5/8"x2 3/8"x16 15/16" (16x60x429) (x1) H100200 | SCREW PFH BLK (x13) | 8x1 1/2 | ROOF TRIM-W4L15753 | ROOF TRIM-W4L15751 (x1) | 5/8"x2 3/8"x23 7/16" (16x60x595) (x2) | 5/8"x2 3/8"x16 15/16"...
- Page 64 STEP 40 PLAYHOUSE ASSEMBLY H100797 | SCREW PWH BLK (x 2 ) | 8x1 A4M01045 | BELL ASSEMBLY (x1)
- Page 65 STEP 41 PLAYHOUSE ASSEMBLY H100392 | SCREW PWH BLK (x 2 ) | 8x3/4 A100314 | "A" REVISION TAG (x1)
- Page 66 STEP 42 PLAYHOUSE ASSEMBLY H100408 | SCREW PWH BLK (x 2 ) | 8x 1/2 A4M00528 | BYD ID TAG (MEDIUM) AGES 2 TO 10 (x1)
- Page 67 STEP 43 PLAYHOUSE ASSEMBLY H100379 | T- NUT H100459 | BOLT WH BLK (x 2 ) | 5/16 (x 2 ) | 5/16x1 1/4 A4M00527 | GROUND STAKE REBAR (x2)
- Page 68 STEP 44 PLAYHOUSE ASSEMBLY H100379 | T- NUT (x 2 ) | 5/16 H100459 | BOLT WH BLK (x 2 ) | 5/16x1 1/4 A4M00527 | GROUND STAKE REBAR (x2)
- Page 69 STEP 1 DRILL ASSEMBLY 495-5 DRILL (x1) 495-5 (x1) DRILL "AA" BATTERY (x2) (Not Included) (INCLUDED WITH KIT) (x1) FIRST INSTALL THE COVER REMOVED ABOVE WITH THE INCLUDED HARDWARE. NOTE: -DO NOT MIX OLD AND NEW BATTERIES. -DO NOT MIX ALKALINE, STANDARD (CARBON-ZINC), OR RECHARGEABLE (NI-CAD, NI-MH, ETC.) BATTERIES. -NON-RECHARGEABLE BATTERIES ARE NOT TO BE RECHARGED.
Need help?
Do you have a question about the LITTLE COUNTRY WORKSHOP and is the answer not in the manual?
Questions and answers