Sony Handycam Vision DCR-TRV890E Operating Instructions Manual
Digital video camera recorder
Hide thumbs
Also See for Handycam Vision DCR-TRV890E:
- Operation manual (284 pages) ,
- Service manual (215 pages) ,
- Service manual (27 pages)
Table of Contents
Advertisement
Quick Links
Digital Video
Camera Recorder
Operating Instructions
Before operating the unit, please read this manual thoroughly,
and retain it for future reference.
Инструкция по эксплуатации
Перед эксплуатацией аппарата внимательно прочтите,
пожалуйста, данное руководство и сохраняйте его для
дальнейших справок.
DCR-TRV890E/TRV900E
©1998 by Sony Corporation
DCR-TRV900E
3-864-632-34 (2)
Advertisement
Table of Contents

Related Manuals for Sony Handycam Vision DCR-TRV890E


Summary of Contents for Sony Handycam Vision DCR-TRV890E
-
Page 1: Operating Instructions
Before operating the unit, please read this manual thoroughly, and retain it for future reference. Инструкция по эксплуатации Перед эксплуатацией аппарата внимательно прочтите, пожалуйста, данное руководство и сохраняйте его для дальнейших справок. DCR-TRV900E DCR-TRV890E/TRV900E ©1998 by Sony Corporation 3-864-632-34 (2) - Page 2 English Welcome! Congratulations on your purchase of this Sony Handycam Vision camcorder. With your Handycam Vision you can capture life’s precious moments with superior picture and sound quality. Your Handycam Vision is loaded with advanced features, but at the same time it is very easy to use.
-
Page 3: Table Of Contents
English Table of contents Before you begin Using this manual ... 5 Checking supplied accessories ... 7 Getting started Installing and charging the battery pack ... 8 Inserting a cassette ... 13 Basic operations Camera recording ... 14 Attaching the lens hood ... 17 Using the zoom feature ... - Page 4 Русский Оглавление Перед началом эксплуатации Использование данного руководства ... 5 Проверка прилагаемых принадлежностей ... 7 Подготовка к эксплуатации Уcтaнoвка и зарядка батарейного блока ... 8 Вставка кассеты ... 13 Основные операции Запись с помощью видеокамеры ... 14 Прикрепление светозащитной бленды объектива...
-
Page 5: Before You Begin Using This Manual
Before you begin Using this manual The instructions in this manual are for the two models listed below. Before you start reading this manual and operating the unit, check your model number by looking at the bottom of your camcorder. The DCR-TRV900E is the model used for illustration purposes. -
Page 6: Precautions On Camcorder Care
Using this manual Precaution on copyright Television programmes, films, video tapes, and other materials may be copyrighted. Unauthorized recording of such materials may be contrary to the provision of the copyright laws. Precautions on camcorder care • The LCD screen and/or the colour viewfinder are manufactured using high-precision technology. -
Page 7: Checking Supplied Accessories
Checking supplied accessories Check that the following accessories are supplied with your camcorder. RMT-811 1 Wireless Remote Commander (1) (p. 190) RMT-811: DCR-TRV900E RMT-812: DCR-TRV890E 2 AC-L10A AC power adaptor (1), Mains lead (1) (p. 9, 32) The shape of the plug varies from region to region. -
Page 8: Getting Started
AC power adaptor. This comcorder operates only with the “InfoLITHIUM” battery back. “InfoLITHIUM” is a trademark of Sony Corporation. Installing the battery pack (1) Lift up the viewfinder. (2) Insert the battery pack in the direction of the $ mark on the battery pack. -
Page 9: Charging The Battery Pack
Installing and charging the battery pack Charging the battery pack Charge the battery pack on a flat surface without vibration. The battery pack is charged a little in the factory. (1) Open the DC IN jack cover and connect the supplied AC power adaptor to the DC IN jack with the plug’s 4 mark up. - Page 10 Installing and charging the battery pack Notes • “– – – min” appears on the display window until the camcorder calculates remaining battery time. • Remaining battery time indication on the display window roughly indicates the recording time with the viewfinder. Use it as a guide.
- Page 11 Installing and charging the battery pack While using with LCD Battery Continuous Typical pack recording recording time ** time *** NP-F330 60 (50) 30 (25) (supplied) NP-F530 95 (85) 50 (45) NP-F550 120 (105) 65 (55) NP-F730 210 (190) 115 (105) NP-F750 250 (220) 140 (120)
- Page 12 Installing and charging the battery pack To remove the battery pack Lift up the viewfinder. While pressing BATT RELEASE, slide the battery pack in the direction of the arrow. Установка и зарядка батарейного блока Для снятия батарейного блока Поднимите видоискатель вверх. Нажимая BATT RELEASE, передвиньте...
-
Page 13: Inserting A Cassette
Inserting a cassette You can use mini DV cassette with only. Make sure that the power source is installed. (1) While pressing the small blue button on the EJECT switch, slide it in the direction of the arrow. The cassette compartment automatically opens. -
Page 14: Basic Operations Camera Recording
Basic operations Camera recording Make sure that the power source is installed and a cassette is inserted and that the START/STOP MODE selector inside the LCD panel is set to Before you record one-time events, you had better make a trial recording to make sure that the camcorder is working correctly. - Page 15 Camera recording To stop recording momentarily [a] Press START/STOP. The “STBY” indicator appears on the LCD screen or in the viewfinder (Standby mode). To finish recording [b] Set the POWER switch to OFF. Then, eject the cassette and remove the battery pack. To focus the viewfinder lens If you cannot see the indicators in the viewfinder clearly, or after someone else has used the...
- Page 16 • When you record in LP mode, we recommend you to use a Sony Excellence/Master mini DV cassette so that you can get the most out of your camcorder. • You cannot make audio dubbing on a tape recorded in LP mode.
-
Page 17: Attaching The Lens Hood
Camera recording Note on remaining tape indicator The indicator may not be displayed accurately depending on the tape. Though the indicator does not appear at the time of recording, it will appear in a few seconds. Attaching the lens hood To record fine pictures, we recommend you to attach the lens hood, no matter where you shoot. - Page 18 Camera recording Zooming speed (Variable speed zooming) Press the power zoom lever a little for a relatively slow zoom; press it still more for a high-speed zoom. When you shoot a subject using a telephoto zoom If you cannot get a sharp focus while in extreme telephoto zoom, press the “W”...
-
Page 19: Selecting The Start/Stop Mode
Camera recording Selecting the start/stop mode Your camcorder has two modes besides normal start/stop mode. These modes enable you to take a series of quick shots resulting in a lively video. (1) While pressing OPEN, open the LCD panel. (2) Set START/STOP MODE to the desired mode. : Recording starts when you press START/STOP, and stops when you press it again (factory setting). -
Page 20: Shooting With The Lcd Screen
Camera recording Notes on 5SEC recording • If you have turned off the indicators on the LCD screen, the dots do not appear. • When selecting “ ANTI GROUND SHOOTING” or “5SEC,” the fader function does not work. • When selecting “5SEC,” the time code is not displayed. -
Page 21: Letting The Subject Monitor The Shot
Camera recording Notes on the LCD panel •When closing the LCD panel, turn it vertically until it clicks [a]. •When turning the LCD panel, turn it always vertically; otherwise, the camcorder body may be damaged or the LCD panel may not close properly [b]. - Page 22 Camera recording To cancel mirror mode Turn the LCD panel down toward the camcorder body. Notes on mirror mode •When you turn the LCD panel about 135 degrees to 180 degrees, the camcorder enters mirror mode. •Using the mirror mode, you can record yourself while watching yourself on the LCD screen.
-
Page 23: Self-Timer Recording
Camera recording Self-timer recording You can make a recording with the self-timer. This mode is useful when you want to record yourself. (1) Press (self-timer) to display on the LCD screen or in the viewfinder while the camcorder is in Standby mode. (2) Press START/STOP. -
Page 24: Hints For Better Shooting
Hints for better shooting For hand-held shots, you will get better results by holding the camcorder according to the following suggestions: • Hold the camcorder firmly and secure it with the grip strap so that you can easily manipulate the controls with your thumb. [a] •... - Page 25 If you have a tripod for a still camera, you can also use it with the camcorder. When attaching a non-Sony tripod, make sure that the length of the tripod screw is less than 6.5 mm (9/32 inch). Otherwise, you cannot attach the tripod securely and the screw may damage the camcorder.
-
Page 26: Checking The Recorded Picture
Checking the recorded picture Using the EDITSEARCH, you can review the last recorded scene or check the recorded picture on the LCD screen or in the viewfinder. (1)While pressing the small green button on the POWER switch, set it to CAMERA. (2)Press the –... -
Page 27: Playing Back A Tape
Playing back a tape You can monitor the playback picture on the LCD screen or in the viewfinder. (1) Insert the recorded tape with the window facing out. (2) While pressing OPEN, open the LCD panel. (3) While pressing the small green button on the POWER switch, set it to VTR (DCR-TRV900E) or PLAYER (DCR-TRV890E). -
Page 28: Various Playback Modes
Playing back a tape To display the LCD screen/viewfinder screen indicators Press DISPLAY. To erase the indicators, press again. Notes on screen indicators • The screen indicator disappears when the title is displayed. • When you play back a tape using a “InfoLITHIUM”... - Page 29 Playing back a tape To locate a scene (picture search) Keep pressing 0 or ) during playback. To resume normal playback, release the button. To monitor the high-speed picture while advancing the tape or rewinding (skip scan) Keep pressing 0 while rewinding or ) while advancing the tape.
- Page 30 Playing back a tape Notes on playback •The sound is muted in the various playback modes. •During playback other than normal playback, the previous recording may appear in mosaic image. This is not malfunction. •When playback pause mode lasts for 5 minutes, the camcorder automatically enters stop mode.
-
Page 31: Searching For The End Of The Picture
Searching for the end of the picture You can go to the end of the recorded portion after you record and play back the tape. The tape starts rewinding or fast-forwarding and the last about 5 seconds of the recorded portion plays back. -
Page 32: Advanced Operations Using Alternative Power Sources
(supplied), NP-F530, NP-F550, NP-F730, NP-F750, NP-F930, NP-F950 In the car 12 V or Sony DC adaptor/charger 24 V car DC-V700 battery Note on power sources Disconnecting the power source or removing the battery pack during recording or playback may damage the inserted tape. -
Page 33: Using A Car Battery
Keep the AC power adaptor away from the camcorder if the picture is disturbed. Using a car battery Use a DC adaptor/charger such as Sony DC- V700 (not supplied). Connect the car battery cord to the cigarette lighter socket of a car (12 V or 24 V). -
Page 34: Changing The Mode Settings
Changing the mode settings You can change some of the mode settings programmed at the factory to further enjoy the features and functions of the camcorder. Just turn the control dial to select the menu items displayed on the LCD screen. You can make selections in the following order: the menu display n icons n items n mode settings. -
Page 35: Selecting The Mode Setting Of Each Item
Changing the mode settings Notes on changing the mode settings •Menu items differ depending on the setting of the POWER switch to VTR (DCR-TRV900E)/ PLAYER (DCR-TRV890E), CAMERA or MEMORY. •While recording in mirror mode, you cannot operate the menu system. Selecting the mode setting of each item Menu items that can be modified differ... - Page 36 Changing the mode settings STEADYSHOT <ON/OFF> •Normally select ON. •Select OFF when you do not have to worry about camera-shake. AE SHIFT Adjust the setting level of AE (Automatic Exposure). See page 68 for details. GAIN SHIFT <0dB/–3dB> •Set the gain value to 0dB. •Set the gain value to –3dB.
- Page 37 Changing the mode settings AUDIO MIX* Select this item to adjust the balance between the stereo 1 and stereo 2 by turning the control dial. NTSC PB <ON PAL TV/NTSC 4.43> •Normally select ON PAL TV. •Select NTSC 4.43 when playing back a tape recorded in the NTSC colour system.
- Page 38 Changing the mode settings Items for the MEMORY SET menu CONTINUOUS <OFF/ON/MULTI SCRN> •Select OFF not to record continuously. •Select ON to record 2 to 4 pictures continuously. •Select MULTI SCRN to record nine pictures continuously. QUALITY <STANDARD/FINE/SUPER FINE> •Select STANDARD to record still pictures in the standard image quality mode, using the memory card slot.
- Page 39 Changing the mode settings Items for the CM SET menu CM SEARCH <ON/OFF> •Select ON to search using cassette memory. •Select OFF to search without using cassette memory. TITLEERASE Erase the title you have superimposed. TITLE DSPL <ON/OFF> •Select ON to display the title you have superimposed.
- Page 40 Changing the mode settings ÒREMAIN <AUTO/ON> • Select AUTO to display the remaining time of the tape in the following cases: – With the power on or a tape inside, for eight seconds after the remaining time of the tape becomes certain.
- Page 41 Changing the mode settings Notes on DEMO MODE •DEMO MODE is set to STBY (Standby) at the factory. The demonstration starts about 10 minutes after you set the POWER switch to CAMERA without inserting a cassette. You can cancel the demonstration by inserting a cassette, setting the POWER switch to a position other than CAMERA, or select OFF in the menu system.
- Page 42 Changing the mode settings DISPLAY <LCD or V-OUT/LCD > • Normally select LCD. • Select V-OUT/LCD to display indicators both on the LCD screen and TV screen. REC LAMP <ON/OFF> • Normally select ON. • Select OFF when you do not want the camera recording lamp on the front of the unit to light COLOUR BAR <OFF/ON>...
-
Page 43: Photo Recording
Photo recording You can record a still picture like a photograph for about seven seconds. This photo recording is useful when you want to enjoy a picture such as a photograph or when you print a picture using a video printer (not supplied). You can record about 510 pictures on a 60-minute tape in SP mode. - Page 44 Photo recording When shooting in the dark Install the HVL-FDH2 video flash light (not supplied) to the accessory shoe. If the exposure is in manual exposure mode, set it to automatic exposure mode. When appears next to the “CAPTURE” indicator on the LCD screen or in the viewfinder, the video flash is ready to be used.
-
Page 45: Printing The Still Picture
Photo recording Printing the still picture You can print a still picture by using the video printer (not supplied). Connect the video printer using the S video connecting cable (not supplied). Refer to the operating instruction of the video printer as well. Video printer/ Видеопринтер... -
Page 46: Shooting With All The Pixels - Prog. Scan
Shooting with all the pixels – PROG. SCAN When modifying the digital images on your personal computer, set PROG. SCAN to ON before shooting. You can record the images on a mini DV tape frame by frame with higher resolution. Since the image taken in progressive mode does not go out of focus even in a pause, it is especially useful when you analyze high-speed... - Page 47 Shooting with all the pixels – PROG. SCAN Note on the progressive mode The normal TV broadcast divides the screen into two finer fields and displays them in turns every 1/50 of a second. Thus, the actual image displayed in an instant covers only half of the apparent image area.
-
Page 48: Using The Fader Function
Using the FADER function You can fade in or out to give your recording a professional appearance. When fading in, the picture gradually fades in while the sound increases. When fading out, the picture gradually fades out while the sound decreases. - Page 49 Using the FADER function FADER FADER MONOTONE OVERLAP To cancel the fader function Before pressing START/STOP, press FADER until the fade indicator disappears. You cannot use the fader function in the following situations – The START/STOP MODE selector is set ANTI GROUND SHOOTING or 5SEC.
-
Page 50: Shooting With Backlighting
Shooting with backlighting When you shoot a subject with the light source behind the subject or a subject with a light background, use the BACK LIGHT function. Press BACK LIGHT. The c indicator appears on the LCD screen or in the viewfinder. [a] Subject is too dark because of backlight. -
Page 51: Using The Wide Mode Function
Using the wide mode function You can record a 16:9 wide picture to watch on the 16:9 wide-screen TV (16:9WIDE). The picture with black bands at the top and the bottom on the LCD screen or in the viewfinder [a] is normal. The picture on a normal TV [b] is horizontally compressed. - Page 52 Using the wide mode function To cancel wide mode Select OFF in step 5, then press the control dial. To watch the tape recorded in wide mode To watch the tape recorded in 16:9WIDE mode, set it to full mode. For details, refer to the operating instruction of your TV.
-
Page 53: Enjoying Picture Effect
Enjoying picture effect Selecting picture effect You can make pictures like those of television with the Picture Effect function. NEG. ART [a] The colour of the picture is reversed. SEPIA The picture is sepia. B&W The picture is monochrome (black and white). SOLARIZE [b] The light intensity is clearer, and the picture looks like an illustration. -
Page 54: Using Picture Effect Function
Enjoying picture effect Using picture effect function (1) While in Standby mode, press PICTURE EFFECT. (2) Turn the control dial to select the desired picture effect mode. To return to normal mode Press PICTURE EFFECT so that the indicator disappears. Notes on the picture effect •... -
Page 55: Recording With Various Effects - Digital Effect
Recording with various effects – digital effect With the following functions of Digital Effect, you can add various visual effects to the picture. The sound is recorded normally. STILL You can record a still picture to be superimposed on a moving picture. FLASH You can record still pictures successively at constant intervals. - Page 56 Recording with various effects – digital effect (1) While in Standby mode or Recording mode, press DIGITAL EFFECT. The digital effect indicator flashes. (2) Turn the control dial to select the desired digital effect mode. (3) Press the control dial. The digital effect indicator lights up and the bars appear.
- Page 57 Recording with various effects – digital effect To cancel digital effects Press DIGITAL EFFECT so that the indicator disappears. Notes on digital effect •You cannot use the following functions while using the digital effect. – Functions using the FADER button –...
-
Page 58: Shooting With Manual Adjustment
Shooting with manual adjustment Under normal conditions, this unit automatically makes various adjustments as it shoots. However, you can adjust manually the following functions to your preference. Functions you can adjust by setting the AUTO LOCK selector to the centre (auto lock release) position Brightness (exposure), shutter speed, white balance, and program AE... -
Page 59: Adjusting Exposure
Shooting with manual adjustment Adjusting exposure Adjust the exposure manually under the following cases. •The background is too bright (back lighting) •Insufficient light: most of the picture is dark •Bright subject and dark background •To record the darkness faithfully (1)Set AUTO LOCK selector to the centre (auto lock release) position while the camcorder is in Standby mode. -
Page 60: Adjusting The Shutter Speed
Shooting with manual adjustment Adjusting the shutter speed (1)Set AUTO LOCK selector to the centre (auto lock release) position while the camcorder is in Standby mode. (2)Press SHUTTER SPEED. The shutter speed indicator appears on the LCD screen or in the viewfinder. -
Page 61: Adjusting The White Balance
Shooting with manual adjustment Adjusting the white balance White balance adjustment makes white subjects look white and allows more natural colour balance for camera recording. Normally white balance is automatically adjusted. You can obtain better results by adjusting the white balance manually when lighting conditions change quickly or when recording outdoors: e.g., neon signs, fireworks. - Page 62 Shooting with manual adjustment Display Shooting conditions ∑ •Adjusting the white balance according to the light source. This operation is not available during recording. Follow the steps described below to adjust the settings again. w (Outdoor) •Recording a sunset/sunrise, just after sunset, just before sunrise, neon signs, or fireworks •Under a colour matching...
- Page 63 Shooting with manual adjustment Notes on the ∑ indicator on the screen •The state of the indicator shows as follows: Slow flashing: white balance is not adjusted. Fast flashing: white balance is being adjusted. Lights up: white balance has been adjusted. •When the ∑...
- Page 64 Shooting with manual adjustment Adjusting recording level You can adjust the recording sound level. Use headphones to monitor the sound when you adjust. (1) Set the POWER switch to CAMERA. (2) Press MENU to display the menu. (3) Turn the control dial to select the dial.
-
Page 65: Using The Nd Filter
Shooting with manual adjustment To adjust the microphone level automatically Select AUTO in step 5, then press the control dial. Notes on the adjustment •The sound level setting is retained as long as the power is on and for about five minutes after removing the battery. -
Page 66: Shooting With The Zebra Pattern
Shooting with manual adjustment Shooting with the zebra pattern You can set the camcorder to display a zebra pattern (diagonal stripes) in the portion of the picture on the LCD screen or in the viewfinder with a subject whose brightness exceeds a certain level. -
Page 67: Releasing The Steady Shot Function
Shooting with manual adjustment To erase the zebra pattern Select OFF in step 5, then press the control dial. Notes on shooting with the zebra pattern • A zebra pattern appears at more than 100 IRE. • Even though you see the zebra pattern on the LCD screen or in the viewfinder, the zebra pattern is not recorded. -
Page 68: Adjusting Ae Shift
Shooting with manual adjustment To activate the Steady Shot function again Select ON in step 5, then press the control dial. Notes on the Steady Shot function • The Steady Shot function will not correct excessive camera-shake. • If you use a tele conversion lens (not supplied) or a wide conversion lens (not supplied), the Steady Shot function may not work. - Page 69 Shooting with manual adjustment To deactivate AE shift Set the bar indicator at the centre in step 5, then press the control dial. When you adjust AE shift –4 to +4 indicator is displayed on the LCD screen or in the viewfinder. The number varies corresponding to the AE shift level.
- Page 70 Shooting with manual adjustment To deactivate gain shift Select 0dB in step 5, then press the control dial. What is gain shift When shooting in bright conditions, the gain shift function automatically adjusts the automatic exposure control’s gain value to –3dB as much as possible.
-
Page 71: Using The Program Ae Function
Using the PROGRAM AE function You can select from five PROGRAM AE (Auto Exposure) modes to suit your shooting situation, referring to the following. Selecting the best mode Select a proper PROGRAM AE mode referring to the following description. A: Aperture priority mode Selecting the aperture to determine the desired depth of field. - Page 72 Using the PROGRAM AE function Using the PROGRAM AE function (1)Set AUTO LOCK selector to the centre (auto lock release) position while the camcorder is in Standby or Recording mode. (2) Press PROGRAM AE. (3) Turn the control dial so that the symbol of the desired PROGRAM AE mode matches the indicator on the LCD screen or in the viewfinder.
- Page 73 Using the PROGRAM AE function To return to automatic adjustment mode Set AUTO LOCK selector to AUTO LOCK or press PROGRAM AE so that the indicator disappears. When you focus in telephoto You cannot choose F1.6, F2 and F2.4. About the depth of field The depth of field is the in-focus range, measured from the distance behind a subject to the distance in front.
-
Page 74: Focusing Manually
Focusing manually When to use manual focus In the following cases you should obtain better results by adjusting the focus manually. • Insufficient light [a] • Subjects with little contrast — walls, sky, etc. • Too much brightness behind the subject [c] •... -
Page 75: Adjusting Focus Manually
Focusing manually Adjusting focus manually When focusing manually, first focus in telephoto before recording, and then reset the shot length. (1) Slide FOCUS down to MANUAL. The f indicator appears on the LCD screen or in the viewfinder. (2) Turn the focus ring to focus on the subject. To focus in infinity Slide FOCUS to INFINITY. -
Page 76: Interval Recording
Interval recording You can make a time-lapse recording by setting the camcorder to automatically record and standby sequentially. You can achieve an excellent recording for flowering, emergence, etc., with this function. (1) Set the POWER switch to CAMERA. (2) Press MENU to display the menu. (3) Turn the control dial to select the dial. - Page 77 Interval recording MENU C A M E R A S E T D Z O O M 1 6 : 9 W I D E S T E A D Y S H O T A E S H I F T G A I N S H I F T F R A M E R E C I N T .
- Page 78 Interval recording During the interval recording mode The INTERVAL indicator appears. Notes on interval recording • You cannot do interval recording with photo recording. • You cannot perform interval recording in the MEMORY mode. • There may be a discrepancy in recording time of up to +/–...
-
Page 79: Cut Recording
Cut recording You can make a recording with a stop-motion animated effect using cut recording. To create this effect, alternately move the subject a little and make a cut recording. We recommend you to use a tripod, and to operate the camcorder using the Remote Commander in steps 7 and 8. - Page 80 Cut recording To cancel the cut recording • Set FRAME REC to OFF in the menu system. • Set the POWER switch to OFF, VTR, or MEMORY. Notes on cut recording • The last recorded cut is longer than other cuts. •...
-
Page 81: Superimposing A Title
Superimposing a title If you use a tape with cassette memory, you can superimpose the titles while recording or after recording. When you play back the tape, the title is displayed for five seconds from the point where you superimposed it. You can select from eight preset titles and two original (CUSTOM TITLE) to superimpose over the picture. - Page 82 Superimposing a title To superimpose the title from beginning After step 7, press START/STOP to start recording. To superimpose the title while you are recording After pressing START/STOP to start recording, start from step 1. In this case, beep or melody is not heard.
-
Page 83: Erasing A Title
Superimposing a title Erasing a title (1) Press MENU to display the menu. (2) Turn the control dial to select the dial. (3) Turn the control dial to select TITLEERASE, then press the dial. (4) Turn the control dial to select the title you want to erase, then press the dial. -
Page 84: Making A Custom Title
Making a custom title If you use a tape with cassette memory, you can make up to two titles and store them in the camcorder. We recommend you to set the POWER switch to VTR (DCR-TRV900E) or PLAYER (DCR-TRV890E) or eject the cassette before you begin. - Page 85 Making a custom title To edit a title you have stored In step 3, select CUSTOM1 or CUSTOM2, depending on which title you want to edit, then change the title. If you take 5 minutes or longer to enter characters while a cassette is in the camcorder The power goes off automatically.
-
Page 86: Labelling A Cassette
Labelling a cassette If you use a tape with cassette memory, you can label a cassette. The label can consist of up to 10 characters and is stored in cassette memory. When you insert the labeled cassette and turn the power on, the label is displayed on the LCD screen, in the viewfinder, or on the TV screen. - Page 87 Labelling a cassette To erase a character In step 6 turn the control dial to select [ M ], then press the dial. The last character is erased. To change the label you have made Insert the cassette to change the label, and operate in the same way to make a new label.
-
Page 88: Watching On A Tv Screen
Watching on a TV screen Connect the camcorder to your TV or VCR to watch the playback picture on the TV screen. When monitoring the playback picture by connecting the camcorder to your TV, we recommend you to use mains for the power source. -
Page 89: Laser Link
Watching on a TV screen If your VCR or TV is a monaural type Connect only the white plug for audio on both the camcorder and the VCR or the TV. If you connect the white plug, the sound is L (left) signal. - Page 90 Watching on a TV screen To cancel the LASER LINK function Press LASER LINK. Notes on LASER LINK • When LASER LINK is activated (the LASER LINK button is lit), the camcorder consumes power. Press and turn off the LASER LINK button when it is not needed.
-
Page 91: Viewing The Picture With The Picture Effect
Viewing the picture with the picture effect You can play back recorded images with the picture effect. The available picture effects are NEG. ART, SEPIA, B&W and SOLARIZE. During playback, press PICTURE EFFECT. See page 53 for details on the picture effect. To return to normal mode Press PICTURE EFFECT so that the indicator disappears. -
Page 92: Viewing The Picture With The Digital Effect
Viewing the picture with the digital effect You can play back the recorded images with the digital effect. The available digital effects are STILL, FLASH, LUMI. and TRAIL. (1) During playback, press DIGITAL EFFECT. (2) Turn the control dial to select the desired digital effect mode. -
Page 93: Searching The Boundaries Of Recorded Tape With Date - Date Search
Searching the boundaries of recorded tape with date – date search You can search for the boundaries of recorded tape with date – Date Search function. To search the beginning of the specific date and play back from the point, there are two ways: •Using cassette memory, you can select the date displayed on the LCD screen. -
Page 94: Searching The Boundaries Of Recorded Tape With Date
Searching the boundaries of recorded tape with date – date search (1) Set the POWER switch to VTR (DCR- TRV900E) or PLAYER (DCR-TRV890E). (2) Press MENU to display the menu. (3) Turn the control dial to select CM SEARCH , then press the dial. (4) Turn the control dial to select ON, then press the dial. -
Page 95: Searching For The Date Without Using Cassette Memory
Searching the boundaries of recorded tape with date – date search To stop searching Press p. Notes •The interval of the boundaries between the dates needs to be more than two minutes. The camcorder may not search if the beginning of the recorded date is too close to the next one. - Page 96 Searching the boundaries of recorded tape with date – date search (1) Set the POWER switch to VTR (DCR- TRV900E) or PLAYER (DCR-TRV890E). (2) Press MENU to display the menu. (3) Turn the control dial to select CM SEARCH in , then press the dial.
-
Page 97: Searching The Boundaries Of Recorded Tape With Title - Title Search
Searching the boundaries of recorded tape with title – title search You can search for the boundaries of recorded tape with title – Title Search function. If you use a tape with cassette memory, you can select the title displayed on the LCD screen. You can only operate with the Remote Commander. -
Page 98: Title Search
Searching the boundaries of recorded tape with title – title search (1) Set the POWER switch to VTR (DCR- TRV900E) or PLAYER (DCR-TRV890E). (2) Press MENU to display the menu. (3) Turn the control dial to select CM SEARCH in , then press the dial. -
Page 99: Searching For A Photo - Photo Search/Photo Scan
Searching for a photo – photo search/photo scan You can search for the recorded still picture – Photo Search function. There are two modes in Photo Search: •Using cassette memory, you can select the recorded date which is displayed on the LCD screen. - Page 100 Searching for a photo – photo search/photo scan Searching for a photo by using cassette memory – photo search You can use this function only when playing back a tape with cassette memory (p. 150). (1) Set the POWER switch to VTR (DCR- TRV900E) or PLAYER (DCR-TRV890E).
- Page 101 Searching for a photo – photo search/photo scan Searching for a photo without using cassette memory – photo search If you use a tape without cassette memory, skip steps 3 and 4. (1) Set the POWER switch to VTR (DCR- TRV900E) or PLAYER (DCR-TRV890E).
- Page 102 Searching for a photo – photo search/photo scan Scanning photo – photo scan You can use this function whether the tape has cassette memory or not. (1) Set the POWER switch to VTR (DCR- TRV900E) or PLAYER (DCR-TRV890E). (2) Press SEARCH MODE on the Remote Commander repeatedly until the photo scan indicator displayed on the LCD screen.
-
Page 103: Returning To A Pre-Registered Position
Returning to a pre- registered position Using the Remote Commander, you can easily go back to the desired point on a tape after playback. (1) During playback, press ZERO SET MEMORY at the point you later want to locate. The counter shows “0:00:00”... -
Page 104: Displaying Recording Data - Data Code Function
Displaying recording data – data code function You can display recording data (date/time or various settings when recorded) on the LCD screen or in the viewfinder during playback (Data Code). The Data Code is also displayed on the TV. Press DATA CODE during playback. To select the items to be displayed Set DATA CODE in the menu system, and select the following items:... -
Page 105: Editing Onto Another Tape
Editing onto another tape You can create your own video programme by editing with any other h 8 mm, H Hi8, j VHS, k S-VHS, VHSC, K S-VHSC or l Betamax VCR that has audio/video inputs. You can edit with little deterioration of picture and sound quality when using the i.LINK cable (DV connecting cable). - Page 106 Editing onto another tape Notes on editing when using the A/V connecting cable •Press DATA CODE, SEARCH MODE on the Remote Commander, or DISPLAY to turn off the display indicators. Otherwise, the indicators will be recorded on the tape. •If your TV or VCR is a monaural type, connect the yellow plug of the A/V connecting cable for video to the TV or VCR.
-
Page 107: Starting Editing
Editing onto another tape Notes on editing when using the i.LINK cable (DV connecting cable) •You can connect one VCR only. •You can record picture, sound and system data at the same time on the DV products by using the i.LINK cable (DV connecting cable) only. •You cannot edit the titles, display indicator or the contents of cassette memory. -
Page 108: Editing Partially On A Mini Dv Tape - Dv Synchro-Editing
Editing partially on a mini DV tape – DV synchro-editing By simply selecting the scenes to edit, you can duplicate the desired portion on a tape, using other equipment connected with an i.LINK cable (DV connecting cable). The scenes can be selected by frame. - Page 109 DV tape – DV synchro-editing PLAY STOP PAUSE Notes •If you use other than Sony DV equipment, you cannot perform DV synchro-editing. •You cannot set DV EDITING IN or OUT on a blank portion of the tape. Errors in duplicating If you connect this camcorder to Sony equipment with DV jack, the range of errors is within +/–...
-
Page 110: Recording From A Vcr Or Tv (Dcr-Trv900E Only)
Recording from a VCR or TV (DCR- TRV900E only) You can record a tape from another VCR or a TV programme from a TV that has audio/video outputs. Connect the camcorder to the VCR or You can record only from a PAL system-based TV when you use this function. - Page 111 Recording from a VCR or TV (DCR-TRV900E only) If your TV or VCR is a monaural type, connect the yellow plug of the A/V connecting cable for video to the TV or VCR. Connect only the white or red plug for audio to the TV or VCR. If you connect the white plug, the sound is L (left) signal.
-
Page 112: Replacing Recording On A Tape - Insert Editing (Dcr-Trv900E Only)
Replacing recording on a tape – insert editing (DCR-TRV900E only) You can insert a new scene from a VCR onto your originally recorded tape by specifying starting and ending points. After inserting, the previous picture and sound will be erased. Connection is the same as on page 105 or 106. - Page 113 Replacing recording on a tape – insert editing (DCR- TRV900E only) To change the end point Press ZERO SET MEMORY on the Remote Commander so that the ZERO SET MEMORY indicator disappears and begin from step 3. Note on the inserted picture The picture may be distorted at the end of the inserted portion when it is played back.
-
Page 114: Audio Dubbing
Audio dubbing You can record an audio sound to add to the original sound on a tape by connecting audio equipment or a microphone. If you connect the audio equipment, you can add sound to your recorded tape by specifying starting and ending points. -
Page 115: Audio Dubbing
Audio dubbing Dubbing with the AUDIO/VIDEO jack (DCR-TRV900E only) AUDIO/ VIDEO Ç : Signal flow/Передача сигнала Note The picture is not output from the AUDIO/ VIDEO jack. Check the recorded picture on the LCD screen or in the viewfinder, as well as check the recorded sound by using a speaker or headphones. -
Page 116: Adding An Audio Sound On A Recorded Tape
Audio dubbing Adding an audio sound on a recorded tape (1) Insert your recorded tape into the camcorder. (2) Set the POWER switch to VTR. (3) On the camcorder, locate the point where the recording should begin by pressing 0 or ). - Page 117 Audio dubbing If you make all the connections The audio input to be recorded will take precedence over others in the following order. •MIC (PLUG IN POWER) jack •Intelligent accessory shoe •AUDIO/VIDEO jack * •Built-in microphone * DCR-TRV900E only If an i.LINK cable (DV connecting cable) is connected to this unit You cannot add a sound to a recorded tape.
-
Page 118: Memory Card Slot Operations Using The Memory Card Slot-Introduction
Sony recommends Memory Sticks Sony recommends using the MSAKIT-PC4A Memory Stick/PC card kit (not supplied). The Memory Stick is a brand new type of recording medium that records images and sounds as digital data and operates just like a PC card. - Page 119 Using the memory card slot – introduction The types of PC cards you can use Use TYPE II PC cards that conform to ATA specification of PC card standard. Format the PC card with this camcorder before use. Once you format the PC card, you can store data of up to 64 MB in it.
- Page 120 Using the memory card slot – introduction Be sure to place the adapter on a stable surface Placing the floppy disk adapter on an unstable or slanting surface or holding the adapter by hand during operation may result not only in malfunction of the unit but also in injury.
- Page 121 Using the memory card slot – introduction About the power source When you use the memory card slot, getting the power from a mains is recommended, using the AC power adaptor. About the remaining battery indicator This camcorder displays remaining recording/ playback time on the LCD screen or in the viewfinder.
- Page 122 Using the memory card slot – introduction Connecting the floppy disk adapter or PC card With the upper side of the connector facing the LCD panel, insert the connector until it clicks. Access lamp/ Лампочка доступа To eject the floppy disk adapter or PC card Slide the MEMORY RELEASE lever in the direction of the arrow as illustrated below.
- Page 123 Using the memory card slot – introduction Inserting a floppy disk Insert a floppy disk until it clicks. Before inserting, check that the write protect tab is set to the recordable position for recording a still picture. To eject the floppy disk Press the floppy disk eject button.
-
Page 124: Selecting Image Quality Mode
Using the memory card slot – introduction Note Unless you press any memory operating buttons after inserting another foppy disk, the indicator may not disappear from the screen. Selecting image quality mode You can select one of three image quality modes in still picture recording. - Page 125 Using the memory card slot – introduction Setting image quality Setting Meaning SUPER FINE (SFN) This is the highest image quality in this camcorder. The number of still images you can record is less than FINE. The image is compressed to about 1/4.
- Page 126 Using the memory card slot – introduction Formatting (initializing) a PC card or a floppy disk (1) When you format a floppy disk, insert a disk into the floppy disk adapter. When you format a PC card, insert the card into the memory card slot.
- Page 127 Using the memory card slot – introduction MENU Notes on formatting •Formatting erases all information on the floppy disk or PC card, including the protected image data. Check the contents of the disk or card before formatting. • Be sure that the battery is fully charged when formatting a floppy disk or PC card.
-
Page 128: Recording An Image From A Mini Dv Tape As A Still Image
Recording an image from a mini DV tape as a still image This camcorder can read moving picture data recorded on a mini DV tape and record it as a still image on a floppy disk or a PC card. The unit can also take in moving picture data through the input connector and record it as a still image on a floppy disk or a PC card. -
Page 129: Recording An Image From A Mini Dv Tape As A Still Image
Recording an image from a mini DV tape as a still image When the access lamp is flashing Never shake or strike the unit. As well do not turn the power off , eject a PC card/floppy disk adapter or remove the battery pack. Otherwise, the image data breakdown may occur. - Page 130 Recording an image from a mini DV tape as a still image When recording the image through the AUDIO/VIDEO jack You can record only from a PAL system-based TV when you use this function. S VIDEO VIDEO (1) Turn the POWER switch to VTR and set DISPLAY to LCD in the menu system.
-
Page 131: Copying Still Images From A Mini Dv Tape - Photo Save
Copying still images from a mini DV tape – photo save Using the search function, you can automatically take in only the still images from mini DV tapes and record them on a floppy disk or a PC card in sequence. - Page 132 Copying still images from a mini DV tape – photo save To cancel copying Press MENU to stop copying. When the memory of the floppy disk or PC card is full “MEMORY FULL” appears on the LCD screen, and the copying stops. Insert another floppy disk or PC card and repeat the procedure from step 1.
-
Page 133: Recording Still Images On Pc Cards (Not Supplied) - Memory Photo Recording
Recording still images on PC cards (not supplied) – memory photo recording You can record still images with all the pixels (progressive) on an optional PC card. Before operation Insert a PC card into the unit. (1) Set the POWER switch to MEMORY. Make sure that the lock knob is set to the right (unlock) position. -
Page 134: Recording Images Continuously
Recording still images on PC cards (not supplied) – memory photo recording When you are recording a still image You can neither turn off the power nor press PHOTO. When you press the PHOTO button on the Remote Commander The camcorder immediately records the image that is on the screen when you press the button. -
Page 135: Memory Photo Recording
Recording still images on PC cards (not supplied) – memory photo recording (1) Set the POWER switch to MEMORY. Make sure that the lock knob is set to the right (unlock) position. (2) Press MENU to display the menu. (3) Turn the control dial to select the dial. - Page 136 Recording still images on PC cards (not supplied) – memory photo recording Settings of continuous shooting Setting Meaning (indicator on the screen) The unit shoots one image at a time. (no indicator) The unit shoots 2 to 4 still images at about 0.8 sec intervals.
-
Page 137: Viewing A Still Picture - Memory Photo Playback
Viewing a still picture – memory photo playback You can play back still images recorded on a floppy disk or PC card. You can also play back 6 images at a time by selecting the index screen. Before operation Connect the floppy disk adapter (with a disk inside) or insert a PC card into the unit. -
Page 138: Viewing A Still Picture – Memory Photo Playback
Viewing a still picture – memory photo playback To play back recorded images on a TV screen • Connect this camcorder to the TV with the supplied A/V connecting cable before the operation. You cannot play back images using the LASER LINK function. •... - Page 139 Viewing a still picture – memory photo playback M V C 0 0 0 0 6 •To display the following 6 images, keep pressing MEMORY +. •To display the previous 6 images, keep pressing MEMORY –. To return to the normal playback screen (single screen) Press MEMORY +/–...
- Page 140 Viewing a still picture – memory photo playback Viewing the recorded images using a personal computer The image data recorded with this camcorder is compressed in the JPEG format. If your personal computer has an application software that allows you to see JPEG images, you can see images recorded on a floppy disk or PC card on a computer screen.
-
Page 141: Preventing Accidental Erasure - Protect
Preventing accidental erasure – PROTECT To prevent accidental erasure of important images, you can protect selected images. Before operation Connect the floppy disk adapter (with a disk inside) or insert a PC card into the unit. (1) Display the image you want to protect. (2) Press MENU to display the menu. - Page 142 Preventing accidental erasure – PROTECT To cancel protection of the image Select OFF in step 5, then press the control dial. Note Formatting erases all information on the floppy disk, including the protected image data. Check the contents of the disk before formatting. Предотвращение...
-
Page 143: Deleting Images
Deleting images Deleting selected image Before operation Connect the floppy disk adapter (with a disk inside) or insert a PC card into the unit. (1) Display the image you want to erase. (2) Press MEMORY DELETE. “DELETE?” appears on the LCD screen. (3) Press MEMORY DELETE again. - Page 144 Deleting images Before operation Connect the floppy disk adapter (with a disk inside) or insert a PC card into the unit. (1) Set the POWER switch to MEMORY. Make sure that the lock knob is set to the right (unlock) position. (2) Press MENU to display the menu.
- Page 145 Deleting images To cancel deleting all the images on the disk Select RETURN in step 4, then press the control dial. While “DELETING” appears Do not turn the POWER switch or press any buttons. Удаление изображений Для отмены удаления всех изображений...
-
Page 146: Copying The Image Recorded With The Memory Card Slot To Mini Dv Tapes (Dcr-Trv900E Only)
Copying the image recorded with the memory card slot to mini DV tapes (DCR-TRV900E only) You can copy still images or titles recorded with the memory card slot and record them to a mini DV tape. Before operation • Insert a mini DV tape for recording. •... - Page 147 Copying the image recorded with the memory card slot to mini DV tapes (DCR-TRV900E only) To stop copying in the middle Press π. During copying You cannot operate the following buttons : MEMORY PLAY, MEMORY INDEX, MEMORY DELETE, MEMORY +, or MEMORY –. Note on the index screen You cannot record the index screen.
-
Page 148: Playing Back Images In A Continuous Loop - Slide Show
Playing back images in a continuous loop – SLIDE SHOW You can automatically play back images in sequence. This function is useful especially when checking the recorded images or during a presentation. Before operation Connect the floppy disk adapter (with a disk inside) or insert a PC card into the unit. -
Page 149: Slide Show
Playing back images in a continuous loop – SLIDE SHOW To cancel the slide show Press MENU to stop the slide show. To pause during a slide show Press MEMORY PLAY to set it in a pause. To start the slide show from a particular image Select the desired image using MEMORY +/–... -
Page 150: Additional Information Usable Cassettes And Playback Modes
Tapes with cassette memory have Memory) mark. Sony recommends that you use a tape having mark to enjoy this camcorder fully. - Page 151 Usable cassettes and playback modes When you play back Copyright signal When playing back Using any other video camera recorder, you cannot record on a tape that has recorded a copyright control signals for copyright protection of software which is played back in this camcorder.
- Page 152 Usable cassettes and playback modes Notes on the mini DV cassette To prevent accidental erasure Slide out the protect tab on the cassette so that the red portion is visible. [a] When affixing a label on the mini DV cassette Be sure to affix a label only on the locations as illustrated below so as not to cause malfunction of the camcorder.
-
Page 153: Charging The Vanadium-Lithium Battery In The Camcorder
Charging the vanadium- lithium battery in the camcorder Your camcorder is supplied with a vanadium- lithium battery installed so as to retain the date and time, etc., regardless of the setting of the POWER switch. The vanadium-lithium battery is always charged as long as you are using the camcorder. - Page 154 Resetting the date and time (1) Set the POWER switch to CAMERA. (2) Press MENU to display the menu. (3) Turn the control dial to select the dial. (4) Turn the control dial to select CLOCK SET, then press the dial. (5) Turn the control dial to adjust the year, then press the dial.
- Page 155 Resetting the date and time To correct the date and time setting Repeat steps 2 to 5. If you do not set the date and time “--.--.--” is recorded on the tape and “80.1.1” on the PC card or floppy disk. The year indicator changes as follows: 1998 1999...
-
Page 156: Simple Setting Of Clock By Time Difference
Simple setting of clock by time difference You can easily set the clock for a local time by a time difference in the menu system. You can also reset the clock simply by setting the time difference to zero. (1)While the camcorder is in Standby mode, press MENU to display the menu. -
Page 157: Tips For Using The Battery Pack
Tips for using the battery pack This section shows you how you can get the most out of your battery pack. Preparing the battery pack Always carry additional batteries Have sufficient battery pack power to do 2 to 3 times as much recording as you have planned. Battery life is shorter in a cold environment Battery efficiency is decreased, and the battery... - Page 158 Tips for using the battery pack When to replace the battery pack While you are using your camcorder, the remaining battery indicator on the LCD screen or in the viewfinder decreases gradually as battery power is used up. The remaining time in minutes also appears. When the remaining battery indicator reaches the lowest point, the i indicator appears and starts flashing on the LCD screen or in the viewfinder.
- Page 159 Tips for using the battery pack Battery pack care •Remove the battery pack from the camcorder after using it, and keep it in a cool place. When the battery pack is installed to the camcorder, a small amount of current flows to the camcorder even if the POWER switch is set to OFF.
- Page 160 Tips for using the battery pack How the battery consumption is displayed The power consumption of the camcorder changes depending on its use, such as whether the LCD panel is used or not, how the autofocusing is working on or not. While checking the condition of the camcorder, the “InfoLITHIUM”...
- Page 161 Tips for using the battery pack Why the remaining battery indication does not match the continuous recording time in the operating instruction The recording time is affected by the environmental temperature and conditions. The recording time becomes very short in a cold environment.
- Page 162 Tips for using the battery pack Notes on the terminals If the terminals (metal parts on the back) are not clean, the battery charge duration will be shortened When the terminals are not clean or when the battery pack has not been used for a long time, repeatedly install and remove the battery pack a few times.
-
Page 163: Maintenance Information And Precautions
Maintenance information and precautions Moisture condensation If the camcorder is brought directly from a cold place to a warm place, moisture may condense inside the camcorder, on the surface of the tape, on the lens, on the head, or on the floppy disk. In this condition, the tape may stick to the head drum and be damaged or the camcorder may not operate correctly. -
Page 164: Maintenance Information And Precautions
LCD screen or in the viewfinder. If [a] or [b] happens, clean the video heads with the Sony DVM12CL cleaning cassette (not supplied). Check the picture and if the above problem persists, repeat the cleaning. (Do not repeat cleaning more than 5 times in one session.) - Page 165 8.4 V (AC power adaptor). •Should any solid object or liquid get inside the casing, unplug the camcorder and have it checked by Sony dealer before operating it any further. •Avoid rough handling or mechanical shock. Be particularly careful of the lens.
- Page 166 Maintenance information and precautions AC power adaptor Charging • Use only an “InfoLITHIUM” type battery pack. • Place the battery pack on a flat surface without vibration during charging. • The battery pack will get hot during charging. This is normal. Others •...
- Page 167 •If the liquid get into your eyes, wash your eyes with a lot of water and then consult a doctor. If any difficulty should arise, unplug the unit and contact your nearest Sony dealer. Информация по уходу за аппаратом и предосторожности...
-
Page 168: Using Your Camcorder Abroad
Using your camcorder abroad Each country or area has its own electric and TV colour systems. Before using your camcorder abroad, check the following points. Power sources You can use your camcorder in any country or area with the supplied AC power adaptor within 100 V to 240 V AC, 50/60 Hz. -
Page 169: Trouble Check
English Trouble check If you run into any problem using the camcorder, use the following table to troubleshoot the problem. Should the difficulty persist, disconnect the power source and contact your Sony dealer or local authorized Sony service facility. Camcorder... - Page 170 Trouble check Operation Symptom The end search function does not work correctly. The tape does not move when a tape transport button is pressed. No sound or only a low sound is heard when playing back a tape. The new sound added to the recorded tape is not heard.
- Page 171 The camcorder is not malfunctioning. m Change locations. • The video heads may be dirty. m Clean the heads using the Sony DVM12CL (not supplied) cleaning cassette. (p. 164) • The video heads may be dirty. m Clean the heads using the Sony DVM12CL (not supplied) cleaning cassette.
- Page 172 Trouble check Picture Symptom The picture seems to be in flash motion. rrrrr is displayed on the LCD screen or in the viewfinder. Remaining tape indicator is not displayed. The memory card slot does not function. Recording does not function. The image cannot be deleted.
- Page 173 Set the selector to DV input position. If you use another DV camcorder, set the power switch to VTR. • The camcorder is connected to DV equipment of other than Sony. m Operate normal editing. • Setting programme on a blank portion of the tape is attempted.
-
Page 174: Self-Diagnosis Function
C:04:ππ C:21:ππ C:22:ππ C:31:ππ C:32:ππ E:61:ππ E:62:ππ If you are unable to resolve the problem, contact your Sony dealer or local authorized Sony service facility. LCD screen/viewfinder Self-diagnosis display •C:ππ:ππ You can service the camcorder yourself. •E:ππ:ππ Contact your Sony dealer or local authorized Sony facility. -
Page 175: Проверка Неисправностей
Если у Вас возникла какая-либо проблема при использовании видеокамеры, воспользуйтесь следующей таблицей для отыскания и устранения проблемы. Если трудности все еще остаются, то отсоедините источник питания и обратитесь к Вашему дилеру Sony или на местное уполномоченное предприятие по обслуживанию Sony. Видеокамера Питание... - Page 176 Проверка неисправностей Работа Признак Функция поиска конца не работает правильно. Лента не перемещается при нажатии кнопки перемещения ленты. Нет звука или только низкий звук слышен при воспроизведении ленты. Новый звук, наложенный на записанную ленту, не прослушивается. Не работает функция устойчивой съемки. Запись...
- Page 177 Видеокамера не является неисправной. m Измените позицию съемки. • Возможно загрязнены видеоголовки. m Очистите видеоголовки с использованием очистительной кассеты DVM12CL фирмы Sony (не прилагается). (стр. 164) • Возможно загрязнены видеоголовки. m Очистите видеоголовки с использованием очистительной кассеты DVM12CL фирмы Sony (не...
- Page 178 Проверка неисправностей Изображение Признак Изображение выглядит как при периодическом движении. rrrrr отображается на экране ЖКД или в видоискателе. Индикатор оставшейся ленты не отображается. Гнездо для платы расширения памяти не функционирует. Запись не функционирует. Изображение не может быть удалено. Прочее Признак Во...
- Page 179 видесигналов. Если Вы используете другую цифровую видеокамеру, установите выключатель питания в положение VTR. • Видеокамера подсоединена к цифровой видеоаппаратуре, отличной от Sony. m Используйте операцию нормального монтажа. • Была выполнена попытка установки программы на чистый участок ленты. m Установите программу снова на записанный участок.
-
Page 180: Функция Самодиагностики
Пятизначный дисплей C:04:ππ C:21:ππ C:22:ππ C:31:ππ C:32:ππ E:61:ππ E:62:ππ Если Вы не можете решить проблему, то свяжитесь с Вашим дилером Sony или местным уполномоченным предприятием Sony. Экран ЖКД/видоискатель Дисплей самодиагностики • С:ππ:ππ Вы можете выполнить техническое обслуживание видеокамеры самостоятельно. • Е:ππ:ππ... -
Page 181: Specifications
English Specifications Video camera recorder System Video recording system Two rotary heads, Helical scanning system Audio recording system Rotary heads, PCM system Quantization: 12bits (Fs 32kHz, stereo 1, stereo 2), 16bits (Fs 48kHz, stereo) Video signal PAL colour, CCIR standards Usable cassette Mini DV cassette with logo printed Tape speed... -
Page 182: Технические Характеристики
Русский Технические характеристики Видеокамера Система Система видеозаписи Две вращающиеся головки, система наклонной механической развертки Система аудиозаписи Вращающиеся головки, система РСМ Квантование: 12 битов (сдвиг по частоте 32 кГц, стереозвучание 1, стереозвучание 2), 16 битов (сдвиг по частоте 48 кГц, стереозвучание) Видеосигнал... -
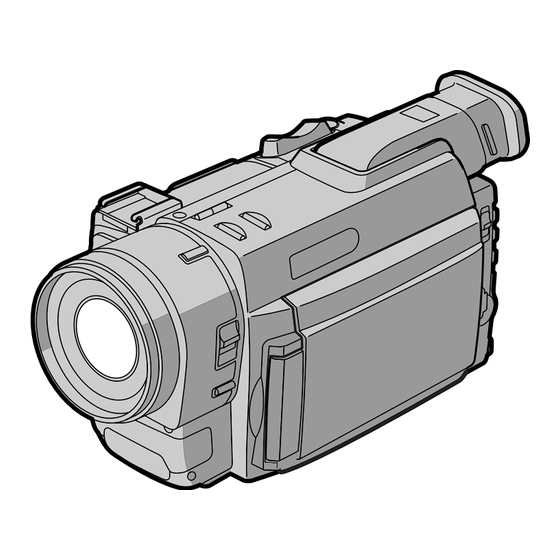
Page 183: Identifying The Parts
Identifying the parts 1 EDITSEARCH buttons (p. 26) 2 BACK LIGHT button (p. 50) 3 FADER button (p. 48) 4 ND FILTER button (p. 65) 5 AUTO LOCK selector (p. 58) 6 OPEN switch (p. 27) 7 Control dial (p. 34) 8 Viewfinder lens adjustment lever (p. - Page 184 Identifying the parts !§ !¶ !• !ª !§ Tape transport buttons (p. 27) π STOP (stop) 0 REW (rewind) · PLAY (playback) ) FF (fast-forward) P PAUSE (pause) r REC (record) (DCR-TRV900E only) !¶ Focus ring (p. 75) !• LASER LINK transmitter (p. 89) /Remote sensor (p.
- Page 185 Identifying the parts @§ @¶ @• @ª #º #¡ @§ LCD Screen (p. 20) @¶ LCD BRIGHT buttons (p. 20, 27) @• VOLUME buttons (p. 27) @ª RESET button (p. 173) #º DATA CODE button (p. 104) #¡ Speaker #™ START/STOP button (p. 14) #£...
- Page 186 Identifying the parts #¶ MEMORY INDEX button (p. 138) #• MEMORY PLAY button (p. 137) #ª PICTURE EFFECT button (p. 54) $º DIGITAL EFFECT button (p. 55) $¡ MEMORY DELETE button (p. 143) $™ MEMORY – button (p. 137, 143) $£...
- Page 187 Identifying the parts $§ $¶ $• $§ Access lamp (p. 122) $¶ DC IN jack (p. 9) $• Hooks for shoulder strap (p. 192) $ª Intelligent accessory shoe %º EJECT switch (p. 13) %¡ PUSH button (p. 13) %™ Grip strap (p. 24) %£...
- Page 188 CONTROL L or REMOTE. %§ DV IN/OUT jack (DCR-TRV900E) (p. 106) DV OUT jack (DCR-TRV890E) (p. 106) This “i.LINK” mark is a trademark of Sony Corporation and indicates that this product is in agreement with IEEE 1394-1995 specifications and their revisions.
- Page 189 Identifying the parts Floppy disk adapter 1 Memory slot connector (p. 122) 2 Floppy disk eject button (p. 123) 3 Floppy disk slot (p. 123) 4 Access lamp (p. 122) Опознавание частей Адаптер флоппи-диска 1 Соединитель гнезда для платы расширения памяти (стр. 122) 2 Кнопка...
- Page 190 Identifying the parts Remote Commander The buttons that have the same name on the Remote Commander as on the camcorder function identically. 1 PHOTO button (p. 43) 2 DISPLAY button (p. 28) 3 Memory control buttons (p. 137) 4 SEARCH MODE button (p. 94, 98, 100) 5 Tape transport buttons (p.
- Page 191 Identifying the Parts To prepare the Remote Commander To use the Remote Commander, you must insert two R6 (size AA) batteries. Use the supplied R6 (size AA) batteries. (1) Remove the battery cover from the Remote Commander. (2) Insert both of the R6 (size AA) batteries with correct polarity.
-
Page 192: Attaching The Shoulder Strap
VTR 2. The commander modes (1, 2 and 3) are used to distinguish this camcorder from other Sony VCRs to avoid remote control misoperation. If you use another Sony VCR in commander mode VTR 2, we recommend you change the commander mode or cover the remote sensor of the VCR with black paper. -
Page 193: Operation Indicators
Identifying the parts Operation indicators !¡ !™ !£ !¢ !∞ 1 Cassette memory indicator (p. 150) 2 Remaining battery indicator (p. 158) 3 Zoom indicator (p. 17) /Exposure indicator (p. 59) /Data file name indicator (p. 119) 4 Digital effect indicator (p. 56) 5 PROG. - Page 194 Identifying the parts !¢ Steady shot OFF indicator (p. 67) !∞ Manual focus/Infinity indicator (p. 74) !§ Recording mode indicator (p. 39) !¶ Standby/Recording indicator (p. 14) /Tape transport mode indicator (p. 27) /Image quality mode indicator (p. 124) !• Warning indicators (p. 196) !ª...
- Page 195 Identifying the parts Display window 1 Remaining time in minutes indicator (p. 9) / Tape counter (p. 103) / Memory counter (p. 138) / Time code indicator (p. 14) 2 FULL charge indicator (p. 9) 3 Remaining battery indicator (p. 9, 158) To watch the demonstration You can watch a brief demonstration of pictures with special effects.
-
Page 196: Warning Indicators
Warning indicators If indicators flash on the LCD screen or in the viewfinder or warning messages appear on the screen, check the following: : You can hear the beep sound when BEEP is set to MELODY or NORMAL in the menu system. - Page 197 (p. 153) 9 Some other trouble has occurred. Use the self-diagnosis function (p. 174). If the display does not disappear, contact your Sony dealer or local authorized Sony service facility. 0 The battery is not the “InfoLITHIUM” type.
-
Page 198: Index
Index A, B, C Audio mode ... 39 AUTO SHTR ... 35 Battery release ... 12 BEEP ... 41 Car battery ... 33 Cassette memory ... 5 Charging battery pack ... 9 Charging vanadium-lithium battery . 153 Cleaning video heads ... 164 Clock set ... - Page 200 Sony Corporation Printed in Japan...
Need help?
Do you have a question about the Handycam Vision DCR-TRV890E and is the answer not in the manual?
Questions and answers