Table of Contents
Advertisement
Quick Links
3-059-566-14 (1)
Digital
Video Camera
Recorder
Operating Instructions
Before operating the unit, please read this manual thoroughly,
and retain it for future reference.
ИНСТРУКЦИЯ ПО ЭКСПЛУАТАЦИИ
Перед эксплуатацией аппарата внимательно прочтите,
пожалуйста, данное руководство и сохраняйте его для
дальнейших справок.
DCR-TRV820E
DCR-TRV720E/TRV820E
©2000 Sony Corporation
Advertisement
Table of Contents

Related Manuals for Sony D8 Digital Handycam DCR-TRV720E


Summary of Contents for Sony D8 Digital Handycam DCR-TRV720E
-
Page 1: Digital Video Camera
Recorder Operating Instructions Before operating the unit, please read this manual thoroughly, and retain it for future reference. ИНСТРУКЦИЯ ПО ЭКСПЛУАТАЦИИ Перед эксплуатацией аппарата внимательно прочтите, пожалуйста, данное руководство и сохраняйте его для дальнейших справок. DCR-TRV820E DCR-TRV720E/TRV820E ©2000 Sony Corporation... -
Page 2: Memory Stick
English Welcome! Congratulations on your purchase of this Sony Digital Handycam camcorder. With your Digital Handycam, you can capture life’s precious moments with superior picture and sound quality. Your Digital Handycam is loaded with advanced features, but at the same time it is very easy to use. -
Page 3: Checking Supplied Accessories
Checking supplied accessories Make sure that the following accessories are supplied with your camcorder. 1 Wireless Remote Commander (1) (p. 205) 2 AC-L10A/L10B/L10C AC power adaptor (1), Mains lead (1) (p. 16) 3 NP-F330 battery pack (1) (p. 15, 16) 4 CR2025 lithium battery (1) (p. -
Page 4: Table Of Contents
English Table of contents Checking supplied accessories ... 3 Quick Start Guide Getting started Using this manual ... 12 Step 1 Preparing the power supply ... 15 Installing the battery pack ... 15 Charging the battery pack ... 16 Connecting to the mains ... 21 Step 2 Inserting a cassette ... - Page 5 Table of contents “Memory Stick” operations Using “Memory Stick” – introduction ... 108 Recording still images on “Memory Stick” – Memory Photo recording ... 113 Superimposing a still image in the “Memory Stick” on a moving image – MEMORY MIX ... 118 Recording an image from a tape as a still image ...
- Page 6 Русский Оглавление Проверка прилагаемых принадлежностей ... 3 Руководство по быстрому запуску ... 10 Подготовка к эксплуатации Использование данного руководства .. 12 Пункт 1 Подготовка источника питания ... 15 Установка батарейного блока ... 15 Зарядка батарейного блока ... 16 Подсоединение к сетевой розетке ...
- Page 7 Оглавление Операции с “Memory Stick” Использование “Memory Stick” – Введение ... 108 Запиcь неподвижных изображений на “Memory Stick” – Фотоcъемка с сохранением в памяти ... 113 Наложение неподвижного изображения из “Memory Stick” на подвижное изображение – MEMORY MIX ... 118 Запись...
-
Page 8: Quick Start Guide
English Quick Start Guide Connecting the mains lead Use the battery pack when using your camcorder outdoors (p. 15). Inserting a cassette Open the lid of the cassette compartment, and press EJECT. The compartment opens automatically. This chapter introduces you to the basic features of your camcorder. -
Page 9: Recording A Picture
Recording a picture Remove the lens cap. Open the LCD panel while pressing OPEN. Viewfinder The picture appears When the LCD panel is closed, use the on the LCD screen. viewfinder placing your eye against its eyecup. Monitoring the playback picture on the LCD screen (p. -
Page 10: Руководство По Быстрому Запуску
Русский Руководство по быстрому запуску Подсоединение провода электропитания При пользовании видеокамерой вне помещения используйте батарейный блок (стр. 15). Установка кассеты Откройте крышку кассетного отсека, а затем нажмите кнопку EJECT. Отсек откроется автоматически. В данной главе приведены основные функции Вашей видеокамеры. Подробные сведения приведены на странице... - Page 11 Запись изображения Снимите крышку объектива. Откройте панель ЖКД, нажав кнопку OPEN. Видоискатель На экране ЖКД Если панель ЖКД закрыта, воспользуйтесь появится видоискателем, приставив глаз к окуляру. изображение. Контроль воспроизводимого изображения на экране ЖКД (стр. 36) Установите переключатель POWER в положение VTR, нажав...
-
Page 12: Getting Started
— Getting started — Using this manual The instructions in this manual are for the 2 models listed in the table below. Before you start reading this manual and operating your camcorder, check the model number by looking at the bottom of your camcorder. The DCR-TRV820E is the model used for illustration purposes. - Page 13 Using this manual Note on TV colour systems TV colour systems differ from country to country. To view your recordings on a TV, you need a PAL system-based TV. Copyright precautions Television programmes, films, video tapes, and other materials may be copyrighted. Unauthorized recording of such materials may be contrary to the provision of the copyright laws.
-
Page 14: Precautions On Camcorder Care
Using this manual Precautions on camcorder care •The LCD screen and the viewfinder are manufactured using high-precision technology. However, there may be some tiny black points and/or bright points (red, blue, green or white) that constantly appear on the LCD screen and in the viewfinder. These points occur normally in the manufacturing process and do not affect the recorded picture in any way. -
Page 15: Step 1 Preparing The Power Supply
Step 1 Preparing the power supply Installing the battery pack Install the battery pack to use your camcorder outdoors. Slide the battery pack down until it clicks. To remove the battery pack Slide the battery pack out in the direction of the arrow while pressing BATT RELEASE down. -
Page 16: Charging The Battery Pack
Step 1 Preparing the power supply Charging the battery pack Use the battery pack after charging it for your camcorder. Your camcorder operates only with the “InfoLITHIUM” battery pack (L series). (1) Open the DC IN jack cover and connect the AC power adaptor supplied with your camcorder to the DC IN jack with the plug’s v mark facing up. - Page 17 Step 1 Preparing the power supply After charging the battery pack Disconnect the AC power adaptor from the DC IN jack on your camcorder. Notes •Prevent metallic objects from coming into contact with the metal parts of the DC plug of the AC power adaptor.
- Page 18 Step 1 Preparing the power supply Charging time/Время зарядки Battery pack/ Батарейный блок NP-F330 (supplied)/ (прилагается) NP-F530/F550 NP-F730/F750 NP-F930/F950 NP-F960 Approximate number of minutes to charge an empty battery pack Recording time/Время записи Battery pack/ Батарейный блок NP-F330 (supplied)/ (прилагается) NP-F530 NP-F550 NP-F730...
- Page 19 Step 1 Preparing the power supply Playing time/Время воспроизведения DCR-TRV720E Battery pack/ Батарейный блок NP-F330 (supplied)/ (прилагается) NP-F530 NP-F550 NP-F730 NP-F750 NP-F930 NP-F950 NP-F960 DCR-TRV820E Battery pack/ Батарейный блок NP-F330 (supplied)/ (прилагается) NP-F530 NP-F550 NP-F730 NP-F750 NP-F930 NP-F950 NP-F960 Approximate number of minutes when you use a fully charged battery Numbers in parentheses “( )”...
- Page 20 This unit is compatible with the “InfoLITHIUM” battery pack (L series). Your camcorder operates only with the “InfoLITHIUM” battery. “InfoLITHIUM” battery packs have the “InfoLITHIUM” is a trademark of Sony Corporation. Пункт 1 Подготовка источника По индикатору времени оставшегося заряда батарейного блока во время...
-
Page 21: Connecting To The Mains
DC IN jack, even when the mains lead is not plugged into the mains. Using a car battery Use Sony DC Adaptor/Charger (not supplied). Пункт 1 Подготовка источника питания Подсоединение к сетевой... -
Page 22: Step 2 Inserting A Cassette
Step 2 Inserting a cassette We recommend using Hi8 cassettes. (1) Prepare the power supply (p. 15). (2) Open the lid of the cassette compartment, and press EJECT. The cassette compartment opens automatically. (3) Insert a cassette with its window facing out and the write-protect tab on the cassette up. - Page 23 Step 2 Inserting a cassette Notes •Do not press the cassette compartment down. Doing so may cause malfunction. •Your camcorder records pictures in the Digital8 system. • The recording time when you use your camcorder is 2/3 of indicated time on Hi8 tape.
-
Page 24: Recording - Basics
— Recording – Basics — Recording a picture Your camcorder automatically focuses for you. (1) Remove the lens cap by pressing both knobs on its sides and attach the lens cap to the grip strap. (2) Install the power source and insert a cassette. See “Step 1”... - Page 25 Recording a picture Notes •Fasten the grip strap firmly. •Do not touch the built-in microphone during recording. Note on Recording mode Your camcorder records and plays back in the SP (standard play) mode and in the LP (long play) mode. Select SP or LP in the menu settings (p.
-
Page 26: Adjusting The Lcd Screen
Recording a picture Adjusting the LCD screen To adjust the brightness of the LCD screen, press either of the two buttons on LCD BRIGHT. The LCD panel moves about 90 degrees to the viewfinder side and about 180 degrees to the lens side. -
Page 27: Using The Zoom Feature
Recording a picture After recording (1) Set the POWER switch to OFF (CHARGE). (2) Close the LCD panel. (3) Eject the cassette. Using the zoom feature Move the power zoom lever a little for a slower zoom. Move it further for a faster zoom. Using the zoom function sparingly results in better-looking recordings. - Page 28 Recording a picture Notes on digital zoom •Digital zoom starts to function when zoom exceeds 25 . •The picture quality deteriorates as you go toward the “T” side. Set D ZOOM to OFF in the menu settings. Otherwise the digital zoom activates without notice.
- Page 29 Recording a picture Indicators displayed in the recording mode The indicators are not recorded on tape. Remaining battery time indicator/ Индикатор времени оставшегося заряда батарейного блока Format indicator/Индикатор формата Recording mode indicator/Индикатор режима записи STBY/REC indicator/Индикатор STBY/REC 0:00:01 4 7 2000 0:05:56 Time code (for tapes recorded in the Digital8 system only)
-
Page 30: Shooting Backlit Subjects - Back Light
Recording a picture Shooting backlit subjects – BACK LIGHT When you shoot a subject with the light source behind the subject or a subject with a light background, use the backlight function. Press BACK LIGHT in CAMERA or MEMORY mode. The . -
Page 31: Shooting In The Dark - Nightshot/Super Nightshot
Recording a picture Shooting in the dark – NightShot/Super NightShot The NightShot function enables you to shoot a subject in a dark place. For example, you can satisfactorily record the environment of nocturnal animals for observation when you use this function. While your camcorder is in CAMERA or MEMORY mode, slide NIGHTSHOT to ON. - Page 32 Recording a picture Notes •Do not use the NightShot function in bright places (ex. outdoors in the daytime). This may cause your camcorder to malfunction. •When you keep NIGHTSHOT set to ON in normal recording, the picture may be recorded in incorrect or unnatural colours.
-
Page 33: Self-Timer Recording
Recording a picture Self-timer recording Recording with the self-timer starts in 10 seconds automatically. This mode is useful when you want to record yourself. You can also use the Remote Commander for this operation. (1) Press (self-timer) in the standby mode. (self-timer) indicator appears on the LCD screen or in the viewfinder. -
Page 34: Checking The Recording - End Search / Editsearch / Rec Review
Checking the recording – END SEARCH / EDITSEARCH / Rec Review You can use these buttons to check the recorded picture or shoot so that the transition between the last recorded scene and the next scene you record is smooth. END SEARCH You can go to the end of the recorded section after you record. - Page 35 Checking the recording – END SEARCH / EDITSEARCH / Rec Review Rec Review You can check the section which you have stopped most recently. Press the – (7) side of EDITSEARCH momentarily in the standby mode. The section you have stopped most recently will be played back for a few seconds, and then your camcorder will return to the standby mode.
-
Page 36: Playback - Basics
— Playback – Basics — Playing back a tape You can monitor the playback picture on the LCD screen. If you close the LCD panel, you can monitor the playback picture in the viewfinder. You can control playback using the Remote Commander supplied with your camcorder. - Page 37 Playing back a tape When monitoring on the LCD screen You can turn the LCD panel over and move it back to the camcorder body with the LCD screen facing out. To display the screen indicators – Display function Press DISPLAY on your camcorder or the Remote Commander supplied with your camcorder.
- Page 38 Playing back a tape Using the data code function Your camcorder automatically records not only images on the tape but also the recording data (date/time or various settings when recorded) (Data code). Press DATA CODE on your camcorder or the Remote Commander in the playback mode.
-
Page 39: Various Playback Modes
Playing back a tape Various playback modes To operate video control buttons, set the POWER switch to VTR. To view a still picture (playback pause) Press X during playback. To resume playback, press X or N. To advance the tape Press M in the stop mode. - Page 40 Playing back a tape To view the picture at double speed Press 2 on the Remote Commander during playback. For double speed playback in the reverse direction, press Remote Commander. To resume normal playback, press N. To view the picture frame-by-frame Press C on the Remote Commander in the playback pause mode.
-
Page 41: Viewing The Recording On Tv
Viewing the recording on TV Connect your camcorder to your TV or VCR with the A/V connecting cable supplied with your camcorder to watch the playback picture on the TV screen. You can operate the playback control buttons in the same way as when you monitor playback pictures on the LCD screen. - Page 42 Viewing the recording on TV If your TV is already connected to a VCR Connect your camcorder to the LINE IN input on the VCR by using the A/V connecting cable supplied with your camcorder. Set the input selector on the VCR to LINE. If your TV or VCR is a monaural type Connect the yellow plug of the A/V connecting...
- Page 43 Viewing the recording on TV Using the AV cordless IR receiver Once you connect the AV cordless IR receiver (not supplied) to your TV or VCR, you can easily view the picture on your TV. For details, refer to the operating instructions of the AV cordless IR receiver.
- Page 44 Press S.LASER LINK. The lamp on the S.LASER LINK button goes out. If you use a Sony TV •You can turn on the TV automatically when you press S.LASER LINK on your camcorder. To do so, do as follows in advance: –...
-
Page 45: Advanced Recording Operations
— Advanced Recording Operations — Recording a still image on a tape – Tape Photo recording You can record a still image like a photograph. This mode is useful when you want to record a picture such as a photograph or when you print a picture using a video printer (not supplied). - Page 46 Recording a still image on a tape – Tape Photo recording Notes •During the tape photo recording, you cannot change the mode or setting. •The PHOTO button does not work: – while the digital effect function is set or in use. –...
-
Page 47: Self-Timer Tape Photo Recording
Recording a still image on a tape – Tape Photo recording Self-timer tape photo recording You can record still images on tapes with the self- timer. This mode is useful when you want to record yourself. You can also use the Remote Commander for this operation. -
Page 48: Printing The Still Image
Recording a still image on a tape – Tape Photo recording Printing the still image You can print a still image by using the video printer (not supplied). Connect the video printer using the A/V connecting cable supplied with your camcorder. Connect the A/V connecting cable to the AUDIO/VIDEO jack and connect the yellow plug of the cable to the video input of the video... -
Page 49: Using The Wide Mode
Using the wide mode You can record a 16:9 wide picture to watch on the 16:9 wide-screen TV (16:9WIDE). Black bands appear on the LCD screen or viewfinder during recording in 16:9WIDE mode [a]. The picture during playing back on a normal TV [b] or a wide-screen TV [c] are compressed in the widthwise direction. - Page 50 Using the wide mode In the wide mode, you cannot select the following functions: – Old movie – Bounce During recording You cannot select or cancel the wide mode. When you cancel the wide mode, set your camcorder to the standby mode and then set 16:9WIDE to OFF in the menu setting.
-
Page 51: Using The Fader Function
Using the fader function You can fade the picture in or out to give your recording a professional appearance. FADER M.FADER (mosaic)/ (мозаика) BOUNCE 1) 2) OVERLAP WIPE (random dot)/ (произвольные точки) MONOTONE When fading in, the picture gradually changes from black-and-white to colour. - Page 52 Using the fader function (1) When fading in [a] In the standby mode, press FADER until the desired fader indicator flashes. When fading out [b] In the recording mode, press FADER until the desired fader indicator flashes. The indicator changes as follows: FADER t M.FADER t BOUNCE t MONOTONE t OVERLAP t WIPE t DOT...
- Page 53 Using the fader function Notes •The overlap, wipe and dot functions work only for tapes recorded in the Digital8 •You cannot use the following functions while using the fader function. Also, you cannot use the fader function while using the following functions: –...
-
Page 54: Using Special Effects - Picture Effect
Using special effects – Picture effect You can digitally process images to obtain special effects like those in films or on the TV. NEG. ART [a] : The colour and brightness of the image is reversed. SEPIA : The image is sepia. B&W : The image is monochrome (black-and-white). -
Page 55: Using Special Effects – Picture Effect
Using special effects – Picture effect (1) Press PICTURE EFFECT in CAMERA mode. The picture effect indicator appears. (2) Turn the SEL/PUSH EXEC dial to select the desired picture effect mode. The indicator changes as follows: NEG.ART y SEPIA y B&W y SOLARIZE y SLIM y STRETCH y PASTEL y MOSAIC To turn the picture effect function... -
Page 56: Using Special Effects - Digital Effect
Using special effects – Digital effect You can add special effects to recorded images using the various digital functions. The sound is recorded normally. STILL You can record a still image so that it is superimposed on a moving image. FLASH (FLASH MOTION) You can record still images successively at constant intervals. - Page 57 Using special effects – Digital effect (1) Press DIGITAL EFFECT in CAMERA mode. The digital effect indicator appears. (2) Turn the SEL/PUSH EXEC dial to select the desired digital effect mode. The indicator changes as follows: STILL y FLASH y LUMI. y TRAIL y SLOW SHTR y OLD MOVIE (3) Press the SEL/PUSH EXEC dial.
- Page 58 Using special effects – Digital effect To cancel the digital effect Press DIGITAL EFFECT. Notes •The following functions do not work during digital effect: – Fader – Low lux mode of PROGRAM AE – Tape photo recording – Super NightShot •The following functions do not work in the slow shutter mode: –...
-
Page 59: Using The Program Ae Function
Using the PROGRAM AE function You can select PROGRAM AE (Auto Exposure) mode to suit your specific shooting requirements. Spotlight mode This mode prevents people’s faces, for example, from appearing excessively white when shooting subjects lit by strong light in the theatre. Soft portrait mode This mode brings out the subject while creating a soft background for subjects such as people or... - Page 60 Using the PROGRAM AE function (1) Press PROGRAM AE in CAMERA or MEMORY mode. The PROGRAM AE indicator appears. (2) Turn the SEL/PUSH EXEC dial to select the desired mode. The indicator changes as follows: To turn the PROGRAM AE function Press PROGRAM AE.
-
Page 61: Adjusting The Exposure Manually
Adjusting the exposure manually You can manually adjust and set the exposure. Adjust the exposure manually in the following cases: – The subject is backlit – Bright subject and dark background – To record dark pictures (e.g. night scenes) faithfully (1) Press EXPOSURE in CAMERA or MEMORY mode. -
Page 62: Focusing Manually
Focusing manually You can gain better results by manually adjusting the focus in the following cases: •The autofocus mode is not effective when shooting: – subjects through glass coated with water droplets. – horizontal stripe. – subjects with little contrast with backgrounds such as walls and sky. - Page 63 Focusing manually To focus precisely Adjust the zoom by first focusing at the “T” (telephoto) position and then shooting at the “W” (wide-angle) position. This makes focusing easier. When you shoot close to the subject Focus at the end of the “W” (wide-angle) position.
-
Page 64: Superimposing A Title
Superimposing a title You can select one of eight preset titles and two custom titles (p. 66). You can also select the language, colour, size and position of titles. (1) Press TITLE to display the title menu in the standby mode. (2) Turn the SEL/PUSH EXEC dial to select then press the dial. - Page 65 Superimposing a title To superimpose the title while you are recording Press TITLE while you are recording, and carry out steps 2 to 5. When you press the SEL/PUSH EXEC dial at step 5, the title is recorded. To select the language of a preset title If you want to change the language, select before step 2.
-
Page 66: Making Your Own Titles
Making your own titles You can make up to two titles and store them in your camcorder. Each title can have up to 20 characters. (1) Press TITLE in the standby or VTR mode. (2) Turn the SEL/PUSH EXEC dial to select then press the dial. - Page 67 Making your own titles To change a title you have stored In step 3, select CUSTOM1 or CUSTOM2, depending on which title you want to change, then press the SEL/PUSH EXEC dial. Turn the SEL/PUSH EXEC dial to select [C], then press the dial to delete the title.
-
Page 68: Inserting A Scene
Inserting a scene You can insert a scene in the middle of a recorded tape by setting the start and end points. The previously recorded frames between these start and end points will be erased. Use the Remote Commander for this operation. (1) While your camcorder is in the standby mode, keep pressing EDITSEARCH, and release the button at the insert end point [b]. -
Page 69: Advanced Playback Operations
— Advanced Playback Operations — Playing back a tape with picture effects During playback, you can process a scene using the picture effect functions: NEG.ART, SEPIA, B&W and SOLARIZE. During playback, press PICTURE EFFECT and turn the SEL/PUSH EXEC dial until the desired picture effect indicator (NEG.ART, SEPIA, B&W or SOLARIZE) appears. -
Page 70: Playing Back A Tape With Digital Effects
Playing back a tape with digital effects During playback, you can process a scene using the digital effect functions: STILL, FLASH, LUMI. and TRAIL. (1) During playback, press DIGITAL EFFECT and turn the SEL/PUSH EXEC dial until the desired digital effect indicator (STILL, FLASH, LUMI. -
Page 71: Enlarging Recorded Images - Pb Zoom
Enlarging recorded images – PB ZOOM You can enlarge moving and still images recorded on tapes. Besides the operation described here, your camcorder can enlarge still images recorded on “Memory Stick”s. (1) Press PB ZOOM on your camcorder while you are playing back. The image is enlarged, and R r appears on the LCD screen or in the viewfinder. - Page 72 Enlarging recorded images – PB ZOOM Notes •PB ZOOM works only for tapes recorded in the Digital8 system. •You cannot process externally input scenes using PB ZOOM function. •You cannot record pictures that you have processed using PB ZOOM function with this camcorder.
-
Page 73: Quickly Locating A Scene Using The Zero Set Memory Function
Quickly locating a scene using the zero set memory function Your camcorder goes forward or backward to automatically stop at a desired scene having a counter value of “0:00:00”. Use the Remote Commander for this operation. Use this function, for example, to view a desired scene later on during playback. -
Page 74: Searching A Recording By Date - Date Search
Searching a recording by date – Date search You can automatically search for the point where the recording date changes and start playback from that point (Date search). Use the Remote Commander for this operation. Use this function to check where recording dates change or to edit the tape at each recording date. - Page 75 Searching a recording by date – Date search Notes •The date search works only for tapes recorded in the Digital8 system. •If one day’s recording is less than two minutes, your camcorder may not accurately find the point where the recording date changes. If a tape has a blank portion in the recorded portions The date search function may not work correctly.
-
Page 76: Searching For A Photo - Photo Search/Photo Scan
Searching for a photo – Photo search/ Photo scan You can search for the still image recorded on tape (photo search). You can also search for still images one after another and display each image for 5 seconds automatically (photo scan). Use the Remote Commander for these operations. -
Page 77: Фотопоиск/Фотосканирование
Searching for a photo – Photo search/Photo scan Scanning photo (1) Set the POWER switch to VTR. (2) Press SEARCH MODE on the Remote Commander repeatedly, until the photo scan indicator appears. The indicator changes as follows: DATE SEARCH t PHOTO SEARCH t PHOTO SCAN (3) Press . -
Page 78: Editing
— Editing — Dubbing a tape Using the A/V connecting cable Connect your camcorder to the VCR using the A/V connecting cable supplied with your camcorder. (1)Insert a blank tape (or a tape you want to record over) into the VCR, and insert the recorded tape into your camcorder. - Page 79 Dubbing a tape Be sure to clear the indicators from the screen If they are displayed, press the following buttons not to record the indicators on the dubbed tape: – DISPLAY – DATA CODE – SEARCH MODE on the Remote Commander You can edit on VCRs that support the following systems: 8 mm,...
- Page 80 Dubbing a tape Using the i.LINK cable (DV connecting cable) Simply connect the i.LINK cable (DV connecting cable) (not supplied) to DV IN/OUT and to DV IN/OUT of the DV products. With digital-to- digital connection, video and audio signals are transmitted in digital form for high-quality editing.
- Page 81 Dubbing a tape Note on tapes that are not recorded in the Digital8 system The picture may fluctuate. This is not a malfunction. During playback of tapes recorded in the Hi8/ standard 8 system Digital signals are output as the image signals from the DV IN/OUT jack.
-
Page 82: Using With Analog Video Unit And Pc - Signal Convert Function
Using with analog video unit and PC – Signal convert function You can capture images and sound from an analog video unit connected to a PC which has the i.LINK (DV) jack to your camcorder. Analog video signals t Digital video signals (1)Set the POWER switch to VTR. - Page 83 Using with analog video unit and PC – Signal convert function After capturing images and Sound Stop capturing procedures on your PC, and stop the playback on the analog video unit. Notes •You need to install software which can exchange video signals. •Depending on the condition of the analog video signals, the PC may not be able to output the images correctly when you convert analog...
-
Page 84: Recording Video Or Tv Programmes
Recording video or TV programmes Using the A/V connecting cable You can record a tape from another VCR or a TV programme from a TV that has video/audio outputs. Use your camcorder as a recorder. (1) Insert a blank tape (or a tape you want to record over) into your camcorder. - Page 85 Recording video or TV programmes When you have finished dubbing a tape Press x on both your camcorder and the VCR. Notes •To enable smooth transition, we recommend that you do not mix pictures recorded in the Hi8/standard 8 with the Digital8 tape.
- Page 86 Recording video or TV programmes Using the i.LINK cable (DV connecting cable) Simply connect the i.LINK cable (DV connecting cable) (not supplied) to DV IN/OUT and to DV IN/OUT of the DV products. With digital-to- digital connection, video and audio signals are transmitted in digital form for high-quality editing.
- Page 87 Recording video or TV programmes You can connect one VCR only using the i.LINK cable (DV connecting cable). During digital editing The colour of the display may be uneven. However this does not affect the dubbed picture. If you record playback pause picture with the DV IN/OUT jack The recorded picture becomes rough.
-
Page 88: Inserting A Scene From A Vcr - Insert Editing
Inserting a scene from a VCR – Insert Editing You can insert a new scene from a VCR onto your originally recorded tape by specifying the insert start and end points. Use the Remote Commander for this operation. Connections are the same as in “Recording video or TV programmes”... -
Page 89: Inserting A Scene From A Vcr – Insert Editing
Inserting a scene from a VCR – Insert Editing (1) Set the POWER switch to VTR. (2) On the VCR, locate just before the insert start point [a], then press X to set the VCR to the playback pause mode. (3) On your camcorder, locate the insert end point [c] by pressing m or M. - Page 90 Inserting a scene from a VCR – Insert Editing Notes •The zero set memory function works only for tapes recorded in the Digital8 •The picture and sound recorded on the section between the insert start and end points will be erased when you insert the new scene.
-
Page 91: Customizing Your Camcorder
— Customizing Your Camcorder — Changing the menu settings To change the mode settings in the menu settings, select the menu items with the SEL/ PUSH EXEC dial. The default settings can be partially changed. First, select the icon, then the menu item and then the mode. -
Page 92: Selecting The Mode Setting Of Each Item
Changing the menu settings To make the menu display disappear Press MENU. Menu items are displayed as the following icons: MANUAL SET CAMERA SET VTR SET LCD/VF SET MEMORY SET PRINT SET (DCR-TRV820E only) TAPE SET SETUP MENU OTHERS English Selecting the mode setting of each item Menu items differ according to the position of the POWER switch. - Page 93 Changing the menu settings Icon/item Mode HiFi SOUND z STEREO TBC* z ON TBC stands for “Time Base Corrector”. DNR* z ON DNR stands for “Digital Noise Reduction”. AUDIO MIX ——— NTSC PB z ON PAL TV NTSC 4.43 PB MODE z AUTO A/V t DV OUT z OFF...
- Page 94 Changing the menu settings Icon/item Mode LCD B. L. z BRT NORMAL BRIGHT LCD COLOUR ——— VF B.L. z BRT NORMAL BRIGHT Notes on LCD B.L. and VF B.L. •When you select BRIGHT, battery life is reduced by about 10 percent during recording. •When you use power sources other than the battery pack, BRIGHT is automatically selected.
- Page 95 Changing the menu settings Icon/item Mode CONTINUOUS z OFF MULTI SCRN QUALITY z FINE STANDARD FLD./FRAME z FIELD FRAME PRINT MARK z OFF PROTECT z OFF SLIDE SHOW ——— DELETE ALL ——— FORMAT z RETURN FORMAT PHOTO SAVE ——— Note on print marks You can print images with the printer on your camcorder including images without print marks.
- Page 96 Changing the menu settings Icon/item Mode 9PIC SAME* ——— 9PIC MULTI* ——— REC MODE z SP AUDIO MODE z 12BIT 16BIT q REMAIN z AUTO DATA CODE z DATE/CAM DATE * DCR-TRV820E only Note on REC MODE When you record on the standard 8 LP mode in the menu settings.
- Page 97 — To automatically turn on the Sony TV when using the super laser link function To switch the video input on a Sony TV when using the super laser link function (p. 44) — To display selected menu items in normal size...
- Page 98 Changing the menu settings Icon/item Mode WORLD TIME ——— BEEP z MELODY NORMAL COMMANDER z ON DISPLAY z LCD V-OUT/LCD REC LAMP z ON INDICATOR z BL OFF BL ON Note If you press DISPLAY with DISPLAY set to V-OUT/LCD in the menu settings, the picture from a TV or VCR will not appear on the LCD screen even when your camcorder is connected to outputs on the TV or VCR.
- Page 99 Изменение установок меню Русский Выбор установок режима по каждому пункту Пункты меню отличаются в зависимости от положения переключателя POWER. На экране ЖКД и в видоискателе отображаются только те пункты, которыми Вы можете оперировать в данный момент времени. Пиктограмма/пункт Режим AUTO SHTR z ON D ZOOM z 450...
- Page 100 Изменение установок меню Пиктограмма/пункт Режим z STEREO HiFi SOUND TBC* z ON TBC означает “Временный базовый корректор”. DNR* z ON DNR означает “Цифровое шумоподавление”. AUDIO MIX ——— NTSC PB z ON PAL TV NTSC 4.43 PB MODE z AUTO A/V t DV OUT z OFF * Только...
- Page 101 Изменение установок меню Пиктограмма/пункт Режим LCD B. L. z BRT NORMAL BRIGHT LCD COLOUR ——— VF B.L. z BRT NORMAL BRIGHT Примечания по режиму LCD B.L. и VF B.L • Если Вы выберите установку BRIGHT, срок службы батарейного блока сократится примерно на 10% при...
- Page 102 Изменение установок меню Пиктограмма/пункт Режим z OFF CONTINUOUS MULTI SCRN QUALITY z FINE STANDARD FLD./FRAME z FIELD FRAME PRINT MARK z OFF PROTECT z OFF SLIDE SHOW ——— DELETE ALL ——— FORMAT z RETURN FORMAT PHOTO SAVE ——— Примечания относительно печатных знаков Вы...
- Page 103 Изменение установок меню Режим Пиктограмма/пункт ——— 9PIC SAME* ——— 9PIC MULTI* z SP REC MODE z 12BIT AUDIO MODE 16BIT z AUTO q REMAIN z DATE/CAM DATA CODE DATE * Только модель DCR-TRV820E Примечание по режиму REC MODE При записи на стандартную ленту 8 SP, даже...
- Page 104 MODE в установках меню. Предназначение Для пepeycтaнoвки даты или времени (стр. 106) — Для автоматического включения телевизора Sony при использовании функции лазерного суперканала передачи сигналов Для включения входного видеосигнала на телевизоре Sony при использовании функции лазерного суперканала передачи сигналов (стр. 44) —...
- Page 105 Изменение установок меню Пиктограмма/пункт Режим WORLD TIME ——— BEEP z MELODY NORMAL COMMANDER z ON DISPLAY z LCD V-OUT/LCD REC LAMP z ON INDICATOR z BL OFF BL ON Примечание Если Вы нажмете кнопку DISPLAY с помощью опции DISPLAY, установленной в положение V- OUT/LCD в...
-
Page 106: Resetting The Date And Time
Resetting the date and time The default clock setting is set to Sydney time for Australia and New Zealand models, to Tokyo time for the models sold in Japan and to Hong Kong time for other models. The date and time are held in memory by the lithium battery. - Page 107 Resetting the date and time The year changes as follows: If you do not set the date and time “– – – – – – – –”“– –:– –:– –” are recorded on the tape and the “Memory Stick.” Note on the time indicator The internal clock of your camcorder operates on a 24-hour cycle.
-
Page 108: Memory Stick" Operations
Using “Memory Stick”– introduction You can record and play back still images on the “Memory Stick” supplied with your camcorder. You can easily play back, record or delete still images. You can exchange image data with other equipment such as a personal computer etc., using the serial port adaptor for “Memory Stick”... - Page 109 Stick”, которая использовалась на другой аппаратуре, отформатируйте “Memory Stick” на Вашей видеокамере, следуя инструкции на стр. 102. Имейте в виду, что все изображения на “Memory Stick” буду удалены, если Вы отформатируете ее. “Memory Stick” и являются фирменными знаками Sony Corporation.
-
Page 110: Inserting "Memory Stick
Using “Memory Stick” –introduction Inserting “Memory Stick” (1) Open the lid of the cassette compartment. (2) Insert the “Memory Stick” with the v mark facing toward the “Memory Stick” slot as illustrated until it clicks. (3) Close the lid of the cassette compartment. To eject the “Memory Stick”... -
Page 111: Selecting Image Quality Mode
Using “Memory Stick” –introduction Selecting image quality mode You can select image quality mode in still image recording. Default setting is FINE. (1) Set the POWER switch to VTR or MEMORY. Make sure that the LOCK is set to the right (unlock) position. - Page 112 Using “Memory Stick” –introduction Image quality settings Setting Meaning FINE (FINE) Use this mode when you want to record high quality images. The image is compressed to about 1/6. STANDARD This is the standard image (STD) quality. The image is compressed to about 1/10.
-
Page 113: Recording Still Images On "Memory Stick" - Memory Photo Recording
Recording still images on “Memory Stick” – Memory Photo recording You can select the FIELD or FRAME mode in still image recording. Your camcorder compensates for camera-shake when recording moving subjects in the FIELD mode. Your camcorder records still images in high quality in the FRAME mode. -
Page 114: Recording Images Continuously
Recording still images on “Memory Stick” – Memory Photo recording Notes •When recording fast-moving subjects in the FRAME mode, the recorded image blurry. •When recording in the FRAME mode, your camcorder may not correct camera-shake. We recommend that you shoot objects with a tripod. -
Page 115: Memory Photo Recording
Recording still images on “Memory Stick” – Memory Photo recording (1) Set the POWER switch to MEMORY. Make sure that the LOCK is set to the right (unlock) position. (2) Press MENU to make the menu display appear. (3) Turn the SEL/PUSH EXEC dial to select then press the dial. - Page 116 Recording still images on “Memory Stick” – Memory Photo recording Continuous shooting settings Setting Meaning (indicator on the screen) Your camcorder shoots one image at a time. (no indicator) MULTI SCRN Your camcorder shoots 9 still images at about 0.5 sec intervals and displays the images on a single page divided into 9 boxes.
-
Page 117: Self-Timer Memory Photo Recording
Recording still images on “Memory Stick” – Memory Photo recording Self-timer memory photo recording You can record still images on “Memory Stick”s with the self-timer. This mode is useful when you want to record yourself. You can also use the Remote Commander for this operation. -
Page 118: Superimposing A Still Image In The "Memory Stick" On A Moving Image - Memory Mix
Superimposing a still image in the “Memory Stick” on a moving image – MEMORY MIX You can superimpose a still image you have recorded on the “Memory Stick” on top of the moving image you are recording. M. CHROM (Memory chroma key) You can swap a blue area of a still image such as an illustration or a frame with a moving image. - Page 119 Superimposing a still image in the “Memory Stick” on a moving image – MEMORY MIX Before operation Insert a Hi8 /Digital8 tape for recording and a “Memory Stick” into your camcorder. (1) Set the POWER switch to CAMERA. (2) Press MEMORY MIX in the standby mode. The last recorded still image on “Memory Stick”...
- Page 120 Superimposing a still image in the “Memory Stick” on a moving image – MEMORY MIX (7) Press START/STOP to start recording. MEMORY MIX M. CHROM 100–0021 Still image/ Неподвижное изображение To change the still image to superimpose Do either of the following: –...
- Page 121 Superimposing a still image in the “Memory Stick” on a moving image – MEMORY MIX During recording You cannot change the mode setting. The “Memory Stick” supplied with your camcorder stores 20 images – For M. CHROM: 18 images (such as a frame) 100-0001~100-0018 –...
-
Page 122: Recording An Image From A Tape As A Still Image
Recording an image from a tape as a still image Your camcorder can read moving image data recorded on a tape in the Digital8 record it as a still image on a “Memory Stick”. Your camcorder can also take in moving image data through the input connector and record it as a still image on a “Memory Stick”. -
Page 123: Recording An Image From A Tape As A Still Image
Recording an image from a tape as a still image When the access lamp is lit or flashing Do not shake or strike the unit. Also do not turn the power off , eject the “Memory Stick” or remove the battery pack. Otherwise, an image data breakdown may occur. -
Page 124: Recording A Still Image From Other Equipment
Recording an image from a tape as a still image Recording a still image from other equipment (1) Set the POWER switch to VTR and set DISPLAY to LCD in the menu settings. (2) Play back the recorded tape, or turn the TV on to see the desired programme. - Page 125 Recording an image from a tape as a still image Using the i.LINK cable (DV connecting cable) S VIDEO LANC DV OUT : Signal flow/ Передача сигнала Запись изображения с ленты как неподвижного изображения Использование кабеля i.LINK (соединительный кабель цифрового видеосигнала...
-
Page 126: Copying Still Images From A Tape - Photo Save
Copying still images from a tape – Photo save Using the search function, you can automatically take in only still images from tapes recorded in the Digital8 system and record them on a“Memory Stick” in sequence. Before operation •Insert a tape recorded in the Digital8 and rewind the tape. - Page 127 Copying still images from a tape – Photo save To stop copying Press MENU to stop copying. When the memory of the “Memory Stick” is full MEMORY FULL appears on the LCD screen, and the copying stops. Insert another “Memory Stick” and repeat the procedure from step 2.
-
Page 128: Viewing A Still Image - Memory Photo Playback
Viewing a still image – Memory Photo playback You can play back still images recorded on a“Memory Stick”. You can also play back 6 images at a time by selecting the index screen. Before operation Insert a“Memory Stick” into your camcorder. (1) Set the POWER switch to MEMORY or VTR. - Page 129 Viewing a still image – Memory Photo playback To play back recorded images on a TV screen •Connect your camcorder to the TV with the A/V connecting cable supplied with your camcorder before the operation. •When operating memory photo playback on a TV or the LCD screen, the image quality may appear to have deteriorated.
- Page 130 Viewing a still image – Memory Photo playback Playing back 6 recorded images at a time (index screen) You can play back 6 recorded images at a time. This function is especially useful when searching for a particular image. Press MEMORY INDEX. A red B mark appears above the image that is displayed before changing to the index screen mode.
- Page 131 Viewing a still image – Memory Photo playback Note When displaying the index screen, the number appears above each image. This indicates the order in which images are recorded on the “Memory Stick”. These numbers are different from the data file names. Files modified with personal computers These files may not be displayed on the index screen.
-
Page 132: Copying The Image Recorded On "Memory Stick" To Tapes
Copying the image recorded on “Memory Stick” to tapes You can copy still images or titles recorded on “Memory Stick”s and record them to /Digital8 tapes. Before operation Insert a Hi8 /Digital8 and a “Memory Stick” into your camcorder. (1) Set the POWER switch to VTR. (2) Using the video control buttons, search a point where you want to record the desired still image. - Page 133 Copying the image recorded on “Memory Stick” to tapes During copying You cannot operate the following buttons: MEMORY PLAY, MEMORY INDEX, MEMORY DELETE, MEMORY MIX, MEMORY +, and MEMORY –. Note on the index screen You cannot record the index screen. If you press EDITSEARCH during pause mode Memory playback stops.
-
Page 134: Enlarging Still Images Recorded On "Memory Stick"S - Memory Pb Zoom
Enlarging still images recorded on “Memory Stick”s – Memory PB ZOOM You can enlarge moving and still images recorded on a “Memory Stick.” Before operation Insert a “Memory Stick” into your camcorder. (1) Set the POWER switch to MEMORY or VTR. Make sure that the LOCK is set to the right (unlock) position. -
Page 135: Playing Back Images In A Continuous Loop - Slide Show
Playing back images in a continuous loop – SLIDE SHOW You can automatically play back images in sequence. This function is useful especially when checking recorded images or during a presentation. Before operation Insert a“Memory Stick” into your camcorder. (1) Set the POWER switch to MEMORY. Make sure that the LOCK is set to the right (unlock) position. -
Page 136: Playing Back Images In A Continuous Loop – Slide Show
Playing back images in a continuous loop – SLIDE SHOW To stop the slide show Press MENU. To pause during a slide show Press MEMORY PLAY. To start the slide show from a particular image Select the desired image using MEMORY +/– buttons before step 2. -
Page 137: Preventing Accidental Erasure - Image Protection
Preventing accidental erasure – Image protection To prevent accidental erasure of important images, you can protect selected images. Before operation Insert a“Memory Stick” into your camcorder. (1) Set the POWER switch to MEMORY or VTR. Make sure that the LOCK is set to the right (unlock) position. - Page 138 Preventing accidental erasure – Image protection To cancel image protection Select OFF in step 6, then press the SEL/PUSH EXEC dial. Note Formatting erases all information on the “Memory Stick”, including the protected image data. Check the contents of the “Memory Stick” before formatting.
-
Page 139: Deleting Images
Deleting images You can delete images stored in a“Memory Stick.” Before operation Insert a“Memory Stick” into your camcorder. Deleting selected images (1) Set the POWER switch to MEMORY or VTR. Make sure that the LOCK is set to the right (unlock) position. -
Page 140: Deleting All The Images
Deleting images Deleting all the images You can delete all the unprotected images in the “Memory Stick”. (1) Set the POWER switch to MEMORY or VTR. Make sure that the LOCK is set to the right (unlock) position. (2) Press MENU to make the menu display appear. - Page 141 Deleting images To cancel deleting all the images in the “Memory Stick” Select RETURN in step 5, then press the SEL/ PUSH EXEC. While DELETING appears Do not turn the POWER switch or press any buttons. If the write-protect tab on the “Memory Stick” is set to LOCK You cannot delete images.
-
Page 142: Writing A Print Mark - Print Mark
Writing a print mark – PRINT MARK You can specify the recorded still image to print out. This function is useful for printing out still images later. Your camcorder conforms with the DPOF (Digital Print Order Format) standard for specifying the still images to print out. This function is not for printing out still images on your camcorder. - Page 143 Writing a print mark – PRINT MARK To cancel writing print marks Select OFF in step 6, then press the SEL/PUSH EXEC dial. If the write-protect tab on the “Memory Stick” is set to LOCK You cannot write print marks on still images. Запись...
-
Page 144: Printing Operations
— Printing operations — Using the printer – Introduction –DCR-TRV820E only You can use the printer on your camcorder to print images on the print paper (supplied). About the print cartridge •Do not touch the ribbon or leave it in a dusty place. - Page 145 Using the printer – Introduction About lamp indications PRINT CARTRIDGE lamp/ Лампочка PRINT CARTRIDGE PRINT lamp Fast flashing (green): •Printer error •Heat build up inside printer Slow flashing (orange): •During printing PRINT PAPER lamp (red) Fast flashing: •Print paper error Slow flashing: •Print paper not inserted PRINT CARTRIDGE lamp (red)
- Page 146 Using the printer – Introduction Inserting the print cartridge Be sure to use the specified print cartridge. (1) Slide PRINT CARTRIDGE OPEN knob on the bottom of your camcorder in the direction of the arrow, and open the print cartridge lid. (2) Insert the print cartridge as far as possible in the direction of the arrow on the cartridge case until it clicks into the cartridge...
- Page 147 Using the printer – Introduction Note The inside of your camcorder sometimes heats up. Do not put your hand inside the print cartridge compartment. The ribbon protector The ribbon protector is located between the ribbon and the cartridge case. This protector prevents the ribbon from being tangled when inserting the print cartridge into the cartridge compartment.
- Page 148 Using the printer – Introduction Removing the print cartridge Slide the removal switch to the end in the direction of the arrow, and remove the print cartridge. Notes •Do not remove the print cartridge when print paper is inserted. This may cause your camcorder malfunction.
- Page 149 Using the printer – Introduction Inserting the print paper Be sure to use the specified print paper. (1) Set the POWER switch to MEMORY or VTR. Make sure that the LOCK is set to the right (unlock) position. (2) Open the LCD panel while pressing OPEN. (3) Slide the printer cover in the direction of the arrow to open.
- Page 150 Using the printer – Introduction To remove drawn in print paper Set the POWER switch to OFF (CHARGE), and set again to either MEMORY or VTR. The print paper is automatically ejected. Pull out the print paper in the direction of the arrow.
- Page 151 Using the printer – Introduction Checking the power supply Be sure to use a fully charged battery or the AC power adaptor. Printing is not possible if the battery is low. However, recording may be possible depending on how much the battery power remains. The remaining battery time indicator does not indicate the possible printing time.
-
Page 152: Making Prints - Standard Print
Making prints – Standard print –DCR-TRV820E only You can print images whenever you want to or print images recorded on “Memory Stick.” Images can also be captured from other equipment and printed. Printing images whenever you want to Before operation Be sure to use a fully charged battery when using the battery to make prints. - Page 153 Making prints – Standard print To cancel printing The print paper is automatically ejected by setting the POWER switch to OFF (CHARGE) once and then to MEMORY. To resume printing, insert new print paper and repeat the procedure from step 4. Notes •During printing, the print paper is inserted and ejected from the left and right sides of the body.
- Page 154 Making prints – Standard print Making prints from other equipment Before operation Be sure to use a fully charged battery when using the battery to make prints. (1) Insert the print cartridge. (p. 146) (2) Set the POWER switch to VTR on your camcorder.
- Page 155 Making prints – Standard print Using the i.LINK cable (DV connecting cable) S VIDEO LANC DV OUT : Signal flow/ Передача сигнала Note Prints cannot be made when images from other equipment are being recorded on your camcorder. (Print paper is not drawn in even if inserted.) Titles superimposed on the image You cannot print titles superimposed on the...
- Page 156 Making prints – Standard print Printing images recorded on “Memory Stick” Before operation •Be sure to use a fully charged battery when using the battery to make prints. •Insert a recorded “Memory Stick” into your camcorder. (1) Insert the print cartridge. (p. 146) (2) Set the POWER switch to MEMORY or VTR.
- Page 157 Making prints – Standard print Notes •During printing, the print paper is inserted and ejected between the paper dispenser and the printer cover. Do not place any objects that may prevent the print paper from being inserted and ejected from the body. •During printing, do not draw out the print paper.
-
Page 158: Memory Mix
Making prints – Standard print Printing images on which superimposed a still image by using MEMORY MIX function Before operation • Be sure to use a fully charged battery when using the battery to make prints. • Insert a recorded “Memory Stick” into your camcorder. -
Page 159: Making Prints Of Split Screens - Split Printing
Making prints of split screens – Split printing – DCR-TRV820E only You can print images recorded on “Memory Stick” to print paper (Sticker type/9 split size). Printing a single image Before operation •Be sure to use a fully charged battery when using the battery to make prints. - Page 160 Making prints of split screens – Split printing Printing images recorded on “Memory Stick” in recording order Before operation •Be sure to use a fully charged battery when using the battery to make prints. •Insert a recorded “Memory Stick” into your camcorder.
-
Page 161: Additional Information
— Additional Information — Digital8 system, recording and playback What is the “Digital8 This video system has been developed to enable digital recording to Hi8 /Digital8 cassette . Usable cassette tapes We recommend using Hi8 cassette.* The recording time when you use your Digital8 system camcorder on Hi8 tape is 2/3 the recording time when using the conventional Hi8... - Page 162 Digital8 system, recording and playback When you play back Playing back an NTSC-recorded tape You can play back tapes recorded in the NTSC video system on the LCD screen, if the tape is recorded in the SP mode . Copyright signal When you play back Using any other video camera recorder, you cannot record on a tape that has recorded...
- Page 163 Digital8 system, recording and playback When you playback a dual sound track tape When you use tapes recorded in the Digital8 system When you play back a Digital8 which is dubbed from a dual sound track tape recorded in the DV system, set HiFi SOUND to the desired mode in the menu settings (p.
-
Page 164: About I.link
About the Name “i.LINK” i.LINK is a more familiar term for IEEE 1394 data transport bus proposed by SONY, and is a trademark approved by many corporations. IEEE 1394 is an international standard standardized by the Institute of Electrical and Electronic Engineers. - Page 165 DV jacks, see page 80. This unit can also be connected to other i.LINK (DV) compatible equipment made by SONY (e.g. VAIO series personal computer) other than video equipment. Before connecting this unit to a personal...
-
Page 166: Changing The Lithium Battery In Your Camcorder
5 seconds when you set the POWER switch to CAMERA or MEMORY. In this case, replace the battery with a Sony CR2025 lithium battery. Use of any other battery may present a risk of fire or explosion. -
Page 167: Changing The Lithium Battery In Your Camcorder
(2) Push the lithium battery in the direction of the arrow once and pull it out from the holder. (3) Install a Sony CR2025 lithium battery with the positive (+) side facing out. (4) Close the lid. -
Page 168: Troubleshooting
If you run into any problem using your camcorder, use the following table to troubleshoot the problem. If the problem persists, disconnect the power source and contact your Sony dealer or local authorized Sony service facility. If “C:ss:ss” appears on the LCD screen, in the viewfinder or the display window, the self-diagnosis display function has worked. - Page 169 Rewind the tape. (p. 36) • The video head may be dirty. c Clean the heads using the Sony V8-25CLD cleaning cassette (not supplied). (p. 188) • The stereo tape is played back with HiFi SOUND set to 2 in the menu settings.
- Page 170 Troubleshooting In the recording and playback modes Symptom The power does not turn on. The end search function does not work. The end search function does not work correctly. The battery pack is quickly discharged. The battery remaining indicator does not indicate the correct time.
- Page 171 Troubleshooting When operating using the “Memory Stick” Symptom The “Memory Stick” does not function. Recording does not function. The image cannot be deleted. You cannot format the “Memory Stick”. Deleting all the images cannot be carried out. You cannot protect the image. You cannot write a print mark on the still image.
- Page 172 • Removal switch is not slid to the end. c Slide it to the end. • The ribbon is jammed in the cartridge compartment. c Contact your Sony dealer or local authorized Sony service facility. • If you disconnect the power source such as the battery pack during printing, the platen roller may not move back to the original position.
- Page 173 Remove the cassette and insert it again, then operate your camcorder. • The AC power adaptor is disconnected. c Connect it firmly. (p. 21) • Something is wrong with the battery pack. c Contact your Sony dealer or local authorized Sony service facility.
-
Page 174: Self-Diagnosis Display
Remove the cassette and leave your camcorder for at least 1 hour to acclimatize. (p. 187) • The video heads are dirty. c Clean the heads using the Sony V8-25CLD cleaning cassette (not supplied). (p. 188) • A malfunction other than the above that you can service has occurred. -
Page 175: Warning Indicators And Messages
English Warning indicators and messages If indicators and messages appear on the LCD screen, in the viewfinder or in the display window, check the following: See the page in parentheses “( )” for more information. Warning indicators Warning indication as to file Slow flashing: •The file is corrupted. - Page 176 Warning indicators and messages Warning messages •CLOCK SET •FOR “InfoLITHIUM” BATTERY ONLY •8 mm TAPE t SP REC Hi8 TAPE t LP/SP REC •Q Z TAPE END •Q NO TAPE • CLEANING CASSETTE** •COPY INHIBIT • FULL • • NO FILE •...
-
Page 177: Поиск И Устранение Неисправностей
Если у Вас возникла какая-либо проблема при использовании видеокамеры, воспользуйтесь следующей таблицей для отыскания и устранения проблемы. Если проблема не устраняется, то следует отсоединить источник питания и обратиться в сервисный центр Sony или в местное уполномоченное предприятие по обслуживанию изделий Sony. Если на экране ЖКД, видоискателе... - Page 178 Перемотайте ленту назад. (стр. 36) • Возможно, загрязнены видеоголовки. c Почистите видеоголовки с помощью очистительной кассеты Sony V8-25CLD (не прилагается). (стр. 188) • Стереофоническая лента воспроизводится при установленном переключателе HiFi SOUND в положение 2 в установках меню. c Установите его в положение STEREO. (стр. 91) •...
- Page 179 Поиск и устранение неисправностей В режимах записи и воспроизведения Возможная неисправность Не включается питание. Не работает функция поиска конца на ленте. Функция поиска конца на ленте работает неправильно. Батарейный блок быстро разряжается. Индикатор оставшегося заряда батарейного блока показывает неправильное время. Выключается...
- Page 180 Поиск и устранение неисправностей При эксплуатации с “Memory Stick” Возможная причина Не функционирует “Memory Stick” . Не функционирует запись. Изображение не может быть удалено. Вы не можете отформатировать “Memory Stick” . Удаление всех изображений не может быть выполнено. Вы не можете защитить изображение.
- Page 181 • Переключатель для извлечения не передвинут до упора. c Передвиньте его до упора. • Произошло замятие красящей ленты в отсеке для картриджа. c Свяжитесь с Вашим дилером Sony или местным уполномоченным сервисным предприятием Sony. • Если Вы отсоедините источник питания, такой как батарейный...
- Page 182 Выньте кассету и вставьте ее снова, а затем включите Вашу видеокамеру. • Отсоединен сетевой адаптер переменного тока. c Подсоедините его плотно. (стр. 21) • Неполадка с батарейным блоком. c Обратитесь в сервисный центр Sony или в местное уполномоченное предприятие по обслуживанию изделий Sony. красащая лента оказалась...
-
Page 183: Индикация Самодиагностики
C:32:ss E:61:ss E:62:ss Если Вы не можете самостоятельно устранить неполадку даже после опробования соответствующих методов устранения несколько раз, обратитесь в сервисный центр Sony или в местное уполномоченное предприятие по обслуживанию изделий Sony. Экран ЖКД, видоискатель или окошко дисплея Индикация самодиагностики... -
Page 184: Предупреждающие Индикаторы И Сообщения
Русский Предупреждающие индикаторы и сообщения Если в видоискателе, на экране ЖКД или в окошке дисплея появятся индикаторы и сообщения, проверьте следующее: См. страницу в круглых скобках “( )” для более подробной информации. Предупреждающие индикаторы Предупреждающая индикация файла Медленное мигание: • Файл поврежден (стр. 108). •... - Page 185 Предупреждающие индикаторы и сообщения Предупреждающие сообщения • CLOCK SET • FOR “InfoLITHIUM” BATTERY ONLY • 8 mm TAPE t SP REC Hi8 TAPE t LP/SP REC • Q Z TAPE END • Q NO TAPE • CLEANING CASSETTE** • COPY INHIBIT •...
-
Page 186: Using Your Camcorder Abroad
Using your camcorder abroad Using your camcorder abroad You can use your camcorder in any country or area with the AC power adaptor supplied with your camcorder within 100 V to 240 V AC, 50/60 Your camcorder is a PAL system based camcorder. -
Page 187: Maintenance Information And Precautions
Maintenance information and precautions Moisture condensation If your camcorder is brought directly from a cold place to a warm place, moisture may condense inside your camcorder, on the surface of the tape, or on the lens. In this condition, the tape may stick to the head drum and be damaged or your camcorder may not operate correctly. - Page 188 – playback pictures are hardly visible. – playback pictures do not appear. If the above problems occur, clean the video heads with the Sony V8-25CLD cleaning cassette (not supplied). Check the picture and if the above problems persists repeat cleaning.
- Page 189 Maintenance information and precautions – DCR-TRV820E only About the influence of dirt on the printer Printed images may have red, blue, or white dots or thin lines on their surface due dirt or dust entering the printer. This is not a malfunction. These symptoms may become worse depending on the storage conditions of the print paper or print cartridge.
- Page 190 Maintenance information and precautions – DCR-TRV820E only About the influence of dirt on the platen roller Printed images may have red, blue, or white dots periodically in horizontal direction due dirt or dust on the platen roller which is inside of the printer.
- Page 191 On purchasing cleaners Contact your Sony dealer or local authorized Sony service facility and inform them of the following product numbers: •Head cleaner (1-772-863-11) •Platen roller cleaner (1-772-862-11) Информация...
- Page 192 •If any solid object or liquid get inside the casing, unplug your camcorder and have it checked by a Sony dealer before operating it any further. •Avoid rough handling or mechanical shock. Be particularly careful of the lens.
- Page 193 не работает. Для использования этой функции сначала скопируйте изображение на цифровую ленту Digital8 или DV, а затем введите его в Вашу программу Sony VAIO. Сетевой адаптер переменного тока • Отсоедините аппарат от электрической сети, если он не используется длительное время. Для отсоединения сетевого шнура...
- Page 194 •If the liquid get into your eyes, wash your eyes with a lot of water and then consult a doctor. If any problem occurs, unplug your camcorder and contact your nearest Sony dealer. Информация по уходу за аппаратом и меры предосторожности...
-
Page 195: Specifications
English Specifications Video camera recorder System Video recording system 2 rotary heads Helical scaning system Audio recording system Rotary heads, PCM system Quantization: 12 bits (Fs 32 kHz, stereo 1, stereo 2), 16 bits (Fs 48 kHz, stereo) Video signal PAL colour, CCIR standards Recommended cassette Hi8/Digital8 video cassette... -
Page 196: Battery Pack
Specifications AC power adaptor Power requirements 100 - 240 V AC, 50/60 Hz Power consumption 23 W Output voltage DC OUT: 8.4 V, 1.5 A in the operating mode Operating temperature 0 °C to 40 °C (32 °F to 104 °F) Storage temperature –20 °C to +60 °C (–4 °F to +140 °F) Dimensions (approx.) -
Page 197: Технические Характеристики
Русский Технические характеристики Видеокамера Система Система видеозаписи 2 вращающиеся головки Система наклонной механической развертки Система аудиозаписи Вращающиеся головки, система ИКМ Дискретизация: 12 битов (Сдвиг частоты 32 кГц, стерео 1, стерео 2), 16 битов (Сдвиг частоты 48 кГц, стерео) Видеосигнал Цветовой сигнал PAL, стандарт МККР... - Page 198 Технические характеристики Сетевой адаптер переменного тока Требования к питанию 100 - 240 В переменного тока, 50/ 60 Гц Потребляемая мощность 23 Вт Выходное напряжение DC OUT: 8,4 В; 1,5 А в рабочем режиме Рабочая температура От 0 С до 40 С Температура...
-
Page 199: Quick Reference
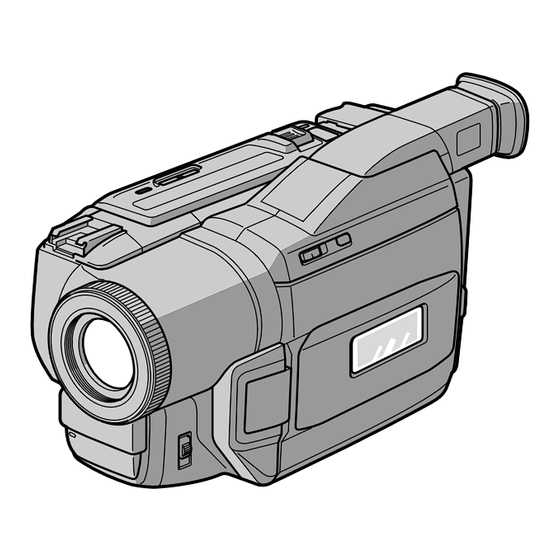
7 Hooks for shoulder strap (p. 201) 8 DC IN jack (p. 16) This mark indicates that this product is a genuine accessory for Sony video products. When purchasing Sony video products, Sony recommends that you purchase accessories with this “GENUINE VIDEO ACCESSORIES” mark. - Page 200 Identifying the parts and controls 9 Video control buttons (p. 36, 39) x STOP (stop) m REW (rewind) N PLAY (playback) M FF (fastforward) X PAUSE (pause) z REC (recording) The control buttons light up when you set the POWER switch to VTR. q;...
- Page 201 Identifying the parts and controls ws Eyecup wd MEMORY PLAY button (p. 128) wf MEMORY – button (p. 119, 128) wg LCD screen (p. 26) wh Speaker (self-timer) button (p. 33, 47, 117) wk Viewfinder lens adjustment lever (p. 28) wl MEMORY DELETE button (p.
- Page 202 Identifying the parts and controls eg Intelligent accessory shoe eh DATA CODE button (p. 38) ej DISPLAY button (p. 37) ek PB ZOOM button (p. 71, 134) el TITLE button (p. 64) r; Power Zoom lever (p. 27) ra “Memory Stick” lamp This lamp lights up while “Memory Stick”...
- Page 203 Identifying the parts and controls rk EJECT button (p. 22) rl Access lamp (p. 110) t; “Memory Stick” slot (p. 110) ta LOCK knob (p. 111) ts Cassette compartment (p. 22) td Grip strap tf LANC /DIGITAL I/O jack (p. 131) LANC stands for Local Application Control Bus System.
- Page 204 Identifying the parts and controls y; Viewfinder (p. 28) ya MEMORY INDEX button (p. 130) ys Lithium battery compartment (p. 167) yd MEMORY + button (p. 119, 128) yf PRINT lamp* (p. 145) yg PRINT PAPER lamp* (p. 145) yh PRINT CARTRIDGE lamp* (p. 145) yj PRINT button* (p.
-
Page 205: Remote Commander
Identifying the parts and controls Remote Commander The buttons that have the same name on the Remote Commander as on your camcorder function identically to the buttons on your camcorder. 1 PHOTO button (p. 45, 113) 2 DISPLAY button (p. 37) 3 SEARCH MODE button (p. - Page 206 1, 2 and 3 are used to distinguish your camcorder from other Sony VCRs to avoid remote control misoperation. If you use another Sony VCR in the Commander mode VTR 2, we recommend changing the Commander mode or covering the sensor of the VCR with black paper.
-
Page 207: Operation Indicators
Identifying the parts and controls Operation indicators LCD screen and Viewfinder/ Экран ЖКД/Видоискатель REC 0:00:00 M.FADER 16:9WIDE SEPIA 1 Recording mode indicator (p. 25)/Mirror mode indicator (p. 26) 2 Format indicator (p. 161) indicator appears. 3 Remaining battery time indicator (p. 16, 29) 4 Zoom indicator (p. - Page 208 Identifying the parts and controls qf STBY/REC indicator (p. 24)/Video control mode (p. 39) qg Tape counter indicator (p. 29, 68, 73)/Time code indicator (p. 29)/Self-diagnosis display indicator (p. 174)/Tape photo recording indicator (p. 45) qh Remaining tape indicator (p. 29) qj ZERO SET MEMORY indicator (p.
-
Page 209: Quick Function Guide
English Quick Function Guide Functions to adjust exposure (in the recording mode) •In a dark place •In insufficient light •In dark environments such as sunset, fireworks, or general night views •Shooting backlit subjects •In spotlight, such as at the theatre •In strong light or reflected light, such as at a beach in midsummer or on a ski slope Functions to give images more impact (in the recording mode) -
Page 210: Руководство По Быстрым Функциям
Русский Руководство по быстрым функциям Функции для регулировки экспозиции (в режиме записи) • В темном месте • При недостаточном освещении • В темных окружающих условиях, например, заход солнца, фейерверки или общие ночные виды • Съемка объектов с задней подсветкой • При прожекторном освещении, например, в театре •... -
Page 211: Index
English Index A, B AC power adaptor ... 16 Adjusting viewfinder ... 28 AFM HiFi Sound ... 163 AUDIO MIX ... 93 AUDIO MODE ... 96 A/V connecting cable ... 41, 48, 78, 124 BACK LIGHT ... 30 Battery pack ... 15 BEEP ... -
Page 212: Алфавитный Указатель
Конденсация влаги ... 187 Лента с двойной звуковой дорожкой ... 163 Лепесток защиты записи ... 23 Мозаичный фейдер ... 51 Монофонический звук ... 42 Sony Corporation Printed in Japan Н, О Нормальная зарядка ... 16 Основной звук ... 93 П, Р...
Need help?
Do you have a question about the D8 Digital Handycam DCR-TRV720E and is the answer not in the manual?
Questions and answers