
Subscribe to Our Youtube Channel
Related Manuals for ACTi SHM-100


Summary of Contents for ACTi SHM-100
- Page 1 Quick Installation Guide SHM-100 Standalone System Health Management Server V18.08.16...
-
Page 2: Before You Start
BEFORE YOU START Thank you for purchasing ACTi Standalone System Health Management Server (SHM). This guide contains all the information you need to quickly set up the SHM system via local display interface. The items below are required for installation: • Monitor (with HDMI, DVI or DisplayPort input and the cable) -
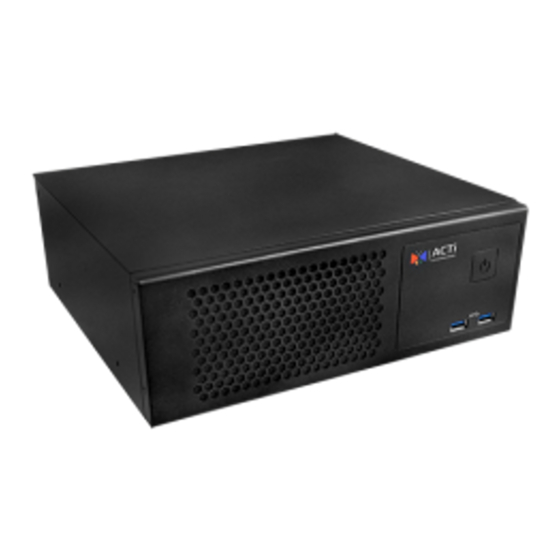
Page 3: Front Panel
AT A GLANCE FRONT PANEL Power Button USB 3.0 Ports x 2 REAR PANEL Power Connector Audio Output DisplayPort HDMI Port LAN Ports x 2 USB 3.0 Ports x 4 COM Port x 2 DVI Connector for RS-232) Audio Input Quick Installation Guide... -
Page 4: Connect The Device
CONNECT THE DEVICE The example below displays a local network consisting of an SHM server and basic required peripherals to start using the device. Network Power Source Network Video Recorders USB Devices HDMI Monitor START UP 1. On the front panel, press the POWER BUTTON to turn on the SHM. - Page 5 OPEN FIREWALL OF NVR PORT For security purposes, Windows Firewall is activated by default. In order to connect to a Network Video Recorder (NVR) server, the firewall must be opened for the specific NVR port. 1. Take note of the IP address and port number of the NVR server that will be added to the SHM. 2.
- Page 6 LOGIN 1. On Windows desktop, double-click the System Health Management icon to open the application interface. 2. Input the default account and password to log in. Default Account and Password Account: admin Password: 123456 Understand the User Interface Full Screen Menu List Logout Language...
-
Page 7: Add Location
ADD LOCATION Before adding the server, define first the possible server locations. 1. On the left menu panel, click Location Setting, then click Add new Location. 2. Type the preferred Location Name; this will be used in defining the location of servers. 3. Type the Address and click Search to mark the location on the map. Information such as Latitude and Longitude are automatically updated based on the map location. -
Page 8: Add Server
ADD SERVER The Server Configuration page allows users to add the server(s) to be monitored through the SHM device. 1. On the left menu panel, click Server Configuration, then click Add new server. 2. Select the server location from the Location Name list. - Page 9 SET eMAP You can use the eMap feature to mark a camera or server to its location on the map. The supported image files are PNG and JPEG. 1. On the left panel, click eMap Setting, then click Choose. 2. Using a USB thumb drive, search and upload the eMap file. The image appears on the lower part of the page. 3.
-
Page 10: Monitor Status
MONITOR STATUS Monitoring can be done through the following pages: Real-time Monitor On the left menu panel, click Real-time Monitor to view the server status as events happen in real-time. Event notification pop-up Event list Event Search On the left menu panel, click Event Search if you want to view the event log by filtering the server, or a particular device or by the events that happened. - Page 11 On the left menu panel, click Dashboard to view the summarize graphical report of events. Note If you have any question during the system installation, please feel free to contact our engineers via ACTi Customer Help Desk platform at http://www.acti.com/CHD.
Need help?
Do you have a question about the SHM-100 and is the answer not in the manual?
Questions and answers