Amantii 30-TRV-SLIM Installation And Operation Instructions Manual
Hide thumbs
Also See for 30-TRV-SLIM:
- Assembly, installation and operation instructions (29 pages) ,
- Installation and operation instructions manual (29 pages) ,
- Installation & owner's manual (34 pages)
Table of Contents
Advertisement
Quick Links
INSTALLATION AND OPERATION INSTRUCTIONS FOR
30-TRV-SLIM
40-TRV-SLIM
50-TRV-SLIM
60-TRV-SLIM
72-TRV-SLIM
SAFETY INFORMATION
WARNING
If the information in these instructions are
not followed exactly, a fire or explosion
may result causing property damage,
personal injury or loss of life.
Do not store or use gasoline or other flammable vapors
and liquids in the vicinity of this or any other appliance.
INSTALLER: LEAVE THIS MANUAL WITH THE APPLIANCE.
CONSUMER: RETAIN THIS MANUAL FOR FUTURE REFERENCE.
Advertisement
Table of Contents

Related Manuals for Amantii 30-TRV-SLIM


Summary of Contents for Amantii 30-TRV-SLIM
- Page 1 INSTALLATION AND OPERATION INSTRUCTIONS FOR 30-TRV-SLIM 40-TRV-SLIM 50-TRV-SLIM 60-TRV-SLIM 72-TRV-SLIM SAFETY INFORMATION WARNING If the information in these instructions are not followed exactly, a fire or explosion may result causing property damage, personal injury or loss of life. Do not store or use gasoline or other flammable vapors and liquids in the vicinity of this or any other appliance.
-
Page 2: Table Of Contents
Please read and carefully follow all instructions found in this manual. Please pay special attention to the safety instructions provided in this manual. The instructions included here will assure that you have many years of dependable and enjoyable service from your Amantii product. IMPORTANT INSTRUCTIONS ............................ -
Page 3: Important Instructions
IMPORTANT INSTRUCTIONS PLEASE RETAIN THIS USER GUIDE FOR FUTURE REFERENCE When using electrical appliances, basic precautions should always be followed to reduce the risk of fire, electric shock, and injury to persons, including the following: 1) Read all instructions before using this fireplace 2) The fireplace is hot when in use. -
Page 4: Plug Installation
PLUG INSTALLATION Your power cord will come separate from the unit, please locate it when unpacking your fireplace. The plug contained inside the box is predetermined at the factory and according to orders placed by authorized dealers. Available are UK, European, Swiss & Australian plugs. Should you require any of these options please contact your dealer for purchase. -
Page 5: Unpacking And Testing Appliance
UNPACKING AND TESTING APPLIANCE Carefully remove the appliance from the box. Prior to installing the appliance, test to make sure the appliance operates properly by plugging the power supply cord into a conveniently located 240 Volt grounded outlet. LOCATING THE FIREPLACE Plan where to locate and frame the fireplace. -
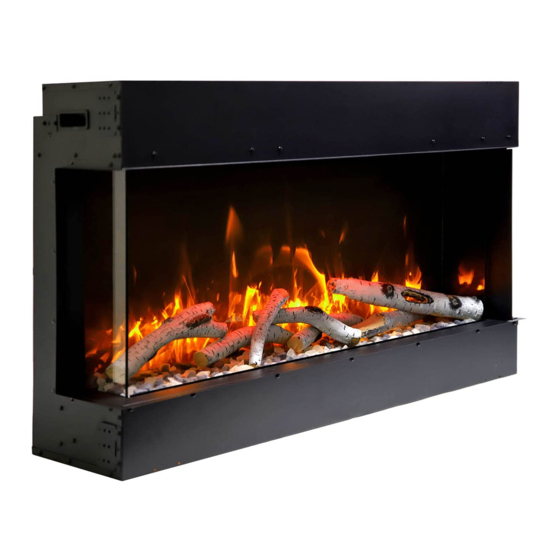
Page 6: 30-Trv-Slim
30-TRV-SLIM Description Built-in Appliance Voltage 240V AC 50-60Hz Watts 1900W Max NO HEATER MOTOR HEATER Appliance Width 33 1/4” or 84.4 . cm Appliance Height 26 5/8” or 67.7 cm Appliance Depth 10 5/8” or 27 cm Gross Weight 85.3 lbs or 38.7 kgs... -
Page 7: 40-Trv-Slim
40-TRV-SLIM Description Built-in Appliance Voltage 240V AC 50-60Hz Watts 1900W Max NO HEATER MOTOR HEATER Appliance Width 43 1/4” or 109.7 cm Appliance Height 26 5/8” or 67.7 cm Appliance Depth 10 5/8” or 36.3 cm Gross Weight 103.6 lbs or 47 kgs Plug Location Left side Cord Length... -
Page 8: 50-Trv-Slim
50-TRV-SLIM Description Built-in Appliance Voltage 240V AC 50-60Hz Watts 1900W Max NO HEATER MOTOR HEATER Appliance Width 53 1/4” or 135.2 cm Appliance Height 26 5/8” or 67.7 cm Appliance Depth 10 5/8” or 27 cm Gross Weight 121.5 lbs or 55.1 kgs Plug Location Left side Cord Length... -
Page 9: 60-Trv-Slim
60-TRV-SLIM Description Built-in Appliance Voltage 240V AC 50-60Hz Watts 1900W Max NO HEATER MOTOR HEATER Appliance Width 63 1/4” or 160.6 . cm Appliance Height 26 5/8” or 67.7 cm Appliance Depth 10 5/8” or 27cm Gross Weight 140.2 lbs or 63.6 kgs Plug Location Left side Cord Length... -
Page 10: 72-Trv-Slim
72-TRV-SLIM Description Built-in Appliance Voltage 240V AC 50-60Hz Watts 1900W Max NO HEATER MOTOR HEATER Appliance Width 75 1/4” or 191 cm Appliance Height 26 5/8” or 67.7 cm Appliance Depth 10 5/8” or 27 cm Gross Weight 167.1 lbs or 75.8 kgs Plug Location Left side Cord Length... -
Page 11: Safety Drill Screw Area
SAFETY DRILL SCREW AREA There is a safety drill screw area as show below. Please make sure that the fix screws are in this area. T h e m a n u a l c o n tro l p a d p o s itio n Sa fe ty d rill s cre w a re a (Da rk a re a ) -
Page 12: Installation
W(") D(") H(") 2. Take off the fending bars and panels if you 30-TRV-SLIM 33 3/4 11 1/8" 27 1/8 want to view the fire from three angles. 40-TRV-SLIM 43 3/4 11 1/8"... - Page 13 framing plate framing plate 5. Make an opening for the fireplace according to requested measurement. 7. After checking that the fireplace operates properly, cover the glass panels with protective plastic bag and install plywood or drywall. 6. Insert the fireplace into the wall opening. Drive the mounting screws into the frame plates on the unit and the wall studs.
- Page 14 8. Decorate the plywood or drywall with glazed tile, wallpaper, etc. 3. After the fending panel is removed, screw back the bar. Installation for Front and right side Viewing 1. To install the fireplace where the left side is close to a wall, and you want to view the fire from front and right side, take off the fending panel on the right.
- Page 15 5. Make an opening for the fireplace according 7. After checking that the fireplace operates to requested measurement. properly, cover the glass panels with protective plastic bag and install plywood or drywall. 6. Insert the fireplace into the wall opening. Drive the mounting screws into the frame plates on the unit and the wall studs.
- Page 16 Installation for Front and Left Side Viewing 1. Install the fireplace where the right side is close to a wall, and you want to view the fire from front and left side, take off the fending panel on the left. 4.
- Page 17 7. After checking that the fireplace operates properly, cover the glass panels with protective plastic bag and install plywood or drywall. 6. Insert the fireplace into the wall opening. Drive the mounting screws into the frame plates on the unit and the wall studs. To fix the bottom of the fireplace and the wall studs with the framing plates that you’ve removed from left and right side of the...
-
Page 18: Media Options
MEDIA OPTIONS The TRV-SLIM series models are shipped with DESIGN-MEDIA-BIRCH-10PCE. DESIGN-MEDIA-BIRCH-10PCE MEDIA OPERATION 3. Take off the front glass panel and put it in safe place. 1. Unscrew 2 screws and take off two brackets which are fending the front glass panel. Screws and brackets 4. -
Page 19: Operation
OPERATION The fireplace can be operated either by the switches located on the left bottom of the fireplace unit or by supplied remote control. Plug the fireplace into a 15 Amp wall socket. MANUAL OPERATION 1、 Press key . Press for the first time,heater work at 1900W, indicator lights red. - Page 20 REMOTE CONTROL OPERATION Press the remote control’s key“ ”, its screen turns on, the flame ignites and the flame icon appears on 、 the LCD screen of the remote control. Week, time (24h system), and temperature setting are displayed normally. Press it again, the screen of the remote control will turn off; Key“...
- Page 21 7、 Press the heating key“ .” Press for the first time ,the heating elements work at 1900W, the LCD screen displays , the indicator on the machine lights red. Press a second time , the heating elements work at 950W, the LCD screen displays , the indicator on the machine lights blue.
- Page 22 for Tuesday. Press for the 7th time and it displays . Press for the 8th time and it exits and recovers to the current week day; 11、Press“ .” Press for the first time and the timing function turns on, the LCD screen displays the machine’s indicator lights green.
-
Page 23: Care And Maintenance
CARE AND MAINTENANCE 1. Switch off and unplug from the power supply before cleaning. 2. Using a soft, moist cloth, with or without a mild soap solution, carefully clean the exterior surface of the products. CAUTION: Allow the product to completely cool before handling or cleaning it. 3. -
Page 24: Replacement Parts
REPLACEMENT PARTS This list contains replacement parts PART NUMBER DESCRIPTION 30-TRV-SLIM 40-TRV-SLIM 50-TRV-SLIM 10701384 10701281 10701216 Front Clear Glass 10201505 ADJUSTABLE SCREW FRONT CLEAR GLASS 3123010 BRACKET 10702266 10702267 10702268 BOTTOM TRAY GLASS 10702271 10701284B 10701219B BACK GLASS 10701385 SIDE CLEAR GLASS... - Page 25 This list contains replacement parts PART NUMBER DESCRIPTION 60-TRV-SLIM 72-TRV-SLIM 10701217 10701218 Front Clear Glass 10201505 ADJUSTABLE SCREW FRONT CLEAR GLASS 3123010 BRACKET 10702269 10702270 BOTTOM TRAY GLASS 10701220B 10701221B BACK GLASS 10701385 SIDE CLEAR GLASS 601136B 601137B LED STRIP FOR TRAY AND FLAME 601141B 601141B...
-
Page 26: Exploded View
EXPLODED VIEW... -
Page 27: Wiring Diagram
Wiring Diagram... -
Page 28: Trouble Shooting
TROUBLE SHOOTING PROBLEM POSSIBLE CAUSE SOLUTION Dim or no flame Flame LED’s are burnt out Inspect the LED’s and replace them if necessary. Ember Ember LED’s are burnt out Inspect the ember bed LED’s and glowing or dimming replace them if necessary. Appliance turns off and Appliance has overheated and Turn off the main switch, allow... -
Page 29: Service History
SERVICE HISTORY This heater must be serviced annually depending on usage. Date Dealer Service technician Service Performed Special Concerns Name Name NOTES:...
Need help?
Do you have a question about the 30-TRV-SLIM and is the answer not in the manual?
Questions and answers