Raven Envizio Pro Quick Reference Manual
Hide thumbs
Also See for Envizio Pro:
- Installation and operation manual (287 pages) ,
- Installation & operation manual (232 pages) ,
- Quick reference manual (16 pages)
Table of Contents
Advertisement
Quick Links
Advertisement
Table of Contents

Related Manuals for Raven Envizio Pro


Summary of Contents for Raven Envizio Pro
- Page 1 Quick Reference Guide Envizio Pro™ and Envizio Pro II™...
-
Page 2: Do's And Don'ts
Envizio Pro and Envizio Pro II. Startup To power up the Envizio Pro or Envizio Pro II, press the power button located on the right side of the field computer. USB Port Do’s and Don’ts... -
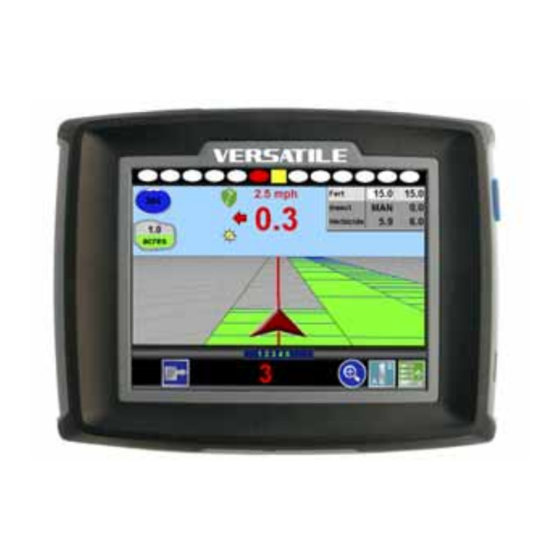
Page 3: Home Screen
No DGPS position is available. Touch the GPS Status indicator on the Home screen to display the GPS Health screen. For more information regarding the GPS Status and Status Indicator icons, refer to the Envizio Pro and Envizio Pro II Installation and Operation Manual. -
Page 4: Tools Menu
Red if wireless communication is not available. Touch the shield icon to display the Wireless Status screen. For more information regarding the Wireless Status and Status Indicator icons, refer to the Envizio Pro and Envizio Pro II Installation and Operation Manual. - Page 5 GPS antenna heights and offsets as well as the swath width and section setup for each implement and transfer those settings to a home or office PC, another Envizio Pro or Envizio Pro II, or reload the Profile at a later date. To Edit Profiles: 1.
- Page 6 Support/Software/index2.jsp To Apply the Latest Software Update: 1. Visit the Raven web site and download the latest software update. 2. Unzip or extract the downloaded software to the root of the flash drive used with the field computer. 3. With the computer powered on, insert the flash drive into a USB port on the field computer.
- Page 7 Use the GPS menu to adjust the internal GPS receiver or to enable the field computer to receive DGPS from an external receiver. The GPS menu also contains screens to review the status of GPS reception, set message outputs (for the internal DGPS receiver only), enable GPS reverse sensing or select the differential satellite PRN (Pseudo-Random Number).
-
Page 8: Guidance Screen
5. Touch the Pattern button to select one of the available Guidance patterns for the job: Straight Fixed Enhanced Pivot (A-B) Line Contour Last Pass 6. If the optional AccuBoom feature will be used, touch the AccuBoom button to enable the feature. To create or load a spray zone map, select the ‘Use Spray Zone Map’... - Page 9 GPS Status status indicator displays the status of GPS reception and the currently selected correction source on the Guidance screen. See the “GPS Status Indicator” section on page 2 for more information. Touch the Display Mode icon to toggle the day or night modes for the guidance screen display.
- Page 10 Menu Touch the Menu icon on the Guidance screen to access additional tools and features of the field computer. The Menu also offers access to the Home screen. The following tools and features may not be accessible at the same time. Be sure to read the descriptions and ensure appropriate information is displayed on- screen to allow access to the following features and tools.
- Page 11 A-B Line can be recalled at any time or loaded into other jobs. In addition, saved paths can be transferred from the field computer via the File Maintenance feature. Refer to the Envizio Pro and Envizio Pro II Installation and Operation Manual for details on the File Maintenance feature and transferring saved paths.
- Page 12 AccuBoom The following sections offer an overview of the optional Raven AccuBoom system when used with the Envizio Pro or Envizio Pro II. Refer to the Envizio Pro and Envizio Pro II Installation and Operation Manual for additional information regarding the AccuBoom system.
- Page 13 Operation If the Use Spray Zone Map option has been enabled for the active job (see the Start a Job section), the Menu will contain tools for recording AccuBoom Spray Zone Map features. To Load a Spray Zone Map with a Job in Progress: 1.
- Page 14 AutoBoom The following sections offer an overview of setting up and using an optional Glide Series AutoBoom system with the Envizio Pro or Envizio Pro II. Refer to the AutoBoom Calibration and Operation manual for detailed setup and calibration information regarding the AutoBoom system.
-
Page 15: Troubleshooting
Glide Series AutoBoom Calibration screen. Troubleshooting The following are a few general tips for troubleshooting the product control system. Refer to the Envizio Pro and Envizio Pro II Installation and Operation manual for detailed troubleshooting information. Issue Possible Cause Solution •... - Page 16 P.O. Box 5107 Fax: 605-331-0426 Sioux Falls, SD 57117-5107 www.ravenprecision.com Notice: This document and the information provided are the property of Raven Industries, Inc. and may only be used as authorized by Raven Industries, Inc. All rights reserved under copyright laws.
Need help?
Do you have a question about the Envizio Pro and is the answer not in the manual?
Questions and answers