
Related Manuals for Raven Envizio Pro Series


Summary of Contents for Raven Envizio Pro Series
- Page 1 Envizio Pro Series Quick Reference Guide P/N 016-0171-507 Rev H 4/15 E24691 Copyright 2015...
- Page 2 Raven Industries shall not be held responsible for any modifications or repairs made outside our...
-
Page 3: Do's And Don'ts
Several optional systems are available to enhance field operation or data management. Refer to the Envizio Pro Series Installation and Operation Manual or contact a local Raven dealer for more information or a complete list of optional features or components available for use with the field computer. -
Page 4: Home Screen
Home Screen Touch anywhere it appears to return to the Home screen. Touch the: Start Job icon to begin a new job or resume an existing job. Tools icon to access the Tools Menu. The Tools Menu contains the settings and calibrations for the field computer and control system. Shutdown icon to power down the field computer. - Page 5 For more information regarding the GPS Status, Status Indicator icons, or GPS features and settings available for each correction type, refer to the Envizio Pro Series Installation & Operation Manual. Wireless Communications Status The current status of wireless communication is displayed along the top of the Home screen display.
- Page 6 Start a Job 1. To begin a job, touch the icon on the Home screen. The Start Job - Verify Settings screen will display. By default, the field computer creates a new job when the Start Job - Verify Settings screen will display.
-
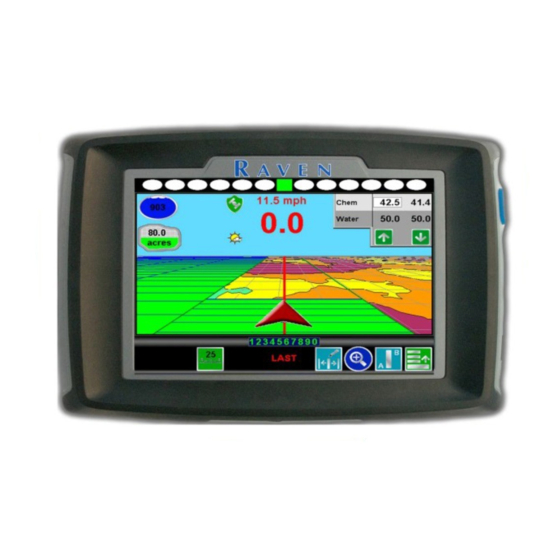
Page 7: Guidance Screen
Guidance Screen Guidance screen is the main screen viewed during product application. SmarTrax Engage 13 14 On-Screen Light Bar is displayed along the top of the Guidance screen. Settings for the light bar may be found by selecting: Computer Tools Menu Display Menu Tank... - Page 8 The current status of Wireless Communication is displayed on the guidance screen. See the See Wireless Communications Status on page 3 for more information. 10.The Product Rate Display shows target and actual application rates as well as indicates the selected product. Touch the name of a product to toggle the selected product or touch in the rates area to access the In Job Product Configuration...
- Page 9 Markers Touch the Field Markers button to mark the current vehicle location. Markers may be used to save locations such as well heads, rock piles, or points of interest during a field operation. Touch a Field Marker and select the Info button to access marker information at any point during the field operation.
- Page 10 A-B Line can be recalled at any time or loaded into other jobs. In addition, saved paths can be transferred from the field computer via the File Maintenance feature. Refer to the Envizio Pro Series Installation and Operation Manual for details on the File Maintenance feature and transferring saved paths.
- Page 11 AccuBoom feature enabled. AccuBoom The following sections offer an overview of the optional Raven AccuBoom system when used with the Envizio Pro. Refer to the Envizio Pro Series Installation and Operation Manual for additional information regarding the AccuBoom system. Setup...
- Page 12 The Master Pressure option is only available if the product control node is capable of controlling the AccuBoom feature based upon liquid product pressure at the boom. Refer to the Envizio Pro Series Installation and Operation Manual for more information on the master pressure feature and available settings.
- Page 13 5. The Guidance screen will re-appear and the field computer will begin recording the boundary or feature. On the Guidance screen, a Pause and End icon appear for the feature currently being recorded. Recorded Pause and Path End Icons On-Screen Switch Box The Menu contains the tools for editing zones when editing a map.
- Page 14 4. If is displayed in the upper right corner, touch the icon to toggle the AutoBoom system on. 5. Touch the Left or Right Boom Disabled button to toggle automated boom height control for each boom. Important: Booms may raise and lower unexpectedly. Make sure the area around the booms is clear of obstructions and people before touching these buttons.
-
Page 15: Tools Menu
CANbus connection may need to be restarted. 1. From the Home screen, touch 2. When prompted, touch the to confirm and retry CANbus communication. If CANbus communication is not re-established, refer to the Envizio Pro Series Installation and Operation Manual for troubleshooting information and assistance. - Page 16 Vehicle Access the Vehicle menu to set up or modify vehicle profiles for each machine or implement with which the field computer will be used. Profiles allow the operator to set up the GPS antenna height and offset, the swath width, and section setup for each implement and transfer those settings to a home or office PC, another Envizio Pro, or reload the Profile at a later date.
- Page 17 Updates Updates for field computer software are available at the Raven Applied Technology Division web site: www.ravenhelp.com Note: Refer to the Envizio Pro Series Installation and Operation Manual for assistance with updating CANbus nodes connected to the field computer.
-
Page 18: Troubleshooting
3. Select the desired baud rate for the output messages from the list on the right side of the screen. Troubleshooting Refer to the Envizio Pro Series Installation and Operation Manual or the Raven CANbus Installation Manual for troubleshooting assistance and information. -
Page 19: Limited Warranty
How Can I Get Service? Bring the defective part and proof of purchase to your Raven dealer. If the dealer approves with the warranty claim, the dealer will process the claim and send it to Raven Industries for final approval. -
Page 20: Extended Warranty
How Can I Get Service? Bring the defective part and proof of purchase to your Raven dealer. If the dealer approves with the warranty claim, the dealer will process the claim and send it to Raven Industries for final approval. The freight cost to Raven Industries will be the customer’s responsibility.
Need help?
Do you have a question about the Envizio Pro Series and is the answer not in the manual?
Questions and answers