
Related Manuals for Proceq ZHT 2092


Summary of Contents for Proceq ZHT 2092
- Page 1 Instruction Manual version 1.3 from 03.06.2011 Proceq ZHT 2092 - 2093 Pocket hardness tester...
-
Page 3: Table Of Contents
ZHT 2092 - 2093 instruction manual General Index Exclusion of liability ..................3 Safety precautions and warnings ............4 Dangers ..................4 Notes regarding safety at work ............. 4 Delivery of apparatus................5 Transportation damages ............... 5 Extent of delivery ................5 Options .................. -
Page 4: Safety Precautions And Warnings
Only spare parts and optional components provided by the manufacturer may be used in combination with the Proceq ZHT 2092 - 2093. If components other than provided by PROCEQ are used with the Proceq ZHT 2092 - 2093, there is no guarantee by PROCEQ for resulting damages, defects or malfunctions. -
Page 5: Delivery Of Apparatus
2.2 Extent of delivery The following parts are included in the delivery: • 1 hardness tester (Proceq ZHT 2092 - 2093 or Proceq ZHT 2093) • 1 tip 0.75 mm (Bosch) • 1 beige pressure spring 0-3 N (graduation: 10 g) •... -
Page 6: Options
• 107 tip 1.0 mm (in dependence on ISO 1518) • 108 tip 0.5 mm (van Laar) Proceq SA refuses all warranty and liability claims for damages caused by usage of the Proceq ZHT 2092 - 2093 in combination with non-original accessories, or accessories from 3 party suppliers. -
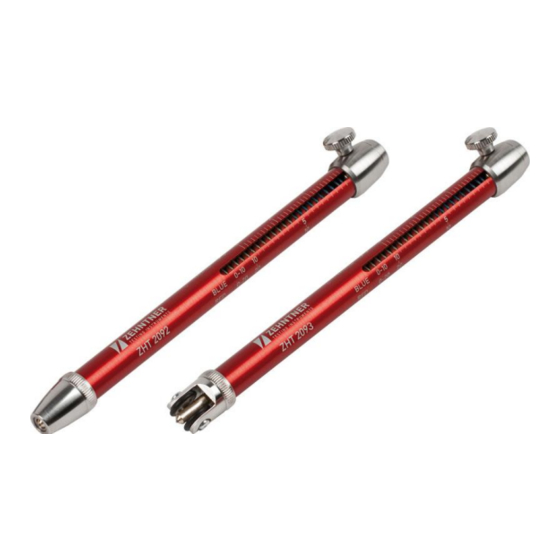
Page 7: Proceq Zht 2093
3.2 Proceq ZHT 2093 clamping screw slide pressure spring hardness scale handhold testing head 3.3 Testing head Proceq ZHT 2092 Proceq ZHT 2093 rubber guiding wheels testing head testing head last update: 03.06.2011 page 7... -
Page 8: Pressure Springs
3.4 Pressure springs pressure spring colour code In the standard delivery are included three pressure springs: • 1 beige pressure spring 0-3 N (graduation: 10 g) • 1 blue pressure spring 0-10 N (graduation: 20 g) • 1 red pressure spring 0-20 N (graduation: 100 g) The colours fit with the three different test ranges on the hardness tester. -
Page 9: Changing The Pressure Springs
4. Changing the pressure springs For changing the pressure spring the following steps have to be carried out: 1. Always reset the spring tension to zero. 2. The handhold has to be separated from the head. 3. Change the pressure spring: hold the handhold vertical, so that the pressure spring will fall down. -
Page 10: Handling
Place the hardness tester with the tip vertically on the surface, press the instrument against the spring tension. When using Proceq ZHT 2093 you need to take care that the rubber guiding wheels are parallel to the testing direction. •... - Page 11 test surface visible scratch test surface visible scratch last update: 03.06.2011 page 11...
- Page 12 • The slide position on the scale indicates the force (N) and the measuring value corresponds to the hardness. used force: 10 N used force: 2 N red pressure white pressure spring spring used hardness scale: used hardness scale: WHITE Always reset the spring tension to zero at the end of the measuring procedure.
-
Page 13: Trolley
6. Trolley By use of the optional trolley you will have an easier handling and a higher reproducibility. • Take the trolley with open opening in one hand. • Put the hardness tester in the opening of the trolley by use of your other hand. - Page 14 When using Proceq ZHT 2093 you need to take care that the rubber guiding wheels are parallel to the testing direction, so that you are able to carry out straight scribes.
- Page 15 • Tighten the butterfly nut lightly with the other hand. Afterwards check if the knurled area of the hardness tester bears on the trolley. If necessary adjust the position before you tighten the butterfly nut until the hardness tester is completely fixed knurled area knurled area last update: 03.06.2011...
- Page 16 • Carry out the hardness tests in accordance with chapter 5 “Handling” on page 10.
-
Page 17: Cleaning
Always reset the spring tension to zero at the end of the measuring procedure. 9. Technical specification Version Testing head Weight Set weight Proceq ZHT Standard: 78 g 358 g 2092 Proceq ZHT With rubber guiding wheels:... - Page 20 Subject to change. Copyright © 2017 by Proceq SA, Schwerzenbach. All rights reserved. www.proceq.com Version 1.3 dated 03.06.2011...
Need help?
Do you have a question about the ZHT 2092 and is the answer not in the manual?
Questions and answers