
Related Manuals for Alcatel-Lucent Enterprise ALE-30h


Summary of Contents for Alcatel-Lucent Enterprise ALE-30h
- Page 1 OXO CONNECT ALE-30h Essential DeskPhone ALE-20h Essential DeskPhone ALE-20 Essential DeskPhone User Manual 8AL91432ENAAed01 w2137...
- Page 2 ALE-20 Essential DeskPhone (ALE-20). These desk phones are part of the Essential DeskPhone range. The Essential DeskPhone range provides a rich communication experience with Alcatel-Lucent Enterprise (ALE) solutions, thanks to a compact design and an intuitive navigation. These models offer enhanced ergonomic features for more effective communication.
- Page 3 User Manual Getting to know your telephone ALE-30h Essential DeskPhone 1.1.1 Phone description ALE-20h Essential DeskPhone / ALE-20 Essential DeskPhone 1.2.1 Phone description Unboxing Install your desk phone 1.4.1 Install the foot 1.4.2 Install a comfort wired handset 1.4.3 Connect the device 1.4.4 First start-up Description of the connectors...
- Page 4 User Manual 2.25.1 Retrieve the call on hold 2.26 Answering a second call during a conversation 2.27 Switching between calls (Broker call) 2.28 Transferring a call 2.29 Transfer a call to a voice mail 2.30 Three-way conference with internal and/or external contacts (conference) 2.30.1 Cancel the conference and recover the last active call before the conference (the other is on hold) (If conference is active) 2.30.2 End the conference with all participants (If conference is active)
- Page 5 User Manual 2.59.3 PIN code 2.59.4 Reset your PIN code 2.59.5 Reconnect your desk phone in your business place 2.59.6 Reconnect your desk phone in remote place Programming your telephone Initializing your voice mailbox Customizing your voice greeting 3.2.1 Record your personal message Modifying your personal code Adjusting the audio functions 3.4.1...
- Page 6 User Manual 4.3.2 Description / Connectors 4.3.3 install the add-on to the desk phone 4.3.4 Icon description 4.3.5 Install more than one add-on module Wall mounting kit USB external ringing interface module (USB Interface module 2 relays 3GV28184AA) 4.5.1 Installation 4.5.2 Connect the device Third parties headset certified in Developer and Solution Partner Program (DSPP)
-
Page 7: Getting To Know Your Telephone
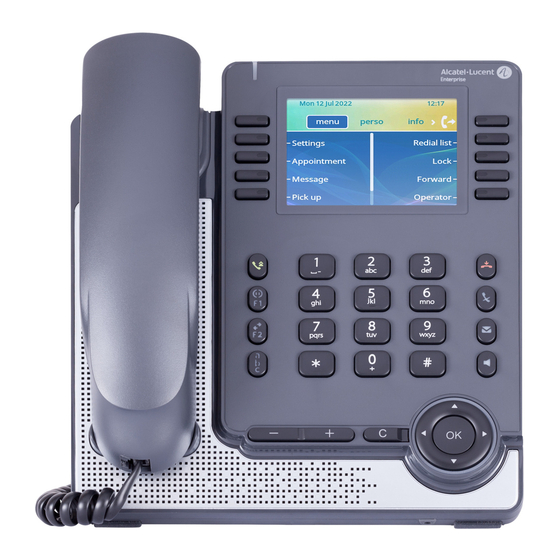
User Manual 1 Getting to know your telephone ALE-30h Essential DeskPhone This phone is part of hybrid models and offers digital or IP mode on the same network interface via a single Digital or Fast Ethernet port. With its large color display associated to 2x5 dedicated softkeys, and intuitive navigation keys, your desk phone provides high audio quality for telephone calls either in full duplex hands-free mode or when using the ergonomic handset (wideband in IP mode, narrow band in Digital mode). - Page 8 User Manual ALE-20h Essential DeskPhone / ALE-20 Essential DeskPhone The ALE-20h Essential DeskPhone is part of hybrid models and offers digital or IP mode on the same network interface via a single Digital or Fast Ethernet port. It is a cost-effective version of the ALE-30h. The ALE-20 Essential DeskPhone is part of IP models and provides a dual Gigabit Ethernet port.
- Page 9 User Manual Unboxing Handset 2-degree adjustable foot Deskphone Safety and regulatory Handset cord instructions Install your desk phone 1.4.1 Install the foot Clip the foot into its compartment behind the phone. Your desk phone provides a 2-degree foot. Depending on the way you insert the foot into the phone, your desk phone will have a different angle: 55°...
-
Page 10: Install A Comfort Wired Handset
User Manual 1.4.2 Install a comfort wired handset Your phone is provided with a connected handset. If you have to replace it: • Plug-in the wired handset to the appropriate connector (see chapter: Description of the connectors.). • Make sure you position the cable correctly in the compartment intended for that purpose. -
Page 11: Description Of The Connectors
User Manual Description of the connectors Various connections to allow phone extensions. The type of connectors you have depends on your phone. ALE-30h Essential DeskPhone ALE-20 Essential DeskPhone ALE-20h Essential DeskPhone ALE-30h ALE-20h ALE-20 Universal Serial Bus (USB-C) connector This connector is used for: •... -
Page 12: Welcome Screens
User Manual Main screens and navigation keys 1.6.1 Welcome screens You can access all of your phone's features from these screens. The default display has three pages that you can access by selecting the corresponding tab at the top of the screen with the navigation keys. The selected page is highlighted. - Page 13 User Manual 1.6.1.2 Description Top bar (date, time, status icons, user dynamic status) Display the page by selecting the corresponding tab. Forward icon. Manage your call forwarding by pressing the key associated with the forward icon. • Stationary arrow: no forwarding activated. •...
-
Page 14: Call Management Screen
User Manual 1.6.2 Call management screen Call management screen displays all information about current calls and lets you access to available features during conversation. 1.6.2.1 Description Tabs: incoming call icon, call in progress, call on hold, … notification (popup) of incoming call softkeys: actions available depending on the call status (when presentation screen is not displayed) Left-right navigator:... -
Page 15: User Local Menu
User Manual User local menu Open the user local menu: reach the 'Menu' page Settings Phone Local Menu The user local menu depends on the running mode of the desk phone, IP or Digital (UA) mode. Display - Use this menu to adjust the display of your set: •... -
Page 16: Status Icons / Call Icons
User Manual Status icons / Call icons Icons giving information about some specific configurations of the phone or about call status are displayed in the top bar of the screen. Status icons Depending on the size of the display, all status icons may not be displayed simultaneously. Which icons are displayed depend on their priority. -
Page 17: Permanent Features Keys
User Manual Permanent features keys This chapter displays all permanent features keys available on your desk phone. They are located around the keypad. • Take the call key - in idle state - short press during incoming call (ringing). • Redial key: to access the 'Redial' feature (short/long press in idle state). -
Page 18: Alphanumeric Keyboard
User Manual 1.10 Alphanumeric keyboard Your phone is equipped with alphanumeric keyboard. You can switch between numeric keyboard to dial number, and alphabetic keyboard to enter text by pressing the alphanumeric key. When you are in a text zone, you can switch to the alphabetic keyboard by selecting this key. -
Page 19: Using Your Telephone
User Manual 2 Using your telephone Identify the terminal you are on The number of your telephone is displayed on the 'Info' page. Messaging portal The messaging portal allows you to access and manage features such as the call log, instant messaging and voice messages. -
Page 20: Consulting The Call Log
User Manual Deleting When consulting an event (call log, instant message or voice message), you can delete the event once you have consulted it. However, you can choose to delete all events in one go. • Access the messaging portal. •... - Page 21 User Manual Delete all missed calls. • Press the associated softkey. • Press the associated softkey. • Press to confirm. All missed calls are deleted. Consulting all calls • Select the 'All' tab. All calls are displayed with an icon giving information on the type of call. Answered outgoing calls.
-
Page 22: Making A Call
User Manual Making a call Use one of the following: • Dial the destination number. The hands-free mode is activated automatically. • Unhook the handset Dial the destination number. • Press the Off-hook key of the headset Dial the destination number. If your headset has no Off- hook/On-hook key, use the phone keys and switch on the audio on the headset ( •... -
Page 23: Switching Between Audio Modes
User Manual Switching between audio modes During conversation, you can switch between different audio modes (handset, loudspeaker, hands-free or headset, if connected) by pressing the loudspeaker/hands-free key until the desired audio mode is displayed: . This feature depends on connected devices and the default device selected in the phone configuration. -
Page 24: Activating The Loudspeaker During A Conversation (Handset Lifted) - Group Listening Feature
User Manual Activating the loudspeaker during a conversation (handset lifted) - Group listening feature Activate or deactivate the loudspeaker when you are in conversation using the handset or the headset. • Activate loudspeaker (long press) The key is blinking blue ( •... -
Page 25: Calling A Contact Using The Unified Directory
User Manual 2.9.1 Calling a contact using the unified directory • Use one of the following: Long press. Enter the first letter of your contact's surname. o If your desk phone is equiped with the magnetic keyboard, enter directly the first letter of your contact's surname (ALE-30h). -
Page 26: Make Calls Via Your Programmed Call Keys
User Manual o list: display the result as a list. Use the navigation keys to select the contact and press the OK key to start the call. You can switch to the other search mode by enabling it in the options menu (available once a search by name is started). -
Page 27: Requesting Automatic Callback If Internal Number Is Busy
User Manual 2.13 Requesting automatic callback if internal number is busy This feature lets you to be automatically called back when your internal contact is free. • The telephone of the internal caller you are trying to contact is busy, and you want the person to call you back as soon as they are free. -
Page 28: Mute, So That Your Contact Cannot Hear You
User Manual 2.16 Mute, so that your contact cannot hear you You can hear your contact but he/she cannot hear you: 2.16.1 From the set • During a conversation. • Disable microphone The key is blinking blue • Enable microphone The mute key no longer blinks 2.16.2 From the headset •... -
Page 29: Sending An Instant Message To A Contact
User Manual Delete all messages • Press the associated softkey. • Press the associated softkey: Voice msg • 2.19 Sending an instant message to a contact You can only send an instant message to a colleague connected to the same telephone system (generally, a colleague in your enterprise). -
Page 30: Consulting Instant Messages
User Manual 2.19.3 Status of the instant messages Once the instant message has been sent, the message is stored in the 'Sent' tab of the instant message feature in the messaging portal. The status of the message is as follows: •... -
Page 31: Answering With An Instant Message
User Manual Delete instant messages When consulting the instant messages, you can choose to delete the messages stored in the following tabs: new, sent, received or all messages. • Press the associated softkey. • Press the associated with the list you want to delete. •... -
Page 32: Lock / Unlock Your Telephone
User Manual 2.21.3 Answering from the call log • Access the messaging portal. • Select the call log feature (Calls). • Enter your password if required. • Select one of the following tabs: missed calls or all calls. Select the tab by using the left and right navigation keys. -
Page 33: Making A Second Call During A Conversation
User Manual Recover the call on hold Use one of the following: • Select the call on hold icon from the conversation screen (the icon depends on your phone: • (this key depends on the system configuration and countries as United States). •... -
Page 34: Answering A Second Call During A Conversation
User Manual 2.26 Answering a second call during a conversation • During a conversation, another person is trying to call you. The name or number of the caller is displayed for a few seconds. • Select the incoming call icon (the icon depends on your phone: •... -
Page 35: Transfer A Call To A Voice Mail
User Manual • • The two callers are connected. You are in communication with a first caller. A second caller is on hold. • You want to connect the first caller with the second. • Use one of the following: Transfer (this key depends on the system configuration and countries as United States). -
Page 36: Initiate A 'Meet Me' Conference
User Manual 2.31 'Meet me' conference The 'Meet me' function is used to set up a conference with a maximum of 6 persons: the 'master ' of the conference (who has the rights for initiating the conference) and the participants (maximum of 5) who meet for the conference. - Page 37 User Manual 2.32 Intrusion into an internal conversation (barge-in) Your contact's line is busy. If the number is not 'protected' and if authorised, you can intrude into the call: • ¤Intrusion • Same key to exit (×Intrusion). 2.32.1 Protection against intrusion •...
- Page 38 User Manual 2.36 Forwarding calls when your line is busy (forward if busy) Callers can be forwarded to another telephone if you are already on the line. • Select the forward icon (the icon depends on your phone: • Onbusy •...
-
Page 39: Forwarding All Group Calls
User Manual 2.40 Forwarding your calls from the receiving terminal ('Follow me') You wish to receive your calls in your present location: use the 'Follow me' function. • Select the forward icon (the icon depends on your phone: • Follow-me •... -
Page 40: Leaving A Text Message For Internal Callers
User Manual 2.45 Leaving a text message for internal callers You can leave a text message on your terminal which will be displayed on the screen of the terminal calling you. The caller is informed of the message, and can read it by selecting the following softkey: Read message. -
Page 41: Answering The General Bell
User Manual 2.46 Send a voice message copy • Access the messaging portal. • Press the softkey associated with the voice message feature: Voice msg. • Enter your password (if required) and apply. • Select the tab to consult. • Using the up and down navigation keys, select the voice message you want to send. -
Page 42: Manager/Assistant Filtering
User Manual 2.50 Manager/Assistant filtering System configuration allows 'Manager/Assistant' groups to be formed, so that the manager's calls can be directed to one or more assistants. 2.50.1 From the manager or assistant telephone • Filter programmed key Incoming calls are filtered by a chosen person (assistant, etc.). •... - Page 43 User Manual Belonging to a group does not affect the management of direct calls. A specific telephone within a group can always be called by using its own number. 2.54 Calling an internal contact on his/her pager The number called does not answer and you know that the person called has a pager: •...
- Page 44 User Manual 2.58.3 ACD application welcome screen – Agent set Name of the agent set. Number of the agent set. Operating status of the agent set. Status of the queues. 4.02 means: group number 4 / 2 calls waiting / the + sign indicates that the queue capacity has been reached.
-
Page 45: Supervisor Station
DeskPhones and Premium DeskPhones Serie “ 8AL90345ENAA. Effortless deployment In this section we describe how to manually configure your desk phone for remote use. Alcatel-Lucent Enterprise also offers remote desk phones deployment solutions: Alcatel-Lucent Enterprise Easy Deployment Server (EDS). EDS offers a cloud server allowing easy deployment of devices in remote worker situation for Alcatel-Lucent Enterprise (ALE) systems and third-party SIP servers. - Page 46 User Manual 2.59.1 First connection as remote working When you connect your desk phone for the first time remotely, you are prompted to set a PIN code. The PIN code is requested when you enter in the VPN configuration (submenus) or when you boot your desk phone (depending on the VPN configuration).
-
Page 47: Change The Configuration
User Manual If you leave the PIN code request menu when the phone is starting, the phone will start without VPN activated. If an error occurs when your phone is running in remote mode, a popup is displayed with an error message. - Page 48 User Manual 2.59.5 Reconnect your desk phone in your business place Your phone is already configured for remote working. If you connect your desk phone to the digital network: If you desk phone is already declared on digital network, you just have to connact and start it (you desk phone is declared twice: on IP network for remote and digital network).
-
Page 49: Programming Your Telephone
User Manual 3 Programming your telephone Initializing your voice mailbox • Light flashes. • Enter your personal code then record your name according to voice guide instructions. Your personal code is used to access your voice mailbox and to lock your telephone. Your password has 6 digits. -
Page 50: Adjusting The Audio Functions
User Manual Your password has 6 digits. A weak personal code with 6 identical digits (000000, 111111, etc.) or a simple sequence of 6 digits (012345, 123456, etc.) will be rejected by the system. After a system upgrade, the password may still have only 4 digits. For security reasons, we recommend you use a password with 6 digits. -
Page 51: Activate/Deactivate Discreet Ring Mode
User Manual 3.4.5 Activate/deactivate discreet ring mode • Beeps • 3 Beeps + Ringing • ON/OFF Activate/deactivate. • • End / To adjust other audio features. 3.4.6 Adjust ringer volume while a call arrives • Your telephone rings. • Adjusting the ringer volume. Hearing Aid If you are using your phone with a hearing device, you must install and activate the hearing aid device (HAC) to avoid hearing discomfort. -
Page 52: Selecting The Welcome Page
User Manual 3.6.3 Set the delay before the brightness is dimmed when the phone is not in use (screensaver) - Only available on ALE-30h • Open the user local menu: reach the 'Menu' page Settings Phone Local Menu Display Screensaver •... - Page 53 User Manual 3.10 Programming direct call keys (Perso page/F1 and F2 keys/Add-on module) : If your set is not equipped with a magnetic keyboard, use the alphanumeric keyboard to enter letters. Use the alphanumeric keyboard key to switch between the numeric and alphabetic keyboard. When in alphabetic mode, the LED corresponding to the key remains lit up.
- Page 54 User Manual 3.11 Customize the color and the style of programmable softkeys (ALE-30h in IP mode) You can customize the color and style of the softkeys of the perso page and the add-on modules by inserting a prefix in front of the label of the softkey. When you program a softkey, add the prefix to the name of the softkey to customize it.
-
Page 55: Programming An Appointment Reminder
User Manual 3.14 Deleting direct call keys • Reach the 'Menu' page. • Settings Keys • Select the key to delete. • Clear • • Go back to the Homepage. 3.15 Programming an appointment reminder You can set the time of a temporary reminder (one within 24 hours) or a permanent reminder (every day at the same time). -
Page 56: Activating/Deactivating 'Forced Headset' Mode
User Manual 3.18 Activating/Deactivating 'Forced headset' mode Forced headset mode must be activated as soon as a headset is installed instead of the handset. • Reach the 'Menu' page. • Settings Phone ForcedHead • ON/OFF Activating/deactivating forced headset. 3.19 Manage connected devices 3.19.1 List of connected devices •... -
Page 57: Contacting Your Administrator (Technical Support)
User Manual 3.20 Contacting your administrator (Technical support) If necessary you may need to contact your administrator. Before contacting your administrator, make sure you have information such as your phone's codes and software version to hand. 3.20.1 Date code / Technical code The codes are located on the back of the phone, next to the connectors. - Page 58 User Manual 3.20.4 Access to administrator configuration (only available in IP mode) Your administrator can access to the phone configuration. Depending on the system configuration, an administrator password is requested to access this menu. This menu is only available when the desk phone is running in IP mode. In this configuration menu, use this icon to go back.
-
Page 59: List Of Accessories
User Manual 4 Accessories List of accessories For more details about references, consult chapter: Ordering information. 4.1.1 USB accessories • AH 21 U II Premium headset monaural USB-A • AH 22 U II Premium headset binaural USB-A • AH 21 M II Premium headset monaural USB-A •... -
Page 60: Installation
User Manual Magnetic alphabetic keyboard: ALE-10 keyboard The magnetic alphabetic keyboard is only available for ALE-30h Essential DeskPhone. 4.2.1 Description The keyboard depends on your country and languages. The magnetic keyboard is automatically fixed on the base of the set. It is connected to the corresponding connector behind the phone. Country variants: •... -
Page 61: How To Use The Keyboard
User Manual 4.2.4 How to use the keyboard Use the keyboard to enter text while configuring the phone. Access directly the dial by name feature by entering the name of your contact on the keyboard. Below is a list of the function keys that allow you to access all the symbols. Caps lock: to write text in capital letters. - Page 62 User Manual 2 x 10 key expansion module: EM200 Smart Expansion Module EM200 Smart Expansion Module is only available for ALE-30h. Phone capabilities can be extended with Add-ons. The EM200 add-on offers up to 60 additional keys with LED: 2 x 10 programmable keys with LED for each virtual pages. The number of virtual pages depends on the system capabilities.
-
Page 63: Icon Description
User Manual Connector to connect the device to the desk phone or already connected add-on (USB-A). Color LCD screen. The module is equipped with a support to fix it to the desk phone or another add-on. Universal Serial Bus (USB-a) connector. Programmable keys. -
Page 64: Wall Mounting Kit
User Manual 4.3.5 Install one add-on module more than You can connect to the ALE-30h up to three modules depending on the way it is powered. An additional power adapter can be connected to the third add-on module. Contact your installer to know how many add-ons can be connected to the phone and if necessary to add a power supply. - Page 65 User Manual USB external ringing interface module (USB Interface module 2 relays 3GV28184AA) The USB external ringing interface module allows driving an external system (like a ring or a lamp), following the ring tone cadence or the communication state of the phone connected on the telephone line.
- Page 66 The mission of the DSPP is to support a broad ecosystem of developers and partners throughout the desk phone lifecycle. In this context, certification tests are performed between partner applications or devices and Alcatel-Lucent Enterprise's platforms. It certifies proper inter-working with partner applications or devices.
-
Page 67: Technical Specifications
User Manual 5 Technical specifications Consult the datasheet of your desk phone for more information. ALE-30h ALE-20h ALE-20 Height 183 mm (7.2 in) 183 mm (7.2 in) 183 mm (7.2 in) Width 207 mm (8.2 in) 207 mm (8.2 in) 207 mm (8.2 in) Depth 35 mm (1.4 in) -
Page 68: Ordering Information
User Manual 6 Ordering information This list is not exhaustive and may change at any moment. ALE-20h Essential DeskPhone 3ML37020AA ALE-20 Essential DeskPhone 3ML37020AB ALE-30h Essential DeskPhone 3ML37030AA EM200 Smart Expansion Module 3MK27007AA Mx/ALE-20/20h/30 Wall Mounting Kit 3MK27008AA ALE-10 Keyboard AZERTY 3ML37010FR ALE-10 Keyboard QWERTY - QWERTZ 3ML37010DW... -
Page 69: Guarantee And Clauses
Always listen at moderate levels. Cleaning and disinfecting Refer to document: “How to clean and disinfect Alcatel-Lucent Enterprise terminals”. Wear gloves when cleaning products. Do not use harsh chemicals such as bleach, peroxide, acetone, ethyl acid, methyl chloride, ammonia, or multi-purpose cleaners to clean plastic, metal, rubber, or screen surfaces. -
Page 70: Regulatory Statements
Related Documentation Other languages for these Safety and Regulatory Instructions and User Documentation are available at the following Web site: https://www.al-enterprise.com/products. The Alcatel-Lucent name and logo are trademarks of Nokia used under license by ALE. 8AL91432ENAAed01 70 /73... - Page 71 User Manual www.al-enterprise.com The Alcatel-Lucent name and logo are trademarks of Nokia used under license by ALE. To view other trademarks used by affiliated companies of ALE Holding, visit: www.al-enterprise.com/en/legal/trademarks-copyright. All other trademarks are the property of their respective owners. The information presented is subject to change without notice. Neither ALE Holding nor any of its affiliates assumes any responsibility for inaccuracies contained herein.
- Page 72 Related Documentation - Other languages for Safety and Regulatory Instructions and User Documentations are available at the following Web site: https://www.al-enterprise.com/products. 8AL91432ENAAed01 - The Alcatel-Lucent name and logo are trademarks of Nokia used under license by ALE. ALE International copyright © 2021...
- Page 73 Related Documentation - Other languages for Safety and Regulatory Instructions and User Documentations are available at the following Web site: https://www.al-enterprise.com/products. 8AL91432ENAAed01 - The Alcatel-Lucent name and logo are trademarks of Nokia used under license by ALE. ALE International copyright © 2021...
Need help?
Do you have a question about the Enterprise ALE-30h and is the answer not in the manual?
Questions and answers