Alcatel-Lucent IP Touch 4068 User Manual
Hide thumbs
Also See for IP Touch 4068:
- Owner's manual (35 pages) ,
- User manual (35 pages) ,
- Manual (2 pages)

Related Manuals for Alcatel-Lucent IP Touch 4068


Summary of Contents for Alcatel-Lucent IP Touch 4068
- Page 1 Alcatel-Lucent OmniPCX Enterprise Communication Server Alcatel-Lucent IP Touch 4068 Attendant Set User Manual...
- Page 2 Legal notice: Alcatel, Lucent, Alcatel-Lucent and the Alcatel-Lucent logo are trademarks of Alcatel-Lucent. All other trademarks are the property of their respective owners. The information presented is subject to change without notice. Alcatel-Lucent assumes no responsibility for inaccuracies contained herein.
-
Page 3: Table Of Contents
Chapter 1 Introduction Overview ....................Set General View ..................Set Display ....................menu Page ....................main (perso) Page ..................next Page ...................... rt&hold Page ....................camp on Page ....................Set Standard Keys ................. Softkeys (Dynamic Feature Keys) ..............Fixed Feature Keys ..................Programmable Keys .................. - Page 4 Putting the Attendant Set in Service ..........Methods for Calling a Number ............Direct Dialing ....................Calling via the Set Directory ................Dial (Call) by Name ..................Call by Speed Dialing ..................Calling an Internal User ............... Reserving (Locking) an Internal User Set ............The Called Set is Free ...................
- Page 5 Routing with Chained Extend ............Routing with Extend and Camped-On Release ......Dialing in DTMF Transparency ............Sending a Calibrated Cut-Off or Flash ........... Temporary Hold of Automatic Transfer ......... Directory Number Supervision ............Individual Call Routing ................. Indiv routing Key Present on the main (perso) Page ........Indiv routing Key Present on the Smart Display Module .......
- Page 6 Adjusting the Smart Display Module Contrast ..........4.12 Configuring a Bluetooth Device (Optional) ........... 4.12 Checking your Attendant Set Configuration ....... 4.13 Reading the Attendant Set IP Parameters ........... 4.13 Reading the Attendant Set Software Version ..........4.14 Carrying Out a Phone Test ................4.15 Selecting the Attendant Group Status ...........
-
Page 7: Overview
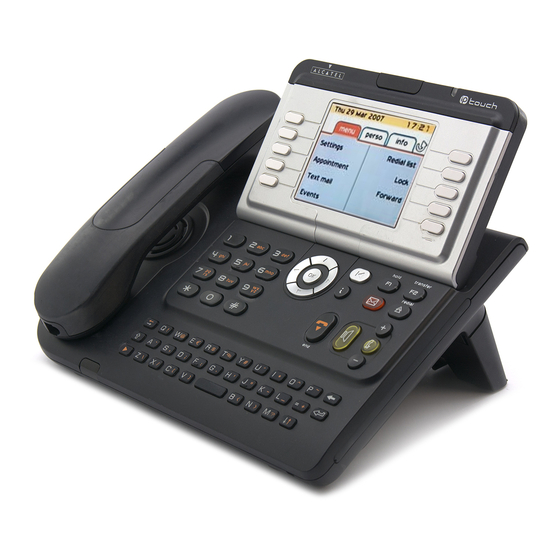
One or more attendants share the workload (up to 80 attendant stations may be operational in the same system). Each attendant set must belong to an attendant group. The keys appearing on the Alcatel-Lucent IP Touch 4068 Phone set offer all the features required for efficient management of incoming and outgoing calls. - Page 8 Chapter Figure 1.1: Alcatel-Lucent IP Touch 4068 Phone Set Layout The Alcatel-Lucent IP Touch 4068 Phone attendant set is equipped with: 1. A corded comfort handset The handset can be replaced by a corded headset or Bluetooth® wireless equipment (headset or handset) 2.
-
Page 9: Set Display
Set Display The display of the Alcatel-Lucent IP Touch 4068 Phone for attendants is a color backlight screen, allowing the set to be used in poor lighting conditions. The set display is adjustable by pushing the button on the left of the Alarm LED, as presented in the set display example below Figure 1.2: Set Display Example... -
Page 10: Menu Page
Chapter Icon Definition Indicates that a headset is connected Indicates that the silent mode is activated Several pages (menu, main (perso), next, rt&hold, and camp on) providing information on calls and access to related features The presence of an additional page is indicated by the sign to the right of the display (last title of page). -
Page 11: Next Page
Figure 1.4: main (perso) Page Example 1.3.3 next Page The next page displays the list of incoming calls (i.e. call handling page). The caller information displayed in the next page differs according to the type of incoming call: For internal or network incoming calls, the caller identity and entity are displayed For external incoming calls, the caller identity is displayed when the caller directory number has been defined in the system as speed dialing number. -
Page 12: Camp On Page
Use scroll bar to see more calls: the whole camp on page can display only eight calls. Figure 1.7: camp on Page Example Set Standard Keys The Alcatel-Lucent IP Touch 4068 Phone operating as attendant includes: A dialing keypad with 12 keys (0, 1 to 9, * and #) An alphabetic keyboard with 34 keys... -
Page 13: Softkeys (Dynamic Feature Keys)
Programmable keys with: • 72 keys on the main (perso) page • Up to 42 additional programmable keys located on add-on keypad modules 1.4.1 Softkeys (Dynamic Feature Keys) Two sets of five softkeys are located on both sides of the set display. Figure 1.8: softkeys Location Softkeys are dynamic keys whose function is determined by the system according to the current status. -
Page 14: Fixed Feature Keys
Chapter Softkey (Label) Press, to: Conference Start a Three-Party Conference End conf Stop a Three-Party Conference Voice mail Deposit a voice message on a voice mail Chained Transfer an external call to an internal set, with retrieval of this call once the internal set user has ended the conversation Announce Put a call on hold after a controlled release... -
Page 15: Programmable Keys
Action Terminates the current communication Enables or disables the hands–free feature: Short press activates the hands-free feature. It enables to switch from hand- set to headset Long press activates the Group Listening feature The hands-free feature is a full duplex mode with echo cancellation and attenu- ation Enable to adjust the set's: Ringing level if used when the set is rung... -
Page 16: Set Leds
Call presentation Important: Call presentation is pre-programmed on key 1. Alcatel-Lucent recommends not to modify this configuration. Another key may be used for the presentation of specific calls (VIP calls or returning calls, when the call is chained, for example). -
Page 17: External Station Speaker
The headset jack is located on the left side of the Alcatel-Lucent IP Touch 4068 Phone set. By default the set is configured to detect headset connection. If the headset is plugged in, the audio is sent to the headset. The hands-free key allows you to switch from handset to headset. - Page 18 Chapter 1-12...
-
Page 19: Putting The Attendant Set In Service
Putting the Attendant Set in Service When the Alcatel-Lucent IP Touch 4068 Phone used as attendant set is powered up, at the end of an initialization period, the screen displays the Attendant status page. This indicates that the attendant is out of service. -
Page 20: Dial (Call) By Name
Chapter Note 2: Pressing the up or down arrow on the navigator ( ) provides access to additional personal directory entries softkeys. On the main (perso) page, press the softkey next to the user you want to call, for example "MAROLEX Eléon.". - Page 21 When the attendant uses the "Dial by name" feature, the system searches the system directory, then, if the search is unsuccessful, a standard LDAP directory (if there is one). Pressing any key on the alphabetical keyboard switches the attendant set to Dial by name mode.
-
Page 22: Call By Speed Dialing
Chapter Note: If there is no name in the list corresponding to the request , the screen displays "Please modify your request". 2.2.4 Call by Speed Dialing Access speed dialing by: The direct speed dial number of the desired user The access prefix followed by the requested digits Pressing a key programmed with a speed dialing number Calling an Internal User... -
Page 23: The Called Set Is Free
Do Not Disturb or Out of Service, the transferred user will be immediately rerouted back to the attendant. Alcatel-Lucent 4059 Extended Edition Attendant Console: This functionality does not apply to 4059 EE Attendant, which already has its own mechanism. In other words, the parameter “SIP registered pseudo reservation”... - Page 24 Chapter Figure 2.7: Telephone Area Example (the Called Set is Free) The screen indicates: The name and first name of the called party, if known to the system The internal directory number of the called party The name of the entity to which the called party belongs That the selected set is free (also indicated by the symbol "...
-
Page 25: The Called Set Is Busy
Figure 2.9: Conversation Screen Example In this state, the attendant controls the conversation. Only the attendant can release the call by pressing the Release softkey. 2.3.3 The Called Set is Busy 2.3.3.1 The Busy Set is Multiline (with a Free Line) Note: A multiline set with a free resource is seen as free by the attendant set. - Page 26 Chapter 2.3.3.2.1 Set in Conversation with Internal Party The user to call is in conversation with an internal party. After dialing the directory number of the called party from the attendant set, the screen displays: Figure 2.11: Telephone Area Example (the Called Set is in Conversation with Internal Party) The following softkeys are available: Release To release this user...
-
Page 27: Special Cases: Unreachable Or Forwarded Sets
Release To release this user Camp on To ring automatically the busy set as soon as the user has hung up. After having activated call waiting, Camp on off softkey is used to deactivate it Intrude To barge in the conversation between the called set and the external party. - Page 28 Chapter The screen may display Unauthorized operat instead of Wrong number. If the attendant is already in conversation when dialing a number which is not recognized by the numbering plan, this is considered an incorrect operation and the screen displays: Figure 2.15: Dialing Wrong Number in Conversation The following softkeys are available: Cancel...
- Page 29 Figure 2.17: Telephone Area Example (the Called Set 13013 is in Immediate Forwarding) The following softkeys are available: Ring To activate ringing on the forwarding destination set Release To release both the forwarding destination set and the forwarded set Overide To activate the Privileged access override feature so that the for- warded set can be called despite the forwarded status of the set Call back...
- Page 30 Chapter Figure 2.19: Telephone Area Example (the Called Set 13013 is in Forward on No Answer) The following softkeys are available: Release To release both the forwarding destination set and the forwarded set Follow fwd Pressing the Follow fwd softkey displays the following screen, see: figure: Telephone Area Example (the Called Set 13013 is Forwarded on No Answer on Set 13010) Call back...
- Page 31 For example, set 13010 (forwarded on busy to set 13018), is in conversation with a party. The attendant dials the directory number (13010) of the called party. The screen displays: Figure 2.21: Telephone Area Example (the Called Set 13010 is in Forward on Busy) The following softkeys are available: Ring To activate ringing on the forwarding destination set...
-
Page 32: Calling An External User
Chapter Intrude To barge in the conversation between the called set and the external party. To exit, press the Intrude off softkey Call back To send a call-back request to the forwarded set Calling an External User To call an external user, the attendant can dial an external access prefix or an ARS prefix. When the external access prefix has been dialed, the screen displays: Figure 2.23: Telephone Area Example (External Access Prefix Dialed) Trunk group name in the telephone area is the name of the group of external lines. -
Page 33: Answering Calls
Figure 2.25: Telephone Area Example (First Digit after External Access Prefix or ARS Prefix Dialed) The first digit of the external number is displayed on the left of the telephone area and the following softkeys are available: Correct To correct the last digits dialed in case of dialing mistake Release To release the current call When all the digits of the external number have been dialed, the screen displays:... -
Page 34: Automatic/Manual Answer
Manual answer which requires an attendant action to take a call To select the desired answer operating mode, see Alcatel-Lucent IP Touch 4068 Attendant Set - Management from the Attendant Set - Selecting Answer and Transfer Operating Modes Following methods to answer a call concern manual answer operating mode. -
Page 35: Answering An External Call
2.5.3 Answering an External Call When receiving an external call, the Alarm LED located at the top of the attendant set flashes in green. The screen displays: Figure 2.29: External Call on Next page (Example) Pressing the softkey next to the number (or name if known to the system) of the caller (or pressing the OK key of the navigator) displays the following screen: Figure 2.30: Telephone Area Example (External Call in Conversation) Trunk group name in the telephone area is the name of the group of external lines. -
Page 36: The Attendant Does Not Answer Immediately
Chapter Figure 2.31: Internal Call to Attendant Group on Next page (Example) Note: If another attendant takes the call, this one disappears on the attendant screen. Pressing the softkey next to the name of the caller (or pressing the OK key of the navigator) displays the following screen: Figure 2.32: Telephone Area Example (Internal Call to Attendant Group in Conversation) The following softkeys are available:... -
Page 37: Answering A Callback Request
Attendant status page: Figure 2.33: the Attendant does not answer the Call Press the Sign on softkey to put the attendant in service. The Next page (see Alcatel-Lucent IP Touch 4068 Attendant Set - Introduction - next Page ) is displayed. 2.5.6 Answering a Callback Request An authorized internal user can activate a callback request to the attendant. -
Page 38: Putting A Call On Hold
Chapter Figure 2.35: Callback Request List Example Select the desired user by pressing the softkey next to his/her name. The screen displays: Figure 2.36: Callback The following softkeys are available: Delete To delete the present callback request Recall To recall the user who has sent a callback request Delete all To delete all the callback requests Putting a Call on Hold... -
Page 39: Consultation Call
Figure 2.37: Internal Call put on Hold (Example) Pressing the softkey next to the name of the caller retrieves the call on hold. If the attendant does not retrieve the call before the end of the timer: Ringing is activated to indicate that the user is calling back the attendant set The urgent waiting call counter (in the information bar) is incremented The Alarm LED located at the top of the attendant set flashes in red The call on hold is also displayed in the next page... - Page 40 Chapter Cancel To cancel the consultation call and continue the conversation with the first party Release To release the conversation with the first party The attendant dials the rest of the number. When the number has been dialed, the screen displays: Figure 2.39: Telephone Area Example (Second Party Number Dialed in Conversation) The following softkeys are available:...
- Page 41 Figure 2.40: Telephone Area Example (Second Party is ringing, First Party is On Hold) The following softkeys are available: Transfer To transfer (without oral presentation to the second party) the first party to the second party which is ringing Broker To switch between the first party and the second party which is ringing (the first party is automatically put on hold when not in conver- sation)
-
Page 42: Consultation Call To An External User
Chapter Transfer To transfer (with oral presentation to the second party) the first party to the second party Broker To switch between the first party and the second party (the party which is not in conversation is automatically put on hold) Cancel To cancel the consultation call and continue the conversation with the party which is not in conversation when the Cancel softkey is... - Page 43 Figure 2.43: Telephone Area Example (All Digits of the External Number Dialed) The following softkeys are available: Correct To correct the last digits dialed in case of dialing mistake Send To activate ringing on the called external set Cancel To cancel the consultation call and continue the conversation with the first party Release To cancel the consultation call and continue the conversation with the...
-
Page 44: Initializing A Three-Party Conference
Chapter Cancel To cancel the internal call and continue the conversation with the second party Release To release both the conversation with the first party and the consultation call DTMF on To activate DTMF calling transparency. After having activated DTMF call- ing transparency, DTMF off softkey is used to deactivate it Conference To put the first party, the second party and the attendant in conference,... -
Page 45: Automatic/Manual Transfer
Manual transfer, which requires an attendant action to transfer a call To select the desired transfer operating mode, see Alcatel-Lucent IP Touch 4068 Attendant Set - Management from the Attendant Set - Selecting Answer and Transfer Operating Modes This manual only describes the manual transfer operating mode. -
Page 46: Routing Participants To A Meet-Me Conference
Chapter Figure 2.47: Telephone Area Example (Internal Busy Set Number Dialed) The following softkeys are available: Transfer To transfer the first party to the busy set. When the busy set will hang up, it will be automatically called by the first party Cancel To cancel the consultation call with the busy set and continue the conver- sation with the first party. -
Page 47: The Conference Circuit Is Free
2.9.1 The Conference Circuit is Free When a conference circuit is free (no conference established), the attendant can call a first participant. When the attendant is in conversation, he/she can press the Meet me conf softkey and dial the conference number. The user is connected to the conference. To add other participants, the attendant follows the same procedure seen previously. - Page 48 Chapter 2-30...
-
Page 49: Routing With Chained Extend
Routing with Chained Extend Routing with chained extend allows the attendant to transfer an incoming external call to an internal set. The external party is rerouted to the attendant set as soon as the internal user has hung up. This allows to successively route the same call to several destinations. This operates as follows. - Page 50 Chapter Chained To activate ringing on the second party set: see below Call back To send a callback request to the second party DTMF on To activate DTMF transparency. After having activated DTMF calling transpar- ency, DTMF off softkey is used to deactivate it When the attendant presses the Chained softkey, the second party set is rung.
-
Page 51: Routing With Extend And Camped-On Release
Routing with Extend and Camped-On Release When routing an external call to a busy internal set, the attendant can put the call on hold. When the busy internal user hangs up, it is not rung. The external call on hold is signaled to the attendant. -
Page 52: Dialing In Dtmf Transparency
Chapter Figure 3.7: Telephone Area Example (BackAnnounce) The attendant may transfer the external party to the internal party by pressing the Transfer softkey. If the busy internal user does not quickly hang up, the attendant screen displays on the rt&hold page: Figure 3.8: Telephone Area Example (the Second Party does not quickly hang up the receiver) In the rt&hold page, pressing the softkey next to the number of the external caller allows the attendant to:... -
Page 53: Sending A Calibrated Cut-Off Or Flash
on the telephone area (only one digit at the same time). Figure 3.9: Telephone Area Example (DTMF dialing) Press the DTMF off softkey to deactivate the DTMF transparency. Sending a Calibrated Cut-Off or Flash This feature sends a calibrated cut-off or flash on the line before sending dialed digits in transparency mode. -
Page 54: Directory Number Supervision
Chapter Figure 3.10: Telephone Area Example (External Call in Conversation) Pressing the Transfer off softkey deactivates temporarily the Auto transfer feature. Directory Number Supervision The attendant may supervise several internal numbers when the Directory Number Supervision feature is programmed by the system administrator for these internal numbers. Note: These internals sets must be in the same node as the attendant set. -
Page 55: Individual Call Routing
Individual Call Routing This feature allows the attendant to route and supervise an incoming external call without its being placed in the common waiting queue and redistributed. When this feature is programmed by the system administrator, he/she can put the Indiv routing key on the main (perso) page or on the Smart Display Module. -
Page 56: Net/Net Key Present On The Main (Perso) Page
Chapter This feature is used to interconnect two external callers via the installation, while retaining the ability to release the connection. When this feature is programmed by the system administrator, he/she can put the Net/Net key on the main (perso) page or on the Smart Display Module. 3.8.1 Net/Net Key Present on the main (perso) Page Following an incoming call, the attendant makes an outgoing call to a party. -
Page 57: O/S Trunk Supervision
There is a red cross when no further trunk is available in the trunk group If there are still trunks free, pressing the trunk group name key corresponds to an ordinary external trunk seizure without numbering of this supervised trunk group. 3.10 O/S Trunk Supervision Note:... -
Page 58: Call Presentation
Chapter 1. Press the Indiv hold key. The external party is connected to the individual hold circuit and to the music on hold. When the timer expires, the ringing cycle speeds up. The icon located next to the Indiv hold key label flashes to indicate that the external party is on urgent hold 2. -
Page 59: Transfer With Privilege
Trunk group entity calls without dialing DDI public entity calls, DDI (ATL) private entity calls/internal calls, Unanswered DDI entity calls. Note 2: Key 1 is already pre-programmed as a call presentation key, allowing the attendant to take the call with the highest priority from those waiting resulting from traffic flows indicating an external party (external call, callback, return from chaining, etc.). - Page 60 Chapter 3-12...
-
Page 61: Management Overview
Management Overview This chapter describes the customization of the Alcatel-Lucent IP Touch 4068 Phone used as attendant set. The menu page lets you customize your attendant set environment. Figure 4.1: menu page menu Page Structure The menu page structure is the following: Figure 4.2: menu Page Structure... -
Page 62: Customizing Your Attendant Set (Settings)
Chapter Outgoing calls Indicates users called from the attendant set Set- Phone Key program Assigning Programmable Keys tings Language Selecting the Display Language Ringing Melody Selecting the Melody Level Adjusting the Ringing Level Type Selecting the Ringing Type Password Changing the Password Plug into Headset jack... -
Page 63: Assigning Programmable Keys
Figure 4.3: Attendant Set Settings 4.3.1 Assigning Programmable Keys In order to create a personal directory, assign an internal or an external number to a programmable key on the main (perso) page or on an add-on keypad module if it exists (smart display module). - Page 64 Immediately after internal user programmable key creation, you may delete this programmable key or modify the programmed number, or name associated to this programmed number. Then the screen displays the next page (see Alcatel-Lucent IP Touch 4068 Attendant Set - Introduction - next Page and it is no longer possible, see...
- Page 65 1. In the Menu page, navigate to: Settings -> Phone -> Key program 2. Enter the password and press the Apply softkey. The screen displays the Key program page Figure 4.7: Key Program Page (Select a Key) 3. Press the Main (perso) page softkey 4.
- Page 66 Chapter key then the programmable key you want to modify on the main (perso) page The screen displays the Key program page c. Press the Modify softkey d. In the Number field, enter the directory number to program and if desired, the name that corresponds to this number (as of R11.0.1) e.
-
Page 67: Selecting Answer And Transfer Operating Modes
Auto answer feature disabled when the checkbox next to the Auto answer label is not validated: see Alcatel-Lucent IP Touch 4068 Attendant Set - Basic Features - Answering Calls 4.3.2.2... -
Page 68: Selecting The Display Language
Auto transfer feature disabled when the checkbox next to the Auto transfer label is not validated: a consultation call is transferred only when Transfer softkey is pressed, see Alcatel-Lucent IP Touch 4068 Attendant Set - Basic Features - Consultation Call 4.3.3... - Page 69 4. Select the melody you wish to use on the set from the 16 available options by pressing the corresponding softkey. The selected melody is played on the speaker. Pressing the up or down arrow on the navigator ( ) provides access to additional melodies 5.
-
Page 70: Changing The Password
Chapter Figure 4.13: Adjusting the Ringing Level 4.3.4.3 Selecting the Ringing Type 1. In the menu page, navigate to: Settings -> Phone -> Ringing 2. Enter the password and press the Apply softkey. The screen displays the Ringing page 3. Press the Type softkey. The screen displays the Ringing type page which offers four possible ringing types: No ringing Used to cancel ringing. -
Page 71: Connecting Optional Equipment
1. In the menu page, navigate to: Settings -> Phone -> Password 2. Enter the current password and press the Apply softkey. The screen displays the Password (Enter your new password) page 3. Enter the new password and press the Apply softkey. The screen displays the Password (Confirm your new password) page 4. -
Page 72: Adjusting The Smart Display Module Contrast
Chapter 4.3.7 Adjusting the Smart Display Module Contrast Note: the Contrast softkey is displayed only when a Smart Display Module (one, two or three) is connected to the attendant set. 1. In the menu page, navigate to: Settings -> Phone -> contrast 2. -
Page 73: Checking Your Attendant Set Configuration
Add device 2. Press the BT Parameters softkey. The screen displays the BT Parameters page which indicates Bluetooth® parameters of the attendant set. Figure 4.17: Attendant Set BT Parameter Example 4.3.8.3 Adding a Bluetooth® Device on the Attendant Set Commissioning a new Bluetooth® device is under system administrator responsability. Checking your Attendant Set Configuration The Option softkey provides information on the attendant set (IP parameters, software version) and provides access to a phone test. -
Page 74: Reading The Attendant Set Software Version
Chapter parameters Figure 4.19: Attendant Set IP Parameter Example 4.4.2 Reading the Attendant Set Software Version 1. In the menu page, navigate to: Settings -> Option -> Version. The screen displays the Version page. Pressing the up or down arrow on the navigator ( ) provides access to the second screen. -
Page 75: Carrying Out A Phone Test
Figure 4.21: Attendant Set Software Version Example (Second Screen) 4.4.3 Carrying Out a Phone Test 1. In the menu page, navigate to: Settings -> Option -> Phone test. The attendant set plays the programmed ringing melody and six leds flash. 2. - Page 76 Chapter This feature can be inhibited or assigned to the attendant set with or without password by the system administrator. In the example below, this feature is assigned to the attendant set without password by the system administrator. 1. In the menu page, navigate to: Service-> Entity status The screen displays the Entity list page which indicates all the entities related to the attendant group number Figure 4.23: Entity List Example...
-
Page 77: Sign Off/Sign On
Figure 4.26: Attendant Status Page 2. Press the Sign On softkey to put the attendant on service. The next page (see Alcatel-Lucent IP Touch 4068 Attendant Set - Introduction - next Page ) is displayed Information 1. In the menu page, press the Information softkey. - Page 78 Chapter Figure 4.27: Information Page Example 4-18...
Need help?
Do you have a question about the IP Touch 4068 and is the answer not in the manual?
Questions and answers