Table of Contents
Advertisement
Quick Links
YUM K3000 Controller
Operation Manual
This manual is updated as new information and models are released. Visit our website for the latest manual.
READ THE INSTRUCTIONS BEFORE USING THE FRYER.
Keep these instructions for future reference.
*8196647*
Part Number: FRY_IOM_816647 11/2021
Original Instructions
CAUTION
Your Growth Is Our Goal
Advertisement
Table of Contents

Related Manuals for Welbilt Frymaster YUM K3000


Summary of Contents for Welbilt Frymaster YUM K3000
- Page 1 Your Growth Is Our Goal YUM K3000 Controller Operation Manual This manual is updated as new information and models are released. Visit our website for the latest manual. CAUTION READ THE INSTRUCTIONS BEFORE USING THE FRYER. Keep these instructions for future reference. *8196647* Part Number: FRY_IOM_816647 11/2021 Original Instructions...
-
Page 2: Chapter 1: K3000 Controller Instructions
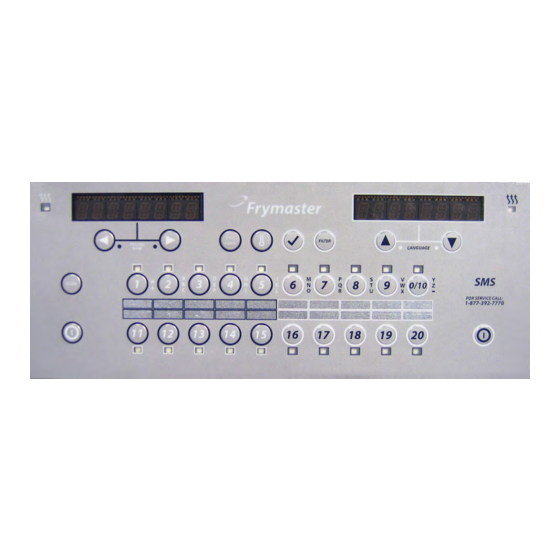
CHAPTER 1: K3000 CONTROLLER INSTRUCTIONS Using the K3000 Enter codes, respond to Pressed Individually: left-display prompts. Scroll displayed menu and Check recovery. See Exit Cool Mode programming options. page 1-2. Check actual, 250°F (121°C); Pressed Simultaneously: Access filter setpoint Changes to second Return to setpoint. - Page 3 1.2 Navigating Controller Press and hold the checkmark button for 10 seconds produces the setup mode, which first displays Product Setup. Follow the steps below to navigate the options Left Display Right Display Action Press and hold until Product Setup is displayed. Product Press ...
- Page 4 1.3 Viewing Operational Stats cont. Left Display Right Display Action complete Blank Exit Exit Press button once to return to menu, or Scan button once to return the Controller to OFF. Filter Stats Press to scroll: Filter Stats, Review Usage, Last Load. With the desired Blank stats displayed, press .
-
Page 5: Vat Set Up
1.4 K3000 Setup Mode Setup mode allows the Controller to be set for language displays, vat sizes, and temperature range displays. Follow the steps below to enter and navigate Vat Setup. Vat Set Up Left Display Right Display Action Press and hold until Product Setup is displayed. Product Setup Blank Press ... - Page 6 1.4 K3000 Setup Mode cont. Left Display Right Display Action DST SETUP This is daylight savings time setup. In the United States, daylight savings time begins each year at 2:00 A.M. on the second Sunday in March, with clocks moving ahead one hour. Daylight savings time ends each year at 2:00 A.M.
- Page 7 1.4 K3000 Setup Mode cont. Left Display Right Display Action 2 polish start tempr 300F Use numbered buttons to change temperature (use 10 for 0). (This is the required temperature for the second polish to begin.) Press . Exit Exit Press ...
- Page 8 Filter Left Display Right Display Action filter Blank Press . Filter Now? alternating Blank Press YES. with yes/no OPEN DRAIN VALVE Blank Open drain valve. Draining Blank None required. OPEN RETURN VALVE Blank Open return valve. POLISHING COUNTDOWN TIMER None required. CLOSE DRAIN VALVE CONFIRM Close drain valve and press CONFIRM.
-
Page 9: Drain To Pan
Drain to Pan Left Display Right Display Action Press Drain to pan Blank DRAIN TO PAN? Yes NO Press YES. OPEN DRAIN VALVE Open the drain valve. draining None required. VAT EMPTY? CONFIRM Press CONFIRM. CLOSE DRAIN VALVE Close the drain valve. OIL IN DRAIN PAN CONFIRM Press CONFIRM. - Page 10 1.7 Prompts Encountered While Programming The K3000 can be programmed for single-segmented cooking, which is used for most products and segmented cooking, which is used for bone-in chicken. When programming for either product, the time prompts encountered are sequentially numbered. For non-segmented products, enter 0:00 for the second time prompt (2 Time) and the additional programming steps associated with segmented programming don’t appear.
- Page 11 1.7 Prompts Encountered While Programming cont. Left Display Right Display Explanation/Action 3 PRESSURE OPEN See 1 Pressure Solenoid. SOLENOID 4 Time Time Segmented: Enter time remaining in the cook cycle after the third temperature change occurs. Non-Segmented: Doesn’t appear. 4 Tempr Temperature Segmented: This is the third temperature change, which occurs at the point entered at the 3 Time prompt.
- Page 12 1.8 Programming for Single Setpoint (Non-Segmented) Items Programming for non-segmented food items is shown below. The right column has the action necessary to continue. Exit from a programming step at any time by pressing the Scan button until the display returns to its pre-programming status. Left Display Right Display Action...
- Page 13 1.9 Multi-Setpoint (Segmented) 1.9.1 Cooking Programming Overview The K3000 is capable of segmented cooking, a feature which allows a cooking cycle to be broken into a number of parts, each with its own cooking temperature and time. An abbreviated version of the programming for a 13-minute cook cycle with four cooking temperatures is shown below.
-
Page 14: Alarm Programming Overview
1.9.2 Alarm Programming Overview Alarms are set to remind operators to shake fry baskets or tend to the product in some other way at points during the cook cycle. The instructions below detail setting three alarms in a 13-minute cook cycle. - Page 15 1.10 Programming for Multi-Setpoint (Segmented) Items Left Display Right Display Action Press and hold until Product Setup is displayed. Press . Product Setup Blank Product Setup Enter Code Enter 1724 Select Product Blank Press desired product button Long Name Product name or button number Enter product name with letter buttons.
- Page 16 1.10 Programming for Multi-Setpoint (Segmented) Items cont. Left Display Right Display Action 5 Time :00 or previously entered time Leave at zero if no more segments are needed and press . If more segments are needed, 5 is the limit, continue programming as shown above.
- Page 17 1.11 K3000 Menu Summary Tree Filter Menu ………………………………………………………………………………………………………….. [With computer ON, press and hold FILTER button] Filter Clean Dispose Drain to Pan Fill Vat From Pan Info Mode ………………...………………………...………………………………………..……………………….. [With computer OFF, press and hold (check) button] Oil Stats Filter Stats Review Usage Last Load Setup and Tech Modes...
-
Page 18: Chapter 2: Operator Troubleshooting
CHAPTER 2: OPERATOR TROUBLESHOOTING Introduction This chapter provides an easy reference guide to some of the common problems that may occur during the operation of your equipment. The troubleshooting guides that follow are intended to help you correct, or at least accurately diagnose, problems with your equipment. Although the chapter covers the most common problems reported, you may encounter problems that are not covered. - Page 19 Troubleshooting Fryers 2.2.1 Error Messages and Display Problems PROBLEM PROBABLE CAUSES CORRECTIVE ACTION A. Press the ON/OFF switch to turn the A. Controller not turned on. Controller on. No display on the B. No power to fryer. B. Verify that the fryer is plugged in and that the C.
- Page 20 PROBLEM PROBABLE CAUSES CORRECTIVE ACTION It is normal for this message to appear during Contactor issue, gas valve off, Controller displays startup if a gas fryer’s lines have air in them. failed Controller, failed HEATING Check that the gas valve is on. If it continues, transformer, open high-limit FAILURE.
- Page 21 PROBLEM PROBABLE CAUSES CORRECTIVE ACTION Press (CONFIRM) and follow directions for Controller displays Drain valve open or possibility that FILL VAT FROM DRAIN PAN. OIL IN DRAIN oil is in drain pan. PAN / CONFIRM This is a normal display when a filter has been Controller displays A filter cycle has been delayed.
- Page 22 FRYMASTER 8700 LINE AVENUE, SHREVEPORT, LA 71106-6800 800-551-8633 318-865-1711 WWW.FRYMASTER.COM EMAIL: FRYSERVICE@WELBILT.COM ©2021 Welbilt Inc. except where explicitly stated otherwise. All rights reserved. Continuing product improvement may necessitate change of specifications without notice. Part Number FRY_IOM_8196647 11/2021...
Need help?
Do you have a question about the Frymaster YUM K3000 and is the answer not in the manual?
Questions and answers