
Related Manuals for Shure Microflex MXCW


Summary of Contents for Shure Microflex MXCW
- Page 1 MXCW ® Microflex Complete Wireless Complete user guide for the MXCW system. Includes installation instructions, specifications, best practices, and troubleshooting. Version: 10.4 (2021-K)
-
Page 2: Table Of Contents
Web Browser Requirements Rechargeable Battery (SB930) Using DNS to Open Web Application Battery Life Web Application Views Important Tips for Care and Storage of Shure Recharge Using a Passphrase able Batteries Wireless and RF Management Networked Charging Station (MXCWNCS) Wireless Operating Distance... - Page 3 Shure Incorporated Configuring Conference Units for Remote Callers Manually Assigning Static IP Address Speak Priority for Remote Callers Setting Latency Changing the Participant Role Using the Web Application with a Wireless Connection 58 Identifying a Device from the Software IP Ports and Protocols...
- Page 4 Shure Incorporated Certifications Trademarks 4/86...
-
Page 5: Mxcw Microflex® Complete Wireless
Each wireless conference unit is powered by a smart lithium-ion rechargeable battery whose remaining charge can be checked remotely by a technician. The MXCW networked charging sta tion charges and stores up to 10 Shure rechargeable batteries that can be monitored through its own web application. Features... -
Page 6: Getting Started
Shure Incorporated Getting Started Set Up the System Access Point (MXCWAPT) Connect the access point to a Power over Ethernet (PoE) source to turn on the device. If prompted, select the operating region on the menu for RF coordination (some model variations). -
Page 7: Set Up Wireless Conference Units (Mxcw640)
Shure Incorporated Set Up Wireless Conference Units (MXCW640) Insert a fully charged Shure SB930 rechargeable battery and connect the MXC400 series microphone. Press and hold the power button on the bottom of the device until the screen powers on. Wait while the microphone device searches for the default access point network (00). -
Page 8: Access Point Transceiver (Mxcwapt)
Shure Incorporated Speak into the microphone to check the audio. Listen to the sound check on the loudspeakers or headphone output. Access Point Transceiver (MXCWAPT) The access point transceiver is the hub of the audio signal flow and manages the RF stability of each microphone in the group. - Page 9 Shure Incorporated ① Display Shows menu screens and settings. ② Enter Button Enter a menu or save settings. ③ Exit Button Return to previous menu screens or cancel setting changes. ④ Arrow Buttons Scroll to a menu item or make a change to a setting.
- Page 10 Shure Incorporated Icon LED Color Description Amber (flashing) A network reset is in progress Green (flashing) + RF LED green Simultaneous LEDs: Device identify from the software is in progress Alternating LEDs: Firmware update is in progress (flashing) + Network Audio LED green (flashing) ⑥...
-
Page 11: Access Point Menu
Shure Incorporated ⑧ Analog XLR Audio Input Connect an external output. ⑨ Analog XLR Audio Output Connect to an external input. ⑩ Ground Lift Switch Lifts the ground from pin 1 of the XLR connector and the sleeve of the ¼" Audio Output to minimize ground-related noise that can occur when connecting the XLR Audio Output or Input to a thirdparty device. - Page 12 Shure Incorporated SSID Select an access point network ID for easy recognition and control of connected conference units. The default SSID is 00. Meeting Ctrls Speak Mode Select a mode to determine how microphones are activated for participants. Change the maximum number of delegates and the total speakers. Total speakers includes Max Speakers the number of chairpersons.
-
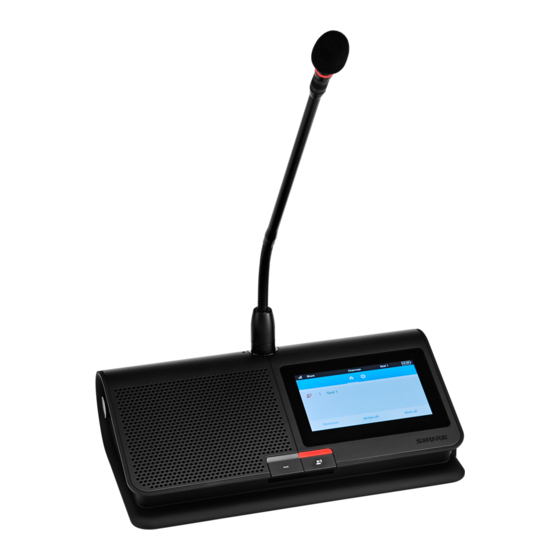
Page 13: Conference Unit (Mxcw640)
Shure Incorporated APT Utilities Shure Control displays the IP address, Subnet, Gateway, and MAC address of the access Network point, while Audio Network shows this information for Dante. Set the IP address for each net work interface to automatic for an assigned IP address, or manual to edit the IP address. -
Page 14: Gooseneck Microphone (Mxc416, Mxc420, Mxc425, Mxc406/Ms)
Shure Incorporated ③ Headphone Output Two TRRS 3.5 mm ports on each side of the unit allow participants to listen to an interpretation channel or the floor audio over headphones. ④ Volume Control Two knobs on each side increase and decrease audio playback volume for headphones. -
Page 15: Using The Conference Units
Shure Incorporated Securing the Microphone to the Conference Unit Insert the microphone into the microphone connector. Insert the 1.5 mm hex wrench into the hole next to the microphone on the conference unit and turn counterclockwise. Using the Conference Units Once a unit has powered on, tap the touchscreen to access the home screen, or insert a preprogrammed NFC card if avail... -
Page 16: Customize Welcome Screen
Shure Incorporated ① • Assign a participant role • Change the left-button functionality ② • Display the firmware version of the conference unit and connected access point • Factory reset the device • Reboot the device ③ • Display the connected access point SSID •... -
Page 17: How To Lock The Welcome Screen
Shure Incorporated How to Lock the Welcome Screen You can lock conference units to stay on the welcome screen for units set to the delegate, dual-delegate, or listener roles. This will prevent participants from changing settings on the units, and it will disable the view of speak and request lists. Voting con... -
Page 18: Rechargeable Battery (Sb930)
Shure Incorporated All Del off (chairperson Turn off all delegate microphones. Solid blue only) Next on (chair Turn on the first microphone in the request list. Solid blue person only) Exclusive Press and hold to mute all delegate microphones (chairperson Solid red and activate the chairperson microphone only. -
Page 19: Important Tips For Care And Storage Of Shure Rechargeable Batteries
Shure Incorporated Important Tips for Care and Storage of Shure Rechargeable Batteries Proper care and storage of Shure batteries results in reliable performance and ensures a long lifetime. • Always store batteries and transmitters at room temperature • Ideally, batteries should be charged to approximately 40% of capacity for long-term storage •... - Page 20 >25% >50% >75% >95% Charging error details are available in the web application and the full online system guide at pubs.shure.com ④ Power Button Flip the switch to turn the unit on or off. ⑤ Power Input Connect to the included power supply.
-
Page 21: Powering On The Device
Shure Incorporated Powering On the Device Connect the device to a power source using the supplied power cable. Flip the power switch to turn on the device. Monitoring Battery Charge The MXCW power management system combines intelligent, rechargeable technology with a variety of monitoring options for the SB930 batteries. -
Page 22: Average Charging Times
Shure Incorporated LED Segment LED State Description Battery hot Green + Amber (alternate flashing) In recovery Green >25% battery charge Green >50% battery charge >75% battery charge Green Battery warm. See web application for details. Green <95% battery charge Average Charging Times... -
Page 23: Battery Statistics
Shure Incorporated Battery Statistics The charging station web application provides detailed information for each battery in the charger. Sort battery statistics by se lecting one of the following statistics from the dropdown: Bay number Displays the order of the batteries based on which slot they are placed in. -
Page 24: Access Point Installation
Shure Incorporated Place the charger in storage mode: ◦ From the hardware: Press and hold the Storage mode button for 5 seconds. ◦ From the software: Open the charger web application to the home page and turn on storage mode. Access Point Installation Best Practices When Selecting a Location for the Access Point •... -
Page 25: External Cover For Painting
Shure Incorporated • Use balanced XLR cables for analog input/output. • Use Gigabit DHCP router to connect multiple access points in the same installation. Ensure it meets the following require ments: ◦ Gigabit ports ◦ Provides Class 0 PoE with at least 6.5 W ◦... -
Page 26: Networked Charging Station Installation
Shure Incorporated Ceiling Tile: Important: Use large fender washers or a large metal plate on the back side of the ceiling tile to support the weight of the ac cess point. Mark and drill pilot holes for the screws and cable entrance using the mounting bracket as a template. -
Page 27: Best Practices For Rack Installation
Shure Incorporated Attach the mounting bracket to the rack or wall using the appropriate screws for you surface. Leave room for cabling to the charging station. Best Practices for Rack Installation • Ambient temperature in the rack should not exceed specified operating temperature range of the device. -
Page 28: Restricting New Device Connections
Shure Incorporated To connect to an access point network: Power on the access point. Wait for it to automatically select the best available wireless channel for operation. When the channel is secured, the access point will broadcast its network (SSID 00) to the wireless MXCW devices. -
Page 29: Custom Network Ssid Labels
Shure Incorporated You can add or remove devices from registration. Select a device, open more options from the device properties panel, and press Deregister to move a device to the unregistered group. Select a device from the unregistered group, then open more options from the device properties panel and press Register to register a unit. - Page 30 Shure Incorporated Multiple networks are useful for installations with adjacent meetings or divisible rooms that can be reconfigured depending on the size and needs of the event. Divisible Room with Multiple System Options Use different SSIDs to separate conference units into independent systems for smaller events. When the room opens up to support more participants, simply set all conference units to the same access point network to create a large system.
- Page 31 Shure Incorporated All connected microphones automatically update to the new network. To update any other devices: Open the technician menu on the MXCW640 by tapping the gear icon. While at the top of the page, hold down the volume control knobs and tap the right side of the screen.
-
Page 32: Web Applications For Monitoring And Control
Charging batteries Monitor battery charge and statistics. CWNCS) Opening the Device Web Application Connect the computer to the device network. Open the Shure Web Device Discovery application. The application lists Shure devices on the network that provide computer control. 32/86... -
Page 33: Web Browser Requirements
Shure Incorporated Find the device you want to open: Application Device host MXCW system setup, control, and monitoring MXCWAPT Batteries currently charging MXCWNCS Double-click the row or right-click to copy the IP address or DNS name to paste into a browser. -
Page 34: Using Dns To Open Web Application
Shure Incorporated Using DNS to Open Web Application You can bypass the Web Device Discovery application by entering the device DNS name into an internet browser. The DNS name is derived from the model of the unit (MXCWAPT or MXCWNCS), in combination with the last three bytes (six digits) of the MAC address, and ending in .local. -
Page 35: Using A Passphrase
Shure Incorporated • Mac: ctrl + cmd + f Using a Passphrase The access point web application must have an Admin passphrase created when an access point is powered on for the first time, or after a factory reset. The passphrase may be changed or removed after the system setup is complete. -
Page 36: Reliable Bandwidth Allocation
Shure Incorporated Cardioid RF Pattern The access point RF pattern is cardioid, picking up equally from the sides to the front cover of the unit. Room Combining Example Increase RF power levels to cover larger combined rooms. Reliable Bandwidth Allocation MXCW easily scales from 2 to 125 conference units without any change in the audio performance. -
Page 37: Interference Detection And Avoidance
Shure Incorporated Interference Detection and Avoidance The access point has a builtin spectrum analyzer that continuously scans the wireless environment and ranks the best chan nels for operation. MXCW commonly operates in a specific block of 5 GHz channels that require Dynamic Frequency Selec... -
Page 38: Setting Up Participants
Shure Incorporated Changing the Country and Region Use the web application to change the country and region after the initial setup: Go to web application > Language and region and select a new country or region. Press Apply to save your changes. Note: After a change is applied, the access point will reboot and all connected devices will not be able to pass audio during this time. Refresh the browser for the web application after the access point has rebooted. -
Page 39: Configuring Conference Units For Remote Callers
Shure Incorporated Role Brief description Details unassigned microphone slots, and remains on the speak list during the event. Both the left and right buttons are configured as speak but tons, one for each participant. The speaker list shows both Two delegates share one conference... -
Page 40: Identifying A Device From The Software
Shure Incorporated From the device technician menu: Enter the technician menu on the conference unit. From the role tab, select a new role. Identifying a Device from the Software Before making changes in the software, confirm you are interacting with the correct hardware. - Page 41 Shure Incorporated Determine which columns display in the devices table: • Seat number • Seat name • Role • Battery • RF strength • Speak priority Visible columns • Audio groups • Left-button functionality • Firmware version • Serial number •...
-
Page 42: Assigning Names And Seat Numbers
> Retain to start saving seat information again. NFC Card Functionality Use the free Shure NFC Card Programming application (available on www.shure.com) to program NFC identification cards with the names of meeting participants. The NFC Card Programming application is designed to work with ACOS3 dual interface or contactless cards, such as the MX... -
Page 43: Active Speaker Interruption
Shure Incorporated • Set the highest-ranking chairperson to 5 Multiple Chairpersons • Set the rest of the chairpersons to 4 • Leave the normal delegates at 1 (default) High-Ranking Delegates • Set the high-ranking delegates to 2 Adjusting Speak Priority To adjust the speak priority without changing the participant's role: Open the web application to the Devices tab. -
Page 44: Setting The Number Of Active Speakers
Shure Incorporated Mode Description How it Works Managed request queue Speak button adds the participant to a request queue that is Manual managed by the chairperson or operator. Speak into microphone Microphone turns on automatically when chairperson or dele Handsfree gate speaks. -
Page 45: Prevent Speak Button Conflicts
Shure Incorporated To set the number of speakers: Go to Meeting Controls > Basic. Use the plus sign (+) and minus sign (−) to change the number of speakers. ◦ Total: Total number of active delegate and chairperson devices. This is the absolute maximum number of people that can address the floor at the same time. -
Page 46: Mxcw Routing Descriptions
Shure Incorporated MXCW Audio Channels Encrypted wireless audio between the access point and conference units: ① MXCW Wireless Net • 8 uplink channels for active speakers work • 9 downlink listening channels (1 floor mix + 8 interpretation channels) XLR connectors on the access point: ②... -
Page 47: Mxcw Wireless Audio
Shure Incorporated MXCW Audio Routing Description Route Description Available channels Web application path Monitor and adjust the signal at each input channel: 1 Analog input web application > Audio > In Input channels Audio signal 10 Dante inputs puts Volume and mute... -
Page 48: The Floor Mix
Shure Incorporated • 1 fixed Floor channel on speaker and headphones • 8 assignable interpretation channels on headphone Listen Chan nels (Down link) Floor and Interpretation The Floor Mix Whenever a microphone is turned on, the audio is routed to the floor mix by default. The floor mix combines all active speakers and sends that signal to the other participant units for listening. -
Page 49: Connecting Analog Devices
Shure Incorporated Access Point Analog Connectors Remove the cover to access the analog connectors Connecting Analog Devices Connect a line-level audio device: ◦ XLR input from a mixer or wireless receiver (default route to floor mix) ◦ XLR output to a recording, loudspeaker, or teleconferencing system (default source is floor mix) Perform a sound check using normal speech levels with the rest of the MXCW microphones. -
Page 50: Automatic Gain Control (Agc)
Shure Incorporated Analog Input Example Automatic Gain Control (AGC) Automatic gain control adjusts channel levels to ensure consistent volume for all speakers, in all scenarios. For quieter voices, it increases gain; for louder voices, it attenuates the signal. For best performance, it is recommended that AGC be enabled for all inputs. This means that all level adjustments will be made automatically by AGC and manual control of input levels using channel faders is inhibited. - Page 51 Shure Incorporated For example, a chairperson's conference unit can be recorded but kept private (taken out of the floor mix). Remove it from the floor mix and route it to another group that is connected to a recording system for archival purposes.
- Page 52 Shure Incorporated 4b. Choose the group mix that the seat is routed to. This group (with the seat that was removed from the floor mix) is now routed to the output channel and ready for recording, broadcasting, or another application.
- Page 53 Shure Incorporated Repeat for the rest of the group mixes (B - H). Open the Outputs tab. For the first Dante output channel, select Mix A for the input source. Repeat for the rest of the outputs. More than 8 Active Speakers To record more than 8 active speakers at a time, route the 8 microphone slots (instead of seats routed to mixes) to the output channels.
-
Page 54: Language Interpretation
Shure Incorporated Repeat for the remaining microphone slots. Emergency Audio Signal To prepare for an emergency, connect an Emergency Evacuation Message (EEM) audio signal to the analog XLR input or one of the 10 Dante input channels. The system will detect when the EEM signal is present and distribute it to the loudspeakers and all output connections. -
Page 55: Digital Audio Networking
Shure Incorporated The floor channel is used by interpreters to provide simultaneous interpretation of the discussion. This channel is also selec table by other participants to listen to the floor channel on headphones or in the remote call. To select headphone channels: Connect headphones to a headphone jack on one of the sides of the conference unit. -
Page 56: Switch Recommendations For Dante Networking
Shure Incorporated • Videoconferencing feed of near-end audio Routing Dante Channels ® Use the free Dante Controller software by Audinate to route Dante channels in and out of the MXCW system. Switch Recommendations for Dante Networking In addition to the basic networking requirements, Dante audio networks should use a Gigabit network switch or router with the following features: •... -
Page 57: Networking
• Connect all Shure networked devices to the same network and set to the same subnet. This applies to all devices that audio signals must be routed between (managed through Dante Controller). It is also required in order to open the web application for a device. -
Page 58: Manually Assigning Static Ip Address
Tip: For larger wireless microphone configurations, it’s recommended to increase the multicast transmission rate to provide adequate bandwidth. Important: For best performance, use a wireless router that does not limit the multicast rate to 1-2 Mbps. Shure recommends the following wireless router brands: •... -
Page 59: Ip Ports And Protocols
8180 HTML Required for web application Open † 8427 Multcast SLP Required for inter-device communication Open 64000 Telnet Required for Shure firmware update Open Dante Audio & Controller Port TCP/UDP Protocol Description SNMP Used by Dante † [319-320]* Dante clocking... -
Page 60: Aes67
Update Dante Controller software to the newest available version to ensure the AES67 configuration tab appears. • Before turning encryption on or off in the Shure device’s web application, you must disable AES67 in Dante Controller. • AES67 cannot operate when the transmit and receive devices both support Dante. -
Page 61: Voting
Shure Incorporated Voting The chairperson controls voting sessions from the conference unit or the voting tab in the chairperson web application view. Use the web application to customize voting session settings, such as: • Enter a vote subject that will appear above the voting buttons and results, if desired •... -
Page 62: Voting Results
Shure Incorporated Voting Configuration Conference Unit Screen 5-Button (Open) 5-Button (Secret) A 5-Button vote allows the user to answer on a scale from “ " to “+ +." These responses can be used to re spond to a poll. Voting Results The results of open voting sessions display after a vote has finished. -
Page 63: Resetting Devices
Shure Incorporated Resetting Devices Shure devices are designed to work together right out of the box. Prior to a new installation, or during troubleshooting, it may be useful to reset devices to ensure system compatibility. The system provides 2 reset levels to choose from: •... -
Page 64: Export Log Files
Firmware Updates Firmware is embedded software in each component that controls functionality. Periodically, new versions of firmware are devel oped to incorporate additional features and enhancements. You can install firmware using Shure Update Utility. Download Shure Update Utility at shure.com. -
Page 65: Specifications
Shure Incorporated Specifications System Latency Microphone Input to Speaker/Headphone Output 16 ms Microphone Input to Analog Output 9.2 ms Analog Input to Speaker/Headphone Output 7.7 ms Frequency Response Headphone Output 100 Hz20 kHz (+0.5 dB/3 dB) Speaker Output 220 Hz15 kHz (±10 dB) - Page 66 Shure Incorporated Frequency Response Line 22 Hz20 kHz (+0.5 dB/3 dB) 22 Hz20 kHz (+0.5 dB/3 dB) Measured at Dante Output Total Harmonic Distortion Line 0.03%, typical 0.02%, typical Measured at Dante Output Dynamic Range Line 115 dB (Aweighted), 113 dB (Unweighted), typical 112 dB (Aweighted), 110 dB (Unweighted), typical...
- Page 67 Shure Incorporated Frequency Response 1 Hz 20 kHz (+0.5 dB/3 dB Audio Injected at Dante Input Total Harmonic Distortion 0.01%, typical Audio Injected at Dante Input Dynamic Range 100 dB (Aweighted), 97 dB (Unweighted), typical Audio Injected at Dante Input Load Impedance >600 Ω, typical...
- Page 68 Shure Incorporated Power Supply Type Power over Ethernet (PoE) Supply Voltage 3757 V Power Consumption 12 .95 Wmaximum, 6.5 Wtypical Network Interface Gigabit Ethernet, Dante digital audio Link Speed 10/100/1000Mbps Network Addressing Capability DHCP or Manual IP address Cable Length...
-
Page 69: Mxcw640
Shure Incorporated Weight 1.15 kg Housing Molded Plastic, Die-casted Aluminum Mounting Type Ceiling bracket or wall Environmental Operating Temperature Range -7℃ (19.4℉) to 49℃ (120.2℉) Storage Temperature -29℃ (-20.2℉) to 60℃ (140℉) Relative Humidity <95% MXCW640 Microphone Input Nominal Input Level 60 dBV... - Page 70 Input Impedance 26 kΩ Configuration Unbalanced Type Multipin Female Gooseneck Socket Pin Assignments Proprietary Shure Pinout Remote Caller Input Maximum Input Level 1.6 dBV Measured at Dante Output Frequency Response 30 Hz 20 kHz (+0.5 dB/3 dB Measured at Dante Output Total Harmonic Distortion 0.07%, typical...
- Page 71 Shure Incorporated Headset Microphone Input Maximum Input Level 5.5 dBV Measured at Dante Output Frequency Response 20 Hz 20 kHz (+0.5 dB/3 dB Measured at Dante Output Total Harmonic Distortion 0.07%, typical Measured at Dante Output Dynamic Range 94 dB Aweighted, 92 dB Unweighted, typical...
- Page 72 Shure Incorporated Total Harmonic Distortion 1%, typical Audio Injected at Dante Input Dynamic Range 94 dBAweighted, 91 dB Unweighted, typical Headphone Output Maximum Output Level 2.1 dBV 1% THD+N. Audio Injected at Dante Input. Frequency Response 100 Hz 20 kHz (+0.5 dB/3 dB)
- Page 73 Shure Incorporated 1% THD+N. Audio Injected at Dante Input. Frequency Response 4 Hz 20 kHz (+0.5 dB/3 dB) Audio Injected at Dante Input Total Harmonic Distortion 0.07%, typical Audio Injected at Dante Input Dynamic Range 87 dB Aweighted, 77 dB Unweighted, typical...
- Page 74 Shure Incorporated Transmission Protocols ISO/IEC 14443 Antenna Type Internal NFC Loop Antenna Power Battery Type Shure , Lithium-Ion Battery Connector Proprietary blade Battery Voltage 3 4.2 V Nominal Capacity 35 Wh Power Consumption 3 W, typical Operating Time > 11 hours, typical...
-
Page 75: Mxcwncs
Shure Incorporated Display Type Color TFT LCD with Capacitive Touchscreen Display Size 4.3 in. (109.2 mm) Display Resolution 480 x 272 (128 ppi) Mechanical Dimensions 70.2 x 148 x 257.5 mm (2.8 x 5.8 x 10.1 in.) Weight 1.21 kg with battery, 1.025 kg without battery... - Page 76 Shure Incorporated Charge Time 50% = 1.5 hours; 100% = 4 hours Charge Current 3.6 A Power Requirements Input 100 to 240 V AC, 50/60 Hz, 2 A maximum Output 4.2 V DCmaximum, 160W maximum Network Connections RJ45 (Ethernet) Other Connections...
-
Page 77: Sb930
Shure Incorporated Charging Temperature Range 0 °C (32 °F) to 35 °C (95 °F) Storage Temperature Range −29 °C (20.2 °F) to 60 °C (140 °F) Related to the storage of the charger, not storage mode. Relative Humidity <95% SB930... - Page 78 Shure Incorporated (140 (113 (122 78/86...
-
Page 79: Accessories
Shure Incorporated Accessories Mini-shotgun gooseneck microphone for MXC and MXCW MXC406/MS Cardioid gooseneck microphone for MXC and MXCW MXC416/C Dualflex, cardioid gooseneck microphone for MXC and MXCW MXC416DF/C Cardioid gooseneck microphone for MXC and MXCW MXC420/C Dualflex, cardioid gooseneck microphone for MXC and MXCW... -
Page 80: Networked Charging Station Model Variations
Shure Incorporated Regions Countries Africa Egypt, Ethiopia, Kenya, Morocco, Nigeria, South Africa Argentina, Brazil, Chile, Colombia, Costa Rica, Dominican Americas Republic, El Salvador, Guatemala, Jamaica, Panama, Peru, Uruguay, Venezuela Austria*, Belgium*, Bulgaria*, Croatia*, Cyprus*, Czech Re public*, Denmark*, Estonia*, Finland*, France*, Germany*, Greece*, Hungary*, Iceland*, Ireland*, Italy*, Latvia*, Liecht... -
Page 81: Important Product Information
Shure Incorporated Important Product Information Safety Information IMPORTANT SAFETY INSTRUCTIONS READ these instructions. KEEP these instructions. HEED all warnings. FOLLOW all instructions. DO NOT use this apparatus near water. CLEAN ONLY with dry cloth. DO NOT block any ventilation openings. Allow sufficient distances for adequate ventilation and install in accordance with the manufacturer’s instructions. - Page 82 Do not short circuit; may cause burns or catch fire • Do not charge or use battery packs other than Shure rechargeable batteries • Dispose of battery packs properly. Check with local vendor for proper disposal of used battery packs.
-
Page 83: Information To The User
The equipment is intended to be used in professional audio applications. Changes or modifications not expressly approved by Shure Incorporated could void your authority to operate this equipment. Note: This device is not intended to be connected directly to a public internet network. - Page 84 Shure Incorporated This device contains licenceexempt transmitter(s)/receiver(s) that comply with Innovation, Science and Economic Develop ment Canada’s licenceexempt RSS(s). Operation is subject to the following two conditions: This device may not cause interference. This device must accept any interference, including interference that may cause undesired operation of the device.
- Page 85 万一、この機器から移動体識別用の構内無線局に対して有害な電波干渉の事例が発生した場合には、 速やかに使用周波 数を変更するか又は電波の発射を停止した上、下記連絡先にご連絡頂き、混 信回避のための処置等(例えば、パーティ ションの設置など)についてご相談して下さい。 その他、この機器から移動体識別用の特定小電力無線局あるいはアマチュア無線局に対して有害な電波干渉の事例が発生 した場合など何かお困りのことが起きたときは、保証書に記載の販売代 理店または購入店へお問い合わせください。代 でもご覧いただけます。 理店および販売店情報は Shure 日本語ウェブサイト http://www.shure.co.jp 現品表示記号について 現品表示記号は、以下のことを表しています。 この無線機器は 2.4GHz 帯の電波を使用し、変調方式は「 DS-SS 」方式および 「 FH-SS 」方式、想定与干渉距離は 40m です。 2,400MHz ~ 2,483.5MHz の全帯域を使用し、移動体識別装置の帯域を回避する ことはできません。 EAC Clarification: This product meets Russian compliance regulations as well as EAC marking requirements.
- Page 86 CE Notice: Hereby, Shure Incorporated declares that this product with CE Marking has been determined to be in compliance with European Union requirements. The full text of the EU declaration of conformity is available at the following site: https:// www.shure.com/en-EU/support/declarations-of-conformity.
Need help?
Do you have a question about the Microflex MXCW and is the answer not in the manual?
Questions and answers