Advertisement
CoolGear USBG-7DU2 7-Port USB2.0
Metal Hub with DIN RAIL Mounting Kit
1. Introduction
Thank you for purchasing this high-speed 7-port USB2.0 hub. It
provides an ideal solution to expand 7 USB2.0 ports from one
single USB2.0 host port. It provides a self power source
(+7~24VDC from 2-pin Terminal Blocks) to provide enough
power on USB2.0 buses.
Features:
Compliant with USB Specification Revision 2.0
Rigid and Wall-mountable Metal Case
Supports High-speed and or Full-speed Packet
Protocol Sequencer for Endpoint 0/1
Provides 7 Downstream Facing Ports
Supports USB Screw Lock Mechanism Increases Reliability
Supports 480Mbps, 12Mbps and 1.5Mbps Speed
Supports Self-powered and Bus-powered Mode
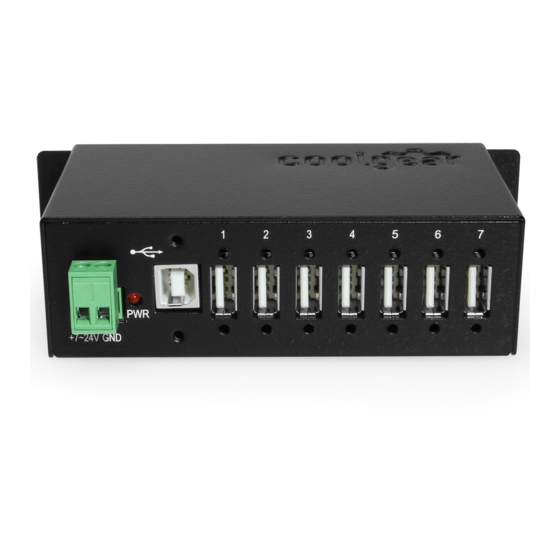
2. Connector Layout
Power LED
Self Power Input
Connectors
Installation Guide
Upstream Port
Connector
1
7 Downstream Ports
Advertisement
Table of Contents

Related Manuals for CoolGear USBG-7DU2


Summary of Contents for CoolGear USBG-7DU2
- Page 1 CoolGear USBG-7DU2 7-Port USB2.0 Metal Hub with DIN RAIL Mounting Kit Installation Guide 1. Introduction Thank you for purchasing this high-speed 7-port USB2.0 hub. It provides an ideal solution to expand 7 USB2.0 ports from one single USB2.0 host port. It provides a self power source (+7~24VDC from 2-pin Terminal Blocks) to provide enough power on USB2.0 buses.
- Page 2 7-Port USB2.0 Metal Hub with DIN RAIL Mounting Kit Upstream Port Connector: Type-B connector from upstream USB2.0 port. It is connected from host or another USB2.0 hub. Self Power Input Connectors: This 2-pin (one pin plus voltage and the other pin is GND) terminal block connectors are used to connect strong power to self-power the hub, the voltage can be in the range from +7V to 24VDC.
- Page 3 7-Port USB2.0 Metal Hub with DIN RAIL Mounting Kit end connector to this hub. Since the USB hub is plug-and-play, you don’t have to turn off your host computer when installing the hub. Note: In some cases, you will see an error message said that the USB Hub caused the USB bus power over the current limit, please ignore this message since the hub is hot plug and its power capacitor will cause a very short period of current.
- Page 4 7-Port USB2.0 Metal Hub with DIN RAIL Mounting Kit 4. Checking the Hub Installation To check the USB hub installation in Windows device manager, please follow the following steps: Click Start Click Control Panel Click System Click Device Manager button Double click Universal Serial Bus Controller Double click Generic USB Hub, the message will show that this device is working properly.
- Page 5 7-Port USB2.0 Metal Hub with DIN RAIL Mounting Kit...
- Page 6 7-Port USB2.0 Metal Hub with DIN RAIL Mounting Kit...
Need help?
Do you have a question about the USBG-7DU2 and is the answer not in the manual?
Questions and answers