Table of Contents
Advertisement
Quick Links
Advertisement
Table of Contents

Related Manuals for PR Lighting XPAR 354


Summary of Contents for PR Lighting XPAR 354
- Page 1 XPAR 354 PR-6209A The user manual contains important information about the safe installation and use of a projector. Please read and follow these instructions carefully and keep the manual in a safe place for future reference. PR LIGHTING LTD. http://www.pr-lighting.com...
- Page 2 Any future technical change in the user manual won’t be with any further notice. Note: For the products made by Guangzhou PR lighting Ltd, the warranty for the whole product is one year starting from the delivery date but the light source is not within the warranty.
-
Page 3: Safety And Warnings
1. SAFETY AND WARNINGS NOTE Before a projector’s installation, power-on, operation and maintenance, please carefully read the safety information hereinafter! The following safety signs are used in the user manual. User Electrical Protective High Warning Flames Goggles Manual shock Gloves Temperature ●... - Page 4 ●While in stable status, the temperature of the housing (heat sink)will be 55℃; ●While the lamp is stricken for the first time, there will be smoke and strange smell. It’s normal and does not mean the projector has some defects. ●While operated, do not touch the metallic housing.
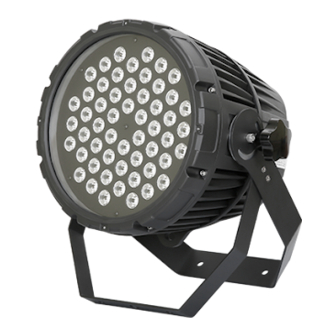
- Page 5 3. APPEARANCE barn door body Name Remarks Frost board(Optional) Frost board must be used with barn door assembly Barn door assembly(Optional) Allen screws Support XLR cable Small size Power cable Big size For harsh places like under water or being dusty Transparent(Optional)...
-
Page 6: Installation
4. INSTALLATION clamp safety cord Warning: For safety, please ensure the safety cord runs through tightened ●RIGGING Take 1 clamp and 1 safety cord out from the package and tighten the clamp with the arm, and then mount the whole unit on the truss, tighten the clamp’s retainers to keep the unit stable. - Page 7 Loosen the screws(1) in the shape of butterfly in the front of the projector(4),, slightly turn the clipping component (2) in the shape of 7,and install the top hat(3). Turn the clipping component opposite ,tighten the screws(1) in the shape of butterfly, run one end of the safety cord though safety cord hole of the light and the other through the hole of the top hat.
-
Page 8: Setup And Configuration
Connection between controller and projector and between one projector and another must be made with a twin-screened cable, with each wire having at least a 0.5mm in diameter. Connection to and from the projector is via cannon 5 pin (which are included with the projector) or 5 pin XLR plugs and sockets. -
Page 9: Master/Slave Mode
● FRONT PANEL OPERATION To browse through or modify the projector’s functions, press key ENTER for more than 3 seconds to unlock the control panel and enter the menus. To set or browse through the projector’s functions, press key UP or DOWN. Press the key ENTER to enter the submenus and the current parameters will be displayed while flashing. -
Page 10: Dmx Mode
Default: Standard 6 Standard 6 Extended 11 Slave MasterSlave Default:Slave Master 128 - 255 Color Offset Green 128 - 255 Blue 128 - 255 Language Setup English Default:English Chinese The LCD backlight will Lcd Light Setup be turned off 3minutes after none key is pushed. -
Page 11: Dmx Protocol
Note: In one DMX chain, only one unit can be made as the master. Before master works, unplug its XLR cable connected with the console. The parameters transmitted from the master include after several units are synchronized: DMX channel mode, DMX signal mode ,control setting, language status, backlight status of the LCD display, display invert, current timing, timer value, ambient brightness value, user memory. -
Page 12: Technical Data
240-255 Preset Memory 16 001-015 User Memory 1 016-031 User Memory 2 032-047 User Memory 3 048-063 User Memory 4 064-079 User Memory 5 080-095 User Memory 6 096-111 User Memory 7 User Memory 112-127 User Memory 8 128-143 User Memory 9 144-159 User Memory 10 160-175... - Page 13 LIGHT SOURCE SPECIFICATIONS 54pcsX3W RGBW light source Power Consumption 162W Manufacturers Rated Lamp Life 50000hours COLORS R/G/B/W, options(R/G/B/A(Amber), R/G/B/L(Lime)) DIMMER Linear Dimmer from 0-100% STROBE Electronic Strobe 0.5-33FP.S BEAM ANGLE Beam Angle(1/2peak) θ 9° (options: 7° ,10° ,20° ,40° ) CONTROL International standard DMX512 signal control protocol Standard mode 6channels , extended mode 11 channels...
-
Page 14: Light Output
LIGHT OUTPUT: luminous flux distance diameter 14/14... -
Page 15: Circuit Diagram And Pcb Connections
9. CIRCUIT DIAGRAM AND PCB CONNECTIONS ● CIRCUIT DIAGRAM 15/15... - Page 16 ●PCB CONNECTIONS (230060120) Master Board Name Optical sensor Power Signal input PWM signal Wireless control Thermal sensor LED driver board (6230000031) : Name Power LED driver PWM signal input 16/16...
-
Page 17: Component Order Codes
Lamp board (6230000043) 10. COMPONENT ORDER CODES Name Code No. Remarks SWITCHING POWER SUPPLY 6190000005 LED LIGHT SOURCES 6230000043 LED DRIVER BOARD 6230000031 MASTER BOARD 230060120 FRONT GLASS 080090115 TRANSPARENT COVER 290190109 Optional SEAL OF TRANSPARENT 290019142 Optional COVER 17/17... - Page 18 1582 Xingye Avenue, Nancun Panyu Guangzhou, 511442 China TEL: +86-20-3995 2888 PR lighting will try its best to offer accurate and overall information about a product’s technical data. Any changes won’t be notified if necessary. Patented Products. Counterfeiting Will be Prosecuted! P/N: 6320000057...
Need help?
Do you have a question about the XPAR 354 and is the answer not in the manual?
Questions and answers