Table of Contents
Advertisement
Quick Links
Pendant Mount
V2000D-PM
For V2000D Vandal Domes, V2360W
Panoramic & V2100D Dome Cameras
Quick Guide
1.
Product Overview
Unit: in. (mm)
5.9 (150)
F
1-1: P
D
IGURE
HYSICAL
IMENSIONS
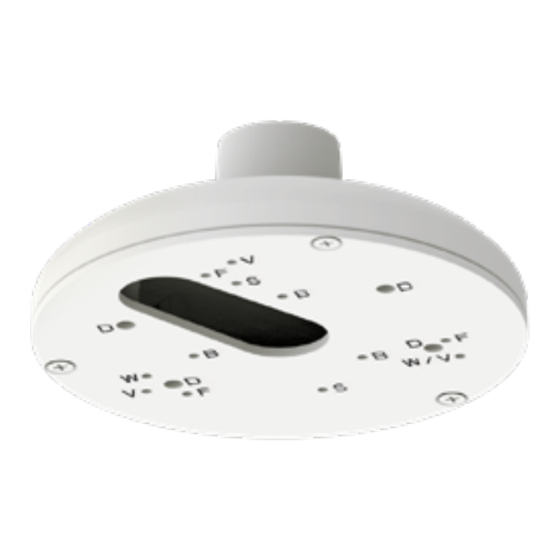
Screw Types & Hole Pattern Instruction
Since the pendant mount supports multiple devices mounting, it is
recommended to review the following diagram carefully, which
depicts different screw types and hole patterns for each device, prior
to installation.
F
1-2: S
T
I
IGURE
CREW
YPES
LLUSTRATION
D: For V2000D Dome
D: For V2360W Panoramic
W: For V2000D Micro-Dome
V: For V2100D Dome
F
1-3: H
P
I
IGURE
OLE
ATTERN
LLUSTRATION
2.
Installation and Mounting
Package Content
Check if all items listed below are included in the packing box.
⚫ One pendant mount
⚫ One printed quick guide
⚫ Four M4X20mm screws (for V2000D Dome)
⚫ Four M4X15mm screws (for V2360W Panoramic)
⚫ Three M4X8mm screws (for V2100D Dome)
⚫ Three M4X8mm screws (for V2000D Micro-Dome)
Installation & Mounting Procedure
1.
Pass the cable through the wall mount bracket and then
through the conduit adaptor attached to the dome pad; seal the
thread of the conduit adaptor with waterproof tape.
F
2-1: P
C
S
T
W
IGURE
ASS
ABLE AND
EAL
HREADS WITH
ATERPROOF
2.
Rotate the conduit adaptor to connect with wall mount bracket,
and then thread the cable through the dome pad, as shown in
figure below.
F
2-2: A
P
M
W
M
B
IGURE
SSEMBLE THE
ENDANT
OUNT WITH
ALL
OUNT
3.
Mounting Procedure
For V2000D Vandal Dome Cameras
1.
When installing the camera dome directly to a surface,
before securing the bottom case on the dome pad, remove
the 4 waterproof rubber plugs at the bottom of bottom case.
Note: If not installing directly to a surface, do NOT remove the
small black plugs from the mounting holes. When putting the
screw through the mounting hole, the plugs will pop out and
this maintains the waterproof protection.
F
3-1: R
IGURE
EMOVE WATERPROOF RUBBER SEALS
2.
Fasten the bottom case to the pendant mount via securing
the 4 M4X0.7P 20mm screws firmly. Then assemble the rest
of the camera parts, including the lens base and the camera
housing in proper order.
T
APE
F
3-2: S
V
D
C
IGURE
ECURE
ANDAL
OME
AMERA ON THE
3.
After assembling the camera and threading required cables,
installation of the vandal dome camera attached to the wall
mount is complete.
RACKET
F
IGURE
3-3: M
OUNTING
C
OMPLETE FOR
For V2360W Panoramic Camera
1.
Secure the bracket on the rear of pendant mount by
fastening with 4 M4X0.7P 15mm screws.
F
IGURE
3-4: S
ECURE BRACKET ON PENDANT MOUNT
2.
Connect the cable on the panoramic camera, and then rotate
the camera to secure the screw on the bracket. Next, rotate
the T10 screw on the panoramic camera counterclockwise to
make sure the panoramic camera does not rotate out.
F
IGURE
3-5: S
ECURE PANORAMIC CAMERA ON PENDANT MOUNT
For V2100D Dome Camera
1.
Connect the cable on the dome camera and use waterproof
tape to seal the cable. Secure the bottom case on the rear of
the pendant mount with the 3 M4X0.7P 8mm screws.
B
RACKET
F
3-6: S
IGURE
ECURE BOTTOM CASE ON PENDANT MOUNT
V
ANDAL
C
AMERA
T10 Screw
Advertisement
Table of Contents

Related Manuals for Vicon V2000D-PM


Summary of Contents for Vicon V2000D-PM
- Page 1 ATTERN LLUSTRATION Pendant Mount For V2360W Panoramic Camera Mounting Procedure V2000D-PM Secure the bracket on the rear of pendant mount by Installation and Mounting fastening with 4 M4X0.7P 15mm screws. For V2000D Vandal Domes, V2360W For V2000D Vandal Dome Cameras Package Content Panoramic &...
- Page 2 Product specifications subject to change without notice. Vicon part number: 8009-8318-95-00 10/2020 Open the top cover of the micro dome and fasten the bottom Copyright ©2020 Vicon Industries Inc. All rights reserved cover to the pendant mount via securing the 2 M4X0.7P 8mm screws firmly.
Need help?
Do you have a question about the V2000D-PM and is the answer not in the manual?
Questions and answers