Table of Contents
Advertisement
Available languages
Available languages
Quick Links
Advertisement
Chapters
Table of Contents

Related Manuals for JUNO JGVN456E2


Summary of Contents for JUNO JGVN456E2
- Page 1 Gebruik‐ User Manual saanwijzing Afwasauto‐ Dishwasher maat JGVN456E2...
-
Page 2: Table Of Contents
Wijzigingen voorbehouden. GA NAAR ONZE WEBSITE VOOR: Advies over gebruik, brochures, het oplossen van problemen, service- en reparatie-informatie: www.juno.de/support VEILIGHEIDSINFORMATIE Lees zorgvuldig de meegeleverde instructies voor installatie en gebruik van het apparaat. De fabrikant is niet verantwoordelijk voor verwondingen of schade die voortvloeit uit de onjuiste installatie of het onjuiste gebruik. - Page 3 Laat kinderen niet met het apparaat spelen. • Houd reinigingsmiddelen uit de buurt van kinderen. • Houd kinderen en huisdieren uit de buurt van het apparaat • als de deur open staat. Kinderen mogen zonder toezicht geen reinigings- en • onderhoudswerkzaamheden aan het apparaat uitvoeren.
-
Page 4: Veiligheidsvoorschriften
Het apparaat moet met de nieuwe meegeleverde slangset • worden aangesloten op een kraan. Oude slangsets mogen niet opnieuw worden gebruikt. VEILIGHEIDSVOORSCHRIFTEN Installatie • Steek de stekker pas in het stopcontact als de installatie is voltooid. Zorg ervoor WAARSCHUWING! Alleen een dat het netsnoer na installatie erkende installatietechnicus bereikbaar is. - Page 5 en haal de stekker uit het stopcontact. structurele en interne onderdelen met Neem contact op met de service- betrekking tot deurconstructies, afdeling om de watertoevoerslang te printplaten, elektronische displays, vervangen. drukschakelaars, thermostaten en sensoren, software en firmware, Gebruik inclusief resetsoftware. Houd er rekening mee dat sommige van deze •...
-
Page 6: Productbeschrijving
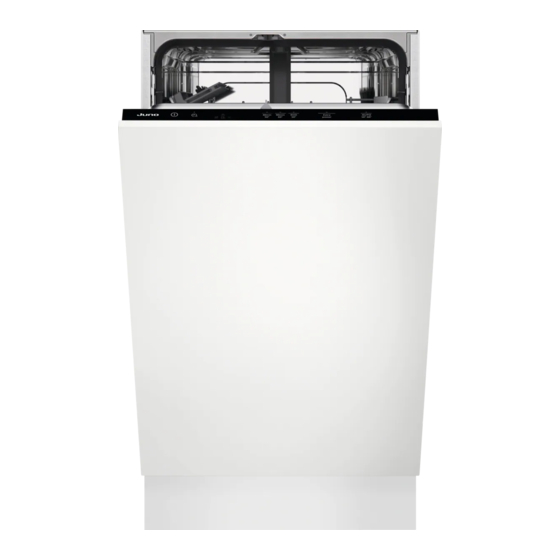
PRODUCTBESCHRIJVING De afbeeldingen hieronder geven alleen een algemeen productoverzicht. Raadpleeg voor meer gedetailleerde informatie andere hoofdstukken en/of documenten die bij het apparaat zijn meegeleverd. Bovenste sproeiarmen Glansmiddeldoseerbakje Onderste sproeiarm Afwasmiddeldoseerbakje Filters Bestekmand Typeplaatje Onderste korf Zoutreservoir Bovenste korf Luchtventilatie BEDIENINGSPANEEL Aan-/uittoets/Resetknop Toets uitgestelde start... -
Page 7: Programmakeuze
Indicatielampjes AUTO programmatoets Programmatoetsen Extra power toets Indicatielampjes Indicatie‐ Beschrijving lampje Controlelampje glansmiddelinstellingen. Het is aan wanneer je de vrijgegeven hoeveelheid glansspoelmiddel instelt. Zie "Basisinstellingen". Indicatielampje zout. Dit is aan als het zoutreservoir bijgevuld dient te wor‐ den. Raadpleeg “Voor eerste ingebruikname”. Indicatielampje Machine Care. - Page 8 Opties Extra power U kunt de programmakeuze aanpassen Deze optie verbetert de wasresultaten van aan uw behoeften door opties te het geselecteerde programma. De optie activeren. verhoogt de wastemperatuur en verlengt de duur. Programmaoverzicht Pro‐ Type lading Mate van Programmafasen Opties gramma bevuiling...
-
Page 9: Basisinstellingen
Pro‐ Type lading Mate van Programmafasen Opties gramma bevuiling Machine • Geen la‐ Het program‐ • Wassen op 65 °C Opties zijn niet Care ding ma reinigt de • Tussentijdse spoe‐ van toepassing op binnenkant ling dit programma. van het ap‐ •... - Page 10 Aantal Instellingen Waarden Omschrijving Waterhardheid Van niveau 1 Aanpassen van het niveau van de waterver‐ tot niveau 10 zachter afgestemd op de hardheid van het (standaard: 5) water in uw omgeving. Niveau glans‐ Van niveau 0 Aanpassen van het niveau glansspoelmid‐ poelsmiddel tot niveau 8 del volgens de benodigde dosering.
- Page 11 Gebruik Vorige en Volgende om te 3. Druk op Vorige of Volgende om de schakelen tussen de basisinstellingen en waarde te veranderen. om hun waarde te wijzigen. 4. Druk op OK om de instelling te bevestigen. Gebruik OK om in de gekozen instelling te •...
- Page 12 Duitse hard‐ Franse hard‐ mmol/l Clarke- Wateronthard‐ heid (°dH) heid (°fH) hardheid ingsniveau 15 - 18 26 - 32 2,6 - 3,2 18 - 22 11 - 14 19 - 25 1,9 - 2,5 13 - 17 4 - 10 7 - 18 0,7 - 1,8 5 - 12...
- Page 13 het apparaat automatisch en blijft deze op Alle in deze paragraaf een kier staan. genoemde verbruikswaarden worden bepaald volgens de huidige geldende norm in laboratoriumomstandigheden met waterhardheid 2,5 mmol/l volgens de verordening 2019/2022 (waterontharder: niveau 3). De druk en de temperatuur van het water en de variaties van de netvoeding kunnen de waarden veranderen.
-
Page 14: Voordat U Het Apparaat Voor De Eerste
VOORDAT U HET APPARAAT VOOR DE EERSTE KEER GEBRUIKT 1. Controleer of het ingestelde stand van de waterontharder juist is voor de waterhardheid in uw omgeving. Indien niet, stel dan de stand van de waterontharder juist in. 2. Vul het zoutreservoir. 3. -
Page 15: Dagelijks Gebruik
Het glansspoelmiddelreservoir LET OP! Gebruik alleen vullen glansspoelmiddel dat speciaal is ontworpen voor vaatwassers. 1. Druk op het ontgrendelelement (A) om het deksel te openen (B). 2. Giet het glansspoelmiddel in het doseervakje (C) totdat de vloeistof de markering "FILL” heeft bereikt. 3. - Page 16 2. Sluit de deur van de afwasmachine om Vul het compartiment (A) niet het programma te starten. met meer dan 30 ml Het apparaat neemt het type lading waar gelvaatwasmiddel. en past aan naar een geschikte wascyclus. Hoe je een programma moet kiezen en starten De start van een programma uitstellen...
-
Page 17: Aanwijzingen En Tips
beïnvloeden. Als u de deur weer sluit, De functie gaat automatisch aan: gaat het apparaat verder vanaf het • Als het programma is voltooid. moment van onderbreking. • Als er na 5 minuten nog geen programma is gestart. Als de deur tijdens de droogfase langer dan 30 Einde van het programma seconden wordt geopend, stopt... - Page 18 afzonderlijk glansmiddel en zout voor 5. Stel de hoeveelheid glansspoelmiddel optimale reinigings- en droogresultaten. • Vaatwasmiddeltabletten lossen bij korte Voordat u een programma start programma's niet geheel op. Om te voorkomen dat vaatwasmiddelresten Zorg vóór het starten van het gekozen op het servies achterblijven, raden we programma dat: u aan om tabletten enkel bij lange...
-
Page 19: Onderhoud En Reiniging
De rekken uitruimen Na voltooiing van het programma kan er zich aan de 1. Laat de borden afkoelen voordat u binnenkant van het apparaat deze uit het apparaat neemt. Hete nog water bevinden. borden zijn gevoelig voor beschadigingen. 2. Ruim eerst het onderrek en dan het bovenrek uit. - Page 20 reinigingsprestaties en kunnen schade aan de afvoerpomp veroorzaken. LET OP! Als u de voorwerpen niet kunt verwijderen, neemt u contact op met een erkende servicedienst. 1. Demonteer het filtersysteem volgens 2. Verwijder de filter (C) uit de filter (B). de instructies in dit hoofdstuk. 3.
- Page 21 2. Was de sproeiarm onder stromend water. Gebruik een smal en puntig gereedschap, bijv. een tandenstoker, om de vuildeeltjes uit de gaten te 7. Plaats de filters (B) en (C) terug. verwijderen. 8. Plaats de filter (B) terug in de platte filter (A).
-
Page 22: Probleemoplossing
1. Trek het bovenrek naar buiten. 4. Steek om de sproeiarm terug te 2. Om de sproeiarm los te maken, draait plaatsen het bevestigingselement in de u het bevestigingselement met de klok sproeiarm en bevestig deze in de mee. toevoerleiding door deze naar links te draaien. - Page 23 Probleem en alarmcode Mogelijke oorzaak en oplossing Je kunt het apparaat niet in‐ • Controleer of de stekker is aangesloten op het stopcon‐ schakelen. tact. • Controleer of er geen beschadigde zekering in het zeke‐ ringenkastje is. Het programma start niet. •...
- Page 24 Probleem en alarmcode Mogelijke oorzaak en oplossing Storing van de waspomp of • Schakel het apparaat uit en aan. de afvoerpomp. • De lampjes die in ver‐ band staan met de pro‐ grammatoetsen knippe‐ ren af en toe 5 keer. •...
- Page 25 Probleem en alarmcode Mogelijke oorzaak en oplossing Kleine lekkage van de deur • Het apparaat staat niet waterpas. Draai aan de verstelbare van het apparaat. pootjes (indien van toepassing). • De deur van het apparaat is niet centraal uitgelijnd op de kuip.
- Page 26 Probleem Mogelijke oorzaak en oplossing Slechte droogresultaten. • Serviesgoed heeft te lang in het gesloten apparaat ge‐ staan. Activeer de functie AirDry om het automatisch openen van de deur in te stellen en de droogprestatie te verbeteren. • Het glansspoelmiddel is op of de dosering van het glansspoelmiddel is niet voldoende.
-
Page 27: Technische Informatie
Probleem Mogelijke oorzaak en oplossing Geuren in het apparaat. • Raadpleeg De binnenkant reinigen. • Start het programma Machine Care met een ontkalker of een reinigingsproduct bestemd voor vaatwassers. Kalkresten op het servies‐ • Het zoutniveau is laag, controleer de bijvulaanduiding. goed, op de kuip en aan de •... - Page 28 alle andere documenten die bij dit het productnummer kunt u vinden op het apparaat worden geleverd. typeplaatje van het apparaat. Zie het hoofdstuk ‘Productbeschrijving’. Het is ook mogelijk om informatie gerelateerd aan de prestaties van het Kijk voor meer informatie over het product in de EU-EPREL-databank te energielabel op www.theenergylabel.eu vinden via de link https://...
-
Page 29: Safety Information
Subject to change without notice. VISIT OUR WEBSITE TO: Get usage advice, brochures, trouble shooter, service and repair information: www.juno.de/support SAFETY INFORMATION Before the installation and use of the appliance, carefully read the supplied instructions. The manufacturer is not responsible for any injuries or damage that are the result of incorrect installation or usage. -
Page 30: Safety Instructions
Children shall not carry out cleaning and user maintenance • of the appliance without supervision. General Safety This appliance is intended to be used in household and • similar applications such as: farm houses; staff kitchen areas in shops, offices and –... - Page 31 • Do not use the appliance before • Before connection to new pipes, pipes installing it in the built-in structure due not used for a long time, where repair to safety manner. work has been carried out or new • Follow the installation instructions devices fitted (water meters, etc.), let supplied with the appliance.
-
Page 32: Product Description
Service has been discontinued: door hinge and seals, other seals, spray arms, drain • To repair the appliance contact the filters, interior racks and plastic Authorised Service Centre. Use original peripherals such as baskets and lids. spare parts only. • Concerning the lamp(s) inside this •... -
Page 33: Control Panel
Upper spray arms Rinse aid dispenser Lower spray arm Detergent dispenser Filters Cutlery basket Rating plate Lower basket Salt container Upper basket Air vent CONTROL PANEL On/Off button/Reset button Extra power button Delay start button AUTO programme button Indicators Programme buttons... -
Page 34: Programme Selection
Indicators Indicator Description Rinse aid setting indicator. It is on when you set the released quantity of rinse aid. Refer to "Basic settings". Salt indicator. It is on when the salt container needs refilling. Refer to "Before first use". Machine Care indicator. It is on when the appliance needs internal cleaning with the Machine Care programme. - Page 35 Programmes overview Pro‐ Type of load Degree of Programme phases Options gramme soil 30min • Crockery • Fresh • Wash 50 °C • Extra power • Cutlery • Intermediate rinse • Final rinse 45 °C • AirDry Pre Rinse • All types •...
-
Page 36: Basic Settings
Water (l) Energy (kWh) Duration (min) 1) 2) Programme 0.704 AUTO 8.0 - 10.7 0.683 - 1.047 120 - 170 Machine Care 7.4 - 8.9 0.396 - 0.484 1) The pressure and the temperature of the water, the variations of the mains supply, the options, the quantity of dishes and the degree of soil can change the values. - Page 37 Use OK to enter the selected setting and to confirm changing its value. How to change a setting Make sure the appliance is in setting mode. 1. Press Previous or Next until the indicator dedicated to the desired setting flashes. Setting mode The light related to indicates the...
- Page 38 The water softener should be adjusted your area. It is important to set the right according to the hardness of the water in level of the water softener to assure good your area. Your local water authority can washing results. advise you on the hardness of the water in Water hardness German de‐...
- Page 39 a programme). Regeneration initiation has To deactivate the rinse aid dispenser, set no impact on the cycle duration, unless it the level of rinse aid to 0. occurs in the middle of a programme or at End sound the end of a programme with a short drying phase.
-
Page 40: Before First Use
Key tones The buttons on the control panel make a click sound when you press them. You can deactivate this sound. BEFORE FIRST USE 1. Make sure that the current level of the water softener agrees with the hardness of the water supply. If not, adjust the level of the water softener. -
Page 41: Daily Use
How to fill the rinse aid CAUTION! Only use rinse aid dispenser designed specifically for dishwashers. 1. Press the release element (A) to open the lid (B). 2. Pour the rinse aid in the dispenser (C) until the liquid reaches the marking "FILL". - Page 42 The light related to the button flashes. 2. Press 2. Activate Extra power if desired. The light related to the button is on. 3. Close the appliance door to start the 3. Close the appliance door to start the programme. countdown.
-
Page 43: Hints And Tips
The Auto Off function End of the programme This function saves energy by switching When the programme is complete, the the appliance off when it is not operating. Auto Off function switches the appliance off automatically. The function comes into operation automatically: All buttons are inactive except for the •... - Page 44 the instructions on the detergent • The correct quantity of detergent is packaging. used. • Always use the correct quantity of rinse Loading the baskets aid. Insufficient dosage of rinse aid decreases the drying results. Using too • Always use the whole space of the much rinse aid results in bluish layers baskets.
-
Page 45: Care And Cleaning
CARE AND CLEANING Internal cleaning WARNING! Before any maintenance other than • Clean the appliance interior with a soft running the programme damp cloth. Machine Care, deactivate the • Do not use abrasive products, abrasive appliance and disconnect the cleaning pads, sharp tools, strong mains plug from the main chemicals, scourer or solvents. - Page 46 5. Make sure that there are no residues 1. Turn the filter (B) counterclockwise of food or soil in or around the edge of and remove it. the sump. 6. Put back in place the flat filter (A). Make sure that it is correctly positioned under the 2 guides.
- Page 47 Cleaning the upper spray arms CAUTION! An incorrect position of the filters can cause We recommend to clean the upper spray bad washing results and arms regularly to prevent soil from damage to the appliance. clogging the holes. Clogged holes can cause unsatisfactory washing results.
-
Page 48: Troubleshooting
and fix it in the duct by turning it counterclockwise. Make sure that the mounting element locks into place. 4. To install the spray arm back, insert the mounting element in the spray arm TROUBLESHOOTING to contact an Authorised Service WARNING! Improper repair of Centre. - Page 49 Problem and alarm code Possible cause and solution The appliance does not • Make sure that the sink spigot is not clogged. drain the water. • Make sure that the interior filter system is not clogged. • The lights related to the •...
- Page 50 Problem and alarm code Possible cause and solution The level of water inside the • Switch the appliance off and on. appliance is too high. • Make sure that the filters are clean. • The lights related to the • Make sure that the outlet hose is installed at the right programme buttons flash height above the floor.
- Page 51 The dishwashing and drying results are not satisfactory Problem Possible cause and solution Poor washing results. • Refer to "Daily use", "Hints and tips" and the basket loading leaflet. • Use more intensive washing programme. • Activate the Extra power option to improve the washing results of a selected programme.
-
Page 52: Technical Information
Problem Possible cause and solution Odours inside the appliance. • Refer to "Internal cleaning". • Start the Machine Care programme with a descaler or a cleaning product designed for dishwashers. Limescale deposits on the ta‐ • The level of salt is low, check the refill indicator. bleware, on the tub and on the •... - Page 53 EPREL database using the link https:// For more detailed information about the eprel.ec.europa.eu and the model name energy label, visit www.theenergylabel.eu. and product number that you can find on the rating plate of the appliance. Refer to the chapter "Product description". ENVIRONMENTAL CONCERNS not dispose of appliances marked with the Recycle materials with the symbol...
- Page 56 156806940-A-162021...
Need help?
Do you have a question about the JGVN456E2 and is the answer not in the manual?
Questions and answers