Table of Contents
Advertisement
Quick Links
Advertisement
Table of Contents

Related Manuals for Speco O2D7M


Summary of Contents for Speco O2D7M
- Page 1 O2D7M User’s Manual Network Camera Manual (O2D7M)
- Page 2 O2D7M User’s Manual D i r e c t i o n s D i r e c t i o n s D i r e c t i o n s D i r e c t i o n s Be careful not to cause any physical damage by dropping or throwing the camera.
- Page 3 O2D7M User’s Manual Caution Any changes or modifications in construction of this device which are not explicitly approved by the party responsible for compliance could void the user’s authority to operate the equipment. Revision History Date Revision Details Aug 18, 2015 First manual revision creation.
-
Page 4: Table Of Contents
Contents ........................4 1. Introduction ......................5 1.1. Overview ..........................5 1.2. Specifications ......................... 6 1.3. Applications of O2D7M ......................7 2. Product Description ....................8 2.1. Contents ..........................8 2.2. Product Preview ........................8 2.3. Physical description ....................... 9 2.4. -
Page 5: Introduction
It enables real time transmission of synchronized video of up to 1080p and audio data. Remote clients can connect to O2D7M for real time video/audio data through various client solutions running on PCs and smartphones. Real time 2-way communication is available through the bidirectional audio communication feature. -
Page 6: Specifications
O2D7M User’s Manual 1.2. Specifications LENS Lens Type 3.3~10mm Motorized Focus Lens Lens Iris Control DC Auto Iris CAMERA Image Sensor 1/2.8” 2 Mega Pixel Sony CMOS Minimum Illumination IR LED Off : 0.5Lux, IR LED On : 0Lux Scanning Mode... -
Page 7: Applications Of O2D7M
Max. 4.8W Approval FCC, CE, IP66 Specifications are subject to change without notice. 1.3. Applications of O2D7M Security surveillance (buildings, stores, manufacturing facilities, parking lots, banks, government facilities, military, etc.) Remote monitoring (hospitals, kindergartens, traffic, public areas, etc.) Teleconference (Bi-directional audio conference). -
Page 8: Product Description
O2D7M User’s Manual 2. Product Description 2.1. Contents The product package contains the following the following: Contents Description Image Remarks Main Body O2D7M Screw M4X25 4EA M4X25 4EA, Screw M4X8 3EA Tools and Mounting Screws L Wrench 1EA L Wrench 1EA, Core 1EA Software &... -
Page 9: Physical Description
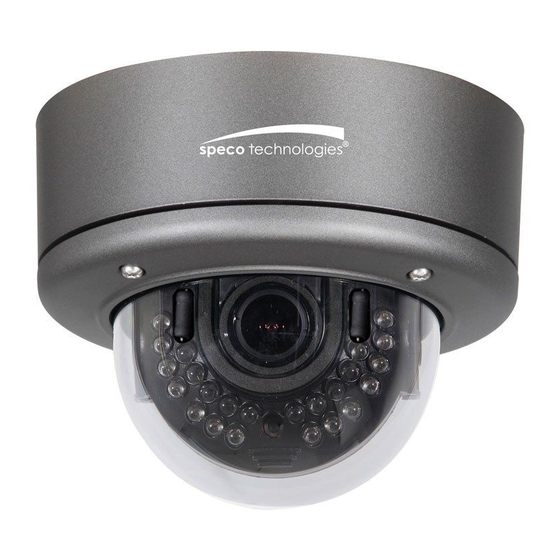
O2D7M User’s Manual 2.3. Physical description 2.3.1. External View Figure 2-1. External view of O2D7M 2.3.2. Dimensions Figure 2-2. Dimensions... - Page 10 O2D7M User’s Manual 2.3.3. Connector information ① ② ③ ④ ⑤ ⑥ 1. Network Port 2. BNC Video Out 3. Power In 4. Ground 5. Audio In/Out 6. Alarm In/Out Figure 2-3. Connector information...
-
Page 11: Functional Description
A DC power. Caution: If O2D7M is powered by PoE, do not plug in DC Jack with active DC power into DC power is powered by PoE, do not plug in DC Jack with active DC power into DC power is powered by PoE, do not plug in DC Jack with active DC power into DC power connector. -
Page 12: Accessories For Installation
A switch provided for returning the IP camera to factory default state. Unscrew the cover to access the switch. Press the switch about 5 seconds while power is applied. Factory default switch Figure 2-5. Factory Default Switch 2.5. Accessories for installation INTWM INTCM INTPM Figure 2-6. Accessories for installation of O2D7M On Site Installation... -
Page 13: Installation
O2D7M User’s Manual Use cables and conduits that are suitable for the installation. Close attention should be paid to the installation so that no moisture is allowed to penetrate into the unit through the cables or conduits during the lifetime of the product. Products that have internal parts exposed to moisture due to improper installation are not covered by warranty. -
Page 14: Getting Started
Brief information for the initial operation of O2D7M is provided in this chapter. 4.1. PC System Requirements Audio/Video streaming data received from O2D7M can be displayed or stored in a PC running client programs. Minimum requirements of the PC are described below:... -
Page 15: Quick Installation Guide
1) Prepare a PC to run programs for the installation and video connection 2) In the case of using PoE, connect the PC and O2D7M to the network using one of the following ways. If your LAN Switch does not support standard PoE, connect O2D7M as shown in dotted line in Figure 4-1. - Page 16 O2D7M User’s Manual 2. Install IP Scanner IP Scanner is a utility to discover IP cameras on the local network. IP Scanner is a utility to discover IP cameras on the local network. The camera is set to DHCP mode out of the box.
- Page 17 1) Connection through Web Viewer The web viewer offers the simplest way simplest way to connect to the O2D7M. For video connection, enter the IP address of For video connection, enter the IP address of O2D7M in the Internet Explorer address bar...
- Page 18 O2D7M User’s Manual...
-
Page 19: Troubleshooting
O2D7M User’s Manual 5. Troubleshooting 5.1. No power is applied In case of Standard PoE (Power over Ethernet) Power supply through standard PoE is possible only when the following conditions are met. 1. Standard PoE is supported on the product. -
Page 20: Cannot Connect To The Camera
O2D7M User’s Manual 5.2. Cannot connect to the camera Check the status of the network connection through PING test. Try the following on your PC: Start > Run > Cmd > Ping IP address (Ex : Ping 172.16.42.51) If “Reply from ~”... -
Page 21: Technical Assistance
O2D7M User’s Manual 5.3. Technical Assistance If you need any technical assistance, please contact If you need any technical assistance, please contact Speco’s technical support. Please provide the following lease provide the following information. Model name 1 . 1 . 1 . 1 .
Need help?
Do you have a question about the O2D7M and is the answer not in the manual?
Questions and answers