Table of Contents
Advertisement
Quick Links
Advertisement
Table of Contents

Related Manuals for Yard force YF2200BL


Summary of Contents for Yard force YF2200BL
- Page 1 Model YF2200BL OPERATOR'S MAnuAL ELEcTRic HiGH-PRESSuRE WASHER Before operating this product, please read this manual thoroughly and retain it for future reference. SuMEc nORTH AMERicA 3939 Royal Drive nW unit #234 Kennesaw, GA 30144 15-4-29 6 32 Y 2200BL indd 1...
- Page 2 DO nOT RETuRn PRODucT TO PLAcE OF PuRcHASE. iF YOu HAVE AnY QuESTiOnS, cALL OuR TOLL-FREE HOTLinE. (866) 902-9690 ForceToolsuSA.com 15-4-29 6 32 Y 2200BL indd 2...
-
Page 3: Table Of Contents
YF2200BL Operator's Manual TABLE OF cOnTEnTS Description of Product Parts………………………………………………………………………………..02 Technical Specifications……………………………………………………………………………………..04 Intended Use……………………………………..…………………………………………………………..04 Important Safety Instructions………………………………………………………………………………..05 Installation Instructions………………………………………………………………………………………...10 Operating Instructions………………………………………………………………………………………..15 Cleaning and Maintenance…………………………………………………………………………………..19 Moving and Storage Instructions…………………………………………………………………....20 Disposal..…………………………………………………………………………………………………..21 Troubleshooting……..………………………………………………………………………………………...21 Warranty………………………………………………………………………………………………....24 15-4-29 6 32 Y 2200BL indd 1... -
Page 4: Description Of Product Parts
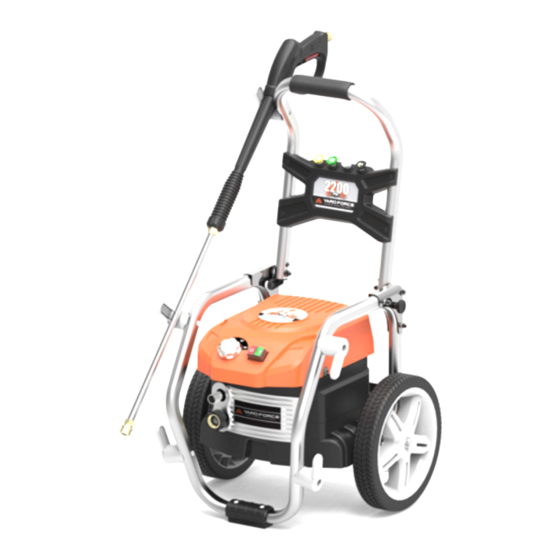
DEScRiPTiOn OF PRODucT PARTS Parts list Fig.1 As shown in Fig. 1-3 1. Gun / power cord / hose holder 2. Handle with soft grip 3. Spray tips storage slots 4. Pressure adjusting knob 5. Support 6. High-pressure water outlet 7. - Page 5 CheCk the delivery parts as shown in Fig. 4 Carefully remove the pressure washer and parts from its packaging. Identify all the parts packaged in the carton against the parts list. Please contact our customer service center (Monday-Friday 8:30AM- 5:00PM ET) at (866) 902 9690 if anything is missing. A High-pressure washer x1 B High-pressure hose x1 C Quick-connect wand x1...
-
Page 6: Technical Specifications
TEcHnicAL SPEciFicATiOnS Model YF2200BL Input voltage rating 120 V, 60 Hz Input power 13 A Working pressure 2200psi Max. pressure 2500psi Flow rate 1.25GPM (280L/H) Inlet pressure 44psi Supply water temperature (max.) Cold tap water 104 F (40 Electrical cord 35ft. -
Page 7: Important Safety Instructions
iMPORTAnT SAFETY inSTRucTiOnS please read all of the safety precautions before operating this pressure washer every time. please pay particular attention to all sections with following symbols. The following signal words and meanings are intended to explain the levels of risk associated with this pressure washer. - Page 8 4. Stay alert-watch what you are doing. 5. Do not operate the pressure washer when fatigued or under the influence of alcohol or drugs. 6. Keep operating area clear of all persons. 7. Do not overreach or stand on unstable support. Keep good footing and balance at all times.
- Page 9 washer. 22. Always follow detergent manufacturer’s label recommendations for proper use of detergents. Always protect eyes, skin and respiratory system from detergent if used. 23. Always lock the trigger of spray gun in the safety position when not in use. 24.
- Page 10 cords are identified by a marking “Acceptable for use with outdoor appliances; store indoors while not in use.” 2. Use only extension cords having an electrical rating not less than the rating of the pressure washer. 3. Do not use damaged extension cords. Examine extension cord before using and replace if damaged.
- Page 11 WarNiNG RISK OF EXPLOSION-DO NOT SPRAY FLAMMABLE LIQUIDS Do not use acids, alkaline, solvents or any flammable material in this product. These products can cause physical injuries to the operator and irreversible damage to the pressure washer. WarNiNG risk OF eleCtriC shOCk 1.
-
Page 12: Installation Instructions
inSTALLATiOn inSTRucTiOnS WarNiNG! Remove power cord from power source before carrying out any work on the equipment, and use only original parts. Before starting any cleaning task, it is important to inspect the area for objects that could create a hazard. Remove any objects from the work area that could be tripped over, such as toys or outdoor furniture. - Page 13 Connect the hose to the pressure washer as shown in Fig. 7 Attach high-pressure hose to the washer's water outlet (hand tighten only). Fig.7 Fig.8 Connect the hose and spray gun as shown in Fig. 8 Screw the high-pressure hose firmly onto the spray gun. Fit the spray nozzles to spray gun as shown in Fig.
- Page 14 Fig.10 Fig.11 Connect to water supply as shown in Fig. 12 & 13 WarNiNG! Before carrying out actions below, make sure the ON/OFF switch is on the OFF position. WariNG! The pressure washer may not be connected directly to the potable water supply.
- Page 15 KnOWLEDGE OF SPRAY TiPS as shown in Fig. 14 The spray tips are for purposes as below: T1: Red-0 : Maximum cleaning pressure T2: Yellow-15 : Delivers balanced pressure and flow for general cleaning T3: White-40 : For delicate cleaning T4: Black-Soap: Low pressure / to apply detergent T5: Turbo: To remove particularly stubborn dirt Fig.14...
- Page 16 1. 1015psi; 2. 1305psi; 3. 1595psi; 4. 2200psi; to select the desired pressure Turn knob so the indicator mark aligns with the desired PSI setting. how to make use of the power cord/hose/gun holder as shown in Fig. 16-1&16-2 This pressure washer is equipped with 5 pieces of power cord/hose/gun holder. Each of them consists of three parts ( support and lever, central pin),each lever also could rotate 360 degree around its central pin clockwise or counter-clockwise, can stop in any required position.
-
Page 17: Operating Instructions
OPERATinG inSTRucTiOnS Connect to electrical main supply as shown in Fig. 17 daNGer! Before you connect the pressure washer to the power source make sure that the data on the rating plate are identical to the mains data. If possible, do not use extension cords with this pressure washer; however, if you must use one, it must comply with requirement mentioned in section of “iMpOrtaNt saFety iNstrUCtiONs: Insert the power cord into the socket. - Page 18 Fig.19 Fig.20 CaUtiON! Before switching on, first purge pump by squeezing trigger handle for around 5 seconds. To switch the pressure washer on, set the On/Off switch to ON. 1. Unlock the safety trigger lever on the spray gun, and press the trigger lever until there is a steady stream of water.
- Page 19 CaUtiON ! Risk of pressure washer damage! Never operate the pressure washer without water inlet as dry running may damage the pump. Use a water filter if the inlet water is contaminated. to temporarily store the spray gun as shown in Fig. 21 When fixing the handle to operating position, this pressure washer provides gun holder on right side.
- Page 20 The high-pressure pump starts running as soon as you operate the hand-held spray gun. Due to the soft start function, after switching on for 10 seconds, the motor will reach to the rated operating speed. After releasing the trigger for 10 seconds, the motor can be completely stopped, due to this pressure washer is soft stop function which controlled by software.
-
Page 21: Cleaning And Maintenance
cLEAninG AnD MAinTEnAncE Clean the outside of high-pressure washer Clean the pressure washer. Wipe the washer with a slightly damp cloth. Do not clean the pressure washer using a high-pressure water jet. Clean the water filter as shown in Fig. 23 The pressure washer is equipped with a water filter to protect the pump. -
Page 22: Moving And Storage Instructions
MOVinG AnD STORAGE inSTRucTiOnS CaUtiON! Before servicing, cleaning, or removal of any part, switch off power and relieve pressure. stOraGe as shown in Fig. 25 & 26 1. Remove the cleaning agent and drain all the water left in the hoses. 2. -
Page 23: Disposal
DiSPOSAL disposing of the pressure washer Pressure washers which are labeled with the adjacent symbol must not be disposed of in household garbage. You must dispose of such old electrical and electronic appliances separately. Please check with your local authority about the possibilities for correct disposal. - Page 24 Fault/malfunction cause Remedy No electrical voltage at the Check the fuse, power cord, device power plug and power source and have them replaced by qualified personnel if necessary On/off switch set to "0" On/off switch set to "I" Cross section of the extension Use extension cord with lager cord no large enough and/or the cross sections and/or use...
- Page 25 The motor starts but there is no The water filter is clogged Clean the water filter buildup of pressure Air intake in the water inlet Check the supply hose and hose connection and replace if necessary Air in the system Ventilate the pressure washer! Run the pressure washer without the pressure washer...
-
Page 26: Warranty
Yard Force retailers. (2) two-year Warranty – pump and Motor The YF2200BL has a 2-Year Limited Warranty from the date of purchase against manufacturer defects for residential use only. Commercial use voids the warranty. This warranty does not cover accidental damage, unreasonable use, normal wear and tear, neglect or non-compliance with the Operating, Safety and Maintenance Instructions. - Page 27 2. Send in proof-of-purchase and serial number (if applicable) to confirm warranty coverage. 3. If service or a warranty evaluation is requested, Yard Force USA will provide an RGA number that should be used in all communications with Yard Force USA and is required to be indicated on the product itself and on the outside of the box.
Need help?
Do you have a question about the YF2200BL and is the answer not in the manual?
Questions and answers